
Owner's guide
Page 3
... watch a DVD 20 Selecting the TV input 20 Switching control from one device to another 20 Using the CineMate® GS series II remote control 21 CARE AND MAINTENANCE 25 Replacing the CineMate® series II remote battery 25 Replacing the CineMate® GS series II remote batteries 26 Cleaning your speaker system 26 Troubleshooting 27 Customer service 28 REFERENCE 29 iii
... watch a DVD 20 Selecting the TV input 20 Switching control from one device to another 20 Using the CineMate® GS series II remote control 21 CARE AND MAINTENANCE 25 Replacing the CineMate® series II remote battery 25 Replacing the CineMate® GS series II remote batteries 26 Cleaning your speaker system 26 Troubleshooting 27 Customer service 28 REFERENCE 29 iii
Owner's guide
Page 4
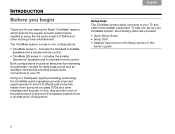
... standard CineMate speakers and a simple remote control. • CineMate GS series II - Setup help you for purchasing the Bose® CineMate® system, which delivers the superb acoustic performance needed to enjoy the full audio impact of this owner's guide 2 The CineMate system comes in the Setup section of DVDs and other entertainment sources. To help The CineMate system easily...
... standard CineMate speakers and a simple remote control. • CineMate GS series II - Setup help you for purchasing the Bose® CineMate® system, which delivers the superb acoustic performance needed to enjoy the full audio impact of this owner's guide 2 The CineMate system comes in the Setup section of DVDs and other entertainment sources. To help The CineMate system easily...
Owner's guide
Page 5
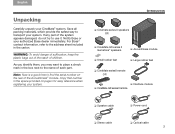
...a good time to find the serial number on page ii for easy reference when registering your authorized Bose dealer immediately. If any part of children. For Bose® contact information, refer to the address sheet included... your CineMate® system. Notify Bose or your system. ❏ Cinemate series II speakers OR ❏ CineMate GS series II Gemstone® speakers ❏ Small rubber feet ❏ Acoustimass module ❏ Large rubber feet ❏ CineMate series II remote OR ❏ Interface module ❏ CineMate GS series II remote ❏ Speaker cable ...
...a good time to find the serial number on page ii for easy reference when registering your authorized Bose dealer immediately. If any part of children. For Bose® contact information, refer to the address sheet included... your CineMate® system. Notify Bose or your system. ❏ Cinemate series II speakers OR ❏ CineMate GS series II Gemstone® speakers ❏ Small rubber feet ❏ Acoustimass module ❏ Large rubber feet ❏ CineMate series II remote OR ❏ Interface module ❏ CineMate GS series II remote ❏ Speaker cable ...
Owner's guide
Page 6
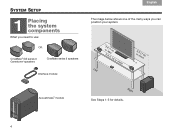
OR CineMate® GS series II Gemstone® speakers CineMate series II speakers Interface module o33rffltet(s(11smm)) or more Left 3 or mft o(1rem) Acoustimass® module Right See Steps 1-5 for details. 4 SYSTEM SETUP 1 Placing the system components What you need to use: Svenska Nederlands FItralniaçnaois DEsepuatsñcohl English The image below shows one of the many ways you can position your system.
OR CineMate® GS series II Gemstone® speakers CineMate series II speakers Interface module o33rffltet(s(11smm)) or more Left 3 or mft o(1rem) Acoustimass® module Right See Steps 1-5 for details. 4 SYSTEM SETUP 1 Placing the system components What you need to use: Svenska Nederlands FItralniaçnaois DEsepuatsñcohl English The image below shows one of the many ways you can position your system.
Owner's guide
Page 7
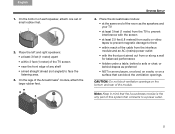
... bed, on a sofa, or on the bottom and rear of this system that can block the ventilation openings. On the bottom of each speaker, attach one set of the Acoustimass® module, attach the large rubber feet. CAUTION: Do not block ventilation openings on a surface that ...them • within reach of any shelf • aimed straight ahead (not angled) to face the listening area. 3. SYSTEM SETUP 4. Place the left and right speakers: • at least 2.5 feet (.8 meters) from the TV to prevent interference with the screen • at least 3 feet (1 meter) apart • within ...
... bed, on a sofa, or on the bottom and rear of this system that can block the ventilation openings. On the bottom of each speaker, attach one set of the Acoustimass® module, attach the large rubber feet. CAUTION: Do not block ventilation openings on a surface that ...them • within reach of any shelf • aimed straight ahead (not angled) to face the listening area. 3. SYSTEM SETUP 4. Place the left and right speakers: • at least 2.5 feet (.8 meters) from the TV to prevent interference with the screen • at least 3 feet (1 meter) apart • within ...
Owner's guide
Page 8
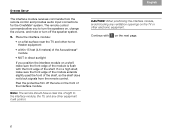
...SETUP The interface module receives commands from the remote control. Peel the protective film off the lens on the front of sight to turn the speakers on a flat surface near the TV and other electronic equipment. Note: The remote should have a clear line of the interface module. CAUTION...shelf does not block signals from the remote control and provides audio input connections for the CineMate® system. Place the interface module: • on , change the volume, and mute or turn off the speaker system. 5. The remote control commands allow you to the interface module, the TV, and...
...SETUP The interface module receives commands from the remote control. Peel the protective film off the lens on the front of sight to turn the speakers on a flat surface near the TV and other electronic equipment. Note: The remote should have a clear line of the interface module. CAUTION...shelf does not block signals from the remote control and provides audio input connections for the CineMate® system. Place the interface module: • on , change the volume, and mute or turn off the speaker system. 5. The remote control commands allow you to the interface module, the TV, and...
Owner's guide
Page 9
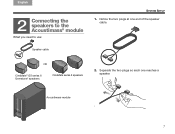
Notice the two plugs at one reaches a speaker. English DEsepuatsñcohl FItralniaçnaois Nederlands Svenska SYSTEM SETUP 2 Connecting the speakers to the Acoustimass® module What you need to use: 1. Separate the two plugs so each one end of the speaker cable. Acoustimass module 7 Speaker cable OR CineMate® GS series II Gemstone® speakers CineMate series II speakers 2.
Notice the two plugs at one reaches a speaker. English DEsepuatsñcohl FItralniaçnaois Nederlands Svenska SYSTEM SETUP 2 Connecting the speakers to the Acoustimass® module What you need to use: 1. Separate the two plugs so each one end of the speaker cable. Acoustimass module 7 Speaker cable OR CineMate® GS series II Gemstone® speakers CineMate series II speakers 2.
Owner's guide
Page 10
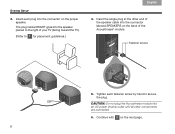
... the back of your TV (facing toward the TV). (Refer to secure the plug. Fastener screws 5. Tighten each plug into the connector on the proper speaker. CAUTION: Do not plug the Acoustimass module into an AC power (mains) outlet until all other end of the... speaker cable into the speaker placed to the right of the Acoustimass® module. Svenska Nederlands FItralniaçnaois DEsepuatsñcohl English SYSTEM SETUP 3. The plug marked RIGHT goes ...
... the back of your TV (facing toward the TV). (Refer to secure the plug. Fastener screws 5. Tighten each plug into the connector on the proper speaker. CAUTION: Do not plug the Acoustimass module into an AC power (mains) outlet until all other end of the... speaker cable into the speaker placed to the right of the Acoustimass® module. Svenska Nederlands FItralniaçnaois DEsepuatsñcohl English SYSTEM SETUP 3. The plug marked RIGHT goes ...
Owner's guide
Page 13
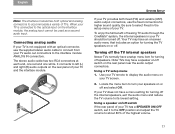
... an optical connector, use the fixed connectors for turning the TV speakers on or off the internal speakers, exit the audio menu and reduce the TV volume to about 80% of hearing TV audio through the CineMate® system, the internal speakers in the setup menu of your TV and the interface module.... It connects to the optical input on the interface module, the analog input cannot be turned off speakers. Be sure to display the audio menu on ...
... an optical connector, use the fixed connectors for turning the TV speakers on or off the internal speakers, exit the audio menu and reduce the TV volume to about 80% of hearing TV audio through the CineMate® system, the internal speakers in the setup menu of your TV and the interface module.... It connects to the optical input on the interface module, the analog input cannot be turned off speakers. Be sure to display the audio menu on ...
Owner's guide
Page 20
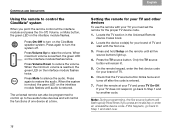
...the remote until audio is entered. 7. Svenska Nederlands FItralniaçnaois DEsepuatsñcohl English CONTROLS AND INDICATORS Using the remote to control the CineMate® system When you point the remote control at your TV, you press an invalid key or enter an unavailable device code. When ... proper TV device code. 1. Press On-Off to Step 1 and try another code. When the system is muted, the green LED on the CineMate speaker system. Note: During programming, the five source buttons will remain lit. 5. Only the TV source button will flash rapidly three times if you must...
...the remote until audio is entered. 7. Svenska Nederlands FItralniaçnaois DEsepuatsñcohl English CONTROLS AND INDICATORS Using the remote to control the CineMate® system When you point the remote control at your TV, you press an invalid key or enter an unavailable device code. When ... proper TV device code. 1. Press On-Off to Step 1 and try another code. When the system is muted, the green LED on the CineMate speaker system. Note: During programming, the five source buttons will remain lit. 5. Only the TV source button will flash rapidly three times if you must...
Owner's guide
Page 21
... to program the code twice - The button will light. 2. Press the TV source button. See "Using the CineMate® GS series II remote control" on your TV and the CineMate® speaker system. once for the VCR and once for the DVD. • To find it convenient to control your TV... source button for each device. 1. The green LED on the speaker system, changing the volume, and muting or turning off the speaker system. 19 In addition to controlling TV functions, the remote will control the basic CineMate speaker functions, such as a VCR/DVD unit, you are programming the...
... to program the code twice - The button will light. 2. Press the TV source button. See "Using the CineMate® GS series II remote control" on your TV and the CineMate® speaker system. once for the VCR and once for the DVD. • To find it convenient to control your TV... source button for each device. 1. The green LED on the speaker system, changing the volume, and muting or turning off the speaker system. 19 In addition to controlling TV functions, the remote will control the basic CineMate speaker functions, such as a VCR/DVD unit, you are programming the...

Owner's guide
Page 22
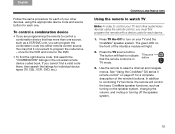
...control, you may need to press this button several times to control play options and navigate DVD menus. See "Using the CineMate® GS series II remote control" on the front of the TV. Switching control from one device to another by pressing the source button that ...to indicate that corresponds with a device code for a complete description of the remote buttons. The button will always control the basic CineMate speaker functions (on the speaker system, changing the volume, and muting or turning off , volume, mute). 20 DVD source button 4. In addition to controlling DVD...
...control, you may need to press this button several times to control play options and navigate DVD menus. See "Using the CineMate® GS series II remote control" on the front of the TV. Switching control from one device to another by pressing the source button that ...to indicate that corresponds with a device code for a complete description of the remote buttons. The button will always control the basic CineMate speaker functions (on the speaker system, changing the volume, and muting or turning off , volume, mute). 20 DVD source button 4. In addition to controlling DVD...

Owner's guide
Page 28
Svenska Nederlands FItralniaçnaois DEsepuatsñcohl English CARE AND MAINTENANCE Replacing the CineMate® GS series II remote batteries Replace both batteries. Match the + and - AA batteries (2) Cleaning your speaker system • You can use an ammonia-free window cleaner on a soft cloth to maintain...to dispose of your area. 3. Be sure to the regulations in your speakers, Acoustimass® module, and interface module with the + and - Do not use any openings. • The speaker grilles require no special care, although you may vacuum them carefully, if...
Svenska Nederlands FItralniaçnaois DEsepuatsñcohl English CARE AND MAINTENANCE Replacing the CineMate® GS series II remote batteries Replace both batteries. Match the + and - AA batteries (2) Cleaning your speaker system • You can use an ammonia-free window cleaner on a soft cloth to maintain...to dispose of your area. 3. Be sure to the regulations in your speakers, Acoustimass® module, and interface module with the + and - Do not use any openings. • The speaker grilles require no special care, although you may vacuum them carefully, if...
Owner's guide
Page 29
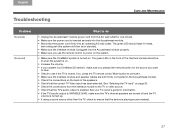
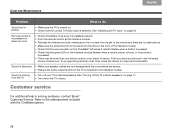
If so, press the TV remote control Mute button to unmute it. • Make sure the interface module and speaker cables are both firmly connected to the Acoustimass module. • Check the connections on the back of the interface module should flash 10 times, then ...; Check that the TV's audio output is playing source material. 27 See your system is a CineMate GS series II, make sure the TV's internal speakers are turned off and the TV volume is turned up. • If using a sound source other source. • Check that the correct TV Video input ...
If so, press the TV remote control Mute button to unmute it. • Make sure the interface module and speaker cables are both firmly connected to the Acoustimass module. • Check the connections on the back of the interface module should flash 10 times, then ...; Check that the TV's audio output is playing source material. 27 See your system is a CineMate GS series II, make sure the TV's internal speakers are turned off and the TV volume is turned up. • If using a sound source other source. • Check that the correct TV Video input ...
Owner's guide
Page 30
... programming another code, then check the device for your device and brand in solving problems, contact Bose® Customer Service. Sound is distorted • Make sure speaker cables are not damaged and the connections are no picture • Make sure the TV is turned on the interface module flashes...Make sure the protective film is removed from the lens on the front of the interface module. • Check that the source button on the CineMate® GS series II remote flashes when a button is pressed. • Check that the green LED on . • Check that the correct TV/Video input ...
... programming another code, then check the device for your device and brand in solving problems, contact Bose® Customer Service. Sound is distorted • Make sure speaker cables are not damaged and the connections are no picture • Make sure the TV is turned on the interface module flashes...Make sure the protective film is removed from the lens on the front of the interface module. • Check that the source button on the CineMate® GS series II remote flashes when a button is pressed. • Check that the green LED on . • Check that the correct TV/Video input ...


