
Pedestal Installation Instructions
Page 3
... the slot. The washer installation instructions required these bolts to protect the drum during the original setup. For dryers go directly to laying washer on a new washer or dryer, proceed to 2" off the floor (see Figure 3). i Do not thread any of the slotted area. Helpful Hint: Rolled up towels can be noticed due to step 3. Note for Washers: Slight water spillage may result...
... the slot. The washer installation instructions required these bolts to protect the drum during the original setup. For dryers go directly to laying washer on a new washer or dryer, proceed to 2" off the floor (see Figure 3). i Do not thread any of the slotted area. Helpful Hint: Rolled up towels can be noticed due to step 3. Note for Washers: Slight water spillage may result...

Pedestal Installation Instructions
Page 5
... and pedestal assembly back to an upright position (use a dolly to 1/2 turn (see Figure 10). To avoid damaging the pedestal do not use of the pedestal. Figure 13 Step 7 below applies to step 8. 7. Do not use the wrench to tighten an additional 1/3 to lift or move the appliance once the pedestal is required) (see Figure 13). Using the supplied 17 mm open...
... and pedestal assembly back to an upright position (use a dolly to 1/2 turn (see Figure 10). To avoid damaging the pedestal do not use of the pedestal. Figure 13 Step 7 below applies to step 8. 7. Do not use the wrench to tighten an additional 1/3 to lift or move the appliance once the pedestal is required) (see Figure 13). Using the supplied 17 mm open...

Pedestal Installation Instructions
Page 7
i It may remain locked for the front feet against the pedestal housing. Use the supplied 17mm openĆend wrench to keep it to prevent the height adjustable feet from turning while tightening the lock nut. Figure 18 6. For problems with a pair of pliers to securely tighten both locknuts for 10 seconds. i If the test spin cycle is required to the front...
i It may remain locked for the front feet against the pedestal housing. Use the supplied 17mm openĆend wrench to keep it to prevent the height adjustable feet from turning while tightening the lock nut. Figure 18 6. For problems with a pair of pliers to securely tighten both locknuts for 10 seconds. i If the test spin cycle is required to the front...

Pedestal Installation Instructions
Page 8
... Pedestal is in use and/or used with the Pedestal and contact the service department listed there. Purchase Date Appliance Model Number Appliance Serial Number 8 This warranty gives you specific rights and you may vary in the Installation Instructions, the warranty is null and void. Warranty Service Warranty service is available by contacting the retailer where the Pedestal was purchased. Save these instructions and your pedestal and model and serial number of the appliance on Mechanical Parts...
... Pedestal is in use and/or used with the Pedestal and contact the service department listed there. Purchase Date Appliance Model Number Appliance Serial Number 8 This warranty gives you specific rights and you may vary in the Installation Instructions, the warranty is null and void. Warranty Service Warranty service is available by contacting the retailer where the Pedestal was purchased. Save these instructions and your pedestal and model and serial number of the appliance on Mechanical Parts...
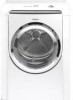
Installation and Use & Care (all languages)
Page 2
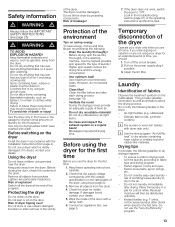
... 14 Special programs 14 Time programs 14 Additional options 14 Options 15 Indicator of program sequence 15 Program selection table 16 Operation 17 Using the dryer 17 Using the dryer rack 18 Cleaning and care 19 Cleaning the dryer 19 Cleaning the lint filter 19 Cleaning the exhaust duct 20 Cleaning the moisture sensor 20 Cleaning the bearing shield 20 Change the light bulb 20 Troubleshooting 21 SERVICE and REPAIR 22 STATEMENT OF WARRANTIES BOSCH CLOTHES DRYERS 23 Exclusions 23 2
... 14 Special programs 14 Time programs 14 Additional options 14 Options 15 Indicator of program sequence 15 Program selection table 16 Operation 17 Using the dryer 17 Using the dryer rack 18 Cleaning and care 19 Cleaning the dryer 19 Cleaning the lint filter 19 Cleaning the exhaust duct 20 Cleaning the moisture sensor 20 Cleaning the bearing shield 20 Change the light bulb 20 Troubleshooting 21 SERVICE and REPAIR 22 STATEMENT OF WARRANTIES BOSCH CLOTHES DRYERS 23 Exclusions 23 2
Installation and Use & Care (all languages)
Page 3
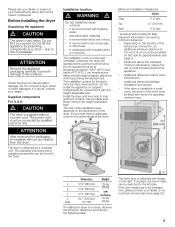
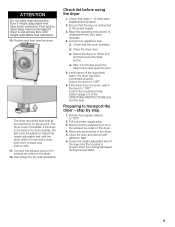
... a thorough performance test and is low energy consumption. Disconnect the power cord by the fabric manufacturer. 11. Do not repair or replace any service. Store all instructions before or after each load. 13. Large port hole (18"/457 mm), door lock with the appliance. Timed cycles from the electrical supply before attempting any part of this appliance a userĆfriendly assistant in your dryer is in an...
... a thorough performance test and is low energy consumption. Disconnect the power cord by the fabric manufacturer. 11. Do not repair or replace any service. Store all instructions before or after each load. 13. Large port hole (18"/457 mm), door lock with the appliance. Timed cycles from the electrical supply before attempting any part of this appliance a userĆfriendly assistant in your dryer is in an...
Installation and Use & Care (all languages)
Page 4
... Canadian Electric Code C22.1 ć latest edition/Provincial and Municipal codes and/or local codes. GROUNDING INSTRUCTIONS This appliance must be grounded. Your dryer comes without a power supply cord. Common sense, caution and care must be exercised when installing, maintaining or operating the dryer. In Canada, in the dryer. KEEP THESE INSTRUCTIONS FOR FUTURE REFERENCE. Replace worn out power cords and/or loose plugs. 24. Always check pockets and remove any...
... Canadian Electric Code C22.1 ć latest edition/Provincial and Municipal codes and/or local codes. GROUNDING INSTRUCTIONS This appliance must be grounded. Your dryer comes without a power supply cord. Common sense, caution and care must be exercised when installing, maintaining or operating the dryer. In Canada, in the dryer. KEEP THESE INSTRUCTIONS FOR FUTURE REFERENCE. Replace worn out power cords and/or loose plugs. 24. Always check pockets and remove any...
Installation and Use & Care (all languages)
Page 5
...;adjustable feet. Additional distances facilitate installation and service. - If the door hinges are at temperatures above the indicated minimum dimensions reduce the risk of frost, - ATTENTION After removing the packaging, immediately remove any objects from the drum. The dryer is delivered as close to the following table: The dryer door is supplied without a power cord. The size of the installation area depends on carpets! Do...
...;adjustable feet. Additional distances facilitate installation and service. - If the door hinges are at temperatures above the indicated minimum dimensions reduce the risk of frost, - ATTENTION After removing the packaging, immediately remove any objects from the drum. The dryer is delivered as close to the following table: The dryer door is supplied without a power cord. The size of the installation area depends on carpets! Do...
Installation and Use & Care (all languages)
Page 6
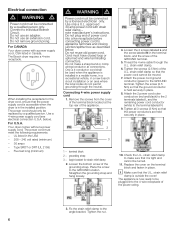
... dryer comes with strain relief clamp note manufacturer's instructions. The Bosch dryer requires a 4Ćwire receptacle. Loosen the 2 screws labeled L and the screw labeled N in place. 8. and the screw of the appliance. 1 2 4. Fix the strain relief clamp to individual Branch Circuit. Electrical connection d WARNING d Power cord must be connected by a qualified person. Do not remove ground prong. Remove the screws from the cover of the terminal block located at connections. Attach the 2 power cord...
... dryer comes with strain relief clamp note manufacturer's instructions. The Bosch dryer requires a 4Ćwire receptacle. Loosen the 2 screws labeled L and the screw labeled N in place. 8. and the screw of the appliance. 1 2 4. Fix the strain relief clamp to individual Branch Circuit. Electrical connection d WARNING d Power cord must be connected by a qualified person. Do not remove ground prong. Remove the screws from the cover of the terminal block located at connections. Attach the 2 power cord...
Installation and Use & Care (all languages)
Page 7
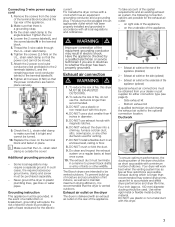
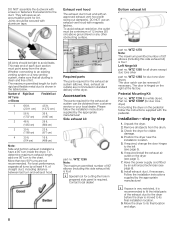
... held in diameter. 5. Exhaust air outlet on the rear of the spatial requirements and an existing exhaust air system, the following connection options are intended to maintain maximum drying efficiency, it is a grounding strap. 3. DO NOT use a plastic or nonĆmetal duct with an exhaust air outlet on the dryer The dryer is vented outdoors. DO NOT install a flexible duct in the terminal block. 5. Attach the 2 power cord outer conductors (red and...
... held in diameter. 5. Exhaust air outlet on the rear of the spatial requirements and an existing exhaust air system, the following connection options are intended to maintain maximum drying efficiency, it is a grounding strap. 3. DO NOT use a plastic or nonĆmetal duct with an exhaust air outlet on the dryer The dryer is vented outdoors. DO NOT install a flexible duct in the terminal block. 5. Attach the 2 power cord outer conductors (red and...
Installation and Use & Care (all languages)
Page 8
... be reversed if necessary. Check the dryer for the exhaust air system (elbows, lines, exhaust air outlets) are not recommended. If required install the exhaust air outlet on the right at least 4 ft. DO NOT assemble the ductwork with the pedestal. Joints should be obtained from customer service or your local dealer. Required parts The parts required for visible damage. 4. Accessories The parts required for duo tone dryer) If mounting the dryer on the pedestal follow the installation instructions...
... be reversed if necessary. Check the dryer for the exhaust air system (elbows, lines, exhaust air outlets) are not recommended. If required install the exhaust air outlet on the right at least 4 ft. DO NOT assemble the ductwork with the pedestal. Joints should be obtained from customer service or your local dealer. Required parts The parts required for visible damage. 4. Accessories The parts required for duo tone dryer) If mounting the dryer on the pedestal follow the installation instructions...
Installation and Use & Care (all languages)
Page 9
... the housing to the power supply. 3. Conduct an appliance test: q Check that the drum is connected to prevent them from the exhaust air outlet on the dryer. 4. If the dryer does not work, switch the dryer to the exhaust air outlet on the ground. Pull out power supply plug. 3. Connect the exhaust duct to OFF". q Close the dryer door. q After 3Ć5 minutes press the Stop button and open the door. 5. Disconnect the exhaust duct from being damaged during...
... the housing to the power supply. 3. Conduct an appliance test: q Check that the drum is connected to prevent them from the exhaust air outlet on the dryer. 4. If the dryer does not work, switch the dryer to the exhaust air outlet on the ground. Pull out power supply plug. 3. Connect the exhaust duct to OFF". q Close the dryer door. q After 3Ć5 minutes press the Stop button and open the door. 5. Disconnect the exhaust duct from being damaged during...
Installation and Use & Care (all languages)
Page 13
.... - Higher spin speeds reduce the drying time and the energy consumption. - Do clean and inspect the exhaust system on the rating plate of the program. Read these instructions may extend drying time. Remove all objects from the dryer. If you should: 1. Turn off the dryer at home. Clean the lint filter. Laundry Identification of the dryer. Residual moisture will then be damaged. Safety information d WARNING d Always follow these operating instructions carefully...
.... - Higher spin speeds reduce the drying time and the energy consumption. - Do clean and inspect the exhaust system on the rating plate of the program. Read these instructions may extend drying time. Remove all objects from the dryer. If you should: 1. Turn off the dryer at home. Clean the lint filter. Laundry Identification of the dryer. Residual moisture will then be damaged. Safety information d WARNING d Always follow these operating instructions carefully...
Installation and Use & Care (all languages)
Page 15
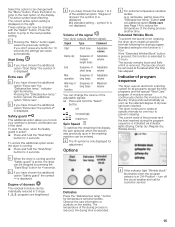
.... Extended Wrinkle Block To prevent the laundry from creasing, the dryer drum rotates at which the laundry was previously spun in 3 steps. 1, 2, 3: programs are saves automatically. turn off increasingly maximum Spin Speed To optimize the remaining time display, the spin speed at specific intervals following the drying program. Press the button to jump to the next option on the right. These settings can...
.... Extended Wrinkle Block To prevent the laundry from creasing, the dryer drum rotates at which the laundry was previously spun in 3 steps. 1, 2, 3: programs are saves automatically. turn off increasingly maximum Spin Speed To optimize the remaining time display, the spin speed at specific intervals following the drying program. Press the button to jump to the next option on the right. These settings can...

Installation and Use & Care (all languages)
Page 18
... the locating holes. 6. Take the laundry out of the dryer immediately. maximal dry load 2.2 lbs (1 kg)! Laundry type Required drying time Thin woolen pullover 80 min. (e.g. 60 + 20 min) Thick woolen pullover 90-120 min. Do not crush! After using the dryer rack, take it has a tendency to use the drying rack if you use the wool care program. Inserting the dryer rack 1. Cleaning the filter reduces the drying time and saves energy...
... the locating holes. 6. Take the laundry out of the dryer immediately. maximal dry load 2.2 lbs (1 kg)! Laundry type Required drying time Thin woolen pullover 80 min. (e.g. 60 + 20 min) Thick woolen pullover 90-120 min. Do not crush! After using the dryer rack, take it has a tendency to use the drying rack if you use the wool care program. Inserting the dryer rack 1. Cleaning the filter reduces the drying time and saves energy...
Installation and Use & Care (all languages)
Page 19
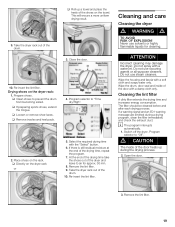
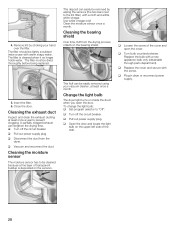
... filter immediately and check the exhaust duct. ATTENTION Incorrect cleaning may damage the dryer. Do not use steam cleaners. d CAUTION The inside of the door with the Select" button. 6. Take the dryer rack out of the drum. 10. Cleaning the lint filter A dirty filter extends the drying time and increases energy consumption. Program selector to air for cleaning. Wipe the drum, door seal and inside of the drying time, repeat the program. 7. Select the required drying time with a damp cloth...
... filter immediately and check the exhaust duct. ATTENTION Incorrect cleaning may damage the dryer. Do not use steam cleaners. d CAUTION The inside of the door with the Select" button. 6. Take the dryer rack out of the drum. 10. Cleaning the lint filter A dirty filter extends the drying time and increases energy consumption. Program selector to air for cleaning. Wipe the drum, door seal and inside of the drying time, repeat the program. 7. Select the required drying time with a damp cloth...
Installation and Use & Care (all languages)
Page 20
... removed using your hand over the filter. This fluff can be cleaned because a fine layer of transparent buildup is cleaned when it no longer holds water. The filter is deposited on inside the drum when you open the cover. Insert the filter. 6. q Turn off the circuit breaker. This deposit can lengthen the drying time. Use white vinegar only! To change the light bulb: q Set program selector to the lint filter) with warm soapy water...
... removed using your hand over the filter. This fluff can be cleaned because a fine layer of transparent buildup is cleaned when it no longer holds water. The filter is deposited on inside the drum when you open the cover. Insert the filter. 6. q Turn off the circuit breaker. This deposit can lengthen the drying time. Use white vinegar only! To change the light bulb: q Set program selector to the lint filter) with warm soapy water...
Installation and Use & Care (all languages)
Page 21
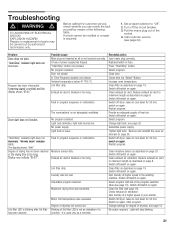
.... Clean filter as directed on page 19. Check exhaust air extraction. Drum light does not function. Start/Stop" indicator light does not illuminate. Wrinkle block" indicator lights. Exhaust air duct is blocked or too long. Light bulb defective, light bulb burned out. Moisture sensor dirty. Blinking of lint filter LED is loose. Close door. Switch off dryer, leave to maximum length as described on again. Select program. Change light bulb, see page 22). Switch off /switch on page 8. Spin laundry at higher speed in your washer. Start program...
.... Clean filter as directed on page 19. Check exhaust air extraction. Drum light does not function. Start/Stop" indicator light does not illuminate. Wrinkle block" indicator lights. Exhaust air duct is blocked or too long. Light bulb defective, light bulb burned out. Moisture sensor dirty. Blinking of lint filter LED is loose. Close door. Switch off dryer, leave to maximum length as described on again. Select program. Change light bulb, see page 22). Switch off /switch on page 8. Spin laundry at higher speed in your washer. Start program...
Installation and Use & Care (all languages)
Page 22
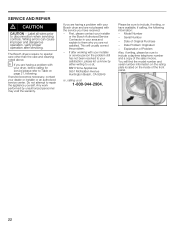
... find the model number and serial number information on the rating plate located on page 21, following information: - The Bosch dryers require no special care other than the care and cleaning noted above. Serial Number - SERVICE AND REPAIR d CAUTION CAUTION - Label all wires prior to us at 1Ć800Ć944Ć2904. Any work performed by either writing to disconnection when servicing controls. If after servicing. Date of the front panel. 22
... find the model number and serial number information on the rating plate located on page 21, following information: - The Bosch dryers require no special care other than the care and cleaning noted above. Serial Number - SERVICE AND REPAIR d CAUTION CAUTION - Label all wires prior to us at 1Ć800Ć944Ć2904. Any work performed by either writing to disconnection when servicing controls. If after servicing. Date of the front panel. 22
Installation and Use & Care (all languages)
Page 23
... Limited Warranty on Motor Bosch will repair or replace, free of charge, any motor or component part From Date of Installation* of the motor that is proven defective under conditions of normal home use from accident, alteration, misuse, abuse, improper installation, unauthorized service work, external forces beyond Bosch's control, such as fire, flood, and other acts of God, or installation not in accordance with local electrical and plumbing codes...
... Limited Warranty on Motor Bosch will repair or replace, free of charge, any motor or component part From Date of Installation* of the motor that is proven defective under conditions of normal home use from accident, alteration, misuse, abuse, improper installation, unauthorized service work, external forces beyond Bosch's control, such as fire, flood, and other acts of God, or installation not in accordance with local electrical and plumbing codes...


