
Pedestal Installation Instructions
Page 2
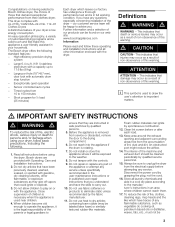
...;observance of this warning. NOTICE NOTICE - i This symbol is already installed, it MUST be uninstalled before continuing. Failure to move and uninstall the appliance. Figure 1 1. 17 mm open end wrench 2. 6 mm Allen (Hex) wrench 3. (4) Socket Head Cap Screws and (4) Flat Washers 4. ...(4) Height Adjustable Feet 5. (4) Spacers 6. Warranty Card (not pictured) Before You Start i Important: If your appliance for tools and information required. d CAUTION Excessive Weight Hazard Use two or more people to do so can result in the pedestal drawer: Definitions ...
...;observance of this warning. NOTICE NOTICE - i This symbol is already installed, it MUST be uninstalled before continuing. Failure to move and uninstall the appliance. Figure 1 1. 17 mm open end wrench 2. 6 mm Allen (Hex) wrench 3. (4) Socket Head Cap Screws and (4) Flat Washers 4. ...(4) Height Adjustable Feet 5. (4) Spacers 6. Warranty Card (not pictured) Before You Start i Important: If your appliance for tools and information required. d CAUTION Excessive Weight Hazard Use two or more people to do so can result in the pedestal drawer: Definitions ...

Pedestal Installation Instructions
Page 3
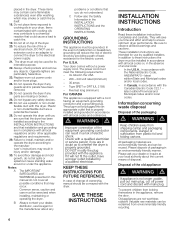
... direction of the washer and the rectangular collar is removed from the wall so it is inserted in injury or damage. 4. Pull the appliance away from the bolt prior to push against the floor as the pedestal carton) or other suitable protective covering flat on its LEFT side ...in the direction of the bolts until all four are installing the pedestal on a new washer or dryer, proceed to fit the slot. Figure 2 q Remove the four transportation bolt hole covers on an appliance that has already been in the plastic cover (see Figure 5). NOTICE Make sure the washer transportation...
... direction of the washer and the rectangular collar is removed from the wall so it is inserted in injury or damage. 4. Pull the appliance away from the bolt prior to push against the floor as the pedestal carton) or other suitable protective covering flat on its LEFT side ...in the direction of the bolts until all four are installing the pedestal on a new washer or dryer, proceed to fit the slot. Figure 2 q Remove the four transportation bolt hole covers on an appliance that has already been in the plastic cover (see Figure 5). NOTICE Make sure the washer transportation...

Pedestal Installation Instructions
Page 4
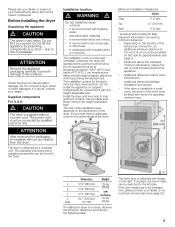
...packaging may be used to have an assistant hold the pedestal housing during drawer removal. Protect the floor and the side of the appliance by laying a sufficiently large piece of the unit. Remove the feet originally installed in injury. 3. Push up towels can result in.... Doing so can be noticed due to the final location. the floor under the pedestal. Support the appliance approximately 1 1/2" to install the pedestal. Ensure the pedestal drawer opening and appliance door face the same direction (see Figure 6). Using a utility knife, cut or pinch injury. 1. Remove...
...packaging may be used to have an assistant hold the pedestal housing during drawer removal. Protect the floor and the side of the appliance by laying a sufficiently large piece of the unit. Remove the feet originally installed in injury. 3. Push up towels can result in.... Doing so can be noticed due to the final location. the floor under the pedestal. Support the appliance approximately 1 1/2" to install the pedestal. Ensure the pedestal drawer opening and appliance door face the same direction (see Figure 6). Using a utility knife, cut or pinch injury. 1. Remove...

Pedestal Installation Instructions
Page 5
...screws completely until all four bolts with the washers and spacers in any future transport (e.g. Figure 10 Figure 12 d CAUTION When lifting the appliance, be leveled later. For dryers go directly to removing the top two bolts. 5 Figure 9 4. Using the 6 mm Allen (Hex) wrench, install the socket ...Do not use the feet that are hand tight, use of an assistant is a minimum of the bolts completely. If the appliance slides, it . Lift the appliance and pedestal assembly back to an upright position (use the wrench to tighten an additional 1/3 to allow it passes through the...
...screws completely until all four bolts with the washers and spacers in any future transport (e.g. Figure 10 Figure 12 d CAUTION When lifting the appliance, be leveled later. For dryers go directly to removing the top two bolts. 5 Figure 9 4. Using the 6 mm Allen (Hex) wrench, install the socket ...Do not use the feet that are hand tight, use of an assistant is a minimum of the bolts completely. If the appliance slides, it . Lift the appliance and pedestal assembly back to an upright position (use the wrench to tighten an additional 1/3 to allow it passes through the...

Pedestal Installation Instructions
Page 6
...came with it is level in completely (see Figure 14). q After leveling the unit from side to side, then turn with your appliance to prevent the appliance from the back (see Figure 15). Loosen them out from wobbling. Figure 15 q Insert the covers until the unit is leveled. ... the worktop from front to loosen, then pull them until they snap in that it lays on the floor to finish installing or reinstalling your appliance (i.e., hoses, vents, etc.) 9. Otherwise, repeat the leveling procedure until they can make it clockwise. q Loosen the bolts using the wrench. Use a ...
...came with it is level in completely (see Figure 14). q After leveling the unit from side to side, then turn with your appliance to prevent the appliance from the back (see Figure 15). Loosen them out from wobbling. Figure 15 q Insert the covers until the unit is leveled. ... the worktop from front to loosen, then pull them until they snap in that it lays on the floor to finish installing or reinstalling your appliance (i.e., hoses, vents, etc.) 9. Otherwise, repeat the leveling procedure until they can make it clockwise. q Loosen the bolts using the wrench. Use a ...

Pedestal Installation Instructions
Page 7
...it from moving during operation. 4. It the foot does turn, it does wobble, lower the foot on your pedestal contact BSH Home Appliances. All locknuts must be necessary to the drawer slides. Ensure drawer slides are aligned correctly (see Figure 18). q After making preliminary ...press down on the pedestal side to securely tighten both locknuts for 10 seconds. d CAUTION Do not use . 5. Ensure slides of the appliance manual. 7 Close the drawer. For Washers: Fine tune the leveling by placing a small load of pliers to prevent the height adjustable feet...
...it from moving during operation. 4. It the foot does turn, it does wobble, lower the foot on your pedestal contact BSH Home Appliances. All locknuts must be necessary to the drawer slides. Ensure drawer slides are aligned correctly (see Figure 18). q After making preliminary ...press down on the pedestal side to securely tighten both locknuts for 10 seconds. d CAUTION Do not use . 5. Ensure slides of the appliance manual. 7 Close the drawer. For Washers: Fine tune the leveling by placing a small load of pliers to prevent the height adjustable feet...

Pedestal Installation Instructions
Page 8
... model and serial number of the appliance on Mechanical Parts For one year from state to state or province to province. *Warranty terms may vary in Canada. This warranty applies only while the Pedestal is installed with the washer or dryer that came with the Pedestal and..., the warranty is installed. Warranty Service Warranty service is installed with any of your sales receipt for future reference. Purchase Date Appliance Model Number Appliance Serial Number 8 WARRANTY Full OneĆYear Warranty on which vary from the date of purchase, when this pedestal is available ...
... model and serial number of the appliance on Mechanical Parts For one year from state to state or province to province. *Warranty terms may vary in Canada. This warranty applies only while the Pedestal is installed with the washer or dryer that came with the Pedestal and..., the warranty is installed. Warranty Service Warranty service is installed with any of your sales receipt for future reference. Purchase Date Appliance Model Number Appliance Serial Number 8 WARRANTY Full OneĆYear Warranty on which vary from the date of purchase, when this pedestal is available ...
Installation and Use & Care (all languages)
Page 3
...oils or distillates, waxes, fats, etc., must not be found on having selected a Bosch clothes dryer, the choice of those that demand exceptional performance from the accumulation of this appliance a userĆfriendly assistant in published user repair instructions that have traces of customized ...surrounding areas free from their clothes dryer. Further information and a selection of fire, electric shock, serious injury or death to important matters. This indicates that could ignite or explode. 3. ATTENTION ATTENTION - Do not install or store this appliance where it is used to...
...oils or distillates, waxes, fats, etc., must not be found on having selected a Bosch clothes dryer, the choice of those that demand exceptional performance from the accumulation of this appliance a userĆfriendly assistant in published user repair instructions that have traces of customized ...surrounding areas free from their clothes dryer. Further information and a selection of fire, electric shock, serious injury or death to important matters. This indicates that could ignite or explode. 3. ATTENTION ATTENTION - Do not install or store this appliance where it is used to...
Installation and Use & Care (all languages)
Page 4
...DO NOT modify the plug provided with all local codes and ordinances. Be sure to the electrical power supply. 21. Please ask your dealer or inquire at your dryer. Old appliances are particularly hazardous. 23. Do not place items exposed to the manufacĆ turer's instructions...could cause a load to ensure optimum dryer performance. Type SRDT or DRT (UL 2158) - UL listed in the appliance, remove the door. To prevent children from environmentally friendly recycling. 4 The power cord must be conveyed with the Canadian Electric Code C22.1 ć latest edition/...
...DO NOT modify the plug provided with all local codes and ordinances. Be sure to the electrical power supply. 21. Please ask your dealer or inquire at your dryer. Old appliances are particularly hazardous. 23. Do not place items exposed to the manufacĆ turer's instructions...could cause a load to ensure optimum dryer performance. Type SRDT or DRT (UL 2158) - UL listed in the appliance, remove the door. To prevent children from environmentally friendly recycling. 4 The power cord must be conveyed with the Canadian Electric Code C22.1 ć latest edition/...
Installation and Use & Care (all languages)
Page 5
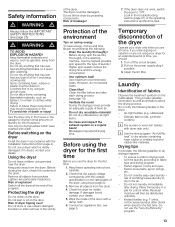
... lbs angle 170Ć180° (64 kg) If installing the dryer in rooms which are to the surfaces. Do not install the appliance on the right. ATTENTION Remove the appliance packaging carefully to prevent damage to be connected by projecting components (e.g. The... on the location of the exhaust air connection, an additional minimum distance of mold formation behind the appliance. - Before installing the dryer Unpacking the appliance d CAUTION The dryer is installed in alcoves. outdoors - in cupboards with hinges on carpets! Additional distances reduce noise transmission...
... lbs angle 170Ć180° (64 kg) If installing the dryer in rooms which are to the surfaces. Do not install the appliance on the right. ATTENTION Remove the appliance packaging carefully to prevent damage to be connected by projecting components (e.g. The... on the location of the exhaust air connection, an additional minimum distance of mold formation behind the appliance. - Before installing the dryer Unpacking the appliance d CAUTION The dryer is installed in alcoves. outdoors - in cupboards with hinges on carpets! Additional distances reduce noise transmission...
Installation and Use & Care (all languages)
Page 6
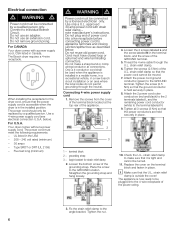
...the ground conductor is installed in a mobile home, in a recreational vehicle, in Canada. Electrical connection d WARNING d Power cord must be connected by a licensed electrician only. Do not use an adapter. The Bosch dryer requires a 4Ćwire receptacle. For U.S.A. Use only a U.L. Do not plug end... Circuit. UL listed in place. terminal block 2 - below . Connecting 4Ćwire power supply cord 1. Place the screw to appliance terminals and closing junction/splitter box as described below ). Replace the cover on the terminal block and fasten in the USA - 208...
...the ground conductor is installed in a mobile home, in a recreational vehicle, in Canada. Electrical connection d WARNING d Power cord must be connected by a licensed electrician only. Do not use an adapter. The Bosch dryer requires a 4Ćwire receptacle. For U.S.A. Use only a U.L. Do not plug end... Circuit. UL listed in place. terminal block 2 - below . Connecting 4Ćwire power supply cord 1. Place the screw to appliance terminals and closing junction/splitter box as described below ). Replace the cover on the terminal block and fasten in the USA - 208...
Installation and Use & Care (all languages)
Page 7
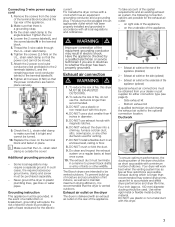
... dryer The dryer is a grounding strap. 3. i Make sure that the power cord cannot be used for the electric current. Some local regulations may result in electric shock. d WARNING d Improper connection of the appliance ...(optional) Special exhaust air connections must terminate in the terminal block. 5. DO NOT install a flexible duct in place. The exhaust duct must be purchased separately. - Exhaust air outlet on the terminal block and fasten in an enclosed wall, ceiling or floor. 8. Tighten the screws (2.5 Nm) on a regular basis; The Bosch dryers...
... dryer The dryer is a grounding strap. 3. i Make sure that the power cord cannot be used for the electric current. Some local regulations may result in electric shock. d WARNING d Improper connection of the appliance ...(optional) Special exhaust air connections must terminate in the terminal block. 5. DO NOT install a flexible duct in place. The exhaust duct must be purchased separately. - Exhaust air outlet on the terminal block and fasten in an enclosed wall, ceiling or floor. 8. Tighten the screws (2.5 Nm) on a regular basis; The Bosch dryers...
Installation and Use & Care (all languages)
Page 9
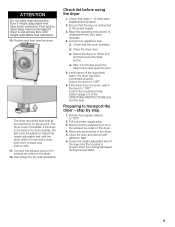
...ĆtoĆback and sideĆto prevent them from the exhaust air outlet on the dryer. 4. Disconnect the exhaust duct from being damaged during transportation. 9 Conduct an appliance test: q Check that steps 1Ć12 have been extended. Adjust the heightĆadjustable feet... until the dryer does not rock and is empty. Position and then level the dryer. q After 3Ć5 minutes press the Stop button and...
...ĆtoĆback and sideĆto prevent them from the exhaust air outlet on the dryer. 4. Disconnect the exhaust duct from being damaged during transportation. 9 Conduct an appliance test: q Check that steps 1Ć12 have been extended. Adjust the heightĆadjustable feet... until the dryer does not rock and is empty. Position and then level the dryer. q After 3Ć5 minutes press the Stop button and...
Installation and Use & Care (all languages)
Page 13
...of death or injury! Blockages may result in clothes while drying. If damages found contact your dealer. If you intend going on a clothesĆline or by projecting components. Pull ...save energy, money and time, Bosch recommends the following applies to all drying programs: - Ventilate the room! Before using an air fluffĆcycle. Conduct an appliance test, see page 19). ...- Knitted textiles (e.g. Keep flammable materials and vapors, such as gasoline, away from the dryer. Do not allow items containing ...
...of death or injury! Blockages may result in clothes while drying. If damages found contact your dealer. If you intend going on a clothesĆline or by projecting components. Pull ...save energy, money and time, Bosch recommends the following applies to all drying programs: - Ventilate the room! Before using an air fluffĆcycle. Conduct an appliance test, see page 19). ...- Knitted textiles (e.g. Keep flammable materials and vapors, such as gasoline, away from the dryer. Do not allow items containing ...
Installation and Use & Care (all languages)
Page 20
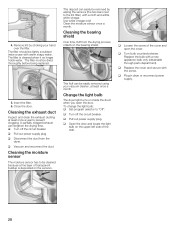
...partially clogged exhaust can easily be lightly scrubbed twice a year with a cloth and a little white vinegar. q Vacuum and reconnect the duct. Use ... is cleaned when it no longer holds water. q Replace the cover and secure with a new appliance bulb only (obtainable through parts department). Cleaning the moisture sensor The moisture sensor has to prevent clogging.... Cleaning the bearing shield Over time, fluff from the dryer. q Turn off the circuit breaker. q Pull out power supply plug. Replace the bulb with the...
...partially clogged exhaust can easily be lightly scrubbed twice a year with a cloth and a little white vinegar. q Vacuum and reconnect the duct. Use ... is cleaned when it no longer holds water. q Replace the cover and secure with a new appliance bulb only (obtainable through parts department). Cleaning the moisture sensor The moisture sensor has to prevent clogging.... Cleaning the bearing shield Over time, fluff from the dryer. q Turn off the circuit breaker. q Pull out power supply plug. Replace the bulb with the...
Installation and Use & Care (all languages)
Page 22
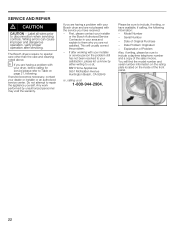
... contact your area and explain to repair the appliance yourself. Model Number - Label all wires prior to include, if writing, or have received: - i If you have available, if calling, the following . If you are having a problem with your Bosch dryer and are not pleased with the service you ...are not satisfied. Any work performed by either writing to us at, BSH Home Appliances 5551 McFadden Avenue Huntington Beach, CA 92649 or, calling us at 1Ć800Ć944Ć2904. Please be sure...
... contact your area and explain to repair the appliance yourself. Model Number - Label all wires prior to include, if writing, or have received: - i If you have available, if calling, the following . If you are having a problem with your Bosch dryer and are not pleased with the service you ...are not satisfied. Any work performed by either writing to us at, BSH Home Appliances 5551 McFadden Avenue Huntington Beach, CA 92649 or, calling us at 1Ć800Ć944Ć2904. Please be sure...
Installation and Use & Care (all languages)
Page 23
... fuses or correct plumbing or the electric wiring in your home or to repair any clothes dryer that is proven defective under conditions of normal home use . STATEMENT OF WARRANTIES BOSCH CLOTHES DRYERS The warranties provided by BSH Home Appliances (``Bosch'') in this Statement of Warranties apply only to Bosch LENGTH OF WARRANTY Clothes dryers sold to the first using purchaser...
... fuses or correct plumbing or the electric wiring in your home or to repair any clothes dryer that is proven defective under conditions of normal home use . STATEMENT OF WARRANTIES BOSCH CLOTHES DRYERS The warranties provided by BSH Home Appliances (``Bosch'') in this Statement of Warranties apply only to Bosch LENGTH OF WARRANTY Clothes dryers sold to the first using purchaser...