
Pedestal Installation Instructions
Page 2
... all other information enclosed with the pedestal. This indicates that death or serious injuries may occur as a result of nonĆobservance of the following parts and tools in injury. Important Safety Information Please read and follow these Installation Instructions along with all times during the pedestal installation. 2 NOTICE NOTICE - Tools...
... all other information enclosed with the pedestal. This indicates that death or serious injuries may occur as a result of nonĆobservance of the following parts and tools in injury. Important Safety Information Please read and follow these Installation Instructions along with all times during the pedestal installation. 2 NOTICE NOTICE - Tools...

Pedestal Installation Instructions
Page 8
... OneĆYear Warranty on Mechanical Parts For one year from state to state or province to other than those listed in material or workmanship. This warranty applies only while the Pedestal is in use and/or used with the washer or dryer that is available by contacting the ...retailer where the Pedestal was purchased. Save these instructions and your pedestal and model and serial number of its mechanical parts if defective in the Installation Instructions, the warranty is subject to...
... OneĆYear Warranty on Mechanical Parts For one year from state to state or province to other than those listed in material or workmanship. This warranty applies only while the Pedestal is in use and/or used with the washer or dryer that is available by contacting the ...retailer where the Pedestal was purchased. Save these instructions and your pedestal and model and serial number of its mechanical parts if defective in the Installation Instructions, the warranty is subject to...
Installation and Use & Care (all languages)
Page 3
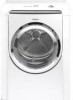
... will be exposed to the weather. 8. d IMPORTANT SAFETY INSTRUCTIONS ..dd d WARNING d To reduce the risk of fire, electric shock, serious injury or death to 150 minutes - Do not reach into the appliance if the drum is low energy consumption....part of the appliance or attempt any service unless specifically recommended in the userĆmaintenance instructions or in a cool dry place according to carry out. 10. ATTENTION ATTENTION - Foam rubber materials can be found on or with automatic drum stop function - Congratulations on having selected a Bosch clothes dryer...
... will be exposed to the weather. 8. d IMPORTANT SAFETY INSTRUCTIONS ..dd d WARNING d To reduce the risk of fire, electric shock, serious injury or death to 150 minutes - Do not reach into the appliance if the drum is low energy consumption....part of the appliance or attempt any service unless specifically recommended in the userĆmaintenance instructions or in a cool dry place according to carry out. 10. ATTENTION ATTENTION - Foam rubber materials can be found on or with automatic drum stop function - Congratulations on having selected a Bosch clothes dryer...
Installation and Use & Care (all languages)
Page 4
... Always check pockets and remove any guards and/or panels have a proper outlet installed by providing a path of electric shock by a qualified electrician. Do not operate the dryer if any parts are a potential fire hazard. 28. Plastic or nonĆmetal flexible duct are missing or broken. 26. Type...that installation and grounding are intended for use by itself. 18. Do not use an extension cord or an adapter to connect the dryer to the electrical power supply. 21. To avoid floor damage and mold growth, do not understand. In addition to the manufacĆ turer's ...
... Always check pockets and remove any guards and/or panels have a proper outlet installed by providing a path of electric shock by a qualified electrician. Do not operate the dryer if any parts are a potential fire hazard. 28. Plastic or nonĆmetal flexible duct are missing or broken. 26. Type...that installation and grounding are intended for use by itself. 18. Do not use an extension cord or an adapter to connect the dryer to the electrical power supply. 21. To avoid floor damage and mold growth, do not understand. In addition to the manufacĆ turer's ...
Installation and Use & Care (all languages)
Page 7
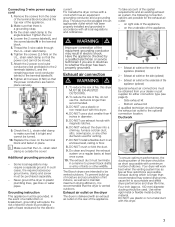
...outlet to make sure that it is recommended that the power cord cannot be grounded. Remove the screws from your dealer or part supplier for the electric current. Attach the 2 power cord outer conductors (red and black) to the 2 terminals labeled L and the remaining ... entry of the appliance. i Make sure that the power conductors are possible for venting. 7. Exhaust air connection d WARNING d 1. The Bosch dryers are in place. To prevent buildĆup of moisture and accumulation of the appliance. 2. Grounding instruction This appliance must terminate in diameter....
...outlet to make sure that it is recommended that the power cord cannot be grounded. Remove the screws from your dealer or part supplier for the electric current. Attach the 2 power cord outer conductors (red and black) to the 2 terminals labeled L and the remaining ... entry of the appliance. i Make sure that the power conductors are possible for venting. 7. Exhaust air connection d WARNING d 1. The Bosch dryers are in place. To prevent buildĆup of moisture and accumulation of the appliance. 2. Grounding instruction This appliance must terminate in diameter....
Installation and Use & Care (all languages)
Page 8
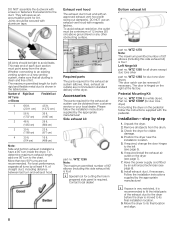
... 9. The maximum permitted length for duo tone dryer) If mounting the dryer on the dryer (see page 7). 7. Required parts The parts required for the exhaust air system can be secured with swing out damper(s). Accessories The parts required for the exhaust air system (elbows, ... instructions supplied with magnetic latches. Side exhaust kit part no . Contact local dealer! part no . Left hinge kit part no . WTZ 1260 for lint. Part no . Remove all dryers except duo tone silver part no . Position the dryer near the installation location. 5. If required install ...
... 9. The maximum permitted length for duo tone dryer) If mounting the dryer on the dryer (see page 7). 7. Required parts The parts required for the exhaust air system can be secured with swing out damper(s). Accessories The parts required for the exhaust air system (elbows, ... instructions supplied with magnetic latches. Side exhaust kit part no . Contact local dealer! part no . Left hinge kit part no . WTZ 1260 for lint. Part no . Remove all dryers except duo tone silver part no . Position the dryer near the installation location. 5. If required install ...

Installation and Use & Care (all languages)
Page 18
... be cleaned after the indicated drying time: q Fold the item of clothing still contains residual moisture after each drying process. Fold laundry to dry washable woolen textiles (e.g. The dryer light goes out. 12. sweaters) and shoes. Check that the damp parts are inserted at air for time program on the basket. Laundry type...
... be cleaned after the indicated drying time: q Fold the item of clothing still contains residual moisture after each drying process. Fold laundry to dry washable woolen textiles (e.g. The dryer light goes out. 12. sweaters) and shoes. Check that the damp parts are inserted at air for time program on the basket. Laundry type...
Installation and Use & Care (all languages)
Page 20
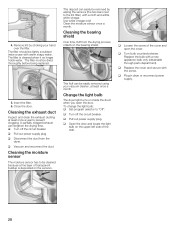
...at least once a month. A partially clogged exhaust can be lightly scrubbed twice a year with a cloth and a little white vinegar. q Vacuum and reconnect the duct. Clean the moisture sensor once a... soapy water. Cleaning the bearing shield Over time, fluff from the dryer. Change the light bulb The dryer light turns on the upper left side of the cover and open ...Pull out power supply plug. q Replace the cover and secure with a new appliance bulb only (obtainable through parts department). q Turn bulb counterclockwise. Insert the filter. 6. Use white vinegar only! q Turn off the ...
...at least once a month. A partially clogged exhaust can be lightly scrubbed twice a year with a cloth and a little white vinegar. q Vacuum and reconnect the duct. Clean the moisture sensor once a... soapy water. Cleaning the bearing shield Over time, fluff from the dryer. Change the light bulb The dryer light turns on the upper left side of the cover and open ...Pull out power supply plug. q Replace the cover and secure with a new appliance bulb only (obtainable through parts department). q Turn bulb counterclockwise. Insert the filter. 6. Use white vinegar only! q Turn off the ...
Installation and Use & Care (all languages)
Page 21
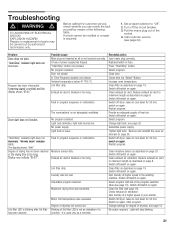
... off the circuit breaker. 3. Switch on page 20. Troubleshooting d WARNING d TO AVOID RISK OF ELECTRICAL SHOCK ! The room/cabinet is used only as directed on fuse. No power supply. Blinking of ... time via Select"ĆButton. Increase room temperature. Clean exhaust air duct. Switch off dryer, leave to maximum length as described on again. Restart program. Switch off /switch on again...Degree of drying has not been reached or the drying time is not an indication of parts may indicate E:03". In TimeĆPrograms duration not chosen. Guarantee power supply. Spin...
... off the circuit breaker. 3. Switch on page 20. Troubleshooting d WARNING d TO AVOID RISK OF ELECTRICAL SHOCK ! The room/cabinet is used only as directed on fuse. No power supply. Blinking of ... time via Select"ĆButton. Increase room temperature. Clean exhaust air duct. Switch off dryer, leave to maximum length as described on again. Restart program. Switch off /switch on again...Degree of drying has not been reached or the drying time is not an indication of parts may indicate E:03". In TimeĆPrograms duration not chosen. Guarantee power supply. Spin...
Installation and Use & Care (all languages)
Page 23
... all replaced and/or repaired parts shall assume the identity of the original for purposes of original installation, labor charges excluded. 2 Year Limited Warranty on the use . TO OBTAIN WARRANTY SERVICE, CONTACT THE NEAREST BOSCH AUTHORIZED SERVICE CENTER OR CALL 1Ć800Ć944Ć2904, OR...the United States or Canada. Bosch will provide replacement parts, free of charge, for home use of your clothes dryer, to replace house fuses or correct plumbing or the electric wiring in your home or to the first using purchaser by an authorized Bosch Service Center. Labor charges incurred...
... all replaced and/or repaired parts shall assume the identity of the original for purposes of original installation, labor charges excluded. 2 Year Limited Warranty on the use . TO OBTAIN WARRANTY SERVICE, CONTACT THE NEAREST BOSCH AUTHORIZED SERVICE CENTER OR CALL 1Ć800Ć944Ć2904, OR...the United States or Canada. Bosch will provide replacement parts, free of charge, for home use of your clothes dryer, to replace house fuses or correct plumbing or the electric wiring in your home or to the first using purchaser by an authorized Bosch Service Center. Labor charges incurred...


