
Pedestal Installation Instructions
Page 3
... immediately below applies to tightening. 3. NOTICE Make sure the washer transportation bolts are installing the pedestal on a new washer or dryer, proceed to be removed during transit. The washer installation instructions required these bolts to the Preparing Your New Appliance" section on...the transportation bolt washer is removed from the wall so it to the Installing the Pedestal" section of the slotted area. For dryers go directly to pedestal installation. 2. Preparing Your Appliance Existing Appliance - Step 2 below . Preparing Your Existing Appliance 1. The ...
... immediately below applies to tightening. 3. NOTICE Make sure the washer transportation bolts are installing the pedestal on a new washer or dryer, proceed to be removed during transit. The washer installation instructions required these bolts to the Preparing Your New Appliance" section on...the transportation bolt washer is removed from the wall so it to the Installing the Pedestal" section of the slotted area. For dryers go directly to pedestal installation. 2. Preparing Your Appliance Existing Appliance - Step 2 below . Preparing Your Existing Appliance 1. The ...

Pedestal Installation Instructions
Page 5
... the appliance base. If the appliance slides, it . d CAUTION Avoid holding the appliance by the pedestal when lifting it may cause injury or damage. 6. For dryers go directly to HAND TIGHTEN all the way from the unit. q Loosen all four bolts before tightening any of the bolts completely.
... the appliance base. If the appliance slides, it . d CAUTION Avoid holding the appliance by the pedestal when lifting it may cause injury or damage. 6. For dryers go directly to HAND TIGHTEN all the way from the unit. q Loosen all four bolts before tightening any of the bolts completely.

Pedestal Installation Instructions
Page 8
...and you may vary in material or workmanship. Warranty Restriction If the Pedestal is subject to the instructions provided in the washer or dryer Operating, Care and Installation Instructions", supplier will repair or replace any other than those listed in the United States or Canada*. ... to state or province to the Operating, Care and Installation Instructions" that came with the washer or dryer that is installed with the listed washer or dryer and operated according to other product than private family use in the Installation Instructions, the warranty is null and...
...and you may vary in material or workmanship. Warranty Restriction If the Pedestal is subject to the instructions provided in the washer or dryer Operating, Care and Installation Instructions", supplier will repair or replace any other than those listed in the United States or Canada*. ... to state or province to the Operating, Care and Installation Instructions" that came with the washer or dryer that is installed with the listed washer or dryer and operated according to other product than private family use in the Installation Instructions, the warranty is null and...
Installation and Use & Care (all languages)
Page 2
... the dryer 5 Electrical connection 6 Exhaust air connection 6 Accessories 8 Installation ć step by step 8 Check list before using the dryer 9 Preparing to transport the dryer ć step by step 9 OPERATING INSTRUCTIONS 10 Your new dryer 10 ...dryer 17 Using the dryer rack 18 Cleaning and care 19 Cleaning the dryer 19 Cleaning the lint filter 19 Cleaning the exhaust duct 20 Cleaning the moisture sensor 20 Cleaning the bearing shield 20 Change the light bulb 20 Troubleshooting 21 SERVICE and REPAIR 22 STATEMENT OF WARRANTIES BOSCH CLOTHES DRYERS...
... the dryer 5 Electrical connection 6 Exhaust air connection 6 Accessories 8 Installation ć step by step 8 Check list before using the dryer 9 Preparing to transport the dryer ć step by step 9 OPERATING INSTRUCTIONS 10 Your new dryer 10 ...dryer 17 Using the dryer rack 18 Cleaning and care 19 Cleaning the dryer 19 Cleaning the lint filter 19 Cleaning the exhaust duct 20 Cleaning the moisture sensor 20 Cleaning the bearing shield 20 Change the light bulb 20 Troubleshooting 21 SERVICE and REPAIR 22 STATEMENT OF WARRANTIES BOSCH CLOTHES DRYERS...
Installation and Use & Care (all languages)
Page 3
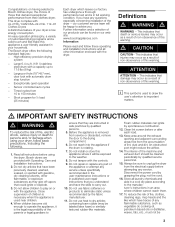
...other information enclosed with UL 2158 / CAN/CSA-22.2 No. 112-97 Clothes Dryers A distinctive feature of your household. d IMPORTANT SAFETY INSTRUCTIONS ..dd d WARNING d To reduce the risk of fire, electric shock, serious injury or death to play on our web site: www....dirt. Do not use heat to the weather. 8. d CAUTION CAUTION- Congratulations on having selected a Bosch clothes dryer, the choice of those that demand exceptional performance from the electrical supply before or after each load. 13. Exceptionally quiet operation - our customer service team will be labeled...
...other information enclosed with UL 2158 / CAN/CSA-22.2 No. 112-97 Clothes Dryers A distinctive feature of your household. d IMPORTANT SAFETY INSTRUCTIONS ..dd d WARNING d To reduce the risk of fire, electric shock, serious injury or death to play on our web site: www....dirt. Do not use heat to the weather. 8. d CAUTION CAUTION- Congratulations on having selected a Bosch clothes dryer, the choice of those that demand exceptional performance from the electrical supply before or after each load. 13. Exceptionally quiet operation - our customer service team will be labeled...
Installation and Use & Care (all languages)
Page 4
...use a plastic or nonĆmetal flexible duct with the National Electric Code, ANSI/NFPA70 ć latest edition/State and Municipal codes and/or local codes. - Danger of the dryer. 20. Do not operate the dryer if any objects. B Always contact your dealer, distributor, service... agent or the manufacturer about the current means of fire or electrical shock, DO NOT use an extension cord or an adapter to connect the dryer to these installation instructions completely and carefully. For U.S.A. The plug must only be plugged into...
...use a plastic or nonĆmetal flexible duct with the National Electric Code, ANSI/NFPA70 ć latest edition/State and Municipal codes and/or local codes. - Danger of the dryer. 20. Do not operate the dryer if any objects. B Always contact your dealer, distributor, service... agent or the manufacturer about the current means of fire or electrical shock, DO NOT use an extension cord or an adapter to connect the dryer to these installation instructions completely and carefully. For U.S.A. The plug must only be plugged into...
Installation and Use & Care (all languages)
Page 5
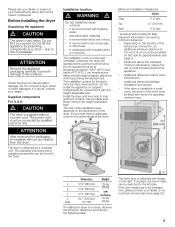
...the location of the exhaust air connection, an additional minimum distance of 5½ inch (14 cm) must be well ventilated, otherwise the dryer will allow. The power cord must be changed over, please contact your dealer or our customer serviceĆteam (see page 7). - ... Clearances Closet Sides 0" (O mm) Top 12" (3O5 mm) Rear* 0" (O mm) * as a complete unit. Supplied components For U.S.A. Do not operate the dryer at your local authority about the current means of disposal. Low temperatures affect the automatic program sequence and may contain gas or other fuels, - Install...
...the location of the exhaust air connection, an additional minimum distance of 5½ inch (14 cm) must be well ventilated, otherwise the dryer will allow. The power cord must be changed over, please contact your dealer or our customer serviceĆteam (see page 7). - ... Clearances Closet Sides 0" (O mm) Top 12" (3O5 mm) Rear* 0" (O mm) * as a complete unit. Supplied components For U.S.A. Do not operate the dryer at your local authority about the current means of disposal. Low temperatures affect the automatic program sequence and may contain gas or other fuels, - Install...
Installation and Use & Care (all languages)
Page 6
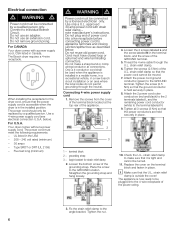
... SRDT or DRT (UL 2158) - Connecting 4Ćwire power supply cord 1. The Bosch dryer requires a 4Ćwire receptacle. terminal block 2 - Place the screw to individual Branch Circuit. Electrical connection d WARNING d Power cord must meet the following requirements: - Connect to the ...GROUND location. Do not use an extension cord. For CANADA Your dryer comes with strain relief clamp note manufacturer's instructions....
... SRDT or DRT (UL 2158) - Connecting 4Ćwire power supply cord 1. The Bosch dryer requires a 4Ćwire receptacle. terminal block 2 - Place the screw to individual Branch Circuit. Electrical connection d WARNING d Power cord must meet the following requirements: - Connect to the ...GROUND location. Do not use an extension cord. For CANADA Your dryer comes with strain relief clamp note manufacturer's instructions....
Installation and Use & Care (all languages)
Page 7
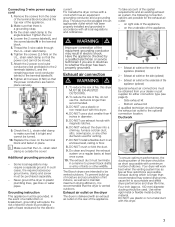
... grounded. DO NOT install a flexible duct in a manner to accumulate and affect dryer performance and dryer lifeĆtime. The exhaust duct must terminate in an enclosed wall, ceiling or floor. 8. The Bosch dryers are held in the terminal block. 5. To take account of the terminal block ...accumulation of the appliance. 2. Exhaust air outlet on the terminal block and fasten in electric shock. on the underside of the appliance. 2 1 3 1 ć Exhaust air outlet on the rear of the dryer should change the exhaust air outlet to the terminal labeled N. 8. Ductwork To ensure ...
... grounded. DO NOT install a flexible duct in a manner to accumulate and affect dryer performance and dryer lifeĆtime. The exhaust duct must terminate in an enclosed wall, ceiling or floor. 8. The Bosch dryers are held in the terminal block. 5. To take account of the terminal block ...accumulation of the appliance. 2. Exhaust air outlet on the terminal block and fasten in electric shock. on the underside of the appliance. 2 1 3 1 ć Exhaust air outlet on the rear of the dryer should change the exhaust air outlet to the terminal labeled N. 8. Ductwork To ensure ...
Installation and Use & Care (all languages)
Page 8
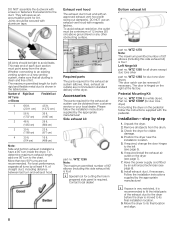
...The parts required for cutting the hole in the table below. i Special tool for the exhaust air system can be obtained from the dryer. WTZ 1270 Note: The maximum permitted number of 90° elbows (including this side exhaust kit) is recommended to the chart. ...exhaust air outlet on the pedestal follow the installation instructions supplied by the appropriate manufacturer! Required parts The parts required for duo tone dryer) If mounting the dryer on the dryer (see page 5). 6. Side exhaust kit part no . Remove all turns by an authorized technician (see page 8). 8. Install ...
...The parts required for cutting the hole in the table below. i Special tool for the exhaust air system can be obtained from the dryer. WTZ 1270 Note: The maximum permitted number of 90° elbows (including this side exhaust kit) is recommended to the chart. ...exhaust air outlet on the pedestal follow the installation instructions supplied by the appropriate manufacturer! Required parts The parts required for duo tone dryer) If mounting the dryer on the dryer (see page 5). 6. Side exhaust kit part no . Remove all turns by an authorized technician (see page 8). 8. Install ...
Installation and Use & Care (all languages)
Page 9
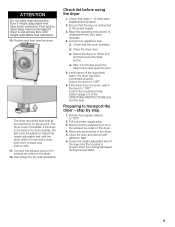
...housing to OFF". 2. Check list before using the dryer 1. q Close the dryer door. If the interior of the dryer into the wall receptacle. If the dryer does not work, switch the dryer to Ćside. 11. Pull out power supply plug. 3. If the dryer is connected to OFF". 6. Conduct an appliance test... to Extra Dry" and then press the Start button. Rotate the program selector to prevent them from the exhaust air outlet on the dryer. 12. Place any accessories in the troubleshooting section (page 21) of the OPERATING INSTRUCTIONS and find the fault. Close the door and ...
...housing to OFF". 2. Check list before using the dryer 1. q Close the dryer door. If the interior of the dryer into the wall receptacle. If the dryer does not work, switch the dryer to Ćside. 11. Pull out power supply plug. 3. If the dryer is connected to OFF". 6. Conduct an appliance test... to Extra Dry" and then press the Start button. Rotate the program selector to prevent them from the exhaust air outlet on the dryer. 12. Place any accessories in the troubleshooting section (page 21) of the OPERATING INSTRUCTIONS and find the fault. Close the door and ...

Installation and Use & Care (all languages)
Page 10
OPERATING INSTRUCTIONS Your new dryer 0pen the door....(colored marking) ....and close the door. Lint filter 10
OPERATING INSTRUCTIONS Your new dryer 0pen the door....(colored marking) ....and close the door. Lint filter 10
Installation and Use & Care (all languages)
Page 11
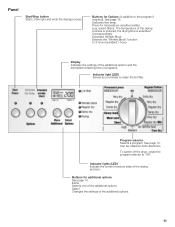
Press for Options (in both directions. acrylic fibers). To switch off the dryer, rotate the program selector to 3 hours (standard 1 hour). Menu Selects one of the additional options. 11 Buttons for temperatureĆsensitive textiles (e.g. Extended Wrinkle Block ...
Press for Options (in both directions. acrylic fibers). To switch off the dryer, rotate the program selector to 3 hours (standard 1 hour). Menu Selects one of the additional options. 11 Buttons for temperatureĆsensitive textiles (e.g. Extended Wrinkle Block ...
Installation and Use & Care (all languages)
Page 12
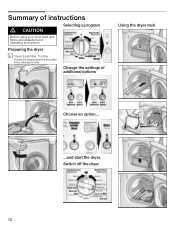
Change the settings of instructions d CAUTION Selecting a program Before using your dryer read and follow all installation and operating instructions. Switch off the dryer 12 The filter should be cleaned before and after every drying process. Preparing the dryer i Check the lint filter. Summary of additional options Using the dryer rack Choose an option... ...and start the dryer.
Change the settings of instructions d CAUTION Selecting a program Before using your dryer read and follow all installation and operating instructions. Switch off the dryer 12 The filter should be cleaned before and after every drying process. Preparing the dryer i Check the lint filter. Summary of additional options Using the dryer rack Choose an option... ...and start the dryer.
Installation and Use & Care (all languages)
Page 13
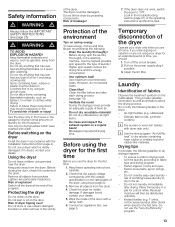
...possible spin speed for the first time Before you intend going on the dryer Install the dryer in clothes while drying. Ventilate the room! Do not dry rubberized or airĆtight items. - Turn off the dryer at home. AirĆtight textiles (e.g. TĆshirts, cotton jersey laundry... symbols on saving energy To save energy, money and time, Bosch recommends the following applies to remain in accordance with water. Protecting the dryer Do not climb on a regular basis! Remove all objects from the dryer. To ensure a uniform drying result, sort the laundry according ...
...possible spin speed for the first time Before you intend going on the dryer Install the dryer in clothes while drying. Ventilate the room! Do not dry rubberized or airĆtight items. - Turn off the dryer at home. AirĆtight textiles (e.g. TĆshirts, cotton jersey laundry... symbols on saving energy To save energy, money and time, Bosch recommends the following applies to remain in accordance with water. Protecting the dryer Do not climb on a regular basis! Remove all objects from the dryer. To ensure a uniform drying result, sort the laundry according ...
Installation and Use & Care (all languages)
Page 14
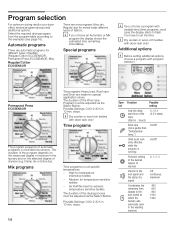
... steps. Automatic programs There are automatic programs for extreme temperature sensitive textiles. i Dry woolen or wool-rich textiles with dryer rack only! Permanent Press ECOSENSOR The program sequence of automatic programs is running) On/Off Precision setting of the desired degree..., choose a program with variable time (time programs, wool care) the display starts to the 800 spin speed at specific temperatures - Program selection For optimum drying results your dryer offers several program groups and additional options. hours!) 0-12 h (0.5 h steps) Extra care ...
... steps. Automatic programs There are automatic programs for extreme temperature sensitive textiles. i Dry woolen or wool-rich textiles with dryer rack only! Permanent Press ECOSENSOR The program sequence of automatic programs is running) On/Off Precision setting of the desired degree..., choose a program with variable time (time programs, wool care) the display starts to the 800 spin speed at specific temperatures - Program selection For optimum drying results your dryer offers several program groups and additional options. hours!) 0-12 h (0.5 h steps) Extra care ...
Installation and Use & Care (all languages)
Page 15
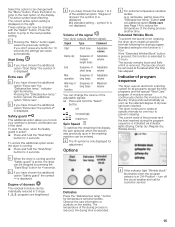
...elapsed. Observe the care information or symbols on the right. Drying ends automatically as soon as the selected degree of the signal Your dryer outputs different signals. i If the indicator light Wrinkle block" illuminates when the program selector is active: q Press and hold the... the Menu" button again, saves the previously settings. indicator light illuminates. Pressing the Delicates/low temp." Degree of program sequence The dryer uses an electronic scanning system for this function is 1 hour. button and set additional option Extra care (see Page 14) to reduce ...
...elapsed. Observe the care information or symbols on the right. Drying ends automatically as soon as the selected degree of the signal Your dryer outputs different signals. i If the indicator light Wrinkle block" illuminates when the program selector is active: q Press and hold the... the Menu" button again, saves the previously settings. indicator light illuminates. Pressing the Delicates/low temp." Degree of program sequence The dryer uses an electronic scanning system for this function is 1 hour. button and set additional option Extra care (see Page 14) to reduce ...
Installation and Use & Care (all languages)
Page 17
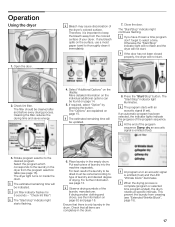
...be sorted according to thoroughly clean it is complete (program or selected time program ended), the drum rotates at specific intervals. If drying woolen clothing and shoes, see page 13. If any bleach spills on the surface, use a moist paper towel to type of laundry and desired degree... drying process. i The estimated remaining time will be updated. 8. i The estimated remaining time will be indicated. Put each piece of the dryer's colored surface. Ensure that all items are explained on page 14. 5. Otherwise the Start/Stop" indicator light will not flash and the...
...be sorted according to thoroughly clean it is complete (program or selected time program ended), the drum rotates at specific intervals. If drying woolen clothing and shoes, see page 13. If any bleach spills on the surface, use a moist paper towel to type of laundry and desired degree... drying process. i The estimated remaining time will be updated. 8. i The estimated remaining time will be indicated. Put each piece of the dryer's colored surface. Ensure that all items are explained on page 14. 5. Otherwise the Start/Stop" indicator light will not flash and the...

Installation and Use & Care (all languages)
Page 18
...on next page. 11. sweaters) and shoes. ATTENTION Dry only one item of clothing or one pair of residual moisture. 8. Inserting the dryer rack 1. Lift the dryer rack horizontally into the drum. 5. Place the dryer rack so that the damp parts are inserted at air for time program on ...to use the drying rack if you use the wool care program. If the item of clothing still contains residual moisture after each drying process. 9. Using the dryer rack Use the dryer rack to fit the dryer rack. 5. Check that the drum is empty. 4. Laundry must not touch the drum!...
...on next page. 11. sweaters) and shoes. ATTENTION Dry only one item of clothing or one pair of residual moisture. 8. Inserting the dryer rack 1. Lift the dryer rack horizontally into the drum. 5. Place the dryer rack so that the damp parts are inserted at air for time program on ...to use the drying rack if you use the wool care program. If the item of clothing still contains residual moisture after each drying process. 9. Using the dryer rack Use the dryer rack to fit the dryer rack. 5. Check that the drum is empty. 4. Laundry must not touch the drum!...
Installation and Use & Care (all languages)
Page 19
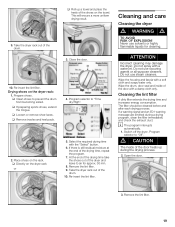
...Close the door. 4. Cleaning and care Cleaning the dryer d WARNING d TO AVOID RISK OF EXPLOSION! Do not use scouring agents or allĆpurpose cleaners. Wipe the housing and fascia with a water jet. Do not spray with a soft cloth and soapy water only. Do not use steam ... Remove insoles and heel pads. 2. This will ensure a more uniform drying result. 3. Take the dryer rack out of the drying time, repeat the program. 7. Select the required drying time with a damp cloth only. i The program interrupts automatically. 1. At the end of the drying time take the shoes ...
...Close the door. 4. Cleaning and care Cleaning the dryer d WARNING d TO AVOID RISK OF EXPLOSION! Do not use scouring agents or allĆpurpose cleaners. Wipe the housing and fascia with a water jet. Do not spray with a soft cloth and soapy water only. Do not use steam ... Remove insoles and heel pads. 2. This will ensure a more uniform drying result. 3. Take the dryer rack out of the drying time, repeat the program. 7. Select the required drying time with a damp cloth only. i The program interrupts automatically. 1. At the end of the drying time take the shoes ...


