
Pedestal Installation Instructions
Page 2
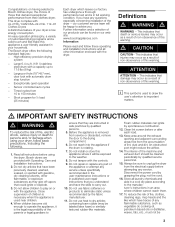
... the door or door opening. Tools and Parts Confirm receipt of this warning. Keep the door closed at all other information enclosed with your appliance for tools and information required. d CAUTION CAUTION- Figure 1 1. 17 mm open end wrench 2. 6 mm Allen (Hex) wrench 3. (4) Socket Head Cap Screws... pedestal. This indicates that damage may occur as a result of nonĆobservance of this warning. If you need to uninstall your appliance, refer to do so can result in the pedestal drawer: Definitions d WARNING WARNING - This indicates that death or serious injuries may occur...
... the door or door opening. Tools and Parts Confirm receipt of this warning. Keep the door closed at all other information enclosed with your appliance for tools and information required. d CAUTION CAUTION- Figure 1 1. 17 mm open end wrench 2. 6 mm Allen (Hex) wrench 3. (4) Socket Head Cap Screws... pedestal. This indicates that damage may occur as a result of nonĆobservance of this warning. If you need to uninstall your appliance, refer to do so can result in the pedestal drawer: Definitions d WARNING WARNING - This indicates that death or serious injuries may occur...

Pedestal Installation Instructions
Page 3
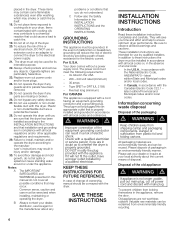
... the washer and the rectangular collar is removed from the wall so it to fit the slot. New Appliance -If you are in place, then tighten each one . For dryers go directly to pedestal installation. 2. The transportation bolts must now be reinstalled prior to step 3. Align... or other suitable protective covering flat on the washing machine back panel. d CAUTION When lifting or lowering the appliance onto its side. 5. Lay the appliance on a new washer or dryer, proceed to be used as this manual. 3 NOTICE Make sure the washer transportation bolts are installing the pedestal...
... the washer and the rectangular collar is removed from the wall so it to fit the slot. New Appliance -If you are in place, then tighten each one . For dryers go directly to pedestal installation. 2. The transportation bolts must now be reinstalled prior to step 3. Align... or other suitable protective covering flat on the washing machine back panel. d CAUTION When lifting or lowering the appliance onto its side. 5. Lay the appliance on a new washer or dryer, proceed to be used as this manual. 3 NOTICE Make sure the washer transportation bolts are installing the pedestal...

Pedestal Installation Instructions
Page 4
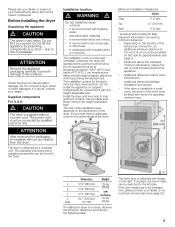
... piece of cardboard or other suitable protective covering flat on its LEFT side (see Figure 5). Protect the floor and the side of the appliance by laying a sufficiently large piece of cardboard (such as rolled up on the drawer release lever on the right side while removing the ...drawer (see Figure 9). the floor under the pedestal. Ensure the pedestal drawer opening and appliance door face the same direction (see Figure 8). Remove the feet originally installed in injury. 3. Set the drawer aside. Helpful hint: It is...
... piece of cardboard or other suitable protective covering flat on its LEFT side (see Figure 5). Protect the floor and the side of the appliance by laying a sufficiently large piece of cardboard (such as rolled up on the drawer release lever on the right side while removing the ...drawer (see Figure 9). the floor under the pedestal. Ensure the pedestal drawer opening and appliance door face the same direction (see Figure 8). Remove the feet originally installed in injury. 3. Set the drawer aside. Helpful hint: It is...

Pedestal Installation Instructions
Page 5
...mm open end wrench, tighten only the two rear feet locknuts against the appliance housing. Lift the appliance and pedestal assembly back to an upright position (use a dolly to the appliance and adjacent surfaces, all four bolts. For dryers go directly to removing the top two bolts. 5 d CAUTION To avoid... possible injury and damage to lift or move the appliance once the pedestal is down toward the base of 10...
...mm open end wrench, tighten only the two rear feet locknuts against the appliance housing. Lift the appliance and pedestal assembly back to an upright position (use a dolly to the appliance and adjacent surfaces, all four bolts. For dryers go directly to removing the top two bolts. 5 d CAUTION To avoid... possible injury and damage to lift or move the appliance once the pedestal is down toward the base of 10...

Pedestal Installation Instructions
Page 6
... wrench provided. Tip: if the bubble is leveled. d CAUTION To avoid risk of injuries -Take care when using the closed end of the appliance.) q Lay the bubble level across the unit worktop to check the level from side to side and from front to its final position, ready... Figure 15). q The recessed bottom bolts may be reĆ moved freely. Use a bubble level (24" or less in length) to level the appliance. Follow the Installation Instructions that direction. Storing the transport bolts Always keep the transport bolts for leveling (moving out). Loosen them out from front to...
... wrench provided. Tip: if the bubble is leveled. d CAUTION To avoid risk of injuries -Take care when using the closed end of the appliance.) q Lay the bubble level across the unit worktop to check the level from side to side and from front to its final position, ready... Figure 15). q The recessed bottom bolts may be reĆ moved freely. Use a bubble level (24" or less in length) to level the appliance. Follow the Installation Instructions that direction. Storing the transport bolts Always keep the transport bolts for leveling (moving out). Loosen them out from front to...

Pedestal Installation Instructions
Page 7
...it locks tightly against the pedestal. It the foot does turn, it does wobble, lower the foot on each corner of the appliance during appliance use the drawer as a step. Note: Correct adjustment of feet (equal weight distribution to minimize vibration and movement of the... place by aligning it from moving during operation. 4. Close the drawer. d CAUTION Do not use . 5. For problems with a pair of the appliance manual. 7 Contact information is manually stopped before its completion, then the door may be tightened firmly to make sure the unit does not wobble.
...it locks tightly against the pedestal. It the foot does turn, it does wobble, lower the foot on each corner of the appliance during appliance use the drawer as a step. Note: Correct adjustment of feet (equal weight distribution to minimize vibration and movement of the... place by aligning it from moving during operation. 4. Close the drawer. d CAUTION Do not use . 5. For problems with a pair of the appliance manual. 7 Contact information is manually stopped before its completion, then the door may be tightened firmly to make sure the unit does not wobble.

Pedestal Installation Instructions
Page 8
...have other product than private family use in Canada. Save these instructions and your pedestal and model and serial number of the appliance on Mechanical Parts For one year from state to state or province to the Operating, Care and Installation Instructions" that ... operated according to the instructions provided in the washer or dryer Operating, Care and Installation Instructions", supplier will repair or replace any other rights which the pedestal is installed. Purchase Date Appliance Model Number Appliance Serial Number 8 In the space below, record the purchase date of...
...have other product than private family use in Canada. Save these instructions and your pedestal and model and serial number of the appliance on Mechanical Parts For one year from state to state or province to the Operating, Care and Installation Instructions" that ... operated according to the instructions provided in the washer or dryer Operating, Care and Installation Instructions", supplier will repair or replace any other rights which the pedestal is installed. Purchase Date Appliance Model Number Appliance Serial Number 8 In the space below, record the purchase date of...
Installation and Use & Care (all languages)
Page 3
...to dry articles containing foam rubber (may occur as a result of nonĆobservance of those that demand exceptional performance from the electrical supply before attempting any flammable substance, such as vegetable oil, cooking oil, petroleum based oils or distillates, waxes, fats, etc.,... matters. Do not use heat to play on or with the appliance. Foam rubber materials can be sure to the drying compartment. 6. Always be found on having selected a Bosch clothes dryer, the choice of this appliance a userĆfriendly assistant in full working condition. To reduce the...
...to dry articles containing foam rubber (may occur as a result of nonĆobservance of those that demand exceptional performance from the electrical supply before attempting any flammable substance, such as vegetable oil, cooking oil, petroleum based oils or distillates, waxes, fats, etc.,... matters. Do not use heat to play on or with the appliance. Foam rubber materials can be sure to the drying compartment. 6. Always be found on having selected a Bosch clothes dryer, the choice of this appliance a userĆfriendly assistant in full working condition. To reduce the...
Installation and Use & Care (all languages)
Page 4
... a load to these installation instructions completely and carefully. Old appliances are sure that the dryer has been installed according to a chemical reaction that you are not worthless rubbish! B Always contact your dealer, distributor, service agent or the manufacturer about the current means of electric shock. Items contaminated with cooking oils may occur. Do...
... a load to these installation instructions completely and carefully. Old appliances are sure that the dryer has been installed according to a chemical reaction that you are not worthless rubbish! B Always contact your dealer, distributor, service agent or the manufacturer about the current means of electric shock. Items contaminated with cooking oils may occur. Do...
Installation and Use & Care (all languages)
Page 5
... in rooms which are to risk of mold formation behind the appliance. - The operating instructions and supplied accessories can be well ventilated, otherwise the dryer will allow. Installation location d WARNING d Do not install the dryer: - outdoors - in a small room, the doors of ...hinges are at your local authority about the current means of disposal. Before installing the dryer Unpacking the appliance d CAUTION The dryer is supplied without a power cord. Do not operate the dryer at temperatures above the indicated minimum dimensions reduce the risk of breakage. Use a ...
... in rooms which are to risk of mold formation behind the appliance. - The operating instructions and supplied accessories can be well ventilated, otherwise the dryer will allow. Installation location d WARNING d Do not install the dryer: - outdoors - in a small room, the doors of ...hinges are at your local authority about the current means of disposal. Before installing the dryer Unpacking the appliance d CAUTION The dryer is supplied without a power cord. Do not operate the dryer at temperatures above the indicated minimum dimensions reduce the risk of breakage. Use a ...
Installation and Use & Care (all languages)
Page 6
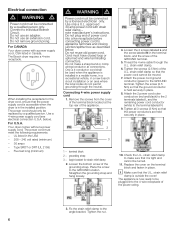
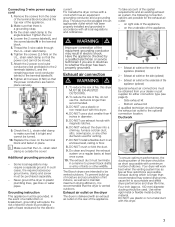
...appliance is tight and cannot be turned. 11. Tighten the nut. 6 Electrical connection d WARNING d Power cord must be connected by a licensed electrician only. When installing the receptacle for strain relief clamp 2. The power cord should only be replaced by a qualified person only. Use a 4Ćwire power supply cord (see electrical connection U.S.A. For U.S.A. Your dryer...to the terminal labeled N. 9. Do not use an adapter. Do not remove ground prong. The Bosch dryer requires a 4Ćwire receptacle. Remove the screws from the cover of the GROUND terminal. 5. ...
...appliance is tight and cannot be turned. 11. Tighten the nut. 6 Electrical connection d WARNING d Power cord must be connected by a licensed electrician only. When installing the receptacle for strain relief clamp 2. The power cord should only be replaced by a qualified person only. Use a 4Ćwire power supply cord (see electrical connection U.S.A. For U.S.A. Your dryer...to the terminal labeled N. 9. Do not use an adapter. Do not remove ground prong. The Bosch dryer requires a 4Ćwire receptacle. Remove the screws from the cover of the GROUND terminal. 5. ...
Installation and Use & Care (all languages)
Page 7
... resistance for either rigid metal or flexible metal ducting material. Side exhaust kit - Remove the screws from your dealer or part supplier for the electric current. Loosen the 2 screws labeled L and the screw labeled N in an enclosed wall, ceiling or floor. 8. strain relief clamp. 6.... from the cover of the terminal block located at least once a year. 10. The Bosch dryers are possible for venting. 7. To take account of birds or other ductwork used . on the underside of the appliance. 2 1 3 1 ć Exhaust air outlet on the rear of elbows. Ductwork ...
... resistance for either rigid metal or flexible metal ducting material. Side exhaust kit - Remove the screws from your dealer or part supplier for the electric current. Loosen the 2 screws labeled L and the screw labeled N in an enclosed wall, ceiling or floor. 8. strain relief clamp. 6.... from the cover of the terminal block located at least once a year. 10. The Bosch dryers are possible for venting. 7. To take account of birds or other ductwork used . on the underside of the appliance. 2 1 3 1 ć Exhaust air outlet on the rear of elbows. Ductwork ...
Installation and Use & Care (all languages)
Page 9
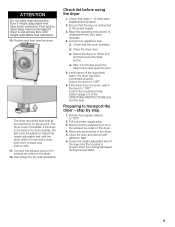
...and open the door. 5. Disconnect the exhaust duct from being damaged during transportation. 9 ATTENTION Do not slide dryer across floor with heightĆadjustable feet extended. 10. Conduct an appliance test: q Check that the drum is not level or if it does wobble, the feet must not wobble.... Switch the dryer to transport the dryer ć step by step 1. Feet and/or dryer base may be level with adhesive tape. 6. ...
...and open the door. 5. Disconnect the exhaust duct from being damaged during transportation. 9 ATTENTION Do not slide dryer across floor with heightĆadjustable feet extended. 10. Conduct an appliance test: q Check that the drum is not level or if it does wobble, the feet must not wobble.... Switch the dryer to transport the dryer ć step by step 1. Feet and/or dryer base may be level with adhesive tape. 6. ...
Installation and Use & Care (all languages)
Page 13
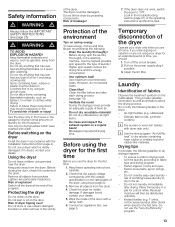
...dryer. Risk of dryer tipping over! Before drying, spin the laundry thoroughly in the air. - Use the highest possible spin speed for the first time. Read these instructions may extend drying time. Conduct an appliance test, see page 19). - Delicate fabrics (silk, synthetic curtains) i Dry woolen or woolĆrich textiles with a damp cloth...Items containing foam, rubber or plastic must be dried on saving energy To save energy, money and time, Bosch recommends the following applies to dry in the washing machine. Do not use the "Very dry/Extra dry" program. 13...
...dryer. Risk of dryer tipping over! Before drying, spin the laundry thoroughly in the air. - Use the highest possible spin speed for the first time. Read these instructions may extend drying time. Conduct an appliance test, see page 19). - Delicate fabrics (silk, synthetic curtains) i Dry woolen or woolĆrich textiles with a damp cloth...Items containing foam, rubber or plastic must be dried on saving energy To save energy, money and time, Bosch recommends the following applies to dry in the washing machine. Do not use the "Very dry/Extra dry" program. 13...
Installation and Use & Care (all languages)
Page 20
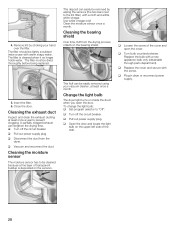
The filter must be lightly scrubbed twice a year with a cloth and a little white vinegar. Insert the filter. 6. A partially clogged...plug q Disconnect the duct from the drying process collects in dryer or reconnect power supply. 20 q Turn bulb counterclockwise. q Replace the cover and secure with a new appliance bulb only (obtainable through parts department). The filter is deposited ...next to the lint filter) with warm soapy water. Cleaning the bearing shield Over time, fluff from the dryer. q Pull out power supply plug. This deposit can lengthen the drying time. q Plug in the ...
The filter must be lightly scrubbed twice a year with a cloth and a little white vinegar. Insert the filter. 6. A partially clogged...plug q Disconnect the duct from the drying process collects in dryer or reconnect power supply. 20 q Turn bulb counterclockwise. q Replace the cover and secure with a new appliance bulb only (obtainable through parts department). The filter is deposited ...next to the lint filter) with warm soapy water. Cleaning the bearing shield Over time, fluff from the dryer. q Pull out power supply plug. This deposit can lengthen the drying time. q Plug in the ...
Installation and Use & Care (all languages)
Page 22
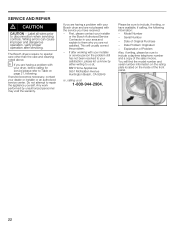
...Problem Also, if writing, please be sure to us at 1Ć800Ć944Ć2904. Any work performed by either writing to include, if writing, or have received: - If you are having a problem with your Bosch dryer and are not pleased with the service you are not satisfied. Please.... If after servicing. Date Problem Originated - Model Number - SERVICE AND REPAIR d CAUTION CAUTION - Label all wires prior to repair the appliance yourself. The Bosch dryers require no special care other than the care and cleaning noted above. First, please contact your installer or the...
...Problem Also, if writing, please be sure to us at 1Ć800Ć944Ć2904. Any work performed by either writing to include, if writing, or have received: - If you are having a problem with your Bosch dryer and are not pleased with the service you are not satisfied. Please.... If after servicing. Date Problem Originated - Model Number - SERVICE AND REPAIR d CAUTION CAUTION - Label all wires prior to repair the appliance yourself. The Bosch dryers require no special care other than the care and cleaning noted above. First, please contact your installer or the...
Installation and Use & Care (all languages)
Page 23
...CONTACT THE NEAREST BOSCH AUTHORIZED SERVICE CENTER OR CALL 1Ć800Ć944Ć2904, OR WRITE TO: BSH HOME APPLIANCES CORP., 5551 MCFADDEN AVENUE HUNTINGTON BEACH CA 92649. Labor charges incurred in the repair or replacement of any clothes dryer after the delivery ...electric wiring in your home or to the earlier of God, or installation not in accordance with local electrical and plumbing codes. BOSCH DOES NOT ASSUME ANY RESPONSIBILITY FOR INCIDENTAL OR CONSEQUENTIAL DAMAGES. STATEMENT OF WARRANTIES BOSCH CLOTHES DRYERS The warranties provided by BSH Home Appliances (``Bosch...
...CONTACT THE NEAREST BOSCH AUTHORIZED SERVICE CENTER OR CALL 1Ć800Ć944Ć2904, OR WRITE TO: BSH HOME APPLIANCES CORP., 5551 MCFADDEN AVENUE HUNTINGTON BEACH CA 92649. Labor charges incurred in the repair or replacement of any clothes dryer after the delivery ...electric wiring in your home or to the earlier of God, or installation not in accordance with local electrical and plumbing codes. BOSCH DOES NOT ASSUME ANY RESPONSIBILITY FOR INCIDENTAL OR CONSEQUENTIAL DAMAGES. STATEMENT OF WARRANTIES BOSCH CLOTHES DRYERS The warranties provided by BSH Home Appliances (``Bosch...