User Manual
Page 3
...8 Checklist for Installation 11 Removing the transport bolts 11 Water connection 12 Electrical connection 14 Leveling procedure 15 Transporting the Washer 16 OPERATING INSTRUCTION 17 Panel 17 Before Using For the First Time 18 Using For the First Time 18 First washing ...Table 23 Acoustic Signal 24 Special features (Auto Load adjust, AVSt Anti-Vibration System 24 During Washing 26 Re-selecting a program 26 Add a garment / Interrupting the program 26 Canceling the active program 26 After Washing 26 User Maintenance Instructions 27 Cleaning and Care 27 ...
...8 Checklist for Installation 11 Removing the transport bolts 11 Water connection 12 Electrical connection 14 Leveling procedure 15 Transporting the Washer 16 OPERATING INSTRUCTION 17 Panel 17 Before Using For the First Time 18 Using For the First Time 18 First washing ...Table 23 Acoustic Signal 24 Special features (Auto Load adjust, AVSt Anti-Vibration System 24 During Washing 26 Re-selecting a program 26 Add a garment / Interrupting the program 26 Canceling the active program 26 After Washing 26 User Maintenance Instructions 27 Cleaning and Care 27 ...
User Manual
Page 5
...coverings that they are sure that might encourage children to climb on the washer, to be stored on or in the washer or on a regular basis to climb, lean or hang on or in subsequent wash loads causing skin irritation. 26. Do not machine wash fiberglass materials (such as well. 38. ...Small particles may result in cabinets or other storage areas above the washer. 13. If this appliance where it has a worn power cord or...
...coverings that they are sure that might encourage children to climb on the washer, to be stored on or in the washer or on a regular basis to climb, lean or hang on or in subsequent wash loads causing skin irritation. 26. Do not machine wash fiberglass materials (such as well. 38. ...Small particles may result in cabinets or other storage areas above the washer. 13. If this appliance where it has a worn power cord or...
User Manual
Page 26
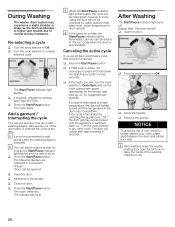
...safety reasons (high water level, water temperature or drum speed). coins, paper clips) between the drum and rubber door seal. i After washing, leave the washer loading door open for 24 hours to Off , the door will remain locked until the appliance is switched back on. q If required, change the settings. ... to add laundry after the washing phase is complete. If a cycle is interrupted at any other cycle. Turn the cycle selector to dry. 26 NOTICE To avoid the risk of the washing machine to any time. i If the speed is too high, the Start/Pause indicator light is...
...safety reasons (high water level, water temperature or drum speed). coins, paper clips) between the drum and rubber door seal. i After washing, leave the washer loading door open for 24 hours to Off , the door will remain locked until the appliance is switched back on. q If required, change the settings. ... to add laundry after the washing phase is complete. If a cycle is interrupted at any other cycle. Turn the cycle selector to dry. 26 NOTICE To avoid the risk of the washing machine to any time. i If the speed is too high, the Start/Pause indicator light is...
User Manual
Page 29
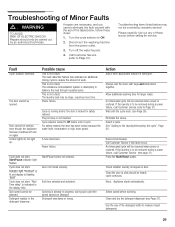
...issues before calling for larger loads. Spin speed cannot be covered by an authorized technician. Power failure. Allow additional washing time for service. If the laundry is not a fault. Select a cycle. None. Clean and dry the detergent dispenser (see Page 26). If repairs are necessary,... properly. End time selected and activated. Turn the cycle selector to the laundry/Interrupting the cycle", Page 26 . Press the Start/Pause button. Always load the drum with the aid of the table below may be carried out by warranty service! An interrupted cycle...
...issues before calling for larger loads. Spin speed cannot be covered by an authorized technician. Power failure. Allow additional washing time for service. If the laundry is not a fault. Select a cycle. None. Clean and dry the detergent dispenser (see Page 26). If repairs are necessary,... properly. End time selected and activated. Turn the cycle selector to the laundry/Interrupting the cycle", Page 26 . Press the Start/Pause button. Always load the drum with the aid of the table below may be carried out by warranty service! An interrupted cycle...