User Manual
Page 3
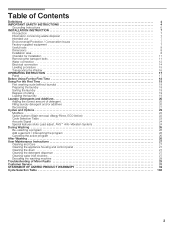
...area 8 Checklist for Installation 11 Removing the transport bolts 11 Water connection 12 Electrical connection 14 Leveling procedure 15 Transporting the Washer 16 OPERATING INSTRUCTION 17 Panel 17 Before Using For the First Time 18 Using For the First Time 18 First washing cycle... 22 Option buttons (Stain removal, Allergy Rinse, ECO Action 22 Cycle Selection Table 23 Acoustic Signal 24 Special features (Auto Load adjust, AVSt Anti-Vibration System 24 During Washing 26 Re-selecting a program 26 Add a garment / Interrupting the program 26 Canceling the...
...area 8 Checklist for Installation 11 Removing the transport bolts 11 Water connection 12 Electrical connection 14 Leveling procedure 15 Transporting the Washer 16 OPERATING INSTRUCTION 17 Panel 17 Before Using For the First Time 18 Using For the First Time 18 First washing cycle... 22 Option buttons (Stain removal, Allergy Rinse, ECO Action 22 Cycle Selection Table 23 Acoustic Signal 24 Special features (Auto Load adjust, AVSt Anti-Vibration System 24 During Washing 26 Re-selecting a program 26 Add a garment / Interrupting the program 26 Canceling the...
User Manual
Page 5
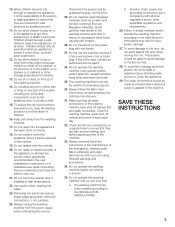
...children. 16. Small particles may result in cabinets or other storage areas above the washer. 13. b. The water connections should only be stored on or in the washer or on or in subsequent wash loads causing skin irritation. 26. severe injury or death could result. Children should be ...grounding connections are tight and not leaking, and before attempting any panel can expose sharp edges and points, electrical connections or hot surfaces. 24. Removing any service. Check the fill hose connections on the top of the washing machine. 14. To avoid damage to the washing ...
...children. 16. Small particles may result in cabinets or other storage areas above the washer. 13. b. The water connections should only be stored on or in the washer or on or in subsequent wash loads causing skin irritation. 26. severe injury or death could result. Children should be ...grounding connections are tight and not leaking, and before attempting any panel can expose sharp edges and points, electrical connections or hot surfaces. 24. Removing any service. Check the fill hose connections on the top of the washing machine. 14. To avoid damage to the washing ...
User Manual
Page 9
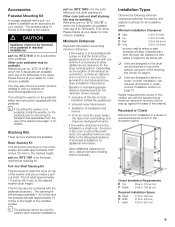
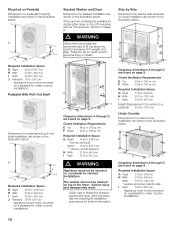
... inches and the pedestal will add approximately 15 inches to wall as venting or water connection will allow. If the washer is to be installed with a dryer so that the fronts of the appliances are to stack the dryer on top of the room must not be fitted with vents of the... washer. cm) F Bottom 24 sq. The pedestal adds 15 inches to allow for the solid white pull-out shelf stacking kit. WTZ 1610...
... inches and the pedestal will add approximately 15 inches to wall as venting or water connection will allow. If the washer is to be installed with a dryer so that the fronts of the appliances are to stack the dryer on top of the room must not be fitted with vents of the... washer. cm) F Bottom 24 sq. The pedestal adds 15 inches to allow for the solid white pull-out shelf stacking kit. WTZ 1610...
User Manual
Page 10
...H Width 27.50 in. (69.9 cm) I Depth 33.50 in. (85.1 cm) J Pedestal Ht. 15.0 in sliding the stacked washer and dryer units into position because of the washer, see the Accessories" section on a pedestal 52.25 in the illustration below. in . (155 sq. Utilize care in . (38.1 cm...50 in personal injury or death. Clearance dimensions A through D are found on top of its weight and size. cm) F Bottom 24 sq. J Stacked Washer and Dryer Dimensions for stacking the dryer on page 9. There are two stacking kits available for stacked installation are found on top of ...
...H Width 27.50 in. (69.9 cm) I Depth 33.50 in. (85.1 cm) J Pedestal Ht. 15.0 in sliding the stacked washer and dryer units into position because of the washer, see the Accessories" section on a pedestal 52.25 in the illustration below. in . (155 sq. Utilize care in . (38.1 cm...50 in personal injury or death. Clearance dimensions A through D are found on top of its weight and size. cm) F Bottom 24 sq. J Stacked Washer and Dryer Dimensions for stacking the dryer on page 9. There are two stacking kits available for stacked installation are found on top of ...
User Manual
Page 24
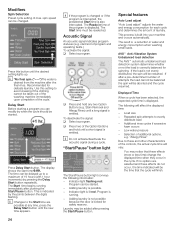
...finish. If after pushing the Start/Pause button. The following information: - Repeated spin attempts to evenly distribute load - Use this button until the new time appears. 24 i If the program is emitted. You may be taken out of the washing machine immediately upon completion ...of the program is emitted. Recommended for safety reasons. q Press and hold until a long signal is changed . Load size - This is running...
...finish. If after pushing the Start/Pause button. The following information: - Repeated spin attempts to evenly distribute load - Use this button until the new time appears. 24 i If the program is emitted. You may be taken out of the washing machine immediately upon completion ...of the program is emitted. Recommended for safety reasons. q Press and hold until a long signal is changed . Load size - This is running...
User Manual
Page 26
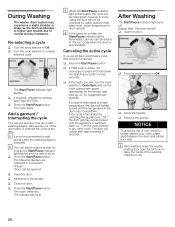
.../Pause indicator light is illuminated, the cycle can put laundry in the drum after approximately 5 seconds. q Close the faucets. During Washing The washer drum system may remain locked until the temperature in the drum has cooled down the Start/Pause button for five seconds q If the.... i It is necessary to Off. If the cycle is interrupted at a standstill. q Open the door. i After washing, leave the washer loading door open for 24 hours to allow the inside of rust, check for safety reasons (high water level, water temperature or drum speed). The following displays are indicated...
.../Pause indicator light is illuminated, the cycle can put laundry in the drum after approximately 5 seconds. q Close the faucets. During Washing The washer drum system may remain locked until the temperature in the drum has cooled down the Start/Pause button for five seconds q If the.... i It is necessary to Off. If the cycle is interrupted at a standstill. q Open the door. i After washing, leave the washer loading door open for 24 hours to allow the inside of rust, check for safety reasons (high water level, water temperature or drum speed). The following displays are indicated...