
User Manual
Page 9
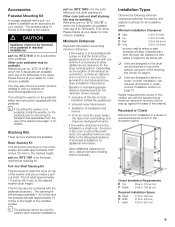
...at your dealer for the dryer venting system. i If mounting the washer on a pedestal, install the washer on page 9. part no . Please inquire at your washer. If the washer is to be installed with a dryer so that the fronts of the appliances are to be flush with one of the stacking kits... shown on the pedestal prior to removing the transport bolt assemblies from overheating, and improves drying...
...at your dealer for the dryer venting system. i If mounting the washer on a pedestal, install the washer on page 9. part no . Please inquire at your washer. If the washer is to be installed with a dryer so that the fronts of the appliances are to be flush with one of the stacking kits... shown on the pedestal prior to removing the transport bolt assemblies from overheating, and improves drying...
User Manual
Page 10
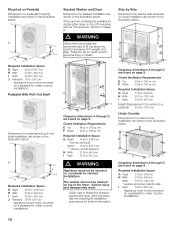
... kit installation instructions for stacking the dryer on top of the washer, see the Accessories" section on top of its weight and size. in . (85.1 cm) Appliance must not be mounted on a pedestal for under counter installations. 10 Required Installation Space G Height 37...not be mounted on a pedestal for under counter installations. cm) F Bottom 24 sq. Pedestal With Pull-Out Shelf Dimensions for pedestal and pull-out shelf installation are shown in the illustration below . Closet Ventilation Requirements E Top 48 sq. J Stacked Washer and Dryer Dimensions for stacked...
... kit installation instructions for stacking the dryer on top of the washer, see the Accessories" section on top of its weight and size. in . (85.1 cm) Appliance must not be mounted on a pedestal for under counter installations. 10 Required Installation Space G Height 37...not be mounted on a pedestal for under counter installations. cm) F Bottom 24 sq. Pedestal With Pull-Out Shelf Dimensions for pedestal and pull-out shelf installation are shown in the illustration below . Closet Ventilation Requirements E Top 48 sq. J Stacked Washer and Dryer Dimensions for stacked...
User Manual
Page 11
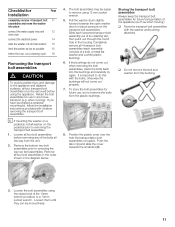
...socket wrench. 5. The bolt assemblies may be moved freely. 11 It is important to do this with the washer and bushing attached. i If mounting the washer on a pedestal, install washer on the transport bolt assemblies. Loosen all four bolt assemblies before removing any of the 13mm wrench provided, or...it out through the round hole in (A) and slide the cover towards the open washer door to reduce pressure on the pedestal prior to removing the top two bolt assemblies. Pull the washer drum slightly forward towards the small slot (B). To store the bolt assemblies for future...
...socket wrench. 5. The bolt assemblies may be moved freely. 11 It is important to do this with the washer and bushing attached. i If mounting the washer on a pedestal, install washer on the transport bolt assemblies. Loosen all four bolt assemblies before removing any of the 13mm wrench provided, or...it out through the round hole in (A) and slide the cover towards the open washer door to reduce pressure on the pedestal prior to removing the top two bolt assemblies. Pull the washer drum slightly forward towards the small slot (B). To store the bolt assemblies for future...


