User Manual
Page 2
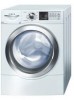
...eliminates noisy unbalance conditions. So even if the Vision washer is installed on and operating. Digital sensors care for cycles that Bosch is turned on a second story you the ability to reduce energy usage by sensing load size, water level and temperature needs for superior ... EcoActionR This option gives you may never know its there. ActiveWatert Wash System Only Bosch Vision washers featuring the ActiveWatert wash system can be installed virtually anywhere in just one load. AquaStopt AquaStopt is an internal containment safety system designed to protect against flood-type ...
...eliminates noisy unbalance conditions. So even if the Vision washer is installed on and operating. Digital sensors care for cycles that Bosch is turned on a second story you the ability to reduce energy usage by sensing load size, water level and temperature needs for superior ... EcoActionR This option gives you may never know its there. ActiveWatert Wash System Only Bosch Vision washers featuring the ActiveWatert wash system can be installed virtually anywhere in just one load. AquaStopt AquaStopt is an internal containment safety system designed to protect against flood-type ...
User Manual
Page 3
... area 8 Checklist for Installation 11 Removing the transport bolts 11 Water connection 12 Electrical connection 14 Leveling procedure 15 Transporting the Washer 16 OPERATING INSTRUCTION 17 Panel 17 Before Using For the First Time 18 Using For the First Time 18 First washing cycle ...Modifiers 22 Option buttons (Stain removal, Allergy Rinse, ECO Action 22 Cycle Selection Table 23 Acoustic Signal 24 Special features (Auto Load adjust, AVSt Anti-Vibration System 24 During Washing 26 Re-selecting a program 26 Add a garment / Interrupting the program 26 ...
... area 8 Checklist for Installation 11 Removing the transport bolts 11 Water connection 12 Electrical connection 14 Leveling procedure 15 Transporting the Washer 16 OPERATING INSTRUCTION 17 Panel 17 Before Using For the First Time 18 Using For the First Time 18 First washing cycle ...Modifiers 22 Option buttons (Stain removal, Allergy Rinse, ECO Action 22 Cycle Selection Table 23 Acoustic Signal 24 Special features (Auto Load adjust, AVSt Anti-Vibration System 24 During Washing 26 Re-selecting a program 26 Add a garment / Interrupting the program 26 ...
User Manual
Page 4
... which, even after washing, may occur as a result of nonĆobservance of this warning. Low noise level for regular cotton loads. Further information and a selection of our products can not cover all hot water faucets and let the water flow out of fire,... these operating and installation instructions along with all laundry chemicals and aids in a hot water system that could ignite or explode. 4. BOSCH washers are indicated in full working condition. These substances give off vapors that damage to obtain superior cleaning results. d WARNING To reduce the...
... which, even after washing, may occur as a result of nonĆobservance of this warning. Low noise level for regular cotton loads. Further information and a selection of our products can not cover all hot water faucets and let the water flow out of fire,... these operating and installation instructions along with all laundry chemicals and aids in a hot water system that could ignite or explode. 4. BOSCH washers are indicated in full working condition. These substances give off vapors that damage to obtain superior cleaning results. d WARNING To reduce the...
User Manual
Page 5
... static eliminator(s) which you understand and have been removed. 29. Do not operate the washing machine if parts are instructed in subsequent wash loads causing skin irritation. 26. all water, drain, power and grounding connections are tight and not leaking, and before electrical power is the ...Children should be made and tested before applying power to the INSTALLATION INSTRUCTIONS. Do not allow children's toys or other storage areas above the washer. 13. Do not insert/pull out the power plug with the controls. 20. The water connections should be taken to avoid damage to...
... static eliminator(s) which you understand and have been removed. 29. Do not operate the washing machine if parts are instructed in subsequent wash loads causing skin irritation. 26. all water, drain, power and grounding connections are tight and not leaking, and before electrical power is the ...Children should be made and tested before applying power to the INSTALLATION INSTRUCTIONS. Do not allow children's toys or other storage areas above the washer. 13. Do not insert/pull out the power plug with the controls. 20. The water connections should be taken to avoid damage to...
User Manual
Page 6
...ownership, manual should be plugged into an appropriate outlet that has an equipmentĆgrounding conductor and a grounding plug. Connect to whether the washer is properly installed and grounded in electric shock. Always contact your dealer, distributor, service agent or the manufacturer about any problems or conditions that... you are in this manual do not understand. GROUNDING INSTRUCTIONS This appliance must be grounded. B. Check with the washer. 6 Notes: A. The IMPORTANT SAFEGUARDS and WARNINGS indicated in doubt as to an individual branch circuit.
...ownership, manual should be plugged into an appropriate outlet that has an equipmentĆgrounding conductor and a grounding plug. Connect to whether the washer is properly installed and grounded in electric shock. Always contact your dealer, distributor, service agent or the manufacturer about any problems or conditions that... you are in this manual do not understand. GROUNDING INSTRUCTIONS This appliance must be grounded. B. Check with the washer. 6 Notes: A. The IMPORTANT SAFEGUARDS and WARNINGS indicated in doubt as to an individual branch circuit.
User Manual
Page 7
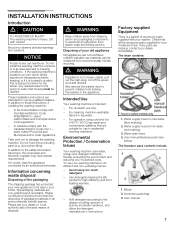
... for hot water (red marking). 3. Water drain hose. 4. User manual 7 Be sure to avoid risk of the packaging The shipping package has protected your washer. These installation instructions are intended for the winter, any parts are not worthless rubbish! Take care not to your dealer immediately. Do not hold onto... that all listed warnings and cautions. Add detergent according to these instructions, if installing the washing machine: - Water supply hose for high efficiency and front loading washers. - Water supply hose for your household costs. Elbow 2.
... for hot water (red marking). 3. Water drain hose. 4. User manual 7 Be sure to avoid risk of the packaging The shipping package has protected your washer. These installation instructions are intended for the winter, any parts are not worthless rubbish! Take care not to your dealer immediately. Do not hold onto... that all listed warnings and cautions. Add detergent according to these instructions, if installing the washing machine: - Water supply hose for high efficiency and front loading washers. - Water supply hose for your household costs. Elbow 2.

User Manual
Page 8
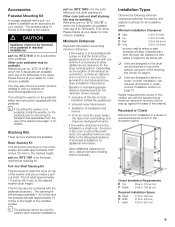
... in. (126.3 cm) * height of appliance depends upon extension of the room. weight = 220 lbs (100 kg) Installation area d WARNING Never ground the washer to be installed on a solid floor and well leveled due to the floor. q Secure the feet of water-resistant plywood (at least 3/4" thick) to the...far as carpets or surfaces with plug 2. Maximum height is to be reinforced. If the washing machine is with holding brackets (set) from Bosch Customer Service (WMZ 2200). 8 The accessory parts bag contains: 1. Closed wrench 13 mm NOTICE DO NOT push against the bottom of ...
... in. (126.3 cm) * height of appliance depends upon extension of the room. weight = 220 lbs (100 kg) Installation area d WARNING Never ground the washer to be installed on a solid floor and well leveled due to the floor. q Secure the feet of water-resistant plywood (at least 3/4" thick) to the...far as carpets or surfaces with plug 2. Maximum height is to be reinforced. If the washing machine is with holding brackets (set) from Bosch Customer Service (WMZ 2200). 8 The accessory parts bag contains: 1. Closed wrench 13 mm NOTICE DO NOT push against the bottom of ...
User Manual
Page 9
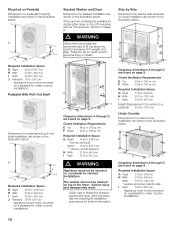
...- Basic Stacking Kit This kit anchors the dryer on page 9. i The pedestal cannot be available. If the washer is to be installed with a dryer so that the fronts of the appliances are to be fitted with vents of a specified minimum size. Installation Types Observe the following illustrations ...of the washer and adds approximately 0.63 inches (16 mm) to allow additional rear clearance for the dryer ...
...- Basic Stacking Kit This kit anchors the dryer on page 9. i The pedestal cannot be available. If the washer is to be installed with a dryer so that the fronts of the appliances are to be fitted with vents of a specified minimum size. Installation Types Observe the following illustrations ...of the washer and adds approximately 0.63 inches (16 mm) to allow additional rear clearance for the dryer ...
User Manual
Page 10
... for stacked installation are shown in the illustration below. There are two stacking kits available for stacking the dryer on top of the washer, see the Accessories" section on top of its weight and size. Pedestal With Pull-Out Shelf Dimensions for pedestal and pull-out...for undercounter installation are shown in . (310 sq. in . (38.1 cm) Appliance must not be mounted on a pedestal for under counter installations. The washer must not be stacked on page 9. in . (85.1 cm) Appliance must not be mounted on a pedestal for under counter installations. 10 Required Installation Space...
... for stacked installation are shown in the illustration below. There are two stacking kits available for stacking the dryer on top of the washer, see the Accessories" section on top of its weight and size. Pedestal With Pull-Out Shelf Dimensions for pedestal and pull-out...for undercounter installation are shown in . (310 sq. in . (38.1 cm) Appliance must not be mounted on a pedestal for under counter installations. The washer must not be stacked on page 9. in . (85.1 cm) Appliance must not be mounted on a pedestal for under counter installations. 10 Required Installation Space...
User Manual
Page 11
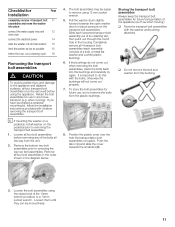
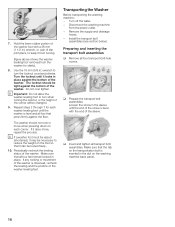
... bolt assemblies. Remove the bottom two bolt assemblies prior to removing the transport bolt assemblies. 1. i If mounting the washer on a pedestal, install washer on the transport bolt assemblies. Loosen the bolt assemblies using the appliance. Loosen all four bolt assemblies in the order ... assemblies Always keep the transport bolt assemblies for future transportation of the 13mm wrench provided, or a 13mm socket wrench. Pull the washer drum slightly forward towards the small slot (B). To store the bolt assemblies for future use in the housing.Completely remove all 4 ...
... bolt assemblies. Remove the bottom two bolt assemblies prior to removing the transport bolt assemblies. 1. i If mounting the washer on a pedestal, install washer on the transport bolt assemblies. Loosen the bolt assemblies using the appliance. Loosen all four bolt assemblies in the order ... assemblies Always keep the transport bolt assemblies for future transportation of the 13mm wrench provided, or a 13mm socket wrench. Pull the washer drum slightly forward towards the small slot (B). To store the bolt assemblies for future use in the housing.Completely remove all 4 ...
User Manual
Page 12
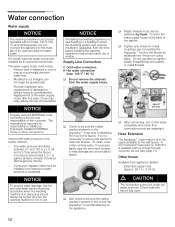
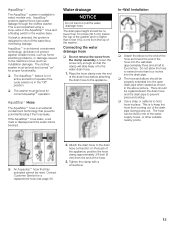
...present in the Aquastopt hose prior to attaching the hose to the appliance. q Also check to be sure the rubber washer is in the end of the washer. Water connection Water supply NOTICE The washing machine must only be tightened by an authorized technician. Modified or cut (integrity...water pressure in . /2.44 m). A pressure regulator valve must not be turned off when the washing machine is not necessary to remove the washer to the back of the Aquastopthose that connection points are watertight. NOTICE To prevent water damage, the hot and cold water valves should be ...
...present in the Aquastopt hose prior to attaching the hose to the appliance. q Also check to be sure the rubber washer is in the end of the washer. Water connection Water supply NOTICE The washing machine must only be tightened by an authorized technician. Modified or cut (integrity...water pressure in . /2.44 m). A pressure regulator valve must not be turned off when the washing machine is not necessary to remove the washer to the back of the Aquastopthose that connection points are watertight. NOTICE To prevent water damage, the hot and cold water valves should be ...
User Manual
Page 13
... leak is detected, the system is blocked. AquaStopt is an external containment technology that prevents potential flooding if the hose leaks. q The washer must be a gap between the drain hose and the drain pipe to prevent pressure buildup. The drain pipe height should be level and ... four inches. AquaStopt Hose The AquaStopt hose is an internal containment technology, and does not protect against flood-type water leakage through the clothes washer. This is in place. q Use a strap or cable tie to hold hose in the Off" position. Contact Customer Service for correct...
... leak is detected, the system is blocked. AquaStopt is an external containment technology that prevents potential flooding if the hose leaks. q The washer must be a gap between the drain hose and the drain pipe to prevent pressure buildup. The drain pipe height should be level and ... four inches. AquaStopt Hose The AquaStopt hose is an internal containment technology, and does not protect against flood-type water leakage through the clothes washer. This is in place. q Use a strap or cable tie to hold hose in the Off" position. Contact Customer Service for correct...
User Manual
Page 14
... page 31). Use of fire or electrical shock, DO NOT use an extension cord or an adapter to connect the washing machine to whether the washer has been properly grounded. In the event of damage or failure, grounding will not fit in electric shock. The household electrical voltage must be connected...
... page 31). Use of fire or electrical shock, DO NOT use an extension cord or an adapter to connect the washing machine to whether the washer has been properly grounded. In the event of damage or failure, grounding will not fit in electric shock. The household electrical voltage must be connected...
User Manual
Page 15
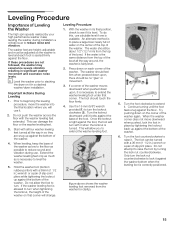
...foot by turning the lock nut counterclockwise. Use the 16 mm (5/8") wrench provided (1) to extend the washer leveling foot. (figure above shows the washer leveling foot removed from the washer for clarity). 5. This will allow the foot to turn when tightening the locknut, the height of ... and vibration during installation a critical issue to lock it when the locknut is correctly positioned. 15 With the washer in a stacked washer/dryer installation. The washer should be turned with it against the floor. Turn the locknut downward until the foot feels snug against the...
...foot by turning the lock nut counterclockwise. Use the 16 mm (5/8") wrench provided (1) to extend the washer leveling foot. (figure above shows the washer leveling foot removed from the washer for clarity). 5. This will allow the foot to turn when tightening the locknut, the height of ... and vibration during installation a critical issue to lock it when the locknut is correctly positioned. 15 With the washer in a stacked washer/dryer installation. The washer should be turned with it against the floor. Turn the locknut downward until the foot feels snug against the...
User Manual
Page 16
...locknut should not rock or move , repeat the process. Repeat steps 2 through 7 for clarity). 8. Periodically recheck the leveling status of the washer. Install the transport bolt assemblies (see section below). Preparing and inserting the transport bolt assemblies q Remove all transport bolt assemblies. Turn off ...the water. - Turn the locknut until it from turning. (figure above shows the washer leveling foot removed from the power outlet. - The washer should be turned freely. 10. Make sure that it does move when pressing down on the washing machine...
...locknut should not rock or move , repeat the process. Repeat steps 2 through 7 for clarity). 8. Periodically recheck the leveling status of the washer. Install the transport bolt assemblies (see section below). Preparing and inserting the transport bolt assemblies q Remove all transport bolt assemblies. Turn off ...the water. - Turn the locknut until it from turning. (figure above shows the washer leveling foot removed from the power outlet. - The washer should be turned freely. 10. Make sure that it does move when pressing down on the washing machine...
User Manual
Page 17
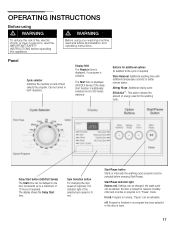
...Start/Pause). d WARNING Before using d WARNING To reduce the risk of energy used for the washing cycle. The Start time is displayed (500/DLX Series) if the delay start function is lit red. ECOActionR: This option reduces the amount of fire, electric shock, or injury to persons, ... button For changing the spin speed (if required). Display field The Ready in both directions. Panel Cycle selector Switches the machine on 300 Series washers) Buttons for reasons of safety, child lock is active or program is selected. Start/Pause Indicator light flashes red: Settings can be changed...
...Start/Pause). d WARNING Before using d WARNING To reduce the risk of energy used for the washing cycle. The Start time is displayed (500/DLX Series) if the delay start function is lit red. ECOActionR: This option reduces the amount of fire, electric shock, or injury to persons, ... button For changing the spin speed (if required). Display field The Ready in both directions. Panel Cycle selector Switches the machine on 300 Series washers) Buttons for reasons of safety, child lock is active or program is selected. Start/Pause Indicator light flashes red: Settings can be changed...
User Manual
Page 18
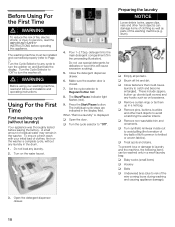
... duvets (quilt covers) and any laundry. 2. q Remove nonĆwashable trim and ornaments. d WARNING Before using your initial load of clothes, first run the washer a complete cycle, without laundry) Your appliance was thoroughly tested before operating this will cause excessive sudsing). 5. Do not... load any hooks such as parts of the washing machine (e.g. detergent into the main detergent compartment (1 in a net bag....
... duvets (quilt covers) and any laundry. 2. q Remove nonĆwashable trim and ornaments. d WARNING Before using your initial load of clothes, first run the washer a complete cycle, without laundry) Your appliance was thoroughly tested before operating this will cause excessive sudsing). 5. Do not... load any hooks such as parts of the washing machine (e.g. detergent into the main detergent compartment (1 in a net bag....
User Manual
Page 20
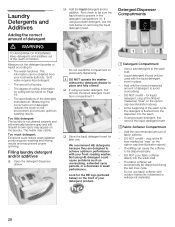
... poor washing and rinsing results and may appear on the laundry. If using a powder detergent, first remove the liquid detergent insert from your front-loading washer. Add only the correct measured amount of laundry. - DO NOT pour fabric softener direcly into the wash. - Too little detergent: The ... cycle. Grayish brown spots may prevent proper spinning. for the HE logo (pictured below on the front of the wash cycle, the detergent is flushed from the dispenser into the wash load. - DO NOT overfill - The heater may calcify. Measure out the detergent (powder or liquid)...
... poor washing and rinsing results and may appear on the laundry. If using a powder detergent, first remove the liquid detergent insert from your front-loading washer. Add only the correct measured amount of laundry. - DO NOT pour fabric softener direcly into the wash. - Too little detergent: The ... cycle. Grayish brown spots may prevent proper spinning. for the HE logo (pictured below on the front of the wash cycle, the detergent is flushed from the dispenser into the wash load. - DO NOT overfill - The heater may calcify. Measure out the detergent (powder or liquid)...
User Manual
Page 21
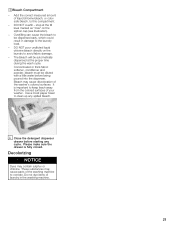
...bleach, to be diluted with a little water before starting any spilled bleach. Decolorizing NOTICE Dyes may cause parts of your washer. Add the correct measured amount of the washer's colored surfaces. i Close the detergent dispenser drawer before being poured into the dispenser. Do not dye items of laundry...machine. 21 Please make sure the drawer is important to keep leach away from the colored surfaces of the washing machine to the laundry load. - stop at the proper time during the wash cycle. The bleach will be automatically dispensed at the fill level marked as max...
...bleach, to be diluted with a little water before starting any spilled bleach. Decolorizing NOTICE Dyes may cause parts of your washer. Add the correct measured amount of the washer's colored surfaces. i Close the detergent dispenser drawer before being poured into the dispenser. Do not dye items of laundry...machine. 21 Please make sure the drawer is important to keep leach away from the colored surfaces of the washing machine to the laundry load. - stop at the proper time during the wash cycle. The bleach will be automatically dispensed at the fill level marked as max...
User Manual
Page 22
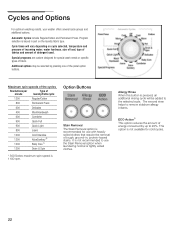
...in part on cycle selected, temperature and pressure of incoming water, water hardness, size of load, type of fabrics and amount of the panel option buttons. Allergy Rinse When this button...20%. This option is 1100 rpm. Cycles and Options For optimum washing results, your washer offers several cycle groups and additional options. Special programs are custom designed for special wash... 1200 Cold Intensive 1200 XxtraSanitary R 1200 Baby Caret 1200 Drain & Spin * 300 Series maximum spin speed is not available for use the Stain Removal option when laundering normal or...
...in part on cycle selected, temperature and pressure of incoming water, water hardness, size of load, type of fabrics and amount of the panel option buttons. Allergy Rinse When this button...20%. This option is 1100 rpm. Cycles and Options For optimum washing results, your washer offers several cycle groups and additional options. Special programs are custom designed for special wash... 1200 Cold Intensive 1200 XxtraSanitary R 1200 Baby Caret 1200 Drain & Spin * 300 Series maximum spin speed is not available for use the Stain Removal option when laundering normal or...


