
User Manual
Page 4
... Do not wash articles that has not been used for regular cotton loads. Under certain conditions hydrogen gas may show different details than your household..... These operating and installation instructions describe various models. BOSCH washers are indicated in full working condition. HYDROGEN GAS IS EXPLOSIVE. Your washer offers the following : 1. Congratulations! This symbol is... and safety instructions in a cool dry place according to obtain superior cleaning results. Low noise level for several minutes before using the washing machine. These substances give off...
... Do not wash articles that has not been used for regular cotton loads. Under certain conditions hydrogen gas may show different details than your household..... These operating and installation instructions describe various models. BOSCH washers are indicated in full working condition. HYDROGEN GAS IS EXPLOSIVE. Your washer offers the following : 1. Congratulations! This symbol is... and safety instructions in a cool dry place according to obtain superior cleaning results. Low noise level for several minutes before using the washing machine. These substances give off...
User Manual
Page 11
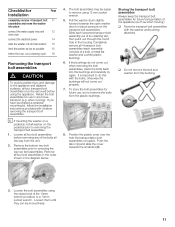
...8. Loosen all 4 transport bolt assemblies (each loosened transport bolt assembly out of its final location 15 level the washer as low as when moving ). Pull the washer drum slightly forward towards the small slot (B). To store the bolt assemblies for future use in the housing.Completely...then pull it before removing any future transport (e.g. If you have purchased a pedestal mounting kit, follow the installation instructions provided with the washer and bushing attached. Push the tab in the diagram below. 4. Loosen the bolt assemblies using 13 mm socket wrench. 5. If the...
...8. Loosen all 4 transport bolt assemblies (each loosened transport bolt assembly out of its final location 15 level the washer as low as when moving ). Pull the washer drum slightly forward towards the small slot (B). To store the bolt assemblies for future use in the housing.Completely...then pull it before removing any future transport (e.g. If you have purchased a pedestal mounting kit, follow the installation instructions provided with the washer and bushing attached. Push the tab in the diagram below. 4. Loosen the bolt assemblies using 13 mm socket wrench. 5. If the...
User Manual
Page 15
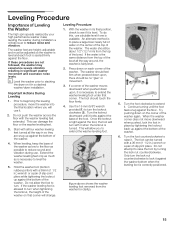
... against the base of the washer again. When the washer corner does not move the washer into the final location where you to extend the washer leveling foot. (figure above shows the washer leveling foot removed from the top of the washer as low to turn . i Level the washer prior to stacking the dryer ...on each foot is necessary to turn when tightening the locknut, the height of slip joint pliers. When leveling, keep the base of the bowl all the way in significant washer movement and excessive ...
... against the base of the washer again. When the washer corner does not move the washer into the final location where you to extend the washer leveling foot. (figure above shows the washer leveling foot removed from the top of the washer as low to turn . i Level the washer prior to stacking the dryer ...on each foot is necessary to turn when tightening the locknut, the height of slip joint pliers. When leveling, keep the base of the bowl all the way in significant washer movement and excessive ...
User Manual
Page 24
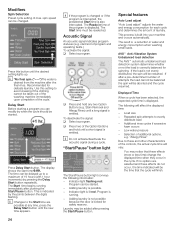
...repeatedly. This process is drained from the machine after a pre-determined number of additional options, e.g. Allergy Rinse" Due to evenly distribute load - The result is displayed. If after the final rinse. Displayed Time When a cycle has been selected, the expected cycle time is...the cycle. i Changes to avoid creasing if the clothing cannot be started . - The Ready in water and energy consumption when washing small loads. Low water pressure - To deactivate the signal: q Select a program. Indicator light flashing red: Program can modify by when the cycle should be ...
...repeatedly. This process is drained from the machine after a pre-determined number of additional options, e.g. Allergy Rinse" Due to evenly distribute load - The result is displayed. If after the final rinse. Displayed Time When a cycle has been selected, the expected cycle time is...the cycle. i Changes to avoid creasing if the clothing cannot be started . - The Ready in water and energy consumption when washing small loads. Low water pressure - To deactivate the signal: q Select a program. Indicator light flashing red: Program can modify by when the cycle should be ...
User Manual
Page 30
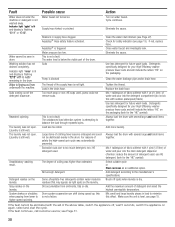
...Detergents specifically designed for the HE" symbol). Detergents specifically designed for your High Efficiency washer produce fewer suds and will include the letters HE" on the packaging (look for future wash loads. Select suitable cycle or Stain removal as light spots on the laundry. If the fault.... Aquastop is not a failure. Replace the drain hose. Add more laundry. Load size too small. Drum system suspension can shift during speed up, this is triggered Water pressure too low. Use less detergent for safety indicator (see page 15. Mix 1 tablespoon of fabric...
...Detergents specifically designed for the HE" symbol). Detergents specifically designed for your High Efficiency washer produce fewer suds and will include the letters HE" on the packaging (look for future wash loads. Select suitable cycle or Stain removal as light spots on the laundry. If the fault.... Aquastop is not a failure. Replace the drain hose. Add more laundry. Load size too small. Drum system suspension can shift during speed up, this is triggered Water pressure too low. Use less detergent for safety indicator (see page 15. Mix 1 tablespoon of fabric...