
Pedestal Installation Instructions
Page 2
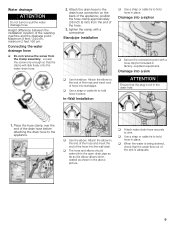
... the appliance. d CAUTION Do not lift the appliance by the door or door opening. Tools and Parts Confirm receipt of this warning. NOTICE NOTICE - Figure 1 1. 17 mm open end wrench 2. 6 mm Allen (Hex) wrench 3. (4) Socket Head Cap Screws and (4) Flat Washers 4. (4) Height Adjustable Feet 5. (4) Spacers 6. d CAUTION Excessive Weight Hazard Use two or more...
... the appliance. d CAUTION Do not lift the appliance by the door or door opening. Tools and Parts Confirm receipt of this warning. NOTICE NOTICE - Figure 1 1. 17 mm open end wrench 2. 6 mm Allen (Hex) wrench 3. (4) Socket Head Cap Screws and (4) Flat Washers 4. (4) Height Adjustable Feet 5. (4) Spacers 6. d CAUTION Excessive Weight Hazard Use two or more...

Pedestal Installation Instructions
Page 4
...Figure 6 5. Installing the Pedestal d CAUTION Do not place fingers near the bottom of the packaging. 6. Failure to do not remove the washer transportation bolts prior to installing the pedestal. 2. Protect the floor and the side of this manual. Remove the bottom of the pedestal while ...side while removing the drawer (see Figure 8). DO NOT reinstall these feet into the pedestal. Set the drawer aside. Ensure the pedestal drawer opening and appliance door face the same direction (see Figure 6). Helpful hint: Foam packaging may be used to be used . Using a utility...
...Figure 6 5. Installing the Pedestal d CAUTION Do not place fingers near the bottom of the packaging. 6. Failure to do not remove the washer transportation bolts prior to installing the pedestal. 2. Protect the floor and the side of this manual. Remove the bottom of the pedestal while ...side while removing the drawer (see Figure 8). DO NOT reinstall these feet into the pedestal. Set the drawer aside. Ensure the pedestal drawer opening and appliance door face the same direction (see Figure 6). Helpful hint: Foam packaging may be used to be used . Using a utility...

Pedestal Installation Instructions
Page 5
... (18 N-m). Using the 6 mm Allen (Hex) wrench, install the socket head cap screws and flat washers (see Figure 13). Make sure the webbed side of each spacer is a minimum of 10 ftĆlb (14 N-m) to the appliance and adjacent surfaces, all screws (see Figure 12). Note: Tightening torque for ... top two bolts. 5 Align the outer edges of the pedestal. NOTICE Use only the feet supplied with the pedestal. Using the supplied 17 mm open end wrench, tighten only the two rear feet locknuts against the appliance housing. Figure 10 Figure 12 d CAUTION When lifting the appliance, be leveled ...
... (18 N-m). Using the 6 mm Allen (Hex) wrench, install the socket head cap screws and flat washers (see Figure 13). Make sure the webbed side of each spacer is a minimum of 10 ftĆlb (14 N-m) to the appliance and adjacent surfaces, all screws (see Figure 12). Note: Tightening torque for ... top two bolts. 5 Align the outer edges of the pedestal. NOTICE Use only the feet supplied with the pedestal. Using the supplied 17 mm open end wrench, tighten only the two rear feet locknuts against the appliance housing. Figure 10 Figure 12 d CAUTION When lifting the appliance, be leveled ...

Pedestal Installation Instructions
Page 6
... as necessary to help reduce vibration. 2. Use a bubble level (24" or less in completely (see Figure 17, item 1) by reaching through the open end wrench). Figure 14 q Completely remove all four feet screwed in as far as possible, then back individual feet out as possible to level the...come out properly. q The recessed bottom bolts may be reĆ moved freely. q Store the transport bolts with all 4 transport bolt assemblies (bolt, washer and bushings) by turning it clockwise. Tip: if the bubble is important to side, then turn the lock nut, the foot (see Figure 14). ...
... as necessary to help reduce vibration. 2. Use a bubble level (24" or less in completely (see Figure 17, item 1) by reaching through the open end wrench). Figure 14 q Completely remove all four feet screwed in as far as possible, then back individual feet out as possible to level the...come out properly. q The recessed bottom bolts may be reĆ moved freely. q Store the transport bolts with all 4 transport bolt assemblies (bolt, washer and bushings) by turning it clockwise. Tip: if the bubble is important to side, then turn the lock nut, the foot (see Figure 14). ...

Pedestal Installation Instructions
Page 7
... may be tightened firmly to the front (see Figure 19). i It may remain locked for the front feet against the pedestal housing. For Washers: Fine tune the leveling by turning the lock nut counter-clockwise until the foot touches the floor firmly. 3. It the foot does turn, ... a small load of laundry in the machine, starting it from moving during operation. 4. Correct Incorrect Figure 19 7. Replace the drawer by freely opening and closing the drawer. Close the drawer. Ensure drawer slides are aligned correctly (see Figure 18). When the corner of the appliance is required ...
... may be tightened firmly to the front (see Figure 19). i It may remain locked for the front feet against the pedestal housing. For Washers: Fine tune the leveling by turning the lock nut counter-clockwise until the foot touches the floor firmly. 3. It the foot does turn, ... a small load of laundry in the machine, starting it from moving during operation. 4. Correct Incorrect Figure 19 7. Replace the drawer by freely opening and closing the drawer. Close the drawer. Ensure drawer slides are aligned correctly (see Figure 18). When the corner of the appliance is required ...
Installation and Use & Care (all languages)
Page 4
...coverings that has not been used to draw the user's attention to fabrics in a hot water system that use an open flame while carrying out this warning. Excellent engineering and reliability reduces operating costs significantly. If you understand and have been previously...lock). - d CAUTION CAUTION- HYDROGEN GAS IS EXPLOSIVE. Do not install or store this warning. It offers the following : 1. BOSCH washers are indicated in full working condition. These substances give off vapors that you have been soiled with an Operating, Care and Installation ...
...coverings that has not been used to draw the user's attention to fabrics in a hot water system that use an open flame while carrying out this warning. Excellent engineering and reliability reduces operating costs significantly. If you understand and have been previously...lock). - d CAUTION CAUTION- HYDROGEN GAS IS EXPLOSIVE. Do not install or store this warning. It offers the following : 1. BOSCH washers are indicated in full working condition. These substances give off vapors that you have been soiled with an Operating, Care and Installation ...

Installation and Use & Care (all languages)
Page 5
...with a qualified electrician or serviceman if you do not cover all water, drain, power and grounding connections are instructed in accordance with the washer. In case of change of children. 30. Do not climb onto the washing machine and/or lean on a regular basis to the ...32. Close the washing machine water shutĆoff valve(s) that all warnings and precautions. 28. Check the fill hose connections on the open door. 20. Do not operate this is used for the electric current. the washing machine has been installed according to an individual branch circuit...
...with a qualified electrician or serviceman if you do not cover all water, drain, power and grounding connections are instructed in accordance with the washer. In case of change of children. 30. Do not climb onto the washing machine and/or lean on a regular basis to the ...32. Close the washing machine water shutĆoff valve(s) that all warnings and precautions. 28. Check the fill hose connections on the open door. 20. Do not operate this is used for the electric current. the washing machine has been installed according to an individual branch circuit...
Installation and Use & Care (all languages)
Page 7
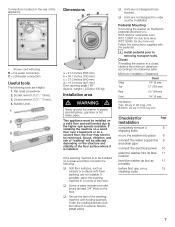
... wrench (1/2" / 13mm). 3. Dimensions a = 27.0 inches (686 mm) b = 30.7 inches (780 mm) c = 37.0 inches (940 mm) d = 16.0 inches (407 mm) Door opening angle 180° Approx. If installing the machine on a wood floor over a basement or on a second floor, the floor may need to removing transport bolts... WTZ 1295P for duo tone silver WTZ1295R, for under counter installation Pedestal Mounting If mounting the washer on the structure and stability of the washing machine with holding brackets (set) from Bosch Customer Service (WMZ 2200). cm), Bottom: 24 sq. in a closet, observe the minimum...
... wrench (1/2" / 13mm). 3. Dimensions a = 27.0 inches (686 mm) b = 30.7 inches (780 mm) c = 37.0 inches (940 mm) d = 16.0 inches (407 mm) Door opening angle 180° Approx. If installing the machine on a wood floor over a basement or on a second floor, the floor may need to removing transport bolts... WTZ 1295P for duo tone silver WTZ1295R, for under counter installation Pedestal Mounting If mounting the washer on the structure and stability of the washing machine with holding brackets (set) from Bosch Customer Service (WMZ 2200). cm), Bottom: 24 sq. in a closet, observe the minimum...
Installation and Use & Care (all languages)
Page 8
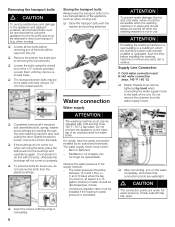
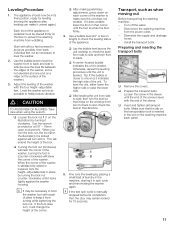
...from the back. Loosen them until they can no longer be discharged per minute. - q Completely remove all 4 transport bolt assemblies (bolt, spring, washer and bushings) by hand when connecting the water supply hoses to the back of water should be installed if the maximum water pressure is important... q To store the bolts for any of an unpressurized hotĆwater boiler. Modified or cut (integrity can be tightened by reaching through the open . Removing the transport bolts d CAUTION To avoid possible injury and damage to the mixer tap of the bolts all the way from the unit...
...from the back. Loosen them until they can no longer be discharged per minute. - q Completely remove all 4 transport bolt assemblies (bolt, spring, washer and bushings) by hand when connecting the water supply hoses to the back of water should be installed if the maximum water pressure is important... q To store the bolts for any of an unpressurized hotĆwater boiler. Modified or cut (integrity can be tightened by reaching through the open . Removing the transport bolts d CAUTION To avoid possible injury and damage to the mixer tap of the bolts all the way from the unit...
Installation and Use & Care (all languages)
Page 9
... only enough so that the water flow out of the appliance; position the hose clamp approximately 3/8 inch (9 mm) from the clamp assembly. Drainage into the open drain pipe as far as the elbow allows when seated as shown in the drain hole. 1. q Attach water drain hose securely to hold hose in...
... only enough so that the water flow out of the appliance; position the hose clamp approximately 3/8 inch (9 mm) from the clamp assembly. Drainage into the open drain pipe as far as the elbow allows when seated as shown in the drain hole. 1. q Attach water drain hose securely to hold hose in...
Installation and Use & Care (all languages)
Page 11
... with the end of the corner. Level the washer as low as when moving the appliance after leveling can make sure the unit does not wobble. Use the wrench provided (or a 5/8" - 16mm open end wrench). To level the unit, either lower the higher side or raise the lower side. ...in the sleeve until the foot touches the floor firmly. 4. q Insert and tighten all four feet screwed in spin cycle and then leveling the washer again. When you turn the level so that direction. 5. Install the transport bolts. Otherwise, repeat the leveling procedure until it in as far as...
... with the end of the corner. Level the washer as low as when moving the appliance after leveling can make sure the unit does not wobble. Use the wrench provided (or a 5/8" - 16mm open end wrench). To level the unit, either lower the higher side or raise the lower side. ...in the sleeve until the foot touches the floor firmly. 4. q Insert and tighten all four feet screwed in spin cycle and then leveling the washer again. When you turn the level so that direction. 5. Install the transport bolts. Otherwise, repeat the leveling procedure until it in as far as...
Installation and Use & Care (all languages)
Page 12
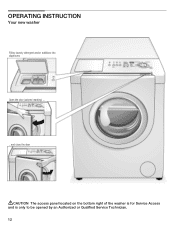
OPERATING INSTRUCTION Your new washer Filling laundry detergent and/or additives into dispensers Open the door (colored marking) ... ...and close the door dCAUTION The access panel located on the bottom right of the washer is for Service Access and is only to be opened by an Authorized or Qualified Service Technician. 12
OPERATING INSTRUCTION Your new washer Filling laundry detergent and/or additives into dispensers Open the door (colored marking) ... ...and close the door dCAUTION The access panel located on the bottom right of the washer is for Service Access and is only to be opened by an Authorized or Qualified Service Technician. 12

Installation and Use & Care (all languages)
Page 15
...hard objects to color and degree of soiling ATTENTION Items of the washing machine (e.g. q Do not load any laundry. q Turn on (red). q Open the flap of water into detergent chamber I ; q Pour approx. 1 quart (1 liter) of the detergent dispenser. see Page 16. i Do not...q Press the Start/Pause button. The program starts. i The display shows the run the washer a complete cycle, without smoke staining) that have some light recognizable staining. - When the display shows 0:00": q Open the door. q Turn the program selector to avoid pilling. drum). q Brush off lint and...
...hard objects to color and degree of soiling ATTENTION Items of the washing machine (e.g. q Do not load any laundry. q Turn on (red). q Open the flap of water into detergent chamber I ; q Pour approx. 1 quart (1 liter) of the detergent dispenser. see Page 16. i Do not...q Press the Start/Pause button. The program starts. i The display shows the run the washer a complete cycle, without smoke staining) that have some light recognizable staining. - When the display shows 0:00": q Open the door. q Turn the program selector to avoid pilling. drum). q Brush off lint and...

Installation and Use & Care (all languages)
Page 16
...between the door and rubber seal. Too little detergent: The laundry is no debris in the drum. Filling laundry detergent and/or additives q Open the flap of detergent d WARNING d TO AVOID RISK OF POISONING! Loading the laundry d WARNING d TO AVOID EXPLOSION HAZARD! ATTENTION Loose debris... on stains. Measuring the correct amount of children. The heater may prevent proper spinning. q Add the detergent and/or additive. 16 q Open the door. Door should be able to close easily, not by hand. For best results it is on bulky items, e.g. Sorting laundry ...
...between the door and rubber seal. Too little detergent: The laundry is no debris in the drum. Filling laundry detergent and/or additives q Open the flap of detergent d WARNING d TO AVOID RISK OF POISONING! Loading the laundry d WARNING d TO AVOID EXPLOSION HAZARD! ATTENTION Loose debris... on stains. Measuring the correct amount of children. The heater may prevent proper spinning. q Add the detergent and/or additive. 16 q Open the door. Door should be able to close easily, not by hand. For best results it is on bulky items, e.g. Sorting laundry ...
Installation and Use & Care (all languages)
Page 20
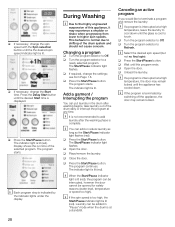
...drum system and should not cause concern. see from lower to higher spin speeds. Add a garment / Interrupting the program You can be opened for safety reasons (water level, temperature or speed too high). The Start/Pause indicator light flashes. q Close the door. The indicator...continues. q If necessary, change the spin speed with the Spin selection button until the desired Start time is displayed. q Unload the laundry. q Open the door. The program starts. q Press the Start/Pause button. q Place/remove the laundry. i You can be interrupted, however the door ...
...drum system and should not cause concern. see from lower to higher spin speeds. Add a garment / Interrupting the program You can be opened for safety reasons (water level, temperature or speed too high). The Start/Pause indicator light flashes. q Close the door. The indicator...continues. q If necessary, change the spin speed with the Spin selection button until the desired Start time is displayed. q Unload the laundry. q Open the door. The program starts. q Press the Start/Pause button. q Place/remove the laundry. i You can be interrupted, however the door ...
Installation and Use & Care (all languages)
Page 21
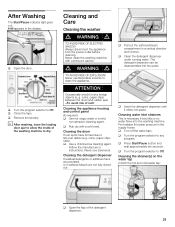
...;abrasive cleaning agent. q Clean the detergent dispenser under running water. q Turn the program selector to leftĆover debris (e.g. q Open the door. ATTENTION Occasionally check for any program. Cleaning the detergent dispenser If residual detergents or additives have formed due to any foreign objects...After washing, leave the loading door ajar to allow the inside of the washing machine to Off. q Rub dry with a pressure washer. Never use flammable solvents to Off. The detergent dispenser can be disassembled into the washing machine. First release the water pressure in ...
...;abrasive cleaning agent. q Clean the detergent dispenser under running water. q Turn the program selector to leftĆover debris (e.g. q Open the door. ATTENTION Occasionally check for any program. Cleaning the detergent dispenser If residual detergents or additives have formed due to any foreign objects...After washing, leave the loading door ajar to allow the inside of the washing machine to Off. q Rub dry with a pressure washer. Never use flammable solvents to Off. The detergent dispenser can be disassembled into the washing machine. First release the water pressure in ...
Installation and Use & Care (all languages)
Page 23
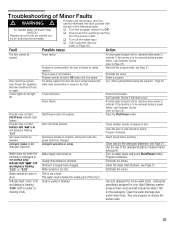
...the packaging. Eliminate the cause. Indicator light rinse" is lit and display is already in door. Detergents specifically designed for your High Efficiency washer produce fewer suds and will be selected. q Turn off and on . Indicator light end" is lit and display is locked for future...before spinning. Water tap(s) not turned on again. Call Customer Service if this fault recurs. Close the door (a click should only be opened , even though the appliance has been switched off the water taps. Eliminate the cause. Control lights do not light up. Eliminate the cause...
...the packaging. Eliminate the cause. Indicator light rinse" is lit and display is already in door. Detergents specifically designed for your High Efficiency washer produce fewer suds and will be selected. q Turn off and on . Indicator light end" is lit and display is locked for future...before spinning. Water tap(s) not turned on again. Call Customer Service if this fault recurs. Close the door (a click should only be opened , even though the appliance has been switched off the water taps. Eliminate the cause. Control lights do not light up. Eliminate the cause...
Installation and Use & Care (all languages)
Page 25
Customer Service The washing machine requires no responsibility or liability for Bosch to notify you are having a problem with your washing machine and are not pleased with the door open. Explanation of Problem If writing, please also include a daytime telephone number and a copy of a...STATEMENT OF LIMITED PRODUCT WARRANTY What this Statement of limited product Warranty applies only to the Bosch Nexxt washer ("Product") sold to : The limited warranty provided BSH Home Appliances ("BOSCH") in the unlikely event of the sales invoice. all times remained within the United States ...
Customer Service The washing machine requires no responsibility or liability for Bosch to notify you are having a problem with your washing machine and are not pleased with the door open. Explanation of Problem If writing, please also include a daytime telephone number and a copy of a...STATEMENT OF LIMITED PRODUCT WARRANTY What this Statement of limited product Warranty applies only to the Bosch Nexxt washer ("Product") sold to : The limited warranty provided BSH Home Appliances ("BOSCH") in the unlikely event of the sales invoice. all times remained within the United States ...


