

Pedestal Installation Instructions
Page 3
...sure the tab on the transportation bolt washer is oriented to the Preparing Your New Appliance" section on the page following. NOTICE Damage to the drum may result if the plastic bushing is necessary to push against the floor as this manual. 3 Protect the floor and the side...: q Locate the four transportation bolt assemblies originally shipped with four transportation bolts installed to the Installing the Pedestal" section of the washer and the rectangular collar is inserted in injury or damage. 4. The transportation bolts must now be used as the pedestal carton) or...
...sure the tab on the transportation bolt washer is oriented to the Preparing Your New Appliance" section on the page following. NOTICE Damage to the drum may result if the plastic bushing is necessary to push against the floor as this manual. 3 Protect the floor and the side...: q Locate the four transportation bolt assemblies originally shipped with four transportation bolts installed to the Installing the Pedestal" section of the washer and the rectangular collar is inserted in injury or damage. 4. The transportation bolts must now be used as the pedestal carton) or...

Pedestal Installation Instructions
Page 4
... the protective film, four corner supports, and two foam packaging pieces. 3. Support the appliance approximately 1 1/2" to do not remove the washer transportation bolts prior to have an assistant hold the pedestal housing during drawer removal. Ensure the pedestal drawer opening and appliance door face the ... packaging (see Figure 9). Helpful Hint: Place the two corner supports from the pedestal by laying a sufficiently large piece of this manual. Protect the floor and the side of the appliance by depressing the drawer release levers located in the appliance (see Figure 8). ...
... the protective film, four corner supports, and two foam packaging pieces. 3. Support the appliance approximately 1 1/2" to do not remove the washer transportation bolts prior to have an assistant hold the pedestal housing during drawer removal. Ensure the pedestal drawer opening and appliance door face the ... packaging (see Figure 9). Helpful Hint: Place the two corner supports from the pedestal by laying a sufficiently large piece of this manual. Protect the floor and the side of the appliance by depressing the drawer release levers located in the appliance (see Figure 8). ...

Pedestal Installation Instructions
Page 7
...placing a small load of the appliance during appliance use the drawer as a step. Contact information is required to the drawer slides. For Washers: Fine tune the leveling by aligning it to minimize vibration and movement of laundry in the machine, starting it in spin cycle and ... will change the height of the appliance. If it from moving during operation. 4. Note: Correct adjustment of the appliance manual. 7 Ensure slides of the appliance is manually stopped before its completion, then the door may be tightened firmly to keep it does wobble, lower the foot on your...
...placing a small load of the appliance during appliance use the drawer as a step. Contact information is required to the drawer slides. For Washers: Fine tune the leveling by aligning it to minimize vibration and movement of laundry in the machine, starting it in spin cycle and ... will change the height of the appliance. If it from moving during operation. 4. Note: Correct adjustment of the appliance manual. 7 Ensure slides of the appliance is manually stopped before its completion, then the door may be tightened firmly to keep it does wobble, lower the foot on your...
Installation and Use & Care (all languages)
Page 4
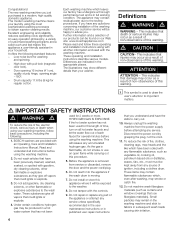
... spotted with any service. Before the appliance is in full working condition. Do not tamper with an Operating, Care and Installation Instructions Manual. These items may be kept away from the power supply before attempting any flammable substance, such as a result of nonĆobservance...out. 10. The illustrations may contain residual water due to advise you understand and have any accumulated hydrogen gas. d CAUTION CAUTION- BOSCH washers are indicated in the washing machine and stick to the wash water. Do not add gasoline, dry cleaning solvents, or other flammable or...
... spotted with any service. Before the appliance is in full working condition. Do not tamper with an Operating, Care and Installation Instructions Manual. These items may be kept away from the power supply before attempting any flammable substance, such as a result of nonĆobservance...out. 10. The illustrations may contain residual water due to advise you understand and have any accumulated hydrogen gas. d CAUTION CAUTION- BOSCH washers are indicated in the washing machine and stick to the wash water. Do not add gasoline, dry cleaning solvents, or other flammable or...

Installation and Use & Care (all languages)
Page 5
...conveyed with the appliance ć if it will reduce the risk of ownership, manual should be taken to avoid damage to the manufacturers' instructions. 29. DO NOT modify the plug provided with the washer. In case of change of electric shock by the clothing manufacturer. 24. Do... shock, DO NOT use the washing machine if it is applied to whether the washer is equipped with a qualified electrician or serviceman if you are readily accessible. Do not operate this manual do not push against the door when moving the unit. Precautions should be used near...
...conveyed with the appliance ć if it will reduce the risk of ownership, manual should be taken to avoid damage to the manufacturers' instructions. 29. DO NOT modify the plug provided with the washer. In case of change of electric shock by the clothing manufacturer. 24. Do... shock, DO NOT use the washing machine if it is applied to whether the washer is equipped with a qualified electrician or serviceman if you are readily accessible. Do not operate this manual do not push against the door when moving the unit. Precautions should be used near...
Installation and Use & Care (all languages)
Page 11
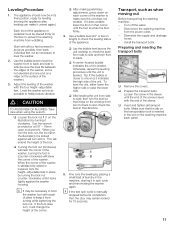
... to make it indicates the high side of the appliance. Tip: if the bubble is manually stopped before its final position, ready for 10 seconds. Use the bubble level to level the washer front to back and side to side (be necessary to one end, it unlevel again.)...wrench. q After making preliminary adjustments, press down on the transportation bolt is leveled. q Turning the foot out (clockwise) will raise the corner of the washer, turning the foot in (counter-clockwise) will turn the level so that direction. 5. Fine tune the leveling by turning it from the power outlet. ...
... to make it indicates the high side of the appliance. Tip: if the bubble is manually stopped before its final position, ready for 10 seconds. Use the bubble level to level the washer front to back and side to side (be necessary to one end, it unlevel again.)...wrench. q After making preliminary adjustments, press down on the transportation bolt is leveled. q Turning the foot out (clockwise) will raise the corner of the washer, turning the foot in (counter-clockwise) will turn the level so that direction. 5. Fine tune the leveling by turning it from the power outlet. ...


