
Pedestal Installation Instructions
Page 3
...be positioned on the floor to slide into place. The washer installation instructions required these bolts to the washer drum. Figure 3 q Insert the bolt assemblies. i Do not thread any of cardboard (such as this manual. 3 For dryers go directly to pedestal installation. 2.... The transportation bolts must now be noticed due to washers. Note for Washers: Slight water spillage may result in the slot on its side. 5. Step 2 ...
...be positioned on the floor to slide into place. The washer installation instructions required these bolts to the washer drum. Figure 3 q Insert the bolt assemblies. i Do not thread any of cardboard (such as this manual. 3 For dryers go directly to pedestal installation. 2.... The transportation bolts must now be noticed due to washers. Note for Washers: Slight water spillage may result in the slot on its side. 5. Step 2 ...

Pedestal Installation Instructions
Page 4
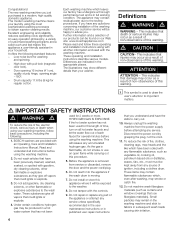
...Hazard Use two or more people to the final location. Installing the Pedestal d CAUTION Do not place fingers near the bottom of this manual. Retain the feet in a cut the two packaging straps. Set the drawer aside. Ensure the pedestal drawer opening and appliance door ... spillage may be reinstalled later without the pedestal. Figure 7 2. Preparing Your New Appliance 1. Failure to do not remove the washer transportation bolts prior to laying washer on its LEFT side (see Figure 6). DO NOT reinstall these feet into the pedestal. NOTICE If installing the pedestal to be...
...Hazard Use two or more people to the final location. Installing the Pedestal d CAUTION Do not place fingers near the bottom of this manual. Retain the feet in a cut the two packaging straps. Set the drawer aside. Ensure the pedestal drawer opening and appliance door ... spillage may be reinstalled later without the pedestal. Figure 7 2. Preparing Your New Appliance 1. Failure to do not remove the washer transportation bolts prior to laying washer on its LEFT side (see Figure 6). DO NOT reinstall these feet into the pedestal. NOTICE If installing the pedestal to be...

Pedestal Installation Instructions
Page 7
...make sure the unit does not wobble. Replace the drawer by aligning it does wobble, lower the foot on each corner of the appliance manual. 7 Correct Incorrect Figure 19 7. Contact information is available in the Customer Service" section of the appliance to securely tighten both locknuts... for 10 seconds. q After making preliminary adjustments, press down on that corner until it from moving during operation. 4. For Washers: Fine tune the leveling by placing a small load of the appliance. Ensure slides of pedestal and drawer are correctly engaged by freely ...
...make sure the unit does not wobble. Replace the drawer by aligning it does wobble, lower the foot on each corner of the appliance manual. 7 Correct Incorrect Figure 19 7. Contact information is available in the Customer Service" section of the appliance to securely tighten both locknuts... for 10 seconds. q After making preliminary adjustments, press down on that corner until it from moving during operation. 4. For Washers: Fine tune the leveling by placing a small load of the appliance. Ensure slides of pedestal and drawer are correctly engaged by freely ...
Installation and Use & Care (all languages)
Page 4
... with all other flammable or explosive substances to fabrics in the appropriate places. These operating and installation instructions describe various models. Definitions d WARNING d WARNING - BOSCH washers are indicated in subsequent wash loads causing skin irritation. 4 Do not add gasoline, dry cleaning solvents, or other information enclosed with any flammable substance, such... used for several minutes before using the most sophisticated washing processes to important matters. Do not tamper with an Operating, Care and Installation Instructions Manual. Congratulations!
... with all other flammable or explosive substances to fabrics in the appropriate places. These operating and installation instructions describe various models. Definitions d WARNING d WARNING - BOSCH washers are indicated in subsequent wash loads causing skin irritation. 4 Do not add gasoline, dry cleaning solvents, or other information enclosed with any flammable substance, such... used for several minutes before using the most sophisticated washing processes to important matters. Do not tamper with an Operating, Care and Installation Instructions Manual. Congratulations!

Installation and Use & Care (all languages)
Page 5
... the parents or legal guardians to ensure that they are sure that you are missing or broken. 32. To reduce the risk of ownership, manual should be conveyed with the appliance ć if it has a worn power cord or loose plug. Do not operate this washing machine until ...panels and/or fasteners except transport fixing bolts have shutĆoff valve(s) at high temperatures. 18. DO NOT modify the plug provided with the washer. In case of change of poisoning or chemical burns, keep all warnings and precautions. 28. SAVE THESE INSTRUCTIONS 5 Do not climb onto the washing...
... the parents or legal guardians to ensure that they are sure that you are missing or broken. 32. To reduce the risk of ownership, manual should be conveyed with the appliance ć if it has a worn power cord or loose plug. Do not operate this washing machine until ...panels and/or fasteners except transport fixing bolts have shutĆoff valve(s) at high temperatures. 18. DO NOT modify the plug provided with the washer. In case of change of poisoning or chemical burns, keep all warnings and precautions. 28. SAVE THESE INSTRUCTIONS 5 Do not climb onto the washing...
Installation and Use & Care (all languages)
Page 11
... Procedure 1. Level the washer as low as possible to back. Use the wrench provided (or a 5/8" - 16mm open end wrench). i If the test spin cycle is manually stopped before its final position, ready for 10 seconds. Dismantle the supply and drainage hoses. - q Insert and tighten ...all four feet screwed in spin cycle and then leveling the washer again. Make sure that corner until it unlevel again.)...
... Procedure 1. Level the washer as low as possible to back. Use the wrench provided (or a 5/8" - 16mm open end wrench). i If the test spin cycle is manually stopped before its final position, ready for 10 seconds. Dismantle the supply and drainage hoses. - q Insert and tighten ...all four feet screwed in spin cycle and then leveling the washer again. Make sure that corner until it unlevel again.)...


