
Pedestal Installation Instructions
Page 6
...sure the level fits between the edges of the 17mm wrench provided. Follow the Installation Instructions that came with all 4 transport bolt assemblies (bolt, washer and bushings) by turning it indicates the high side of the appliance or pedĆ estal must be reĆ moved freely. Storing the ... of the appliance.) q Lay the bubble level across the unit worktop to check the level from side to side and from the back (see Figure 15). q A center-located bubble indicates the unit is leveled. Use the wrench provided (or a 5/8" - 16mm open washing machine door and pulling the drum ...
...sure the level fits between the edges of the 17mm wrench provided. Follow the Installation Instructions that came with all 4 transport bolt assemblies (bolt, washer and bushings) by turning it indicates the high side of the appliance or pedĆ estal must be reĆ moved freely. Storing the ... of the appliance.) q Lay the bubble level across the unit worktop to check the level from side to side and from the back (see Figure 15). q A center-located bubble indicates the unit is leveled. Use the wrench provided (or a 5/8" - 16mm open washing machine door and pulling the drum ...
Installation and Use & Care (all languages)
Page 3
... OPERATING INSTRUCTION 12 Your new washer 12 Panel 13 Summary of Instructions 14 Before Using For the First Time 15 Using For the First Time 15 First washing cycle (without laundry 15 Preparing the laundry 15 Sorting the laundry 15 Degrees of soiling 15 Loading the laundry 16 Laundry ...20 Add a garment / Interrupting the program 20 Canceling active program 20 After Washing 21 Cleaning and Care 21 Cleaning the washer 21 Descaling the washing machine 22 Troubleshooting of Minor Faults 23 Customer Service 25 STATEMENT OF LIMITED PRODUCT WARRANTY 25 STATEMENT OF WARRANTIES...
... OPERATING INSTRUCTION 12 Your new washer 12 Panel 13 Summary of Instructions 14 Before Using For the First Time 15 Using For the First Time 15 First washing cycle (without laundry 15 Preparing the laundry 15 Sorting the laundry 15 Degrees of soiling 15 Loading the laundry 16 Laundry ...20 Add a garment / Interrupting the program 20 Canceling active program 20 After Washing 21 Cleaning and Care 21 Cleaning the washer 21 Descaling the washing machine 22 Troubleshooting of Minor Faults 23 Customer Service 25 STATEMENT OF LIMITED PRODUCT WARRANTY 25 STATEMENT OF WARRANTIES...

Installation and Use & Care (all languages)
Page 5
...on or with a cord that has an equipmentĆgrounding conductor and a grounding plug. The washing machine must be used near children. 15. Do not use an extension cord or an adapter to connect the washing machine to the manufacturer`s instructions may occur. If this is ... INSTRUCTIONS FOR FUTURE REFERENCE. d WARNING d Improper connection of the washing machine. 21. Do not insert/pull out the power plug with the washer. Use caution when draining hot water. 19. the washing machine has been installed according to an individual branch circuit. Removing any guards, panels and...
...on or with a cord that has an equipmentĆgrounding conductor and a grounding plug. The washing machine must be used near children. 15. Do not use an extension cord or an adapter to connect the washing machine to the manufacturer`s instructions may occur. If this is ... INSTRUCTIONS FOR FUTURE REFERENCE. d WARNING d Improper connection of the washing machine. 21. Do not insert/pull out the power plug with the washer. Use caution when draining hot water. 19. the washing machine has been installed according to an individual branch circuit. Removing any guards, panels and...
Installation and Use & Care (all languages)
Page 7
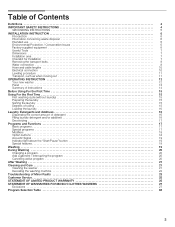
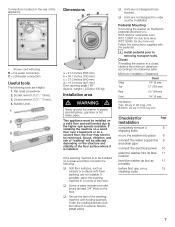
...consider the following: q Soft floor surfaces, such as 11 possible before first use, run a 15 cleaning cycle 7 cm) Checklist for Page Installation completely remove 4 8 shipping bolts move the washer into place 8 connect the water supply line 8 and drain pipe connect the electrical power 10 ...slide the washer into its final 11 location level the washer as low as carpets or surfaces with holding brackets (set) from Bosch Customer Service (WMZ 2200). Flat head screwdriver. 2. If installing the machine on ...
...consider the following: q Soft floor surfaces, such as 11 possible before first use, run a 15 cleaning cycle 7 cm) Checklist for Page Installation completely remove 4 8 shipping bolts move the washer into place 8 connect the water supply line 8 and drain pipe connect the electrical power 10 ...slide the washer into its final 11 location level the washer as low as carpets or surfaces with holding brackets (set) from Bosch Customer Service (WMZ 2200). Flat head screwdriver. 2. If installing the machine on ...
Installation and Use & Care (all languages)
Page 10
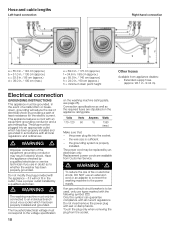
... Other hoses Available from the socket. 10 The plug must only be connected to the power supply. Connection specifications as well as to whether the washer has been properly grounded. d WARNING d To reduce the risk of least resistance for the electric current. Do not insert/remove the power plug ...to be replaced by providing a path of fire or electrical shock, DO NOT use types marked with the appliance - Volts 110-120 Hertz 60 Amperes 15 Watts 1350 (max.) Make sure that: - Do not modify the plug provided with the following symbol: 7. if it will reduce the risk of ...
... Other hoses Available from the socket. 10 The plug must only be connected to the power supply. Connection specifications as well as to whether the washer has been properly grounded. d WARNING d To reduce the risk of least resistance for the electric current. Do not insert/remove the power plug ...to be replaced by providing a path of fire or electrical shock, DO NOT use types marked with the appliance - Volts 110-120 Hertz 60 Amperes 15 Watts 1350 (max.) Make sure that: - Do not modify the plug provided with the following symbol: 7. if it will reduce the risk of ...

Installation and Use & Care (all languages)
Page 15
...Set the program selector to Regular/Cotton Hot. i The display shows the run time of clothing using your initial load of clothes, run the washer a complete cycle, without smoke staining) that the water valves for up to one week. - Tćshirts, shirts and blouses that have... well as overalls or baker's and butcher's coats. Before using the appropriate program. 15 Preparing the laundry ATTENTION Loose debris (coins, paper clips, nails and other hard objects to avoid scratching the washer interior. Soot, soil, sand (pigments), red clay. q Remove nonĆwashable ...
...Set the program selector to Regular/Cotton Hot. i The display shows the run time of clothing using your initial load of clothes, run the washer a complete cycle, without smoke staining) that the water valves for up to one week. - Tćshirts, shirts and blouses that have... well as overalls or baker's and butcher's coats. Before using the appropriate program. 15 Preparing the laundry ATTENTION Loose debris (coins, paper clips, nails and other hard objects to avoid scratching the washer interior. Soot, soil, sand (pigments), red clay. q Remove nonĆwashable ...

Installation and Use & Care (all languages)
Page 16
... not cleaned properly and will distribute better during the spin cycle. Mix up large and small items. Items of detergent relieves the strain on Page 15. - comforters : Full Load Cotton and Linens ½ Load Permanent Press, Synthetic Blends and Knitwear D Load Wool, Delicates, Silk i Close the door. Door should be able...
... not cleaned properly and will distribute better during the spin cycle. Mix up large and small items. Items of detergent relieves the strain on Page 15. - comforters : Full Load Cotton and Linens ½ Load Permanent Press, Synthetic Blends and Knitwear D Load Wool, Delicates, Silk i Close the door. Door should be able...

Installation and Use & Care (all languages)
Page 88
... Very delicate easy care items ÍÈË Hand Wash 75 (27) 26 Woolens ÍÏÈÎ Wool 80 (25) 33 +30 +16 Ć 15 2/3 load +40 +10 Ć 16 full load +40 +10 +17 Ć 10 1/2 load +10 +16 Ć 8 1/2 load Ć 8 +10 +7 Ć...by a spin. 19 * Actual program duration may be different from the indicated values depending on article! 88 Program selection table Nexxt 500 Plus Series Please read and observe Operating, Care and Installation Instructions carefully before using the washing machine! Cotton or linen ÓÁÊÂ...
... Very delicate easy care items ÍÈË Hand Wash 75 (27) 26 Woolens ÍÏÈÎ Wool 80 (25) 33 +30 +16 Ć 15 2/3 load +40 +10 Ć 16 full load +40 +10 +17 Ć 10 1/2 load +10 +16 Ć 8 1/2 load Ć 8 +10 +7 Ć...by a spin. 19 * Actual program duration may be different from the indicated values depending on article! 88 Program selection table Nexxt 500 Plus Series Please read and observe Operating, Care and Installation Instructions carefully before using the washing machine! Cotton or linen ÓÁÊÂ...
