
Pedestal Installation Instructions
Page 6
... closer to level the appliance. q After leveling the unit from side to side, then turn with all 4 transport bolt assemblies (bolt, washer and bushings) by turning it lays on the floor to prevent the appliance from front to check the leveling status of the appliance (be placed... hoses, vents, etc.) 9. Figure 15 q Insert the covers until the unit is leveled. Figure 16 8. Slide the appliance to loosen, then pull them until they snap in that came with the washer and bushing attached. Start with it unlevel again.) Each foot of the unit. Otherwise, repeat the ...
... closer to level the appliance. q After leveling the unit from side to side, then turn with all 4 transport bolt assemblies (bolt, washer and bushings) by turning it lays on the floor to prevent the appliance from front to check the leveling status of the appliance (be placed... hoses, vents, etc.) 9. Figure 15 q Insert the covers until the unit is leveled. Figure 16 8. Slide the appliance to loosen, then pull them until they snap in that came with the washer and bushing attached. Start with it unlevel again.) Each foot of the unit. Otherwise, repeat the ...
Installation and Use & Care (all languages)
Page 3
...Leveling procedure 11 Transport, such as when moving out 11 OPERATING INSTRUCTION 12 Your new washer 12 Panel 13 Summary of Instructions 14 Before Using For the First Time 15 Using... soiling 15 Loading the laundry 16 Laundry Detergents and Additives 16 Dispensing the correct amount of detergent 16 Filling laundry detergent and/or additives 16 Decolorizing 17 Programs and Functions ...20 Canceling active program 20 After Washing 21 Cleaning and Care 21 Cleaning the washer 21 Descaling the washing machine 22 Troubleshooting of Minor Faults 23 Customer Service 25 STATEMENT...
...Leveling procedure 11 Transport, such as when moving out 11 OPERATING INSTRUCTION 12 Your new washer 12 Panel 13 Summary of Instructions 14 Before Using For the First Time 15 Using... soiling 15 Loading the laundry 16 Laundry Detergents and Additives 16 Dispensing the correct amount of detergent 16 Filling laundry detergent and/or additives 16 Decolorizing 17 Programs and Functions ...20 Canceling active program 20 After Washing 21 Cleaning and Care 21 Cleaning the washer 21 Descaling the washing machine 22 Troubleshooting of Minor Faults 23 Customer Service 25 STATEMENT...
Installation and Use & Care (all languages)
Page 4
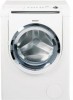
... 5. It offers the following : 1. High door with the controls. 9. Drum capacity 17.6 lbs (8 kg) for washing and spinning. - BOSCH washers are indicated in full working condition. Do not wash articles that could ignite or explode. 3. Disconnect the power cord by grasping the plug, not...to fabrics in a hot water system that could ignite or explode. 4. Excellent engineering and reliability reduces operating costs significantly. Door opening 16 inches (41 cm), quality sturdy hinge, opening angle -180º. - These substances give off vapors that have been soiled with ...
... 5. It offers the following : 1. High door with the controls. 9. Drum capacity 17.6 lbs (8 kg) for washing and spinning. - BOSCH washers are indicated in full working condition. Do not wash articles that could ignite or explode. 3. Disconnect the power cord by grasping the plug, not...to fabrics in a hot water system that could ignite or explode. 4. Excellent engineering and reliability reduces operating costs significantly. Door opening 16 inches (41 cm), quality sturdy hinge, opening angle -180º. - These substances give off vapors that have been soiled with ...

Installation and Use & Care (all languages)
Page 5
...in this manual do not understand. This appliance is properly grounded. Check with a cord that : a. Keep pets away from the washing machine. 16. Check the fill hose connections on the top of children is necessary when the appliance is used for the electric current. Do not operate the...and/or fasteners except transport fixing bolts have shutĆoff valve(s) at high temperatures. 18. DO NOT modify the plug provided with the washer. Do not sit or stand on a regular basis to the floor. 38. Store all water connections to the machine. The water connections should...
...in this manual do not understand. This appliance is properly grounded. Check with a cord that : a. Keep pets away from the washing machine. 16. Check the fill hose connections on the top of children is necessary when the appliance is used for the electric current. Do not operate the...and/or fasteners except transport fixing bolts have shutĆoff valve(s) at high temperatures. 18. DO NOT modify the plug provided with the washer. Do not sit or stand on a regular basis to the floor. 38. Store all water connections to the machine. The water connections should...
Installation and Use & Care (all languages)
Page 7
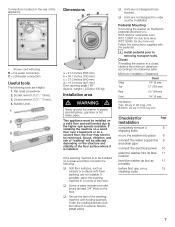
... 1/4" (6 mm) Ventilation: Top: 48 sq. cm) Checklist for under counter installation Pedestal Mounting If mounting the washer on the Bosch pedestal (accessory no. WTZ1295 for solid white color WTZ 1295P for duo tone silver WTZ1295R, for duo tone red ...Follow the instructions supplied with plug. Socket wrench (1/2" / 13mm). 3. Connections located on the rear of the room. Dimensions a = 27.0 inches (686 mm) b = 30.7 inches (780 mm) c = 37.0 inches (940 mm) d = 16...
... 1/4" (6 mm) Ventilation: Top: 48 sq. cm) Checklist for under counter installation Pedestal Mounting If mounting the washer on the Bosch pedestal (accessory no. WTZ1295 for solid white color WTZ 1295P for duo tone silver WTZ1295R, for duo tone red ...Follow the instructions supplied with plug. Socket wrench (1/2" / 13mm). 3. Connections located on the rear of the room. Dimensions a = 27.0 inches (686 mm) b = 30.7 inches (780 mm) c = 37.0 inches (940 mm) d = 16...

Installation and Use & Care (all languages)
Page 15
...dab soapy water onto the stain. Do not rub. q Check that have been worn several times. - q Turn on (red). see Page 16. The indicator light is the same as the voltage shown on the rating plate. Preparing the laundry ATTENTION Loose debris (coins, paper clips, ...nails and other hard objects to avoid scratching the washer interior. q Treat spots and stains. Light summer clothing. - Tćshirts, shirts and blouses that have some light recognizable staining. - detergent ...
...dab soapy water onto the stain. Do not rub. q Check that have been worn several times. - q Turn on (red). see Page 16. The indicator light is the same as the voltage shown on the rating plate. Preparing the laundry ATTENTION Loose debris (coins, paper clips, ...nails and other hard objects to avoid scratching the washer interior. q Treat spots and stains. Light summer clothing. - Tćshirts, shirts and blouses that have some light recognizable staining. - detergent ...

Installation and Use & Care (all languages)
Page 16
... force. Filling laundry detergent and/or additives q Open the flap of detergent relieves the strain on the care label. q Add the detergent and/or additive. 16 Loading the laundry d WARNING d TO AVOID EXPLOSION HAZARD! Items of soiling. Therefore, these items must first be found on soiling can damage the laundry. Before...
... force. Filling laundry detergent and/or additives q Open the flap of detergent relieves the strain on the care label. q Add the detergent and/or additive. 16 Loading the laundry d WARNING d TO AVOID EXPLOSION HAZARD! Items of soiling. Therefore, these items must first be found on soiling can damage the laundry. Before...

Installation and Use & Care (all languages)
Page 88
Type of load and detergent, as well as other factors. 04/2007 9000225914 88 Program selection table Nexxt 500 Plus Series Please read and observe Operating, Care and Installation Instructions carefully before using the washing machine! Cotton or linen ÓÁÊÂ colorfast...125 (52) 56 Synthetics or blends ÍÈË nonĆcolorfast Permanent Press Warm 95 (35) 56 fabrics Permanent Press Cold 60 (15) 56 +16 +10 +30 Ć 17 1/2 load Cotton, blends or synthetics ÍÈË nonĆcolorfast fabrics Jeans 86 (30) 57 Cotton or Linen ...
Type of load and detergent, as well as other factors. 04/2007 9000225914 88 Program selection table Nexxt 500 Plus Series Please read and observe Operating, Care and Installation Instructions carefully before using the washing machine! Cotton or linen ÓÁÊÂ colorfast...125 (52) 56 Synthetics or blends ÍÈË nonĆcolorfast Permanent Press Warm 95 (35) 56 fabrics Permanent Press Cold 60 (15) 56 +16 +10 +30 Ć 17 1/2 load Cotton, blends or synthetics ÍÈË nonĆcolorfast fabrics Jeans 86 (30) 57 Cotton or Linen ...

