Use & Care Manual
Page 3
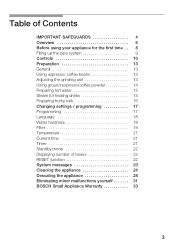
... the grindingĂunit 14 Using ground espresso/coffee powder 14 Preparing hot water 15 Steam for heating drinks 15 Preparing frothy milk 16 Changing settings / programming 17 Programming 17 Language 18 Water hardness 18 Filter 19 Temperature 21 Current time 21 Timer 21 Standby mode 22 Displaying number ofĂbrews 22 RESET function 22 System messages 23 Cleaning the appliance 24 Descaling the appliance 28 Eliminating minor malfunctions yourself 31 BOSCH Small Appliance Warranty...
... the grindingĂunit 14 Using ground espresso/coffee powder 14 Preparing hot water 15 Steam for heating drinks 15 Preparing frothy milk 16 Changing settings / programming 17 Programming 17 Language 18 Water hardness 18 Filter 19 Temperature 21 Current time 21 Timer 21 Standby mode 22 Displaying number ofĂbrews 22 RESET function 22 System messages 23 Cleaning the appliance 24 Descaling the appliance 28 Eliminating minor malfunctions yourself 31 BOSCH Small Appliance Warranty...
Use & Care Manual
Page 4
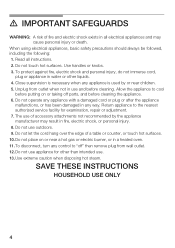
... death. Return appliance to the nearest authorized service facility for other liquids. 4. SAVE THESE INSTRUCTIONS HOUSEHOLD USE ONLY 4 Allow the appliance to off parts, and before cleaning. The use . 13.Use extreme caution when disposing hot steam. When using electrical appliances, basic safety precautions should always ...not immerse cord, plug or appliance in water or other than intended use of accessory attachments not recommended by or near a hot gas or electric burner, or in a heated oven. 11.To disconnect, turn any way. Do not operate any appliance with a damaged cord or ...
... death. Return appliance to the nearest authorized service facility for other liquids. 4. SAVE THESE INSTRUCTIONS HOUSEHOLD USE ONLY 4 Allow the appliance to off parts, and before cleaning. The use . 13.Use extreme caution when disposing hot steam. When using electrical appliances, basic safety precautions should always ...not immerse cord, plug or appliance in water or other than intended use of accessory attachments not recommended by or near a hot gas or electric burner, or in a heated oven. 11.To disconnect, turn any way. Do not operate any appliance with a damaged cord or ...
Use & Care Manual
Page 5
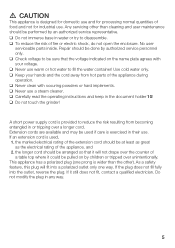
.... q Never clean with your hands and the cord away from becoming entangled in any way. 5 the longer cord should be done by children or tripped over a longer cord. A short power supply cord is provided to fill the water container! Any servicing other ). q Never use warm or hot water to reduce the risk resulting from hot parts of the appliance during operation...
.... q Never clean with your hands and the cord away from becoming entangled in any way. 5 the longer cord should be done by children or tripped over a longer cord. A short power supply cord is provided to fill the water container! Any servicing other ). q Never use warm or hot water to reduce the risk resulting from hot parts of the appliance during operation...

Use & Care Manual
Page 8
... have been glazed, caramelized or treated with coffee beans. mark. q Set function selector 2 to I. q Set power switch 1 to z. Before using your appliance for the firstĂtime General Switching on the appliance and program accordingly (see page 18). q Press button d 4. i The appliance is being used for the first time or has not been operated for use when the illuminated ringsĂon...
... have been glazed, caramelized or treated with coffee beans. mark. q Set function selector 2 to I. q Set power switch 1 to z. Before using your appliance for the firstĂtime General Switching on the appliance and program accordingly (see page 18). q Press button d 4. i The appliance is being used for the first time or has not been operated for use when the illuminated ringsĂon...
Use & Care Manual
Page 10
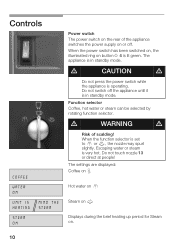
.... The appliance is Ăoperating. Do not touch nozzle 13 or direct at people! Function selector Coffee, hot water or steam can be selected by rotating function selector. d CAUTION d Do not press the power switch while the appliance is in standby mode. Controls COFFEE WATER ON UNIT IS HEATING STEAM ON MIND THE STEAM Power switch The power switch on the rear...
.... The appliance is Ăoperating. Do not touch nozzle 13 or direct at people! Function selector Coffee, hot water or steam can be selected by rotating function selector. d CAUTION d Do not press the power switch while the appliance is in standby mode. Controls COFFEE WATER ON UNIT IS HEATING STEAM ON MIND THE STEAM Power switch The power switch on the rear...
Use & Care Manual
Page 11
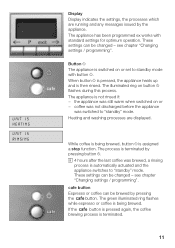
... - While coffee is switched on button d flashes during this process. the appliance was switched to standby" mode. Heating and washing processes are running and any messages issued by pressing button d. cafe button Espresso or coffee can be changed ć see chapter Changing settings / programming". UNIT IS HEATING UNIT IS RINSING Display Display indicates the settings, the processes which are displayed. When button d is pressed, the appliance heats up and is automatically actuated and...
... - While coffee is switched on button d flashes during this process. the appliance was switched to standby" mode. Heating and washing processes are running and any messages issued by pressing button d. cafe button Espresso or coffee can be changed ć see chapter Changing settings / programming". UNIT IS HEATING UNIT IS RINSING Display Display indicates the settings, the processes which are displayed. When button d is pressed, the appliance heats up and is automatically actuated and...
Use & Care Manual
Page 12
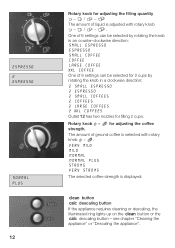
... ESPRESSO ESPRESSO SMALL COFFEE COFFEE LARGE COFFEE XXL COFFEE One of 6 settings can be selected for 2 cups by rotating the knob in a clockwise direction: 2 SMALL ESPRESSO 2 ESPRESSO 2 SMALL COFFEES 2 COFFEES 2 LARGE COFFEES 2 XXL COFFEES Outlet 12 has two nozzles for adjusting the coffee strength. ESPRESSO 2 ESPRESSO NORMAL PLUS 12 Rotary knob for adjusting the filling quantity ( - ( / 8 - 8 The amount of liquid is displayed: + button 4 descaling button If the appliance requires cleaning or descaling, the illuminated ring lights...
... ESPRESSO ESPRESSO SMALL COFFEE COFFEE LARGE COFFEE XXL COFFEE One of 6 settings can be selected for 2 cups by rotating the knob in a clockwise direction: 2 SMALL ESPRESSO 2 ESPRESSO 2 SMALL COFFEES 2 COFFEES 2 LARGE COFFEES 2 XXL COFFEES Outlet 12 has two nozzles for adjusting the coffee strength. ESPRESSO 2 ESPRESSO NORMAL PLUS 12 Rotary knob for adjusting the filling quantity ( - ( / 8 - 8 The amount of liquid is displayed: + button 4 descaling button If the appliance requires cleaning or descaling, the illuminated ring lights...
Use & Care Manual
Page 13
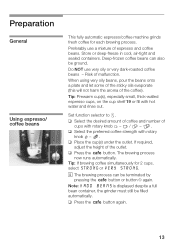
... Using espresso/ coffeeĂbeans This fully automatic espresso/coffee machine grinds fresh coffee for 2 cups, selectĂSTRONG or VERY STRONG. The brewing process nowĂruns automatically. Preferably use very oily or very darkĆroasted coffee beans - Risk of the outlet. StoreĂor deepĆfreeze in cool, airĆtight and sealed containers. When using very oily beans, pour the beans onto a plate...
... Using espresso/ coffeeĂbeans This fully automatic espresso/coffee machine grinds fresh coffee for 2 cups, selectĂSTRONG or VERY STRONG. The brewing process nowĂruns automatically. Preferably use very oily or very darkĆroasted coffee beans - Risk of the outlet. StoreĂor deepĆfreeze in cool, airĆtight and sealed containers. When using very oily beans, pour the beans onto a plate...
Use & Care Manual
Page 17
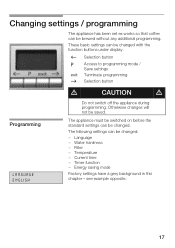
... settings can be changed: - The following settings can be changed with the function buttons under display. < Selection button % Access to programming mode / Save settings & Terminate programming > Selection button d CAUTION d Programming LANGUAGE ENGLISH Do not switch off the appliance during programming. The appliance must be switched on before the standard settings can be brewed without any additional programming. Language - Filter - Otherwise changes will not be saved. Timer function - Temperature - Water hardness - Changing settings / programming...
... settings can be changed: - The following settings can be changed with the function buttons under display. < Selection button % Access to programming mode / Save settings & Terminate programming > Selection button d CAUTION d Programming LANGUAGE ENGLISH Do not switch off the appliance during programming. The appliance must be switched on before the standard settings can be brewed without any additional programming. Language - Filter - Otherwise changes will not be saved. Timer function - Temperature - Water hardness - Changing settings / programming...
Use & Care Manual
Page 18
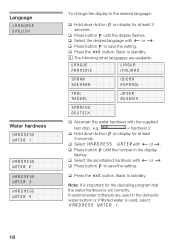
... number in the domestic water system or if filtered water is set correctly. q Press button % until the display flashes. i The following other languages are used in the display flashes. Language LANGUAGE ENGLISH Water hardness HARDNESS WATER 1 HARDNESS WATER 2 HARDNESS WATER 3 HARDNESS WATER 4 To change the display to the desired language: q Hold down button % on display for at least 3 seconds. Back to standby. q Press button % to save the setting. q Press button % to save the setting...
... number in the domestic water system or if filtered water is set correctly. q Press button % until the display flashes. i The following other languages are used in the display flashes. Language LANGUAGE ENGLISH Water hardness HARDNESS WATER 1 HARDNESS WATER 2 HARDNESS WATER 3 HARDNESS WATER 4 To change the display to the desired language: q Hold down button % on display for at least 3 seconds. Back to standby. q Press button % to save the setting. q Press button % to save the setting...
Use & Care Manual
Page 19
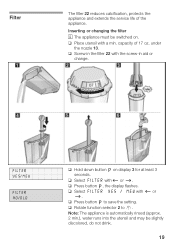
... slightly discolored, do not drink. 19 Filter The filter 22 reduces calcification, protects the appliance and extends the service life of 17 oz. q Select FILTER YES / NEW with the screwĆin the filter 22 with < or >. q Screw in aid or change. q Press button %, the display flashes. Note: The appliance is automatically rinsed (approx. 2 min.), water runs into the utensil and may...
... slightly discolored, do not drink. 19 Filter The filter 22 reduces calcification, protects the appliance and extends the service life of 17 oz. q Select FILTER YES / NEW with the screwĆin the filter 22 with < or >. q Screw in aid or change. q Press button %, the display flashes. Note: The appliance is automatically rinsed (approx. 2 min.), water runs into the utensil and may...
Use & Care Manual
Page 20
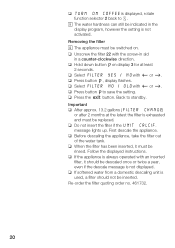
... UNIT CALCIF. q When the filter has been inserted, it should not be replaced. Follow the displayed instructions. Important q After approx. 13.2 gallons (FILTER CHANGE) or after 2 months at least 2 seconds. q Hold down button %on . q Select FILTER YES / NO with the screwĆin aid in the display program, however the setting is used, a filter should be rinsed. q Press the 6 button. q Press button %to save the setting. message lights up. i The water...
... UNIT CALCIF. q When the filter has been inserted, it should not be replaced. Follow the displayed instructions. Important q After approx. 13.2 gallons (FILTER CHANGE) or after 2 months at least 2 seconds. q Hold down button %on . q Select FILTER YES / NO with the screwĆin aid in the display program, however the setting is used, a filter should be rinsed. q Press the 6 button. q Press button %to save the setting. message lights up. i The water...
Use & Care Manual
Page 23
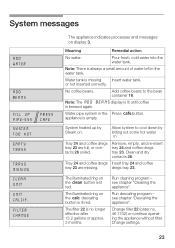
... System messages ADD WATER ADD BEANS FILL UP PIPE-SYS SYSTEM TOO HOT PRESS CAFE EMPTY TRAYS TRAYS MISSING CLEAN UNIT UNIT CALCIF. appliance is brewed again. Remove, empty, and reĆinsert tray 24 and coffee dregs tray 23. Run cleaning program ć see chapter Descaling the appliance". Note: There is lit red. Pour fresh, cold water into the water tank. orĂnot inserted correctly. Change filter...
... System messages ADD WATER ADD BEANS FILL UP PIPE-SYS SYSTEM TOO HOT PRESS CAFE EMPTY TRAYS TRAYS MISSING CLEAN UNIT UNIT CALCIF. appliance is brewed again. Remove, empty, and reĆinsert tray 24 and coffee dregs tray 23. Run cleaning program ć see chapter Descaling the appliance". Note: There is lit red. Pour fresh, cold water into the water tank. orĂnot inserted correctly. Change filter...
Use & Care Manual
Page 24
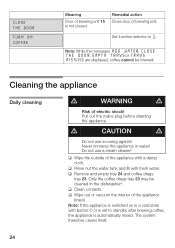
... the messages ADD WATER, CLOSE THE DOOR, EMPTY TRAYS or TRAYS MISSING are displayed, coffee cannot be cleaned in water! d CAUTION d Do not use a steam cleaner! q Remove and empty tray 24 and coffee dregs tray 23. Only the coffee dregs tray 23 may be brewed. q Rinse out the water tank and fill with a damp cloth. q Wipe out or vacuum the interior of brewing unit. Never...
... the messages ADD WATER, CLOSE THE DOOR, EMPTY TRAYS or TRAYS MISSING are displayed, coffee cannot be cleaned in water! d CAUTION d Do not use a steam cleaner! q Remove and empty tray 24 and coffee dregs tray 23. Only the coffee dregs tray 23 may be brewed. q Rinse out the water tank and fill with a damp cloth. q Wipe out or vacuum the interior of brewing unit. Never...
Use & Care Manual
Page 25
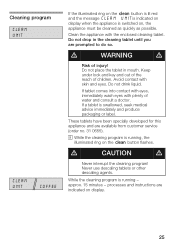
... are prompted to do so. Cleaning program CLEAN UNIT CLEAN UNIT COFFEE If the illuminated ring on the + button is lit red and theĂmessage CLEAN UNIT is indicated on display when the appliance is swallowed, seek medical advice immediately and produce packaging or label. Do not place the tablet in the cleaning tablet until you are available from customer service (order no. 31 0655...
... are prompted to do so. Cleaning program CLEAN UNIT CLEAN UNIT COFFEE If the illuminated ring on the + button is lit red and theĂmessage CLEAN UNIT is indicated on display when the appliance is swallowed, seek medical advice immediately and produce packaging or label. Do not place the tablet in the cleaning tablet until you are available from customer service (order no. 31 0655...
Use & Care Manual
Page 28
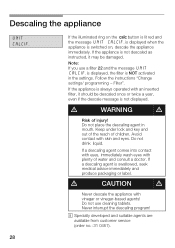
... if the descale message is always operated with plenty of injury! Follow the instructions Change settings/ programming - Do not place the descaling agent in the settings. Filter". d WARNING d Risk of water and consult a doctor. Keep under lock and key and out of the reach of children. d CAUTION d Never descale the appliance with skin and eyes. is displayed, the filter is lit red and the message UNIT CALCIF. Avoid...
... if the descale message is always operated with plenty of injury! Follow the instructions Change settings/ programming - Do not place the descaling agent in the settings. Filter". d WARNING d Risk of water and consult a doctor. Keep under lock and key and out of the reach of children. d CAUTION d Never descale the appliance with skin and eyes. is displayed, the filter is lit red and the message UNIT CALCIF. Avoid...
Use & Care Manual
Page 29
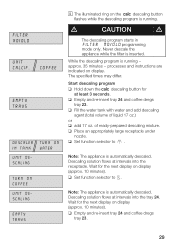
... the water tank with water and add descaling agent (total volume of readyĆprepared descaling mixture. processes and instructions are indicated on the 4 descaling button flashes while the descaling program is automatically descaled. q Empty and reĆinsert tray 24 and coffee dregs tray 23. 29 d CAUTION d The descaling program starts in FILTER NO/OLD programming mode only. q Set function selector to 0 . COFFEE EMPTY TRAYS DESCALER TURN ON IN TANK WATER UNIT DESCALING TURN ON COFFEE UNIT DESCALING EMPTY TRAYS...
... the water tank with water and add descaling agent (total volume of readyĆprepared descaling mixture. processes and instructions are indicated on the 4 descaling button flashes while the descaling program is automatically descaled. q Empty and reĆinsert tray 24 and coffee dregs tray 23. 29 d CAUTION d The descaling program starts in FILTER NO/OLD programming mode only. q Set function selector to 0 . COFFEE EMPTY TRAYS DESCALER TURN ON IN TANK WATER UNIT DESCALING TURN ON COFFEE UNIT DESCALING EMPTY TRAYS...
Use & Care Manual
Page 30
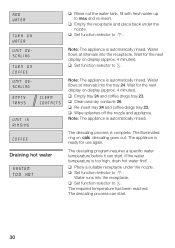
... WATER TURN ON WATER UNIT DESCALING TURN ON COFFEE UNIT DESCALING EMPTY TRAYS CLEAN CONTACTS UNIT IS RINSING COFFEE Draining hot water SYSTEM TOO HOT q Rinse out the water tank, fill with fresh water up to 0. Note: The appliance is automatically rinsed. q Empty tray 24 and coffee dregs tray 23. q ReĆinsert tray 24 and coffee dregs tray 23. Note: The appliance is automatically rinsed. The descaling program requires a specific water temperature before it can start...
... WATER TURN ON WATER UNIT DESCALING TURN ON COFFEE UNIT DESCALING EMPTY TRAYS CLEAN CONTACTS UNIT IS RINSING COFFEE Draining hot water SYSTEM TOO HOT q Rinse out the water tank, fill with fresh water up to 0. Note: The appliance is automatically rinsed. q Empty tray 24 and coffee dregs tray 23. q ReĆinsert tray 24 and coffee dregs tray 23. Note: The appliance is automatically rinsed. The descaling program requires a specific water temperature before it can start...
Use & Care Manual
Page 31
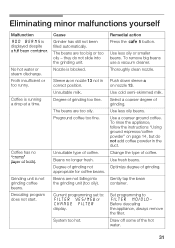
... ADD BEANS is not grinding coffee beans. Grinding unit is displayed despite a full bean container. Unsuitable type of coffee. Remedial action Press the 2 5 button. Set programming to : FILTER YES/NEW or CHANGE FILTER display. Froth insufficient or too runny. The beans are too oily. System too hot. Use cold semiĆskimmed milk. Sleeve a on nozzle 13. To remove big beans use a vacuum cleaner. Use a coarser ground coffee. they do not...
... ADD BEANS is not grinding coffee beans. Grinding unit is displayed despite a full bean container. Unsuitable type of coffee. Remedial action Press the 2 5 button. Set programming to : FILTER YES/NEW or CHANGE FILTER display. Froth insufficient or too runny. The beans are too oily. System too hot. Use cold semiĆskimmed milk. Sleeve a on nozzle 13. To remove big beans use a vacuum cleaner. Use a coarser ground coffee. they do not...
Use & Care Manual
Page 32
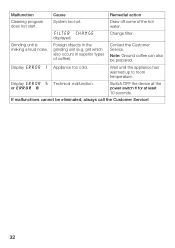
Change filter. Contact the Customer Service. Malfunction Cause Remedial action Cleaning program does not start. Note: Ground coffee can also be eliminated, always call the Customer Service! 32 FILTER CHANGE displayed. grit which also occurs in the grinding unit (e.g. or ERROR 8 Switch OFF the device at the power switch 1 for at least 10 seconds. System too hot. Wait until the appliance has warmed up to room temperature. Grinding unit is making a loud...
Change filter. Contact the Customer Service. Malfunction Cause Remedial action Cleaning program does not start. Note: Ground coffee can also be eliminated, always call the Customer Service! 32 FILTER CHANGE displayed. grit which also occurs in the grinding unit (e.g. or ERROR 8 Switch OFF the device at the power switch 1 for at least 10 seconds. System too hot. Wait until the appliance has warmed up to room temperature. Grinding unit is making a loud...


