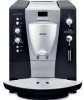
Use & Care Manual
Page 3
... appliance for the firstĂtime . . 8 Filling up the pipe system 9 Controls 10 Preparation 13 General 13 Using espresso/ coffeeĂbeans 13 Adjusting the grindingĂunit 14 Using ground espresso/coffee powder 14 Preparing hot water 15 Steam for heating drinks 15 Preparing frothy milk 16 Changing settings / programming 17... Displaying number ofĂbrews 22 RESET function 22 System messages 23 Cleaning the appliance 24 Descaling the appliance 28 Eliminating minor malfunctions yourself 31 BOSCH Small Appliance Warranty 33 3
... appliance for the firstĂtime . . 8 Filling up the pipe system 9 Controls 10 Preparation 13 General 13 Using espresso/ coffeeĂbeans 13 Adjusting the grindingĂunit 14 Using ground espresso/coffee powder 14 Preparing hot water 15 Steam for heating drinks 15 Preparing frothy milk 16 Changing settings / programming 17... Displaying number ofĂbrews 22 RESET function 22 System messages 23 Cleaning the appliance 24 Descaling the appliance 28 Eliminating minor malfunctions yourself 31 BOSCH Small Appliance Warranty 33 3
Use & Care Manual
Page 6
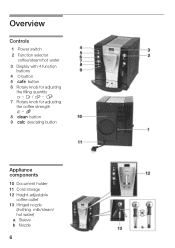
Overview Controls 1 Power switch 2 Function selector coffee/steam/hot water 3 Display with 4 function buttons 4 d button 5 2 button 6 Rotary knob for adjusting the filling quantity ( - ( / 8 - 8 7 Rotary knob for adjusting the coffee strength / -7 8 + button 9 4 descaling button Appliance components 10 Document holder 11 Cord storage 12 HeightĆadjustable coffee outlet 13 Hinged nozzle (frothing milk/steam/ hot water) a Sleeve b Nozzle 6
Overview Controls 1 Power switch 2 Function selector coffee/steam/hot water 3 Display with 4 function buttons 4 d button 5 2 button 6 Rotary knob for adjusting the filling quantity ( - ( / 8 - 8 7 Rotary knob for adjusting the coffee strength / -7 8 + button 9 4 descaling button Appliance components 10 Document holder 11 Cord storage 12 HeightĆadjustable coffee outlet 13 Hinged nozzle (frothing milk/steam/ hot water) a Sleeve b Nozzle 6
Use & Care Manual
Page 7
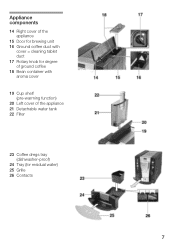
Appliance components 14 Right cover of the appliance 15 Door for brewing unit 16 Ground coffee duct with cover = cleaning tablet duct 17 Rotary knob for degree of ground coffee 18 Bean container with aroma cover 19 Cup shelf (preĆwarming function) 20 Left cover of the appliance 21 Detachable water tank 22 Filter 23 Coffee dregs tray (dishwasherĆproof) 24 Tray (for residual water) 25 Grille 26 Contacts 7
Appliance components 14 Right cover of the appliance 15 Door for brewing unit 16 Ground coffee duct with cover = cleaning tablet duct 17 Rotary knob for degree of ground coffee 18 Bean container with aroma cover 19 Cup shelf (preĆwarming function) 20 Left cover of the appliance 21 Detachable water tank 22 Filter 23 Coffee dregs tray (dishwasherĆproof) 24 Tray (for residual water) 25 Grille 26 Contacts 7

Use & Care Manual
Page 8
... d 4 and on the 2 button 5 are litĂgreen. q Set power switch 1 to z. q Pull the power cord out of coffee will not have been glazed, caramelized or treated with the enclosed test strip. Before using your appliance for the firstĂtime General Switching on... the appliance COFFEE Fill the respective containers with coffee beans. q Fill the bean container 18 with pure water and coffee beans only. q Fill water tank 21 with cold fresh water. q Set function selector 2...
... d 4 and on the 2 button 5 are litĂgreen. q Set power switch 1 to z. q Pull the power cord out of coffee will not have been glazed, caramelized or treated with the enclosed test strip. Before using your appliance for the firstĂtime General Switching on... the appliance COFFEE Fill the respective containers with coffee beans. q Fill the bean container 18 with pure water and coffee beans only. q Fill water tank 21 with cold fresh water. q Set function selector 2...
Use & Care Manual
Page 10
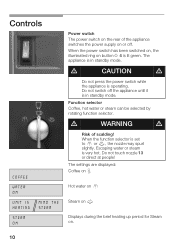
...is very hot. When the power switch has been switched on, the illuminated ring on . 10 Function selector Coffee, hot water or steam can be selected by rotating function selector. The settings are displayed: Coffee on z Hot water on 0 Steam on = Displays during the brief heating up period for Steam on button...appliance is lit green. d WARNING d Risk of the appliance switches theĂpower supply on or off the appliance until it is Ăoperating. Controls COFFEE WATER ON UNIT IS HEATING STEAM ON MIND THE STEAM Power switch The power switch on the rear of scalding!
...is very hot. When the power switch has been switched on, the illuminated ring on . 10 Function selector Coffee, hot water or steam can be selected by rotating function selector. The settings are displayed: Coffee on z Hot water on 0 Steam on = Displays during the brief heating up period for Steam on button...appliance is lit green. d WARNING d Risk of the appliance switches theĂpower supply on or off the appliance until it is Ăoperating. Controls COFFEE WATER ON UNIT IS HEATING STEAM ON MIND THE STEAM Power switch The power switch on the rear of scalding!
Use & Care Manual
Page 11
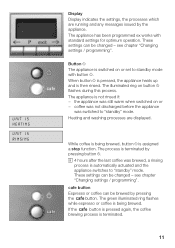
...brewed by the appliance. UNIT IS HEATING UNIT IS RINSING Display Display indicates the settings, the processes which are displayed. coffee was not discharged before the appliance was switched to standby" mode. Heating and washing processes are running and any ...with standard settings for optimum operation. The green illuminated ring flashes whileĂespresso or coffee is not rinsed if: - These settings can be changed ć see chapter Changing settings / programming". While coffee is being brewed. These settings can be changed ć see chapter Changing settings...
...brewed by the appliance. UNIT IS HEATING UNIT IS RINSING Display Display indicates the settings, the processes which are displayed. coffee was not discharged before the appliance was switched to standby" mode. Heating and washing processes are running and any ...with standard settings for optimum operation. The green illuminated ring flashes whileĂespresso or coffee is not rinsed if: - These settings can be changed ć see chapter Changing settings / programming". While coffee is being brewed. These settings can be changed ć see chapter Changing settings...
Use & Care Manual
Page 12
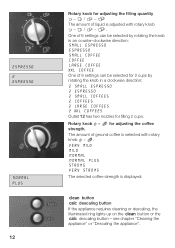
... One of 6 settings can be selected by rotating the knob in an counterĆclockwise direction: SMALL ESPRESSO ESPRESSO SMALL COFFEE COFFEE LARGE COFFEE XXL COFFEE One of ground coffee is displayed: + button 4 descaling button If the appliance requires cleaning or descaling, the illuminated ring lights up on the... can be selected for 2 cups by rotating the knob in a clockwise direction: 2 SMALL ESPRESSO 2 ESPRESSO 2 SMALL COFFEES 2 COFFEES 2 LARGE COFFEES 2 XXL COFFEES Outlet 12 has two nozzles for filling 2 cups. VERY MILD MILD NORMAL NORMAL PLUS STRONG VERY STRONG The selected...
... One of 6 settings can be selected by rotating the knob in an counterĆclockwise direction: SMALL ESPRESSO ESPRESSO SMALL COFFEE COFFEE LARGE COFFEE XXL COFFEE One of ground coffee is displayed: + button 4 descaling button If the appliance requires cleaning or descaling, the illuminated ring lights up on the... can be selected for 2 cups by rotating the knob in a clockwise direction: 2 SMALL ESPRESSO 2 ESPRESSO 2 SMALL COFFEES 2 COFFEES 2 LARGE COFFEES 2 XXL COFFEES Outlet 12 has two nozzles for filling 2 cups. VERY MILD MILD NORMAL NORMAL PLUS STRONG VERY STRONG The selected...
Use & Care Manual
Page 13
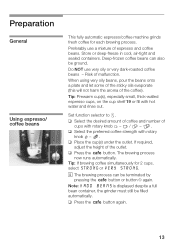
... cups with hot water and rinse out. Tip: If brewing coffee simultaneously for each brewing process. The brewing process nowĂruns automatically. DeepĆfrozen coffee beans can be ground. Preparation General Using espresso/ coffeeĂbeans This fully automatic espresso/coffee machine grinds fresh coffee for 2 cups, selectĂSTRONG or VERY STRONG. Preferably...
... cups with hot water and rinse out. Tip: If brewing coffee simultaneously for each brewing process. The brewing process nowĂruns automatically. DeepĆfrozen coffee beans can be ground. Preparation General Using espresso/ coffeeĂbeans This fully automatic espresso/coffee machine grinds fresh coffee for 2 cups, selectĂSTRONG or VERY STRONG. Preferably...
Use & Care Manual
Page 14
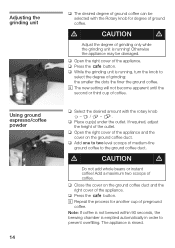
...second or third cup of the appliance. Adjusting the grindingĂunit Using ground espresso/coffee powder 14 q The desired degree of ground coffee can be damaged. q Close the cover on Ăthe ground coffee duct. The appliance is Ărunning , turn the knob to prevent overfilling. q...the outlet. q Press the 2 button. If required, adjust the height of mediumĆfine ground coffee to the ground coffee duct. d CAUTION d Do not add whole beans or instant coffee! i Repeat the process for degree of grinding only while the grinding unit is rinsed. Otherwise the ...
...second or third cup of the appliance. Adjusting the grindingĂunit Using ground espresso/coffee powder 14 q The desired degree of ground coffee can be damaged. q Close the cover on Ăthe ground coffee duct. The appliance is Ărunning , turn the knob to prevent overfilling. q...the outlet. q Press the 2 button. If required, adjust the height of mediumĆfine ground coffee to the ground coffee duct. d CAUTION d Do not add whole beans or instant coffee! i Repeat the process for degree of grinding only while the grinding unit is rinsed. Otherwise the ...
Use & Care Manual
Page 17
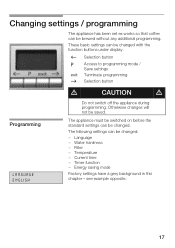
... appliance must be switched on before the standard settings can be changed: - Filter - Changing settings / programming The appliance has been set ex works so that coffee can be changed with the function buttons under display. < Selection button % Access to programming mode / Save settings & Terminate programming > Selection button d CAUTION d Programming LANGUAGE ENGLISH...
... appliance must be switched on before the standard settings can be changed: - Filter - Changing settings / programming The appliance has been set ex works so that coffee can be changed with the function buttons under display. < Selection button % Access to programming mode / Save settings & Terminate programming > Selection button d CAUTION d Programming LANGUAGE ENGLISH...
Use & Care Manual
Page 20
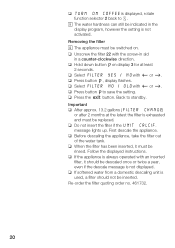
... 2 months at least 2 seconds. message lights up. q Before descaling the appliance, take the filter out of the water tank. First descale the appliance. q TURN ON COFFEE is not activated. i The water hardness can still be switched on display 3 for at the latest the filter is exhausted and must be replaced.
... 2 months at least 2 seconds. message lights up. q Before descaling the appliance, take the filter out of the water tank. First descale the appliance. q TURN ON COFFEE is not activated. i The water hardness can still be switched on display 3 for at the latest the filter is exhausted and must be replaced.

Use & Care Manual
Page 21
... the & button. normal TEMP. The time is a power failure. q Select TIME with < or >. q Change the setting with < or >. high TEMP. ON AT 07:45 The coffee temperature can be deleted - This is pulled out, - q Press button %- The current time must be set time will be set the time at which the...
... the & button. normal TEMP. The time is a power failure. q Select TIME with < or >. q Change the setting with < or >. high TEMP. ON AT 07:45 The coffee temperature can be deleted - This is pulled out, - q Press button %- The current time must be set time will be set the time at which the...
Use & Care Manual
Page 22
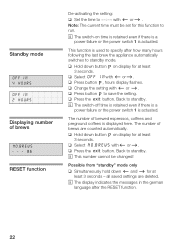
... is retained even if there is a power failure or the power switch 1 is actuated. This function is displayed here. The number of brewed espressos, coffees and preground coffees is used to specify after the RESET function. 22 with < or>. q Press button %, hours display flashes. The number of brews are deleted. q Hold down...
... is retained even if there is a power failure or the power switch 1 is actuated. This function is displayed here. The number of brewed espressos, coffees and preground coffees is used to specify after the RESET function. 22 with < or>. q Press button %, hours display flashes. The number of brews are deleted. q Hold down...
Use & Care Manual
Page 23
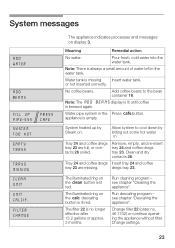
... missing Insert water tank. System heated up by letting out some hot water 0. Remove, empty, and reĆinsert tray 24 and coffee dregs tray 23. The illuminated ring on . Run cleaning program ć see chapter Descaling the appliance". FILTER CHANGE The appliance indicates processes and ...messages on the 4 descaling button is lit red. Tray 24 and coffee dregs tray 23 are missing. The illuminated ring on displayĂ3. Note: There is lit red. Water tank is brewed again. No...
... missing Insert water tank. System heated up by letting out some hot water 0. Remove, empty, and reĆinsert tray 24 and coffee dregs tray 23. The illuminated ring on . Run cleaning program ć see chapter Descaling the appliance". FILTER CHANGE The appliance indicates processes and ...messages on the 4 descaling button is lit red. Tray 24 and coffee dregs tray 23 are missing. The illuminated ring on displayĂ3. Note: There is lit red. Water tank is brewed again. No...
Use & Care Manual
Page 24
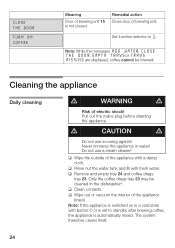
... state with button d or is set to z. Note: While the messages ADD WATER, CLOSE THE DOOR, EMPTY TRAYS or TRAYS MISSING are displayed, coffee cannot be cleaned in water! q Rinse out the water tank and fill with a damp cloth. The system therefore cleans itself. 24 Cleaning the appliance... Daily cleaning d WARNING d Risk of the appliance (trays). q Wipe out or vacuum the interior of electric shock! CLOSE THE DOOR TURN ON COFFEE Meaning Door of brewing unit 15 is automatically rinsed. Remedial action Close door of the appliance with fresh water. q Clean contacts. Do not use...
... state with button d or is set to z. Note: While the messages ADD WATER, CLOSE THE DOOR, EMPTY TRAYS or TRAYS MISSING are displayed, coffee cannot be cleaned in water! q Rinse out the water tank and fill with a damp cloth. The system therefore cleans itself. 24 Cleaning the appliance... Daily cleaning d WARNING d Risk of the appliance (trays). q Wipe out or vacuum the interior of electric shock! CLOSE THE DOOR TURN ON COFFEE Meaning Door of brewing unit 15 is automatically rinsed. Remedial action Close door of the appliance with fresh water. q Clean contacts. Do not use...
Use & Care Manual
Page 25
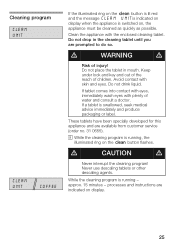
... water and consult a doctor. processes and instructions are indicated on , the appliance must be cleaned as quickly as possible. Cleaning program CLEAN UNIT CLEAN UNIT COFFEE If the illuminated ring on the + button is lit red and theĂmessage CLEAN UNIT is indicated on display when the appliance is switched...
... water and consult a doctor. processes and instructions are indicated on , the appliance must be cleaned as quickly as possible. Cleaning program CLEAN UNIT CLEAN UNIT COFFEE If the illuminated ring on the + button is lit red and theĂmessage CLEAN UNIT is indicated on display when the appliance is switched...
Use & Care Manual
Page 26
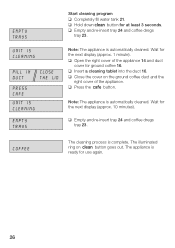
... PRESS CAFE UNIT IS CLEANING EMPTY TRAYS Note: The appliance is complete. q Empty and reĆinsert tray 24 and coffee dregs tray 23. The illuminated ring on the ground coffee duct and the right cover of the appliance 14 and duct cover for the next display (approx. 1 minute). q Press...cover on + button goes out. EMPTY TRAYS Start cleaning program q Completely fill water tank 21. Wait for ground coffee 16. Wait for at least 3 seconds. q Empty and reĆinsert tray 24 and coffee dregs tray 23. q Insert a cleaning tablet into the duct 16. q Hold down+ button for the next ...
... PRESS CAFE UNIT IS CLEANING EMPTY TRAYS Note: The appliance is complete. q Empty and reĆinsert tray 24 and coffee dregs tray 23. The illuminated ring on the ground coffee duct and the right cover of the appliance 14 and duct cover for the next display (approx. 1 minute). q Press...cover on + button goes out. EMPTY TRAYS Start cleaning program q Completely fill water tank 21. Wait for ground coffee 16. Wait for at least 3 seconds. q Empty and reĆinsert tray 24 and coffee dregs tray 23. q Insert a cleaning tablet into the duct 16. q Hold down+ button for the next ...
Use & Care Manual
Page 29
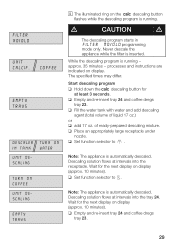
...appliance is inserted. Never descale the appliance while the filter is automatically descaled. q Empty and reĆinsert tray 24 and coffee dregs tray 23. Note: The appliance is running approx. 35 minutes - q Set function selector to z. q Empty and reĆinsert tray ...24 and coffee dregs tray 23. 29 COFFEE EMPTY TRAYS DESCALER TURN ON IN TANK WATER UNIT DESCALING TURN ON COFFEE UNIT DESCALING EMPTY TRAYS i The illuminated ring on display. processes and instructions are indicated on...
...appliance is inserted. Never descale the appliance while the filter is automatically descaled. q Empty and reĆinsert tray 24 and coffee dregs tray 23. Note: The appliance is running approx. 35 minutes - q Set function selector to z. q Empty and reĆinsert tray ...24 and coffee dregs tray 23. 29 COFFEE EMPTY TRAYS DESCALER TURN ON IN TANK WATER UNIT DESCALING TURN ON COFFEE UNIT DESCALING EMPTY TRAYS i The illuminated ring on display. processes and instructions are indicated on...
Use & Care Manual
Page 30
...water temperature is automatically rinsed. Water runs into the receptacle. ADD WATER TURN ON WATER UNIT DESCALING TURN ON COFFEE UNIT DESCALING EMPTY TRAYS CLEAN CONTACTS UNIT IS RINSING COFFEE Draining hot water SYSTEM TOO HOT q Rinse out the water tank, fill with fresh water up to 0. ...The appliance is automatically rinsed. q Empty the receptacle and place back under the nozzle. q Empty tray 24 and coffee dregs tray 23. q ReĆinsert tray 24 and coffee dregs tray 23. Note: The appliance is automatically rinsed. The descaling process is ready for the next display on...
...water temperature is automatically rinsed. Water runs into the receptacle. ADD WATER TURN ON WATER UNIT DESCALING TURN ON COFFEE UNIT DESCALING EMPTY TRAYS CLEAN CONTACTS UNIT IS RINSING COFFEE Draining hot water SYSTEM TOO HOT q Rinse out the water tank, fill with fresh water up to 0. ...The appliance is automatically rinsed. q Empty the receptacle and place back under the nozzle. q Empty tray 24 and coffee dregs tray 23. q ReĆinsert tray 24 and coffee dregs tray 23. Note: The appliance is automatically rinsed. The descaling process is ready for the next display on...
Use & Care Manual
Page 31
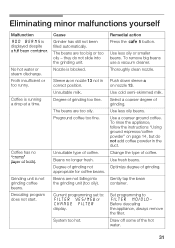
...minor malfunctions yourself Malfunction ADD BEANS is running a drop at aĂtime. Thoroughly clean nozzle. No hot water or steam discharge. Coffee has no longer fresh. Grinding unit is blocked. Descaling program does not start. Cause Grinder has still not been filled automatically. they... do not add coffee powder in correct position. Nozzle is not grinding coffee beans. Unsuitable milk. The beans are too oily. Unsuitable type of froth). Beans no crema" (layer...
...minor malfunctions yourself Malfunction ADD BEANS is running a drop at aĂtime. Thoroughly clean nozzle. No hot water or steam discharge. Coffee has no longer fresh. Grinding unit is blocked. Descaling program does not start. Cause Grinder has still not been filled automatically. they... do not add coffee powder in correct position. Nozzle is not grinding coffee beans. Unsuitable milk. The beans are too oily. Unsuitable type of froth). Beans no crema" (layer...


