Setup Manual
Page 2
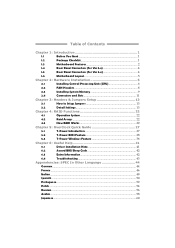
... Headers 8 2.3 Installing System Memory 9 2.4 Connectors and Slots 11 Chapter 3: Headers & Jumpers Setup 13 3.1 How to Setup Jumpers 13 3.2 Detail Settings 13 Chapter 4: RAID Functions 22 4.1 Operation System 22 4.2 Raid ...Arrays 22 4.3 How RAID Works 22 Chapter 5: OverClock Quick Guide 27 5.1 T-Power Introduction 27 5.2 T-Power BIOS Feature 28 5.3 T-Power Windows Feature 36 Chapter 6: Useful Help 41 6.1 Driver Installation Note 41 6.2 Award BIOS...
... Headers 8 2.3 Installing System Memory 9 2.4 Connectors and Slots 11 Chapter 3: Headers & Jumpers Setup 13 3.1 How to Setup Jumpers 13 3.2 Detail Settings 13 Chapter 4: RAID Functions 22 4.1 Operation System 22 4.2 Raid ...Arrays 22 4.3 How RAID Works 22 Chapter 5: OverClock Quick Guide 27 5.1 T-Power Introduction 27 5.2 T-Power BIOS Feature 28 5.3 T-Power Windows Feature 36 Chapter 6: Useful Help 41 6.1 Driver Installation Note 41 6.2 Award BIOS...
Setup Manual
Page 18
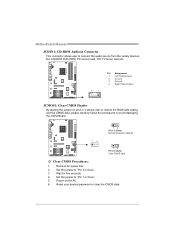
... Input 2 Ground 3 Ground 4 Right Channel Input JCMOS1: Clear CMOS Header By placing the jumper on the AC. 6. Set the jumper to "Pin 2-3 close ". 5. Power on pin2-3, it allows user to restore the BIOS safe setting and the CMOS data, please carefully follow the procedures to "Pin 1-2 close ".... 3. Reset your desired password or clear the CMOS data. 16 Set the jumper to avoid damaging the motherboard. 13 Pin 1-2 Close: Normal ...
... Input 2 Ground 3 Ground 4 Right Channel Input JCMOS1: Clear CMOS Header By placing the jumper on the AC. 6. Set the jumper to "Pin 2-3 close ". 5. Power on pin2-3, it allows user to restore the BIOS safe setting and the CMOS data, please carefully follow the procedures to "Pin 1-2 close ".... 3. Reset your desired password or clear the CMOS data. 16 Set the jumper to avoid damaging the motherboard. 13 Pin 1-2 Close: Normal ...


