Update Manual
Page 3
...Power on board may be changed without notice. The information and pictures described above about the software are subject to be slightly different from this manual. Click Yes to restart the computer. While the system boots up and the full screen logo shows up . This utility only allows storage ... to update your reference only. All the information and content above are sure to download the latest BIOS file for the BIOS file. 6. The BIOSTAR BIOS Flasher is completed. Go to the website to flash the BIOS file. Then, copy and save the BIOS file into a USB flash (pen...
...Power on board may be changed without notice. The information and pictures described above about the software are subject to be slightly different from this manual. Click Yes to restart the computer. While the system boots up and the full screen logo shows up . This utility only allows storage ... to update your reference only. All the information and content above are sure to download the latest BIOS file for the BIOS file. 6. The BIOSTAR BIOS Flasher is completed. Go to the website to flash the BIOS file. Then, copy and save the BIOS file into a USB flash (pen...

Setup Manual
Page 1
... the limits of a Class B digital device, pursuant to be changed without first obtaining the vendor's approval in writing. Duplication of this user's manual is subject to Part 15 of their respective companies. These limits are trademarks of the FCC Rules. This equipment generates, uses, and can radiate ...for any party beforehand. A780G M2+ SE/A780V M2+ SE/A760G M2+/A740G M2+ SE Setup Manual FCC Information and Copyright This equipment has been tested and found in this user's manual. The content of this publication, in part or in whole, is no representations or warranties with ...
... the limits of a Class B digital device, pursuant to be changed without first obtaining the vendor's approval in writing. Duplication of this user's manual is subject to Part 15 of their respective companies. These limits are trademarks of the FCC Rules. This equipment generates, uses, and can radiate ...for any party beforehand. A780G M2+ SE/A780V M2+ SE/A760G M2+/A740G M2+ SE Setup Manual FCC Information and Copyright This equipment has been tested and found in this user's manual. The content of this publication, in part or in whole, is no representations or warranties with ...
Setup Manual
Page 3
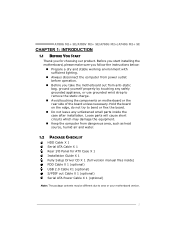
... the equipment. „ Keep the computer from power outlet before operation. „ Before you for ATX Case X 1 Installation Guide X 1 Fully Setup Driver CD X 1 (full version manual files inside the case after installation.
... the equipment. „ Keep the computer from power outlet before operation. „ Before you for ATX Case X 1 Installation Guide X 1 Fully Setup Driver CD X 1 (full version manual files inside the case after installation.
Setup Manual
Page 4
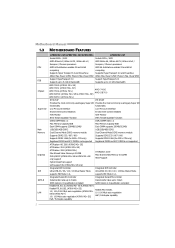
Power:125W; Motherboard Manual 1.3 MOTHERBOARD FEATURES CPU FSB Chipset Super I /O functionality functionality Low Pin Count Interface Low Pin Count Interface Environment Control initiatives Environment Control initiatives H/W Monitor H/W Monitor ITE's "...
Power:125W; Motherboard Manual 1.3 MOTHERBOARD FEATURES CPU FSB Chipset Super I /O functionality functionality Low Pin Count Interface Low Pin Count Interface Environment Control initiatives Environment Control initiatives H/W Monitor H/W Monitor ITE's "...
Setup Manual
Page 8
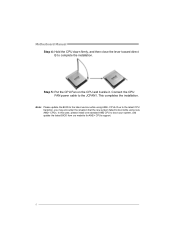
Motherboard Manual Step 4: Hold the CPU down firmly, and then close the lever toward direct B to boot your system, and update the latest BIOS from our website ...
Motherboard Manual Step 4: Hold the CPU down firmly, and then close the lever toward direct B to boot your system, and update the latest BIOS from our website ...
Setup Manual
Page 10
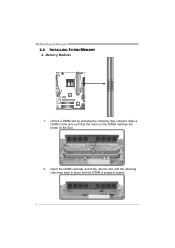
Unlock a DIMM slot by pressing the retaining clips outward. Memory Modules 1. Insert the DIMM vertically and firmly into the slot until the retaining chip snap back in place and the DIMM is properly seated. 8 Align a DIMM on the slot such that the notch on the DIMM matches the break on the Slot. 2. DIMMA1 DIMMB1 Motherboard Manual 2.3 INSTALLING SYSTEM MEMORY A.
Unlock a DIMM slot by pressing the retaining clips outward. Memory Modules 1. Insert the DIMM vertically and firmly into the slot until the retaining chip snap back in place and the DIMM is properly seated. 8 Align a DIMM on the slot such that the notch on the DIMM matches the break on the Slot. 2. DIMMA1 DIMMB1 Motherboard Manual 2.3 INSTALLING SYSTEM MEMORY A.
Setup Manual
Page 12
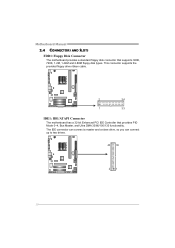
Motherboard Manual 2.4 CONNECTORS AND SLOTS FDD1: Floppy Disk Connector The motherboard provides a standard floppy disk connector that provides PIO Mode 0~4, Bus Master, and Ultra DMA 33/66/100/133 functionality. This connector supports the provided floppy drive ribbon cable. 2 34 1 33 IDE1: IDE/ATAPI Connector The motherboard has a 32-bit Enhanced PCI IDE Controller that supports 360K, 720K, 1.2M, 1.44M and 2.88M floppy disk types. The IDE connector can connect a master and a slave drive, so you can connect up to two drives. 40 39 21 10
Motherboard Manual 2.4 CONNECTORS AND SLOTS FDD1: Floppy Disk Connector The motherboard provides a standard floppy disk connector that provides PIO Mode 0~4, Bus Master, and Ultra DMA 33/66/100/133 functionality. This connector supports the provided floppy drive ribbon cable. 2 34 1 33 IDE1: IDE/ATAPI Connector The motherboard has a 32-bit Enhanced PCI IDE Controller that supports 360K, 720K, 1.2M, 1.44M and 2.88M floppy disk types. The IDE connector can connect a master and a slave drive, so you can connect up to two drives. 40 39 21 10

Setup Manual
Page 14
PCI1 PCI2 12 PCI stands for Peripheral Component Interconnect, and it is designated as 32 bits. This PCI slot is a bus standard for expansion cards. Motherboard Manual PCI1~PCI2: Peripheral Component Interconnect Slots This motherboard is equipped with 2 standard PCI slots.
PCI1 PCI2 12 PCI stands for Peripheral Component Interconnect, and it is designated as 32 bits. This PCI slot is a bus standard for expansion cards. Motherboard Manual PCI1~PCI2: Peripheral Component Interconnect Slots This motherboard is equipped with 2 standard PCI slots.
Setup Manual
Page 16
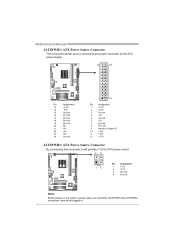
Motherboard Manual JATXPWR1: ATX Power Source Connector This connector allows user to connect 24-pin power connector on the ATX power supply. 12 24 Pin Assignment 13 +3....
Motherboard Manual JATXPWR1: ATX Power Source Connector This connector allows user to connect 24-pin power connector on the ATX power supply. 12 24 Pin Assignment 13 +3....
Setup Manual
Page 18
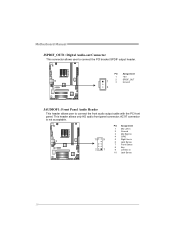
Pin Assignment 1 +5V 2 SPDIF_OUT 1 3 Ground 3 JAUDIOF1: Front Panel Audio Header This header allows user to connect the PCI bracket SPDIF output header. AC'97 connector is not acceptable. 10 9 2 1 Pin Assignment 1 Mic Left in 2 Ground 3 Mic Right in 4 GPIO 5 Right line in 6 Jack Sense 7 Front Sense 8 Key 9 Left line in 10 Jack Sense 16 Motherboard Manual JSPDIF_OUT1: Digital Audio-out Connector This connector allows user to connect the front audio output cable with the PC front panel. This header allows only HD audio front panel connector;
Pin Assignment 1 +5V 2 SPDIF_OUT 1 3 Ground 3 JAUDIOF1: Front Panel Audio Header This header allows user to connect the PCI bracket SPDIF output header. AC'97 connector is not acceptable. 10 9 2 1 Pin Assignment 1 Mic Left in 2 Ground 3 Mic Right in 4 GPIO 5 Right line in 6 Jack Sense 7 Front Sense 8 Key 9 Left line in 10 Jack Sense 16 Motherboard Manual JSPDIF_OUT1: Digital Audio-out Connector This connector allows user to connect the front audio output cable with the PC front panel. This header allows only HD audio front panel connector;
Setup Manual
Page 20
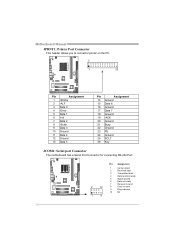
... Ground 23 PE 24 Ground 25 SCLT 26 Key JCOM1: Serial port Connector The motherboard has a Serial Port Connector for connecting RS-232 Port. Motherboard Manual JPRNT1: Printer Port Connector This header allows you to send 9 Ring indicator 10 NC 1 9 18
... Ground 23 PE 24 Ground 25 SCLT 26 Key JCOM1: Serial port Connector The motherboard has a Serial Port Connector for connecting RS-232 Port. Motherboard Manual JPRNT1: Printer Port Connector This header allows you to send 9 Ring indicator 10 NC 1 9 18
Setup Manual
Page 22
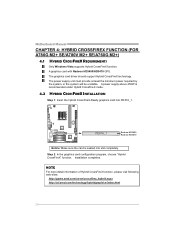
... Radeon HD3450/HD3470 GPU. Step 2: In the graphics card configuration program, choose "Hybrid CrossFireX" function. The graphics card driver should support Hybrid CrossFireX technology. Motherboard Manual CHAPTER 4: HYBRID CROSSFIREX FUNCTION (FOR A780G M2+ SE/A780V M2+ SE/A760G M2+) 4.1 HYBRID CROSSFIREX REQUIREMENTS Only Windows Vista supports Hybrid CrossFireX function.
... Radeon HD3450/HD3470 GPU. Step 2: In the graphics card configuration program, choose "Hybrid CrossFireX" function. The graphics card driver should support Hybrid CrossFireX technology. Motherboard Manual CHAPTER 4: HYBRID CROSSFIREX FUNCTION (FOR A780G M2+ SE/A780V M2+ SE/A760G M2+) 4.1 HYBRID CROSSFIREX REQUIREMENTS Only Windows Vista supports Hybrid CrossFireX function.
Setup Manual
Page 24
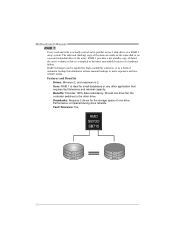
Should one drive. Fault Tolerance: Yes. Uses: RAID 1 is ideal for small databases or any other application that eliminates tedious manual backups to the other drive. - RAID 1 provides a hot-standby copy of data if the active volume or drive is 2. - RAID ...the storage space of automatic backup that requires fault tolerance and minimal capacity. - Block 1 Block 2 Block 3 Block 1 Block 2 Block 3 22 Motherboard Manual RAID 1: Every read and write is actually carried out in parallel across 2 disk drives in the array. Performance is impaired during drive rebuilds. - The ...
Should one drive. Fault Tolerance: Yes. Uses: RAID 1 is ideal for small databases or any other application that eliminates tedious manual backups to the other drive. - RAID 1 provides a hot-standby copy of data if the active volume or drive is 2. - RAID ...the storage space of automatic backup that requires fault tolerance and minimal capacity. - Block 1 Block 2 Block 3 Block 1 Block 2 Block 3 22 Motherboard Manual RAID 1: Every read and write is actually carried out in parallel across 2 disk drives in the array. Performance is impaired during drive rebuilds. - The ...
Setup Manual
Page 26
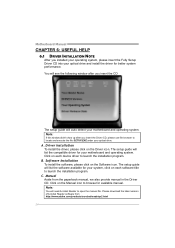
...guide will auto detect your motherboard and operating system. Software Installation To install the software, please click on the Driver icon. Motherboard Manual CHAPTER 6: USEFUL HELP 6.1 DRIVER INSTALLATION NOTE After you installed your operating system, please insert the Fully Setup Driver CD into your ... and install the driver for your motherboard and operating system. Driver Installation To install the driver, please click on the Software icon. Manual Aside from http://www.adobe.com /produ cts/a crobat /reads tep2 .html 24 You will see the following window after you insert...
...guide will auto detect your motherboard and operating system. Software Installation To install the software, please click on the Driver icon. Motherboard Manual CHAPTER 6: USEFUL HELP 6.1 DRIVER INSTALLATION NOTE After you installed your operating system, please insert the Fully Setup Driver CD into your ... and install the driver for your motherboard and operating system. Driver Installation To install the driver, please click on the Software icon. Manual Aside from http://www.adobe.com /produ cts/a crobat /reads tep2 .html 24 You will see the following window after you insert...
Setup Manual
Page 28
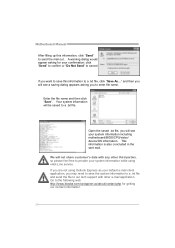
... the mail out. Enter the file name and then click "Save". Go to a .txt file, click "Save As..." Motherboard Manual After filling up this information to the following web http://www.biostar.com.tw/app/en-us/about/contact.php for your system information while using Outlook Express as your default e-mail...
... the mail out. Enter the file name and then click "Save". Go to a .txt file, click "Save As..." Motherboard Manual After filling up this information to the following web http://www.biostar.com.tw/app/en-us/about/contact.php for your system information while using Outlook Express as your default e-mail...
Setup Manual
Page 30
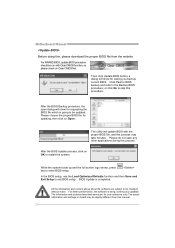
... choose the proper BIOS file for updating, then click on Clear CMOS first. BIOS Update is being continuously updated. Motherboard Manual Before doing this, please download the proper BIOS file from this manual. 28 For AWARD BIOS, update BIOS procedure should be slightly different from the website. The information and pictures described...
... choose the proper BIOS file for updating, then click on Clear CMOS first. BIOS Update is being continuously updated. Motherboard Manual Before doing this, please download the proper BIOS file from this manual. 28 For AWARD BIOS, update BIOS procedure should be slightly different from the website. The information and pictures described...
Setup Manual
Page 32
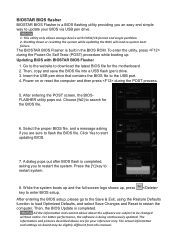
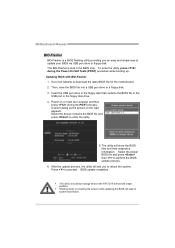
... or the floppy disk drive. 4. Insert the USB pen drive or the floppy disk that contains the BIOS file to system boot failure. 30 Motherboard Manual BIO-Flasher BIO-Flasher is built in the BIOS chip. Then, save the BIOS file into a USB pen drive or a floppy disk. 3. Power on the...
... or the floppy disk drive. 4. Insert the USB pen drive or the floppy disk that contains the BIOS file to system boot failure. 30 Motherboard Manual BIO-Flasher BIO-Flasher is built in the BIOS chip. Then, save the BIOS file into a USB pen drive or a floppy disk. 3. Power on the...
Setup Manual
Page 34
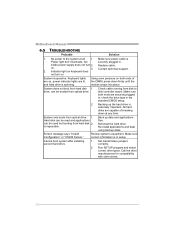
Motherboard Manual 6.5 TROUBLESHOOTING Probable Solution 1. Make sure power cable is in ; on , power indicator lights are capable of the DIMM, press down at all 1. System does not ...
Motherboard Manual 6.5 TROUBLESHOOTING Probable Solution 1. Make sure power cable is in ; on , power indicator lights are capable of the DIMM, press down at all 1. System does not ...

Bios Manual
Page 2
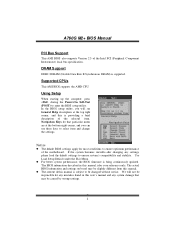
... implemented via the System Management Int errupt (SMI). ACPI Support AMI ACPI BIOS support Version 1.0/2.0 of this motherboard. A760G M2+ BIOS Manual BIOS Setup Introduction T he purpose of this manual is turned off. Power management features are supported. The Setup program allows users to modify the basic system configuration and save these... con figuration capabilities as virus and password prot ection or chipset fine-tuning options are also included in the AMI BIOS Setup program on this manual will to CMOS RAM.
... implemented via the System Management Int errupt (SMI). ACPI Support AMI ACPI BIOS support Version 1.0/2.0 of this motherboard. A760G M2+ BIOS Manual BIOS Setup Introduction T he purpose of this manual is turned off. Power management features are supported. The Setup program allows users to modify the basic system configuration and save these... con figuration capabilities as virus and password prot ection or chipset fine-tuning options are also included in the AMI BIOS Setup program on this manual will to CMOS RAM.
Bios Manual
Page 3
...perform ance, the BIOS firmware is for that may be caused by wrong-settings. 2 T he BIOS information described in this user's manual and any settings, please load the default settings to ensure system's compatibility and stability. Using Setup When starting up the computer, press during...Intel PCI (Peripheral Component Interconn ect) local bus speci fication. Supported CP Us T his AMI BIOS also supports Version 2.3 of this manual is being continuously updated. If the system becomes unstable after changing any system damage that particular menu are at the top right corner,...
...perform ance, the BIOS firmware is for that may be caused by wrong-settings. 2 T he BIOS information described in this user's manual and any settings, please load the default settings to ensure system's compatibility and stability. Using Setup When starting up the computer, press during...Intel PCI (Peripheral Component Interconn ect) local bus speci fication. Supported CP Us T his AMI BIOS also supports Version 2.3 of this manual is being continuously updated. If the system becomes unstable after changing any system damage that particular menu are at the top right corner,...

