Manual
Page 2
... the needle area - such as changing or threading the needle, presser foot etc. 14 Always unplug the sewing-/embroidery computer from the electrical outlet when removing covers, lubricating, or when making any adjustments in use, it has fallen into any objects into water Return the sewing-/embroidery computer to the product. WARNING! Use only attachments, accessories and parts recommended by the manufacturer. 2 Do not use of the sewing -/embroidery computer by removing the...
... the needle area - such as changing or threading the needle, presser foot etc. 14 Always unplug the sewing-/embroidery computer from the electrical outlet when removing covers, lubricating, or when making any adjustments in use, it has fallen into any objects into water Return the sewing-/embroidery computer to the product. WARNING! Use only attachments, accessories and parts recommended by the manufacturer. 2 Do not use of the sewing -/embroidery computer by removing the...
Manual
Page 5
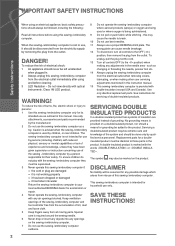
... Free-Hand-System (FHS) Presser Foot Lifter 12 Foot Control 13 LED Sewing Light 13 Pivotable Triple Spool Holder 14 Bobbin 14 Winding the Bobbin 15 Interrupting the winding process 15 Removing / Inserting the Bobbin 16 Threading Lower Thread 16 Slide-on Table 17 Thread Cutter 17 Threading the Upper Thread 18 Double/Triple Needle 19 Changing the Needle 20 Changing the Presser Foot 20 Stitch plates 21 Feed-Dog and Fabric Feed 21 Sewing with the Height Compensation Tool 22 Sewing Corners 22 Thread Tension 23 Upper Thread Tension 23 Lower Thread Tension...
... Free-Hand-System (FHS) Presser Foot Lifter 12 Foot Control 13 LED Sewing Light 13 Pivotable Triple Spool Holder 14 Bobbin 14 Winding the Bobbin 15 Interrupting the winding process 15 Removing / Inserting the Bobbin 16 Threading Lower Thread 16 Slide-on Table 17 Thread Cutter 17 Threading the Upper Thread 18 Double/Triple Needle 19 Changing the Needle 20 Changing the Presser Foot 20 Stitch plates 21 Feed-Dog and Fabric Feed 21 Sewing with the Height Compensation Tool 22 Sewing Corners 22 Thread Tension 23 Upper Thread Tension 23 Lower Thread Tension...
Manual
Page 11
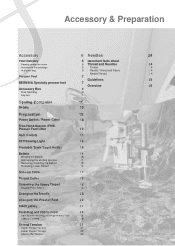
...; Help button ‣ Eco button ‣ Sewing-/Embroidery mode button ‣ «clr» clear button 10 Stitch width knob 11 Stitch length knob 12 Needle position buttons 13 Bobbin winder 14 Thread cutter for bobbin winder 15 Threading slit 16 Triple spool pin 17 Telescope 18 Bobbin pre-tension 19 Slide-on table socket 20 Darning hoop connection 21 FHS (Free Hand System) connection 22 Slide speed control 23 Automatic needle threader 24 Needle stop up/down button 25 Presser foot up/down button 26 Securing button 27 Pattern...
...; Help button ‣ Eco button ‣ Sewing-/Embroidery mode button ‣ «clr» clear button 10 Stitch width knob 11 Stitch length knob 12 Needle position buttons 13 Bobbin winder 14 Thread cutter for bobbin winder 15 Threading slit 16 Triple spool pin 17 Telescope 18 Bobbin pre-tension 19 Slide-on table socket 20 Darning hoop connection 21 FHS (Free Hand System) connection 22 Slide speed control 23 Automatic needle threader 24 Needle stop up/down button 25 Presser foot up/down button 26 Securing button 27 Pattern...
Manual
Page 14
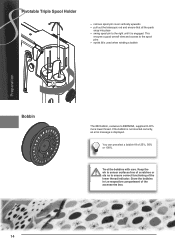
This ensures a good overall view and access to BERNINA, supplies till 40% more lower thread. If the bobbin is not inserted correctly, an error message is used when winding a bobbin A Bobbin The 830 bobbin, exclusive to the spool pins ► eyelet A is displayed. Treat the bobbins with care. You can preselect a bobbin fill of the accessories box. 14 Store the bobbins in the respective compartment of 25%, 50...
This ensures a good overall view and access to BERNINA, supplies till 40% more lower thread. If the bobbin is not inserted correctly, an error message is used when winding a bobbin A Bobbin The 830 bobbin, exclusive to the spool pins ► eyelet A is displayed. Treat the bobbins with care. You can preselect a bobbin fill of the accessories box. 14 Store the bobbins in the respective compartment of 25%, 50...
Manual
Page 18
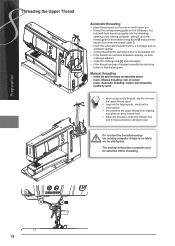
... spool pin ► thread the corresponding guide on the telescopic rod, hold with both hands and guide into the threading opening of the sewing computer, taking it up to the thread guide in the needle clamp A and B and pull from slipping and gives an even thread feed ► place the thread(s) under the presser foot and to the back before starting to front over the thread cutter C ► touch the automatic threader button...
... spool pin ► thread the corresponding guide on the telescopic rod, hold with both hands and guide into the threading opening of the sewing computer, taking it up to the thread guide in the needle clamp A and B and pull from slipping and gives an even thread feed ► place the thread(s) under the presser foot and to the back before starting to front over the thread cutter C ► touch the automatic threader button...
Manual
Page 28
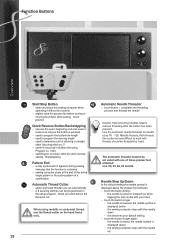
... 28 The automatic threader mustn't be threaded by -stitch reverse sewing - Use the automatic needle threader for accurate stitch-by hand. Automatic Needle Threader ► touch button = completes the threading process and threads the needle Double, triple and wing needles require manual threading after the button has been pressed. Function Buttons Overview Start/Stop Button ► starts and stops the sewing computer when operating it without foot control ► slightly raise the presser foot when turning or moving the project while sewing - Backstepping Pattern End...
... 28 The automatic threader mustn't be threaded by -stitch reverse sewing - Use the automatic needle threader for accurate stitch-by hand. Automatic Needle Threader ► touch button = completes the threading process and threads the needle Double, triple and wing needles require manual threading after the button has been pressed. Function Buttons Overview Start/Stop Button ► starts and stops the sewing computer when operating it without foot control ► slightly raise the presser foot when turning or moving the project while sewing - Backstepping Pattern End...
Manual
Page 29
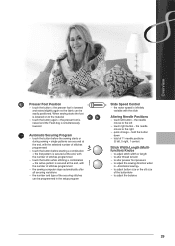
...; the number and type of the buttonhole ► to the left button - the needle moves to adjust the balance 29 hold the button down ► total of 11 needle positions (5 left, 5 right, 1 center) Stitch Width/Length (Multifunction) Knobs ► to adjust stitch width or length ► to alter thread tension ► to alter presser foot pressure ► to adjust the sewing direction when in «directional sewing» ► to adjust button size or the slit size of...
...; the number and type of the buttonhole ► to the left button - the needle moves to adjust the balance 29 hold the button down ► total of 11 needle positions (5 left, 5 right, 1 center) Stitch Width/Length (Multifunction) Knobs ► to adjust stitch width or length ► to alter thread tension ► to alter presser foot pressure ► to adjust the sewing direction when in «directional sewing» ► to adjust button size or the slit size of...
Manual
Page 32
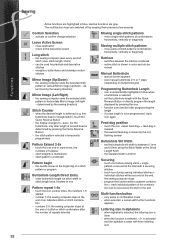
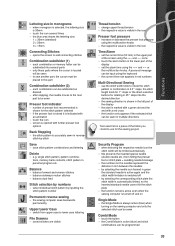
... moved Manual Buttonhole ► special screen appears ► sew manual buttonhole in 5 or 7 steps (depending on buttonhole type) Programming Buttonhole Length ► icon is automatically highlighted in alphabets ► when alphabet is selected, the lettering size is 9mm ► when the function is selected, «2» is activated and the alphabet is achieved (e.g. first buttonhole bead or straight stitch), touch the Quick Reverse Button ► the display changes...
... moved Manual Buttonhole ► special screen appears ► sew manual buttonhole in 5 or 7 steps (depending on buttonhole type) Programming Buttonhole Length ► icon is automatically highlighted in alphabets ► when alphabet is selected, the lettering size is 9mm ► when the function is selected, «2» is activated and the alphabet is achieved (e.g. first buttonhole bead or straight stitch), touch the Quick Reverse Button ► the display changes...
Manual
Page 33
... stitch pattern by inputting the stitch pattern number Permanent reverse sewing ► the sewing computer sews backwards permanently Upper/Lower Case ► switch from hitting the presser foot or stitch plate = avoiding needle breakage ► the numbers on a piece of the fabric you intend to use the stitch width knob to rotate the stitch pattern or combination in 0.5° steps, the stitch length knob for 1° steps or the direct-selection buttons for the sewing project. Lettering size in monograms...
... stitch pattern by inputting the stitch pattern number Permanent reverse sewing ► the sewing computer sews backwards permanently Upper/Lower Case ► switch from hitting the presser foot or stitch plate = avoiding needle breakage ► the numbers on a piece of the fabric you intend to use the stitch width knob to rotate the stitch pattern or combination in 0.5° steps, the stitch length knob for 1° steps or the direct-selection buttons for the sewing project. Lettering size in monograms...
Manual
Page 37
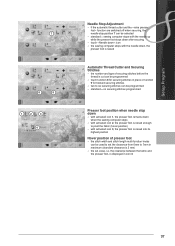
the clearance between the fabric and the presser foot, is 2 mm) ► the set value, i.e. Setup Program 7 8 9 1 2 3 4 Needle Stop Adjustment ► if the automatic thread cutter and the «raise presser foot» function are switched off when securing, the needle stop position 7 can be selected ► standard = sewing computer stops with the needle up while the presser foot stays down after securing ► touch «Needle down» icon...
the clearance between the fabric and the presser foot, is 2 mm) ► the set value, i.e. Setup Program 7 8 9 1 2 3 4 Needle Stop Adjustment ► if the automatic thread cutter and the «raise presser foot» function are switched off when securing, the needle stop position 7 can be selected ► standard = sewing computer stops with the needle up while the presser foot stays down after securing ► touch «Needle down» icon...
Manual
Page 46
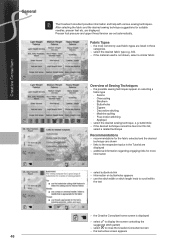
... not shown, select a similar fabric Overview of Sewing Techniques ► the possible sewing techniques appear on this list, select a related technique Recommendations ► recommendations for suitable needles, presser feet etc. are set automatically. buttonhole ► if the desired technique cannot be found on selecting a fabric type ‣ Seams ‣ Overcasting ‣ Blindhem ‣ Buttonholes ‣ Zippers ‣ Decorative stitching ‣ Machine quilting ‣ Free-motion stitching ‣ Appliqué ► select the...
... not shown, select a similar fabric Overview of Sewing Techniques ► the possible sewing techniques appear on this list, select a related technique Recommendations ► recommendations for suitable needles, presser feet etc. are set automatically. buttonhole ► if the desired technique cannot be found on selecting a fabric type ‣ Seams ‣ Overcasting ‣ Blindhem ‣ Buttonholes ‣ Zippers ‣ Decorative stitching ‣ Machine quilting ‣ Free-motion stitching ‣ Appliqué ► select the...
Manual
Page 51
... Impressions 84 Direct Entry Length 68 Button Measurement 68 Main Stitch Categories Stitch Patterns 52 Programming 69 Selection Automatic Buttonhole 69 52 Standard and Stretch Buttonhole 69 via Screen 52 Round and Keyhole Buttonholes 69 by Stitch Number 52 Hand-look Buttonhole 70 Stitch Counter Buttonhole 70 Customizing Stitch Patterns 53 All Buttonhole Types 70 Altering Stitch Width and Stitch Length 53 Altering Needle Position 53 In Long-Term Memory 71 Securing with Quick Reverse Button on Head...
... Impressions 84 Direct Entry Length 68 Button Measurement 68 Main Stitch Categories Stitch Patterns 52 Programming 69 Selection Automatic Buttonhole 69 52 Standard and Stretch Buttonhole 69 via Screen 52 Round and Keyhole Buttonholes 69 by Stitch Number 52 Hand-look Buttonhole 70 Stitch Counter Buttonhole 70 Customizing Stitch Patterns 53 All Buttonhole Types 70 Altering Stitch Width and Stitch Length 53 Altering Needle Position 53 In Long-Term Memory 71 Securing with Quick Reverse Button on Head...
Manual
Page 66
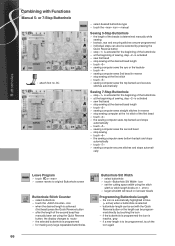
...) press the Quick Reverse button ► after the length of the second bead has manually been set using the Quick Reverse button, the display changes to be programmed, touch the icon again 66 Buttonholes Combining with the Quick Reverse button or the length can be programmed directly by pressing the Quick Reverse button ► step «1» is activated for the beginning of the buttonhole ► at the beginning of sewing, step...
...) press the Quick Reverse button ► after the length of the second bead has manually been set using the Quick Reverse button, the display changes to be programmed, touch the icon again 66 Buttonholes Combining with the Quick Reverse button or the length can be programmed directly by pressing the Quick Reverse button ► step «1» is activated for the beginning of the buttonhole ► at the beginning of sewing, step...
Manual
Page 86
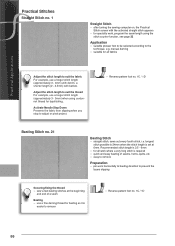
... using the stitch counter function, see page 32 Application ► suitable presser foot to be selected according to adjust or pivot project. ► Reverse pattern foot no. 1C / 1D Basting Stitch no. 21 Basting Stitch ► straight stitch, sews out every fourth stitch, i.e. Practical Applications Practical Stitches Straight Stitch no. 1 Straight Stitch ► after turning the sewing computer on, the Practical Stitch screen with batiste. manual darning ► suitable for all fabrics Adjust the stitch length to remove ► Reverse pattern foot no...
... using the stitch counter function, see page 32 Application ► suitable presser foot to be selected according to adjust or pivot project. ► Reverse pattern foot no. 1C / 1D Basting Stitch no. 21 Basting Stitch ► straight stitch, sews out every fourth stitch, i.e. Practical Applications Practical Stitches Straight Stitch no. 1 Straight Stitch ► after turning the sewing computer on, the Practical Stitch screen with batiste. manual darning ► suitable for all fabrics Adjust the stitch length to remove ► Reverse pattern foot no...
Manual
Page 97
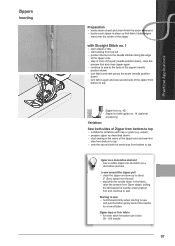
... the zipper (needle position down) ► turn fabric and sew across the seam (needle position down) ► turn fabric again and sew second side of the zipper from bottom to top ► Zipper foot no. 4D ► Zipper foot with guide no . 1 ► open zipper a little ► start sewing in the fabric, raise the presser foot. lower presser foot and continue to sew Starting to sew ► hold threads firmly when starting to sew and pull the fabric gently behind the needle for a few stitches Zipper...
... the zipper (needle position down) ► turn fabric and sew across the seam (needle position down) ► turn fabric again and sew second side of the zipper from bottom to top ► Zipper foot no. 4D ► Zipper foot with guide no . 1 ► open zipper a little ► start sewing in the fabric, raise the presser foot. lower presser foot and continue to sew Starting to sew ► hold threads firmly when starting to sew and pull the fabric gently behind the needle for a few stitches Zipper...
Manual
Page 110
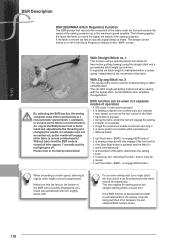
... foot control or the Start-Stop-button is pressed and the fabric is moved simultaneously ► the movement of the fabric determines the sewing speed ► for thread painting or fabric embellishment. The following applies: the faster the fabric is turned off after approx. 7 seconds and the red light goes off. With Zig-zag Stitch no . 1 This function using a special presser foot allows for free-motion quilting (sewing) using the straight stitch and a pre-selected stitch length...
... foot control or the Start-Stop-button is pressed and the fabric is moved simultaneously ► the movement of the fabric determines the sewing speed ► for thread painting or fabric embellishment. The following applies: the faster the fabric is turned off after approx. 7 seconds and the red light goes off. With Zig-zag Stitch no . 1 This function using a special presser foot allows for free-motion quilting (sewing) using the straight stitch and a pre-selected stitch length...

Manual
Page 167
... ECO function Clean sensors with knots Remnants of threads between the tension discs of upper thread tension Calibration data incorrect ECO function switched on Repair Tighten the needle clamp screw Do not pull the fabric during sewing Use the correct presser foot for thick material (e.g. Fault Needle breaks Faulty Stitching Screen does not respond Cause Needle not correctly inserted Fabric is not switched on LED on the key does not light up...
... ECO function Clean sensors with knots Remnants of threads between the tension discs of upper thread tension Calibration data incorrect ECO function switched on Repair Tighten the needle clamp screw Do not pull the fabric during sewing Use the correct presser foot for thick material (e.g. Fault Needle breaks Faulty Stitching Screen does not respond Cause Needle not correctly inserted Fabric is not switched on LED on the key does not light up...
Manual
Page 209
..., 25 125, 126 Fabric Feed 21 Feed-dog Position Raising / lowering the feed-dog 21 32 12, 31 Foot Control Connection Needle stop up / down Needle summary Needle / thread combination Position button Security program Up / Down with functions Left / Right Mirroring of entire combinations Up / Down Motif Size Display Multi-Directional Sewing Multifunction Knobs Multifunction Tool N Needle Altering the needle position Automatic threading Changing the needle Double and triple needles Embroidery needles In standard accessories Information Needle stop up / down Start / Stop function...
..., 25 125, 126 Fabric Feed 21 Feed-dog Position Raising / lowering the feed-dog 21 32 12, 31 Foot Control Connection Needle stop up / down Needle summary Needle / thread combination Position button Security program Up / Down with functions Left / Right Mirroring of entire combinations Up / Down Motif Size Display Multi-Directional Sewing Multifunction Knobs Multifunction Tool N Needle Altering the needle position Automatic threading Changing the needle Double and triple needles Embroidery needles In standard accessories Information Needle stop up / down Start / Stop function...
Manual
Page 210
... Accessories Embroidering Sewing Overlock Overlock foot Seams Stitches Overwriting P Patchwork Specialty feet Stitches With BERNINA Dual Feed Permanent Reverse Sewing Personal Program Pintucks Power Cable Connection Practical Stitches Adjusting individual Brief Description In Personal Program Overview Preparing and Setting Up The embroidery module The sewing computer Presser Foot BERNINA specialty feet BSR foot Changing the presser foot Display Position of presser foot Presser feet summary Presser foot pressure Raise / lower the presser foot Pre-tension Q Quilting BERNINA Quilt Frame BERNINA...
... Accessories Embroidering Sewing Overlock Overlock foot Seams Stitches Overwriting P Patchwork Specialty feet Stitches With BERNINA Dual Feed Permanent Reverse Sewing Personal Program Pintucks Power Cable Connection Practical Stitches Adjusting individual Brief Description In Personal Program Overview Preparing and Setting Up The embroidery module The sewing computer Presser Foot BERNINA specialty feet BSR foot Changing the presser foot Display Position of presser foot Presser feet summary Presser foot pressure Raise / lower the presser foot Pre-tension Q Quilting BERNINA Quilt Frame BERNINA...
Manual
Page 211
... With BSR With height compensation plates Sewing Computer Cover Sewing Light LED Sewing Speed Sideways-Motion Foot Sideways-Motion Stitches Balance Monograms Overview Single Mode Single Pattern Altering a stitch combination Deleting Moving a stitch combination Securing Selection by number Slide-on Table Software Version Speed Control Spool Disc Spool Holder Start-Stop Button Embroidery start Stitch Altering Area Stitch Counter Function Stitch Width / Length Knob Stitch Pattern Buttonholes Decorative stitches Display Functions Help Overview Practical stitches Quilt stitches Skyline 48, 49 36...
... With BSR With height compensation plates Sewing Computer Cover Sewing Light LED Sewing Speed Sideways-Motion Foot Sideways-Motion Stitches Balance Monograms Overview Single Mode Single Pattern Altering a stitch combination Deleting Moving a stitch combination Securing Selection by number Slide-on Table Software Version Speed Control Spool Disc Spool Holder Start-Stop Button Embroidery start Stitch Altering Area Stitch Counter Function Stitch Width / Length Knob Stitch Pattern Buttonholes Decorative stitches Display Functions Help Overview Practical stitches Quilt stitches Skyline 48, 49 36...


