Manual
Page 2
... is required around the sewing needle. 6 Never drop or insert any objects into water Return the sewing-/embroidery computer to your local authorized BERNINA dealer for any openings on a doubleinsulated product, nor should always be followed, including the following: Read all controls OFF (to the ... An appliance should be added to break. 10 Do not use bent needles. 11 Always use of double-insulated products. Use only attachments, accessories and parts recommended by removing the plug from misuse of grounding. Special care is being used by qualified service personnel. No ...
... is required around the sewing needle. 6 Never drop or insert any objects into water Return the sewing-/embroidery computer to your local authorized BERNINA dealer for any openings on a doubleinsulated product, nor should always be followed, including the following: Read all controls OFF (to the ... An appliance should be added to break. 10 Do not use bent needles. 11 Always use of double-insulated products. Use only attachments, accessories and parts recommended by removing the plug from misuse of grounding. Special care is being used by qualified service personnel. No ...
Manual
Page 6
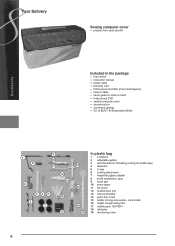
... 14 543 16 2 1 17 12 15 18 19 In plastic bag 1 4 bobbins 2 adjustable guides 3 wire threader for threading cording for bobbin play 4 tweezers 5 2 nets 6 cording attachment 7 magnifying glass adapter 8 small screwdriver, gray 9 touch pen 10 seam ripper 11 lint brush 12 multifunction tool 13 manual threader 14 spool disc small 15...
... 14 543 16 2 1 17 12 15 18 19 In plastic bag 1 4 bobbins 2 adjustable guides 3 wire threader for threading cording for bobbin play 4 tweezers 5 2 nets 6 cording attachment 7 magnifying glass adapter 8 small screwdriver, gray 9 touch pen 10 seam ripper 11 lint brush 12 multifunction tool 13 manual threader 14 spool disc small 15...
Manual
Page 11
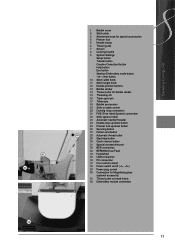
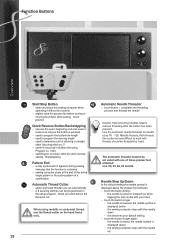
Sewing Computer 41 33 1 Bobbin cover 2 Stitch plate 3 Attachment base for special accessories 4 Presser foot 5 Needle clamp 6 Thread guide 7 Screen 8 Carrying handle 9 System Settings ‣ Setup button ‣ Tutorial button ‣ Creative Consultant button &#... 27 Pattern end button 40 28 Automatic thread cutter 29 Start/stop button 30 Quick reverse button 31 Special-accessories port 32 BSR connection 33 BERNINA Dual Feed 34 Handwheel 35 USB connection 36 PC connection 37 Foot control socket 38 Power switch on/off («I», «0») 39 Power...
Sewing Computer 41 33 1 Bobbin cover 2 Stitch plate 3 Attachment base for special accessories 4 Presser foot 5 Needle clamp 6 Thread guide 7 Screen 8 Carrying handle 9 System Settings ‣ Setup button ‣ Tutorial button ‣ Creative Consultant button &#... 27 Pattern end button 40 28 Automatic thread cutter 29 Start/stop button 30 Quick reverse button 31 Special-accessories port 32 BSR connection 33 BERNINA Dual Feed 34 Handwheel 35 USB connection 36 PC connection 37 Foot control socket 38 Power switch on/off («I», «0») 39 Power...
Manual
Page 12
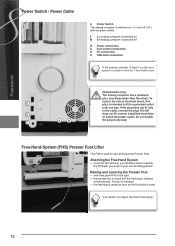
... than the other). If the plug does not fit fully in any way! Free-Hand-System (FHS) Presser Foot Lifter The FHS is lowered simultaneously. Attaching the Free Hand System ► insert into the opening; E D C A B (USA/Canada only): The sewing computer has a polarized plug (one way. Tension is released ► the...
... than the other). If the plug does not fit fully in any way! Free-Hand-System (FHS) Presser Foot Lifter The FHS is lowered simultaneously. Attaching the Free Hand System ► insert into the opening; E D C A B (USA/Canada only): The sewing computer has a polarized plug (one way. Tension is released ► the...
Manual
Page 17
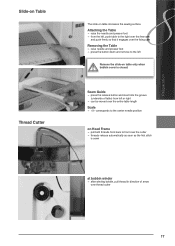
Attaching the Table ► raise the needle and presser foot ► from the left, push table to the right over the free-arm and push firmly ...
Attaching the Table ► raise the needle and presser foot ► from the left, push table to the right over the free-arm and push firmly ...

Manual
Page 20
... the needle in order to get better access to «0» (off) Releasing the Presser Foot ► raise the clamping lever ► remove presser foot Attaching the Presser Foot ► guide the presser foot upwards over the cone ► touch the clamping lever down 20
... the needle in order to get better access to «0» (off) Releasing the Presser Foot ► raise the clamping lever ► remove presser foot Attaching the Presser Foot ► guide the presser foot upwards over the cone ► touch the clamping lever down 20
Manual
Page 28
... = completes the threading process and threads the needle Double, triple and wing needles require manual threading after the button has been pressed. these presser feet attached: nos. 50, 55, 80, 85 and 86. Metallic threads, thick threads like cordonnet and difficult to determine end of these are cut When using metallic...
... = completes the threading process and threads the needle Double, triple and wing needles require manual threading after the button has been pressed. these presser feet attached: nos. 50, 55, 80, 85 and 86. Metallic threads, thick threads like cordonnet and difficult to determine end of these are cut When using metallic...
Manual
Page 38
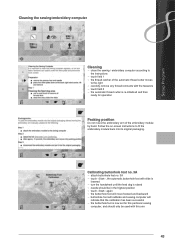
Adjustments can be done if the embroidery module is attached. ► select the required hoop and follow the instructions on the screen ► place embroidery template into the embroidery hoop ► the hoop position is ...
Adjustments can be done if the embroidery module is attached. ► select the required hoop and follow the instructions on the screen ► place embroidery template into the embroidery hoop ► the hoop position is ...
Manual
Page 43
Calibrating buttonhole foot no. 3A ► attach buttonhole foot no. 3A ► touch «Start», the automatic buttonhole foot with slide is lowered ► turn the handwheel until the feed dog ...
Calibrating buttonhole foot no. 3A ► attach buttonhole foot no. 3A ► touch «Start», the automatic buttonhole foot with slide is lowered ► turn the handwheel until the feed dog ...

Manual
Page 54
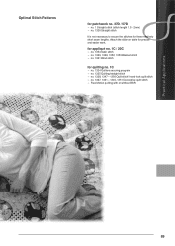
..., toweling and firm wovens; overlock seam, flat joining seams Jersey Stitch For jersey fabrics; flat joining seam, visible seam, attaching elastic, decorative seam Sewn-out Zig-Zag Oversewing woven fabrics, reinforcing edges, decorative seam Honeycomb Stitch Most types of interlock and...Reinforced seams in firm fabrics, visible hems and seams, couching, decorative stitching Universal Stitch For firmer fabrics such as overcasting edges, attaching elastic and lace Super Stretch Stitch For highly elastic fabrics. Practical Stitches Description ► touch the «Practical stitches»...
..., toweling and firm wovens; overlock seam, flat joining seams Jersey Stitch For jersey fabrics; flat joining seam, visible seam, attaching elastic, decorative seam Sewn-out Zig-Zag Oversewing woven fabrics, reinforcing edges, decorative seam Honeycomb Stitch Most types of interlock and...Reinforced seams in firm fabrics, visible hems and seams, couching, decorative stitching Universal Stitch For firmer fabrics such as overcasting edges, attaching elastic and lace Super Stretch Stitch For highly elastic fabrics. Practical Stitches Description ► touch the «Practical stitches»...
Manual
Page 66
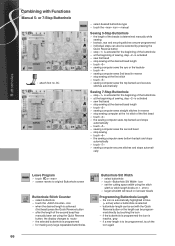
...; the sewing computer sews bottom bartack and stops automatically ► touch «7» ► sewing computer secures stitches and stops automati- or 7-Step Buttonhole ► attach foot no. 3C ► select desired buttonhole type ► touch the «man» icon = manual Sewing 5-Step Buttonhole ► the length of the beads...
...; the sewing computer sews bottom bartack and stops automatically ► touch «7» ► sewing computer secures stitches and stops automati- or 7-Step Buttonhole ► attach foot no. 3C ► select desired buttonhole type ► touch the «man» icon = manual Sewing 5-Step Buttonhole ► the length of the beads...

Manual
Page 70
... part of buttonhole ► second bead in reverse ► bartack and securing stitches, stops and automatically goes to sew buttonhole again Stitch Counter Buttonhole ► attach foot no. 3C All Buttonhole Types Sewing the first bead ► sew first bead forwards, stop sewing computer at required length ► press the Quick...
... part of buttonhole ► second bead in reverse ► bartack and securing stitches, stops and automatically goes to sew buttonhole again Stitch Counter Buttonhole ► attach foot no. 3C All Buttonhole Types Sewing the first bead ► sew first bead forwards, stop sewing computer at required length ► press the Quick...
Manual
Page 71
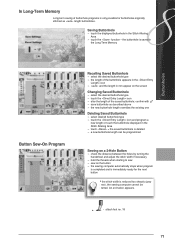
confirm with ► save buttonhole as «auto» length buttonholes. An animation appears. ► attach foot no. 18 71 the buttonhole is saved in the Long Term Memory Buttonholes Button Sew-On Program Recalling Saved Buttonhole ► select the desired ...
confirm with ► save buttonhole as «auto» length buttonholes. An animation appears. ► attach foot no. 18 71 the buttonhole is saved in the Long Term Memory Buttonholes Button Sew-On Program Recalling Saved Buttonhole ► select the desired ...
Manual
Page 72
...-on program twice. 2- For work which is subject to cut open the eyelet The thread shank (distance between the button and the fabric) can be attached. Buttonholes Eyelet Program 72 Sewing on a 4-Hole Button ► sew the front holes first ► carefully move the button forward ► sew the back holes...
...-on program twice. 2- For work which is subject to cut open the eyelet The thread shank (distance between the button and the fabric) can be attached. Buttonholes Eyelet Program 72 Sewing on a 4-Hole Button ► sew the front holes first ► carefully move the button forward ► sew the back holes...
Manual
Page 89
Attach the slide-on table for precise and easier work. for appliqué no. 1C / 20C ► no. 1354 Satin stitch ► no. 1329, 1330, 1352, ...
Attach the slide-on table for precise and easier work. for appliqué no. 1C / 20C ► no. 1354 Satin stitch ► no. 1329, 1330, 1352, ...
Manual
Page 92
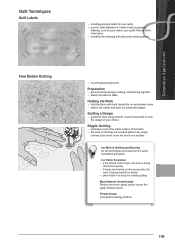
... by a half turn -90° 2 Cover the First Rows 2 ► sew over the fabric ► Darning foot no . 1 Darning Holes or Worn Areas Preparation ► attach the Slide-on bottom, move in different lengths so that the thread is not being moved too slowly Thread breaks If thread breakage is a problem...
... by a half turn -90° 2 Cover the First Rows 2 ► sew over the fabric ► Darning foot no . 1 Darning Holes or Worn Areas Preparation ► attach the Slide-on bottom, move in different lengths so that the thread is not being moved too slowly Thread breaks If thread breakage is a problem...
Manual
Page 108
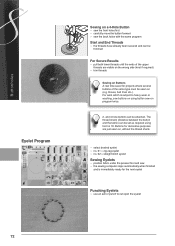
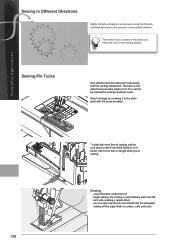
... simply by screwing it to the stitch plate with the screw provided. 108 To help with the cording attachment. The tube on collars, cuffs and tucks Sewing ► place the fabric under the foot ► begin sewing, the cording is automatically sewn into the ... doesn't fall on a piece of the fabric you 're sewing. Decorative Applications Sewing in Different Directions Highly attractive designs can also use the pin tuck attachment for a beautiful scallop off the edge finish on the attachment provides ample room for a cord to use for sewing raised pin tucks.
... simply by screwing it to the stitch plate with the screw provided. 108 To help with the cording attachment. The tube on collars, cuffs and tucks Sewing ► place the fabric under the foot ► begin sewing, the cording is automatically sewn into the ... doesn't fall on a piece of the fabric you 're sewing. Decorative Applications Sewing in Different Directions Highly attractive designs can also use the pin tuck attachment for a beautiful scallop off the edge finish on the attachment provides ample room for a cord to use for sewing raised pin tucks.
Manual
Page 109
... moved too slowly ► place fabric in a hoop for all freehand quilt work Preparation ► pin and baste top layer, batting, and backing together ► attach the slide-on table Holding the Work ► hold the fabric with both hands like an embroidery frame ► start in Combi mode to form...
... moved too slowly ► place fabric in a hoop for all freehand quilt work Preparation ► pin and baste top layer, batting, and backing together ► attach the slide-on table Holding the Work ► hold the fabric with both hands like an embroidery frame ► start in Combi mode to form...

Manual
Page 111
... ‣ removing sole: press both buttons (see arrows) on each side of the foot ‣ slide the sole down the groove at an angle ‣ attaching the sole: slide the sole up in the groove until it clicks into place ► Presser Foot Pressure may be reduced depending on the fabric... type and thickness ► attach the BSR Presser Foot to the sewing computer and plug the cable in the outlet provided ► the «BSR» screen opens automatically ►...
... ‣ removing sole: press both buttons (see arrows) on each side of the foot ‣ slide the sole down the groove at an angle ‣ attaching the sole: slide the sole up in the groove until it clicks into place ► Presser Foot Pressure may be reduced depending on the fabric... type and thickness ► attach the BSR Presser Foot to the sewing computer and plug the cable in the outlet provided ► the «BSR» screen opens automatically ►...
Manual
Page 115
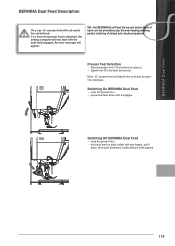
... enabling perfect matching of striped and checkered patterns. If an incorrect presser foot is attached, the sewing computer will appear. An error message will not start with cut-out at the center back. Switching On BERNINA Dual Feed ► raise the presser foot ► press dual feed down until... it engages Switching Off BERNINA Dual Feed ► raise the presser foot ► hold dual feed on black holder ...
... enabling perfect matching of striped and checkered patterns. If an incorrect presser foot is attached, the sewing computer will appear. An error message will not start with cut-out at the center back. Switching On BERNINA Dual Feed ► raise the presser foot ► press dual feed down until... it engages Switching Off BERNINA Dual Feed ► raise the presser foot ► hold dual feed on black holder ...


