Manual
Page 1
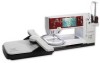
... the enormous possibilities that our customers have acquired the ultimate sewing and embroidery system available in the computerized sewing and embroidery field coupled with more creatively- H.P. Ueltschi President BERNINA International AG CH-8266 Steckborn www.bernina.com I wish you . Dear BERNINA 830 customer, Congratulations! BERNINA wants you have shared with us into the knowledge of modern...
... the enormous possibilities that our customers have acquired the ultimate sewing and embroidery system available in the computerized sewing and embroidery field coupled with more creatively- H.P. Ueltschi President BERNINA International AG CH-8266 Steckborn www.bernina.com I wish you . Dear BERNINA 830 customer, Congratulations! BERNINA wants you have shared with us into the knowledge of modern...
Manual
Page 2
...(«0») position, then remove the plug from all controls OFF (to your local authorized BERNINA dealer for any adjustments in this sewing-/embroidery computer. The sewing-/embroidery computer is not intended for use , it has fallen into any air openings blocked. Replacement... Special care is provided on the sewing-/embroidery computer. 7 Do not use a proper BERNINA stitch plate. To reduce the risk of electrical shock: 1 An appliance should a means for servicing of this manual. this sewing-/embroidery computer from misuse of double-insulated products. ...
...(«0») position, then remove the plug from all controls OFF (to your local authorized BERNINA dealer for any adjustments in this sewing-/embroidery computer. The sewing-/embroidery computer is not intended for use , it has fallen into any air openings blocked. Replacement... Special care is provided on the sewing-/embroidery computer. 7 Do not use a proper BERNINA stitch plate. To reduce the risk of electrical shock: 1 An appliance should a means for servicing of this manual. this sewing-/embroidery computer from misuse of double-insulated products. ...

Manual
Page 4
... Photographs Sterling Rice Group, USA Patrice Heilmann, CH-Winterthur Manual Design & Concept Erika Vollenweider-Czibulya Typesetting, Layout, DTP Susanne Ribi, Erika Vollenweider-Czibulya Copyright 2008 BERNINA International AG, CH-Steckborn All rights reserved In order to improve the product, and for our customers' benefit, all of damage! Very important! Risk of...
... Photographs Sterling Rice Group, USA Patrice Heilmann, CH-Winterthur Manual Design & Concept Erika Vollenweider-Czibulya Typesetting, Layout, DTP Susanne Ribi, Erika Vollenweider-Czibulya Copyright 2008 BERNINA International AG, CH-Steckborn All rights reserved In order to improve the product, and for our customers' benefit, all of damage! Very important! Risk of...
Manual
Page 6
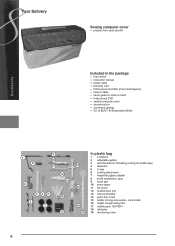
... ► seam guide for slide-on table ► Instructional DVD ► sewing computer cover ► accessory box ► accessory catalog ► CD of BUILT-IN Embroidery Motifs 7 8 6 9 10 11 13 14 543 16 2 1 17 12 15 18 19 In plastic bag 1 4 bobbins 2 adjustable guides 3 wire threader for threading cording for bobbin...
... ► seam guide for slide-on table ► Instructional DVD ► sewing computer cover ► accessory box ► accessory catalog ► CD of BUILT-IN Embroidery Motifs 7 8 6 9 10 11 13 14 543 16 2 1 17 12 15 18 19 In plastic bag 1 4 bobbins 2 adjustable guides 3 wire threader for threading cording for bobbin...
Manual
Page 7
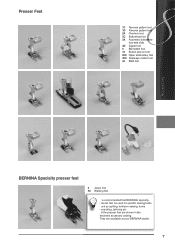
... with slide 4D Zipper foot 5 Blindstitch foot 18 Button sew-on foot 20C Open embroidery foot 40C Sideways motion foot 42 BSR foot Accessory BERNINA Specialty presser feet 8 Jeans foot 50 Walking foot It is recommended that BERNINA specialty presser feet be used for specific sewing tasks such as quilting, heirloom sewing, home...
... with slide 4D Zipper foot 5 Blindstitch foot 18 Button sew-on foot 20C Open embroidery foot 40C Sideways motion foot 42 BSR foot Accessory BERNINA Specialty presser feet 8 Jeans foot 50 Walking foot It is recommended that BERNINA specialty presser feet be used for specific sewing tasks such as quilting, heirloom sewing, home...
Manual
Page 11
...handle 9 System Settings ‣ Setup button ‣ Tutorial button ‣ Creative Consultant button ‣ Help button ‣ Eco button ‣ Sewing-/Embroidery mode button ‣ «clr» clear button 10 Stitch width knob 11 Stitch length knob 12 Needle position buttons 13 Bobbin winder 14 Thread... button 40 28 Automatic thread cutter 29 Start/stop button 30 Quick reverse button 31 Special-accessories port 32 BSR connection 33 BERNINA Dual Feed 34 Handwheel 35 USB connection 36 PC connection 37 Foot control socket 38 Power switch on/off («I»,...
...handle 9 System Settings ‣ Setup button ‣ Tutorial button ‣ Creative Consultant button ‣ Help button ‣ Eco button ‣ Sewing-/Embroidery mode button ‣ «clr» clear button 10 Stitch width knob 11 Stitch length knob 12 Needle position buttons 13 Bobbin winder 14 Thread... button 40 28 Automatic thread cutter 29 Start/stop button 30 Quick reverse button 31 Special-accessories port 32 BSR connection 33 BERNINA Dual Feed 34 Handwheel 35 USB connection 36 PC connection 37 Foot control socket 38 Power switch on/off («I»,...

Manual
Page 13
... Needle ► entire foot rests comfortably on Foot Pedal ► tap the Foot Control with your BERNINA dealer. 13 The LED sewing light illuminates the sewing area with sewing computer model 830. Take the sewing-/embroidery computer to your heel to raise or lower the needle B A C LED Sewing Light Cable tidy ►...
... Needle ► entire foot rests comfortably on Foot Pedal ► tap the Foot Control with your BERNINA dealer. 13 The LED sewing light illuminates the sewing area with sewing computer model 830. Take the sewing-/embroidery computer to your heel to raise or lower the needle B A C LED Sewing Light Cable tidy ►...
Manual
Page 18
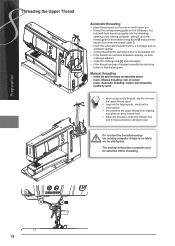
...with and start again ► if the thread has been threaded correctly the start-stop button is no fabric on the stitch plate. The sewing-/embroidery computer must be switched ON for small spools ► this prevents the upper thread from back to front over the thread cutter C ► ...even thread feed ► place the thread(s) under the presser foot and to the back before starting to sew Do not start the threaded sewing-/ embroidery computer if there is illuminated green Manual threading ► follow the two first steps as described above ► touch «Manual threading» ...
...with and start again ► if the thread has been threaded correctly the start-stop button is no fabric on the stitch plate. The sewing-/embroidery computer must be switched ON for small spools ► this prevents the upper thread from back to front over the thread cutter C ► ...even thread feed ► place the thread(s) under the presser foot and to the back before starting to sew Do not start the threaded sewing-/ embroidery computer if there is illuminated green Manual threading ► follow the two first steps as described above ► touch «Manual threading» ...

Manual
Page 25
Needle Guidelines Fabric / Thread Needle size Fine fabrics: Fine thread (darning thread, embroidery thread) 70-75 Medium weight fabrics: Normal thread 80-90 Heavy weight fabrics: 100, 110, 120 130/705 H - medium ball point) 70 Needle size (shank diameter) 25 S / 70 130 Shank length 705 Flat shank H Needle scarf S Needle point (here e.g.
Needle Guidelines Fabric / Thread Needle size Fine fabrics: Fine thread (darning thread, embroidery thread) 70-75 Medium weight fabrics: Normal thread 80-90 Heavy weight fabrics: 100, 110, 120 130/705 H - medium ball point) 70 Needle size (shank diameter) 25 S / 70 130 Shank length 705 Flat shank H Needle scarf S Needle point (here e.g.
Manual
Page 26
...point Micro fiber fabrics and silk Quilting 130/705 H-Q / 75-90 Fine sharp point Straight and topstitching Embroidery 130/705 H-E / 75-90 Large eye, slight ball point Embroidery on all natural and synthetic fabrics 26 Metafil 130/705 H-MET / 75-90 Large eye Sewing with... needle (hemstitch needle) 130/705 HO / 100-120 Wide needle (wing) Hemstitching Double wing needle 130/705 H-ZWI-HO / 100 For special effects with hemstitch embroidery Double needle 130/705 H-ZWI / 70-100 Needle distance: 1.0 / 1.6 / 2.0 / 2.5 / 3.0 / 4.0 / 6.0 / 8.0 Visible hems in stretch fabrics, pin tucks, decorative sewing ...
...point Micro fiber fabrics and silk Quilting 130/705 H-Q / 75-90 Fine sharp point Straight and topstitching Embroidery 130/705 H-E / 75-90 Large eye, slight ball point Embroidery on all natural and synthetic fabrics 26 Metafil 130/705 H-MET / 75-90 Large eye Sewing with... needle (hemstitch needle) 130/705 HO / 100-120 Wide needle (wing) Hemstitching Double wing needle 130/705 H-ZWI-HO / 100 For special effects with hemstitch embroidery Double needle 130/705 H-ZWI / 70-100 Needle distance: 1.0 / 1.6 / 2.0 / 2.5 / 3.0 / 4.0 / 6.0 / 8.0 Visible hems in stretch fabrics, pin tucks, decorative sewing ...
Manual
Page 27
... Function Buttons Display Functions 28 Balance Description 48 Practical and Decorative Stitches 48 30 Corrections 48 Sideways Motion Stitches 48 32 BERNINA Dual Feed 49 Sewing 32 ECO 50 Setup Program 34 ECO Description 50 Entry Screen 34 Display 35 Wallpaper 35 Sewing... 36 Securing stitches after thread is cut 36 Embroidery 38 Adjusting Embroidery Settings 38 Fabric Thickness 38 Screen Calibration 39 Monitoring 40 Information 41 Update 42 Version 42 Service Data 42 Cleaning ...
... Function Buttons Display Functions 28 Balance Description 48 Practical and Decorative Stitches 48 30 Corrections 48 Sideways Motion Stitches 48 32 BERNINA Dual Feed 49 Sewing 32 ECO 50 Setup Program 34 ECO Description 50 Entry Screen 34 Display 35 Wallpaper 35 Sewing... 36 Securing stitches after thread is cut 36 Embroidery 38 Adjusting Embroidery Settings 38 Fabric Thickness 38 Screen Calibration 39 Monitoring 40 Information 41 Update 42 Version 42 Service Data 42 Cleaning ...

Manual
Page 30
Overview Display Menu Selection A A Practical stitches B Decorative stitches C Alphabets B D Buttonholes E Quilt stitches C F Personal Program G History D E F G System Settings H H Setup Program I Tutorial I J Creative Consultant K Help L ECO J M Embroidery/Sewing mode K N clr - Delete L M N Stitch Display O Stitch Pattern selections O 30
Overview Display Menu Selection A A Practical stitches B Decorative stitches C Alphabets B D Buttonholes E Quilt stitches C F Personal Program G History D E F G System Settings H H Setup Program I Tutorial I J Creative Consultant K Help L ECO J M Embroidery/Sewing mode K N clr - Delete L M N Stitch Display O Stitch Pattern selections O 30
Manual
Page 34
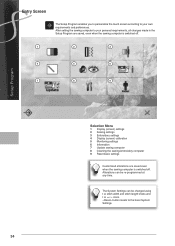
... saved, even when the sewing computer is switched off. 1 2 3 4 5 6 7 8 9 Setup Program Selection Menu 1 Display (screen) settings 2 Sewing settings 3 Embroidery settings 4 Display (screen) calibration 5 Monitoring settings 6 Information 7 Update sewing computer 8 Cleaning the sewing/embroidery computer 9 Reset basic settings Customized alterations are saved even when the sewing computer is switched off. Entry Screen The...
... saved, even when the sewing computer is switched off. 1 2 3 4 5 6 7 8 9 Setup Program Selection Menu 1 Display (screen) settings 2 Sewing settings 3 Embroidery settings 4 Display (screen) calibration 5 Monitoring settings 6 Information 7 Update sewing computer 8 Cleaning the sewing/embroidery computer 9 Reset basic settings Customized alterations are saved even when the sewing computer is switched off. Entry Screen The...

Manual
Page 36
... 10 = +10% 20 = +20% -10 = -10% -20 = -20% ► the tension alteration affects all stitches and stitch patterns and is saved even when the sewing-/embroidery computer is switched off Securing stitches after thread is cut ► function 3 is active = standard ► if the automatic thread cutter is used to cut...
... 10 = +10% 20 = +20% -10 = -10% -20 = -20% ► the tension alteration affects all stitches and stitch patterns and is saved even when the sewing-/embroidery computer is switched off Securing stitches after thread is cut ► function 3 is active = standard ► if the automatic thread cutter is used to cut...
Manual
Page 38
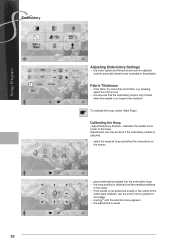
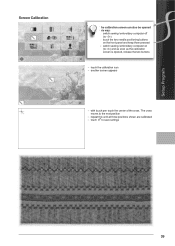
... hoop, select «Next Page». Calibrating the Hoop «Adjust Reference Position» calibrates the needle to the center of the embroidery template, use the arrow icons to position it accurately ► touch until the selection menu appears ► the adjustment is not positioned...needle is more than 4mm thick, e.g. Adjustments can be done if the embroidery module is attached. ► select the required hoop and follow the instructions on the screen ► place embroidery template into the embroidery hoop ► the hoop position is detected and the needle positioned in...
... hoop, select «Next Page». Calibrating the Hoop «Adjust Reference Position» calibrates the needle to the center of the embroidery template, use the arrow icons to position it accurately ► touch until the selection menu appears ► the adjustment is not positioned...needle is more than 4mm thick, e.g. Adjustments can be done if the embroidery module is attached. ► select the required hoop and follow the instructions on the screen ► place embroidery template into the embroidery hoop ► the hoop position is detected and the needle positioned in...
Manual
Page 39
... off (to «0») ► touch the two needle positioning buttons on the front panel and keep them pressed ► switch sewing-/embroidery computer on (to «I») and as soon as the calibration screen is opened this until all three positions shown are calibrated ► touch to ...
... off (to «0») ► touch the two needle positioning buttons on the front panel and keep them pressed ► switch sewing-/embroidery computer on (to «I») and as soon as the calibration screen is opened this until all three positions shown are calibrated ► touch to ...

Manual
Page 42
...; the current versions of the sewing computer and the embroidery module (must be connected to the sewing computer) can be seen ► the total number of stitches and the number of stitches sewn since the last servicing by the BERNINA dealer are displayed Service Data Service data of the actual... condition of your sewing computer can be saved on a USB stick and sent to your authorized BERNINA dealer: ► insert the USB stick into your sewing-/ embroidery computer ► touch «LOG» ► after the data is saved remove the USB stick Updating ►...
...; the current versions of the sewing computer and the embroidery module (must be connected to the sewing computer) can be seen ► the total number of stitches and the number of stitches sewn since the last servicing by the BERNINA dealer are displayed Service Data Service data of the actual... condition of your sewing computer can be saved on a USB stick and sent to your authorized BERNINA dealer: ► insert the USB stick into your sewing-/ embroidery computer ► touch «LOG» ► after the data is saved remove the USB stick Updating ►...
Manual
Page 43
... according to the instructions ► touch field 1 ► the thread catcher of the embroidery module by hand. Follow the on-screen instructions to the right ► carefully remove any thread remnants with this particular sewing computer, and should only... tweezers ► touch field 3 ► the automatic thread cutter is now set for operation Packing position Do not move the embroidery arm of the automatic thread cutter moves to fit the embroidery module back into its original packaging. Calibrating buttonhole foot no. 3A ► attach buttonhole foot no. 3A ► touch &#...
... according to the instructions ► touch field 1 ► the thread catcher of the embroidery module by hand. Follow the on-screen instructions to the right ► carefully remove any thread remnants with this particular sewing computer, and should only... tweezers ► touch field 3 ► the automatic thread cutter is now set for operation Packing position Do not move the embroidery arm of the automatic thread cutter moves to fit the embroidery module back into its original packaging. Calibrating buttonhole foot no. 3A ► attach buttonhole foot no. 3A ► touch &#...
Manual
Page 44
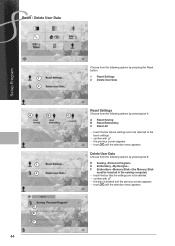
...Reset Settings 2 Delete User Data 2 A B C 1 2 D E F 44 Reset Settings Choose from the following options by pressing bar 1: A Reset Sewing B Reset Embroidery C Reset All ► touch the bar whose settings are to be returned to the basic settings ► confirm with ► the previous screen appears ►... menu appears Delete User Data Choose from the following options by pressing bar 2: D Sewing «Personal Program» E Embroidery «My Designs» F Embroidery «Memory Stick» (the Memory Stick must be inserted in the sewing computer) ► touch the bar that ...
...Reset Settings 2 Delete User Data 2 A B C 1 2 D E F 44 Reset Settings Choose from the following options by pressing bar 1: A Reset Sewing B Reset Embroidery C Reset All ► touch the bar whose settings are to be returned to the basic settings ► confirm with ► the previous screen appears ►... menu appears Delete User Data Choose from the following options by pressing bar 2: D Sewing «Personal Program» E Embroidery «My Designs» F Embroidery «Memory Stick» (the Memory Stick must be inserted in the sewing computer) ► touch the bar that ...

Manual
Page 45
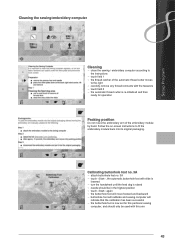
...; the last active screen appears 45 presser foot ► topic overview about the different areas of sewing and embroidering. 1 11 2 10 3 9 4 8 5 6 7 1 Threading 2 Needles 3 Presser foot 4 BERNINA Stitch Regulator (BSR) 5 Troubleshooting 6 Freehand system FHS 7 Miscellaneous 8 Embroidery 9 Buttonholes 10 Quilting 11 Techniques ► select desired topic, e.g.
...; the last active screen appears 45 presser foot ► topic overview about the different areas of sewing and embroidering. 1 11 2 10 3 9 4 8 5 6 7 1 Threading 2 Needles 3 Presser foot 4 BERNINA Stitch Regulator (BSR) 5 Troubleshooting 6 Freehand system FHS 7 Miscellaneous 8 Embroidery 9 Buttonholes 10 Quilting 11 Techniques ► select desired topic, e.g.


