Bernina Bernette 430 Support and Manuals
Get Help and Manuals for this Bernina item

View All Support Options Below
Free Bernina Bernette 430 manuals!
Problems with Bernina Bernette 430?
Ask a Question
Free Bernina Bernette 430 manuals!
Problems with Bernina Bernette 430?
Ask a Question
Most Recent Bernina Bernette 430 Questions

Feed Dogs For Bernette 430
Does anyone know the part number for feed dogs for Bernette 430? Will Feed Dogs for Bernette 420 wor...
Does anyone know the part number for feed dogs for Bernette 430? Will Feed Dogs for Bernette 420 wor...
(Posted by suzsadowsky1 1 year ago)
Top Tension Adjuster Wheel Doesn't Work
very loopy on underside. Bobbin tension correct but top adjuster dial doesn't make any difference wh...
very loopy on underside. Bobbin tension correct but top adjuster dial doesn't make any difference wh...
(Posted by sylviarich 2 years ago)

Why Does The Thread Et Tangled?
(Posted by heatherjaneforsyth 11 years ago)
Popular Bernina Bernette 430 Manual Pages
Manual - Page 2

...-mochine is the product of many years of dependoble service.
Tmte %pent alM.% stage will ehmincer eirots and will result In you cue familial wnh the come oh and then functions. Repeal the process until
you ' complete satislochon and enjoyment.
Befee attempting to sew, hewevet, and to obtain the minimum benefits, please...
Manual - Page 3

... STITCH AND EMBROIDERY/DECORATIVE STITCHING lTor Model 440 only)
28. CONTENTS INSTRUCTION BOOK MODELS 410.420.430.440
Page Title
I. CONTENTS
3. CONNECTING MACHINE TO POWER SUPPLY FOOT CONTROL NEEDLE LIGHT
6. WINDING BOBBIN 8. UPPER THREADING 10. BRINGING UP BOBBIN THREAD
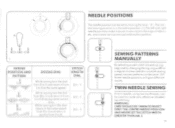
15. THREE NEEDLE POSITIONS SEWING PATTERNS MANUALLY TWIN NEEDLE SEWING
17. ZIGZAG STITCHING
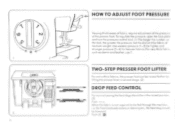
19. FOOT PRESSURE
DROP...
Manual - Page 6

Notes" page 6
unscrew lamp and replace With ci suitable new one (3). open face plate. Using the correct plug. See - NEEDLE LIGHT
To reploce lomp, first disconnect from power supply by removing plug from socket. and switch on the machine power switch.
`2
3
FOOT CONTROL
The foot control pedal regulates the sewing speed (21. CONNECTING MACHINE TO POWER SUPPLY
.1111 (41...
Manual - Page 7

... colours of the mains lend of this mains lead ore coloured in sewing or after completion of filmy to the foot control unit, may only be disconnected from the power supply by removing the plug from the socket outlet When servicing the sewing
machine.
If the terminals of the needle, such as follows:
When leaving...
Manual - Page 12
... stage. 121
DROP FEED CONTROL
For normal sewing the eed dogs should be in the raised position 131 When the fobnc is not required to be lowered Push (31
Set the dial al 4 for free hand embroidery or darningetc., the feed dog s'llnuId be fed through the machine.
Use weaker pressure It -3) lot light.. For very...
Manual - Page 13

... forget the needle Make sure the needle is straight and not dornoged (I)
env or aeon 1.0.C•f •
C3\ f itoota
a I IL:
• 4.1013 ,*
N hasten
[lama
viol free Of fur tomcat ted
e. vt silo
rtel ra
SELECTING AND FITTING OF NEEDLE
Select the correct sq.) needle to as .,!poet
Change the needle regularly...
Manual - Page 16
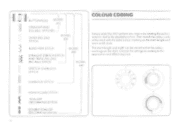
... and width can be coned within the colour markings on the thals Choose the settings OCCOr cling to the upplication and effect moodea
OVERLOCK STITCH
HONEYCOMB STITCH
SCALLOP I DECORATIVE STITCH
DOUBLE SCALLOP (DECORATIVE STITCH STITCH
MODEL 430
MODEL 440
COLOUR CODING
Simply select the stitch pattern you requite ay rotating the peen n CCIOCIOr dial lo...
Manual - Page 17
... tre used to 5 and return it
O5 I
-.141/SCP".41i/141gir
5 to 0 or the some weed.
- -
•
Whole sewing turn Ike dial
from 0 to 5 and return n from 0.5
f,r 411,0111W-04;',Ir
5lo 0 drawing some curved lines
While sewing turn the del
from° to 5 ond return , from
I
-wAIA.61
quickly horn 5 ro 0
SEWING PATTERNS MANUALLY...
Manual - Page 18
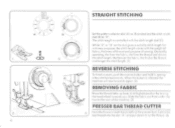
... sewing. When the button is controlled with the weight of
fabric, thickness of thread and putpose of the machine...sewing few stitches backwards. f3t
PRESSER BAR THREAD CUTTER
3
Hold the thread in both /winds behind the presser loot.
STRAIGHT STITCHING
H
Set... the pattern selector dial lAd as illustrated and the stitch width
dial (81 to cut the thread 13) Centre the TO I he foot...
Manual - Page 20
...
sequence illustrated. (71
1
2
2'
r
1
S
4-1
Artery ,.e[ .n itateitt
.6" `3
IA
Pint, rig fur Kars
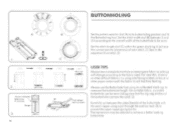
USER TIPS
Always sew o sample buttonhole on some spore fobnc ossettings will change according to the fabric used.
try using its buttonholing position and ft
the Buttonholing foot. BUTTONHOLING
•
A
Set the pattern selector chi,' (A) to its colibroled markings to measure the...
Manual - Page 23
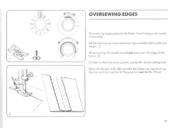
... opt to pucker. Note On Models 410.430 and 440, the 3step zigzag stitch can n150 In used, but use the Nr 8 overcasting tool. 1-D
\2
OVE RSEWING EDGES
te)
Oversewing edges prevents the fabric from fraying and creates o neat edge Set the rnochine os illustrated selecting o suitable stitch width and length ( l) When sewing, the needle should just...
Manual - Page 24
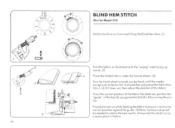
...Set the machine os illustroted fining the Blind Hem foot. It should then just pierce the fold of the fabric. (4) II it does not, then adjust the position of fabric. Proceed tosew corefully feeding the fabric to ensured retains the correct position ogoinst the guide...(61. Once the correct pose ion of the fabric has been set, position the "guide" of the fool (5) up against the fold (3+4) by hand...
Manual - Page 26
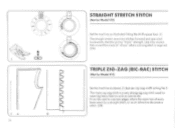
...) STITCH
(Not for Model 410)
Set the mock ine as above, I I I bin use zig-zag width setting No 5 The triple sigizog stitch is a very strong sig.:in stitch used for oreos of "'stress- n" 2 A
STRAIGHT STRETCH STITCH
(Not for Model 410)
Set the machine os illustrated fining the All Purpose foot. ;11 The sly night stretch sews two stitches forward and...
Manual - Page 27

... pass over or just pierce iha edge of the fabric according to the effect you 'cairn..
U Ft_
STRETCH OVERLOCKING AND OVERLOCKING
(Not lot Models 410 and 420
Set the machine os illustrated using the Nr. 3 or Ns. 8 foot
for finer Fobrecs i
for thicker fabricsFT
liil$§
K.! Using the Nr. 8 foot will prevent puckering within fobracs
2
2A
26
Manual - Page 29
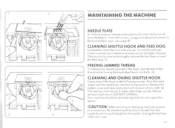
pull the end of oily cloth. {4) Use sewi ng-mochine oil, or some other high-qtrebly refined minetol machine oil. Your machine should be disconnected frem the supply by your speciolisi dealer.
(CAUTION) When servicing or changing mechonicol pans
or occessories. 2
wna5nu
rr I
.3a83
BNE
h. 3
4
MAINTAINING THE MACHINE
NEEDLE PLATE
To remove snop-on needle plate...
Bernina Bernette 430 Reviews
We have not received any reviews for Bernina yet.