Manual
Page 2
...computer only for servicing of lint, dust and loose cloth. 5 Keep fingers away from all controls OFF (to your local authorized BERNINA dealer for any openings on the sewing-/embroidery computer. 7 Do not use the sewing-/embroidery computer outdoors. 8 Do not operate the...sewing-/embroidery computer from the electrical outlet when removing covers, lubricating, or when making any air openings blocked. Use only attachments, accessories and parts recommended by qualified service personnel. No grounding means is provided with reduced physical, sensory or mental capabilities or lack of...
...computer only for servicing of lint, dust and loose cloth. 5 Keep fingers away from all controls OFF (to your local authorized BERNINA dealer for any openings on the sewing-/embroidery computer. 7 Do not use the sewing-/embroidery computer outdoors. 8 Do not operate the...sewing-/embroidery computer from the electrical outlet when removing covers, lubricating, or when making any air openings blocked. Use only attachments, accessories and parts recommended by qualified service personnel. No grounding means is provided with reduced physical, sensory or mental capabilities or lack of...
Manual
Page 3
Sewing Accessory & Preparation Functions & Settings Main Stitch Categories BERNINA World Maintenance / Troubleshooting Stitch & Motif Overview Index
Sewing Accessory & Preparation Functions & Settings Main Stitch Categories BERNINA World Maintenance / Troubleshooting Stitch & Motif Overview Index

Manual
Page 4
Very important! Risk of the sewing-/embroidery computer's features, parts, and accessories are subject to unannounced changes and alterations at any time. Helpful tips! Text Gayle Hillert, Herbert Stolz, Joanna Wild Sewing & Embroidering Projects Colette Cogley,...Sterling Rice Group, USA Patrice Heilmann, CH-Winterthur Manual Design & Concept Erika Vollenweider-Czibulya Typesetting, Layout, DTP Susanne Ribi, Erika Vollenweider-Czibulya Copyright 2008 BERNINA International AG, CH-Steckborn All rights reserved In order to improve the product, and for our customers' benefit, all of damage!
Very important! Risk of the sewing-/embroidery computer's features, parts, and accessories are subject to unannounced changes and alterations at any time. Helpful tips! Text Gayle Hillert, Herbert Stolz, Joanna Wild Sewing & Embroidering Projects Colette Cogley,...Sterling Rice Group, USA Patrice Heilmann, CH-Winterthur Manual Design & Concept Erika Vollenweider-Czibulya Typesetting, Layout, DTP Susanne Ribi, Erika Vollenweider-Czibulya Copyright 2008 BERNINA International AG, CH-Steckborn All rights reserved In order to improve the product, and for our customers' benefit, all of damage!
Manual
Page 5
... Needles 24 Included in the package 6 Thread 24 In plastic bag 6 Needle, Thread and Fabric 24 Needle/Thread 24 Presser Feet 7 Guidelines 25 BERNINA Specialty presser feet 7 Overview 26 Accessory Box 8 Free Standing 8 Lay-out 9 Sewing Computer 10 Details 10 Preparation 12 Power Switch / Power Cable 12 Free-Hand-System (FHS) Presser...
... Needles 24 Included in the package 6 Thread 24 In plastic bag 6 Needle, Thread and Fabric 24 Needle/Thread 24 Presser Feet 7 Guidelines 25 BERNINA Specialty presser feet 7 Overview 26 Accessory Box 8 Free Standing 8 Lay-out 9 Sewing Computer 10 Details 10 Preparation 12 Power Switch / Power Cable 12 Free-Hand-System (FHS) Presser...
Manual
Page 6
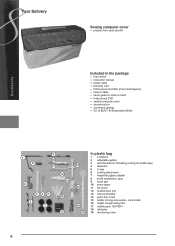
Your Delivery Sewing computer cover ► protects from dust and dirt Accessory Included in the package ► foot control ► instruction manual ► power cable ► warranty card ► FHS presser foot lifter (Free Hand System) ► ...slide-on table ► seam guide for slide-on table ► Instructional DVD ► sewing computer cover ► accessory box ► accessory catalog ► CD of BUILT-IN Embroidery Motifs 7 8 6 9 10 11 13 14 543 16 2 1 17 12 15 18 19 In plastic bag 1 4 bobbins 2 adjustable...
Your Delivery Sewing computer cover ► protects from dust and dirt Accessory Included in the package ► foot control ► instruction manual ► power cable ► warranty card ► FHS presser foot lifter (Free Hand System) ► ...slide-on table ► seam guide for slide-on table ► Instructional DVD ► sewing computer cover ► accessory box ► accessory catalog ► CD of BUILT-IN Embroidery Motifs 7 8 6 9 10 11 13 14 543 16 2 1 17 12 15 18 19 In plastic bag 1 4 bobbins 2 adjustable...
Manual
Page 7
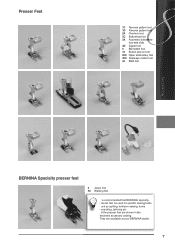
They are shown in the enclosed accessory catalog. All the presser feet are available at your BERNINA dealer. 7 Presser Feet 1C Reverse pattern foot 1D Reverse pattern foot 2A Overlock foot 3C Buttonhole foot 3A Automatic buttonhole foot with slide 4D ... foot 5 Blindstitch foot 18 Button sew-on foot 20C Open embroidery foot 40C Sideways motion foot 42 BSR foot Accessory BERNINA Specialty presser feet 8 Jeans foot 50 Walking foot It is recommended that BERNINA specialty presser feet be used for specific sewing tasks such as quilting, heirloom sewing, home decorating, tailoring etc.
They are shown in the enclosed accessory catalog. All the presser feet are available at your BERNINA dealer. 7 Presser Feet 1C Reverse pattern foot 1D Reverse pattern foot 2A Overlock foot 3C Buttonhole foot 3A Automatic buttonhole foot with slide 4D ... foot 5 Blindstitch foot 18 Button sew-on foot 20C Open embroidery foot 40C Sideways motion foot 42 BSR foot Accessory BERNINA Specialty presser feet 8 Jeans foot 50 Walking foot It is recommended that BERNINA specialty presser feet be used for specific sewing tasks such as quilting, heirloom sewing, home decorating, tailoring etc.

Manual
Page 8
Accessory Box Free Standing ► on the back of the box, pull both extensions out until they click into place Accessory 8
Accessory Box Free Standing ► on the back of the box, pull both extensions out until they click into place Accessory 8

Manual
Page 9
Lay-out Accessory C E G F A B The box is equipped as standard with one small A and one large B drawer as well as a compartment for bobbin holders C and presser feet D. ► to remove a bobbin, press the compartment holder E lightly ► buttonhole foot with slide no. 3A D can be stored in the special compartment G 9 ment F ► store the needle range supplied in the left compart-
Lay-out Accessory C E G F A B The box is equipped as standard with one small A and one large B drawer as well as a compartment for bobbin holders C and presser feet D. ► to remove a bobbin, press the compartment holder E lightly ► buttonhole foot with slide no. 3A D can be stored in the special compartment G 9 ment F ► store the needle range supplied in the left compart-
Manual
Page 11
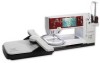
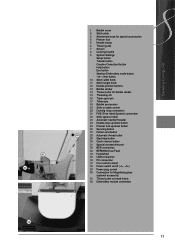
Sewing Computer 41 33 1 Bobbin cover 2 Stitch plate 3 Attachment base for special accessories 4 Presser foot 5 Needle clamp 6 Thread guide 7 Screen 8 Carrying handle 9 System Settings ‣ Setup button ‣ Tutorial button ‣ Creative Consultant button ‣ Help ...26 Securing button 27 Pattern end button 40 28 Automatic thread cutter 29 Start/stop button 30 Quick reverse button 31 Special-accessories port 32 BSR connection 33 BERNINA Dual Feed 34 Handwheel 35 USB connection 36 PC connection 37 Foot control socket 38 Power switch on/off («I», ...
Sewing Computer 41 33 1 Bobbin cover 2 Stitch plate 3 Attachment base for special accessories 4 Presser foot 5 Needle clamp 6 Thread guide 7 Screen 8 Carrying handle 9 System Settings ‣ Setup button ‣ Tutorial button ‣ Creative Consultant button ‣ Help ...26 Securing button 27 Pattern end button 40 28 Automatic thread cutter 29 Start/stop button 30 Quick reverse button 31 Special-accessories port 32 BSR connection 33 BERNINA Dual Feed 34 Handwheel 35 USB connection 36 PC connection 37 Foot control socket 38 Power switch on/off («I», ...
Manual
Page 14
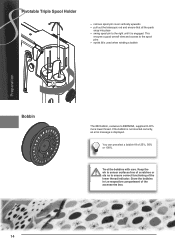
... the parts snap into place ► swing spool pin to the right until it is used when winding a bobbin A Bobbin The 830 bobbin, exclusive to BERNINA, supplies till 40% more lower thread. Store the bobbins in the respective compartment of 25%, 50% or 100%. This ensures a good overall view and access... indicator. Treat the bobbins with care. If the bobbin is not inserted correctly, an error message is displayed. You can preselect a bobbin fill of the accessories box. 14 Keep the white sensor surfaces free of scratches or stains to the spool pins ► eyelet A is engaged.
... the parts snap into place ► swing spool pin to the right until it is used when winding a bobbin A Bobbin The 830 bobbin, exclusive to BERNINA, supplies till 40% more lower thread. Store the bobbins in the respective compartment of 25%, 50% or 100%. This ensures a good overall view and access... indicator. Treat the bobbins with care. If the bobbin is not inserted correctly, an error message is displayed. You can preselect a bobbin fill of the accessories box. 14 Keep the white sensor surfaces free of scratches or stains to the spool pins ► eyelet A is engaged.
Manual
Page 19
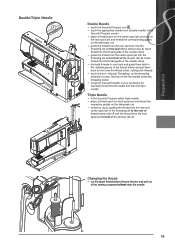
... into the threading slit and the rear of the tension disc A. Next touch the illuminated automatic threading button ► using the manual threader in your accessory kit, manually thread the left needle and then the right needle Triple Needle ► in the Security Program select triple needle ► place a thread spool...
... into the threading slit and the rear of the tension disc A. Next touch the illuminated automatic threading button ► using the manual threader in your accessory kit, manually thread the left needle and then the right needle Triple Needle ► in the Security Program select triple needle ► place a thread spool...
Manual
Page 21
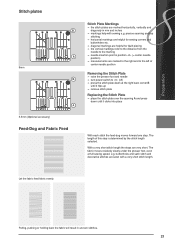
Preparation Stitch plates B A 9mm B A 5.5mm (Optional accessory) Feed-Dog and Fabric Feed Stitch Plate Markings ► the stitch plates are marked horizontally, vertically and diagonaly in uneven stitches. 21 precise seaming and ...
Preparation Stitch plates B A 9mm B A 5.5mm (Optional accessory) Feed-Dog and Fabric Feed Stitch Plate Markings ► the stitch plates are marked horizontally, vertically and diagonaly in uneven stitches. 21 precise seaming and ...
Manual
Page 88
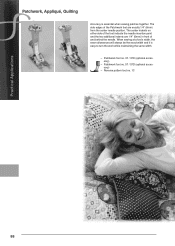
...é, Quilting Accuracy is easy to turn the work while maintaining the same width. ► Patchwork foot no. 37 / 37D (optional accessory) ► Patchwork foot no. 57 / 57D (optional accessory) ► Reverse pattern foot no. 1C Practical Applications 88 The side edges of the Patchwork foot are 1/4" (6mm) in front of the...
...é, Quilting Accuracy is easy to turn the work while maintaining the same width. ► Patchwork foot no. 37 / 37D (optional accessory) ► Patchwork foot no. 57 / 57D (optional accessory) ► Reverse pattern foot no. 1C Practical Applications 88 The side edges of the Patchwork foot are 1/4" (6mm) in front of the...

Manual
Page 90
... to sew along the upper edge ► Reverse pattern foot no. 1C ► Blindstitch foot no. 5 ► Edge stitch foot no. 10 / 10C / 10D (optional accessory) There are three options for wide edge stitching ► guide the folded edge along the edge of the presser foot ► guide the folded edge...
... to sew along the upper edge ► Reverse pattern foot no. 1C ► Blindstitch foot no. 5 ► Edge stitch foot no. 10 / 10C / 10D (optional accessory) There are three options for wide edge stitching ► guide the folded edge along the edge of the presser foot ► guide the folded edge...
Manual
Page 97
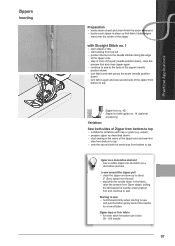
... again and sew second side of the zipper from bottom to top ► Zipper foot no. 4D ► Zipper foot with guide no. 14 (optional accessory) Variation: Sew both sides of the zipper coils ► stop in the fabric, raise the presser foot. velvet) ► prepare zipper as a decorative element To...
... again and sew second side of the zipper from bottom to top ► Zipper foot no. 4D ► Zipper foot with guide no. 14 (optional accessory) Variation: Sew both sides of the zipper coils ► stop in the fabric, raise the presser foot. velvet) ► prepare zipper as a decorative element To...

Manual
Page 98
... the desired position ► use Buttonhole foot no. 3C Automatic Buttonholes ► mark the length of the height compensation plates for buttonholes (available as optional accessory).
... the desired position ► use Buttonhole foot no. 3C Automatic Buttonholes ► mark the length of the height compensation plates for buttonholes (available as optional accessory).

Manual
Page 101
Buttonhole Cutter and Block (Special Accessory) ► place the fabric on the wood block ► place the cutter in the center of the buttonhole ► press down on the cutter with ...
Buttonhole Cutter and Block (Special Accessory) ► place the fabric on the wood block ► place the cutter in the center of the buttonhole ► press down on the cutter with ...
Manual
Page 103
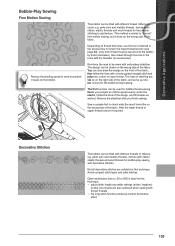
...Very thick thread must be wound onto the bobbin by hand (clockwise), then drawn through the hole in the hook with the threader (in the accessories to "normal" free-motion sewing, but is done on the wrong side of the fabric. The rows of stitching are also achieved when sewing ... 103 The design can be used for free-motion stitching to check what the result looks like on thread thickness, use the tool contained in accessories). Guide your project at uniform speed evenly under the needle, follow the lines with a freely guided straight stitch and polyester, cotton or rayon thread....
...Very thick thread must be wound onto the bobbin by hand (clockwise), then drawn through the hole in the hook with the threader (in the accessories to "normal" free-motion sewing, but is done on the wrong side of the fabric. The rows of stitching are also achieved when sewing ... 103 The design can be used for free-motion stitching to check what the result looks like on thread thickness, use the tool contained in accessories). Guide your project at uniform speed evenly under the needle, follow the lines with a freely guided straight stitch and polyester, cotton or rayon thread....
Manual
Page 115
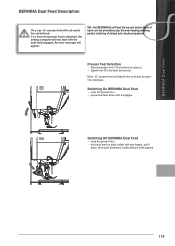
...Selection ► Reverse pattern foot 1D (standard accessory) ► Zipper foot 4D (standard accessory) More «D» presser feet are fed simultaneously, the even feeding enabling perfect matching of striped and checkered patterns. BERNINA Dual Feed BERNINA Dual Feed Description Only use «D» presser...an incorrect presser foot is attached, the sewing computer will appear. With the BERNINA Dual Feed the top and bottom layer of fabric are listed in the enclosed accessories catalogue. Switching On BERNINA Dual Feed ► raise the presser foot ► press dual feed down...
...Selection ► Reverse pattern foot 1D (standard accessory) ► Zipper foot 4D (standard accessory) More «D» presser feet are fed simultaneously, the even feeding enabling perfect matching of striped and checkered patterns. BERNINA Dual Feed BERNINA Dual Feed Description Only use «D» presser...an incorrect presser foot is attached, the sewing computer will appear. With the BERNINA Dual Feed the top and bottom layer of fabric are listed in the enclosed accessories catalogue. Switching On BERNINA Dual Feed ► raise the presser foot ► press dual feed down...

Manual
Page 117
Embroidery Accessory & Preparation Functions & Settings BERNINA World Maintenance / Troubleshooting Stitch & Motif Overview Index
Embroidery Accessory & Preparation Functions & Settings BERNINA World Maintenance / Troubleshooting Stitch & Motif Overview Index


