

Manual
Page 2
... persons (including children) with optical instruments. A double-insulated product is being used by the manufacturer. 2 Do not use a proper BERNINA stitch plate. Caution is advised when the sewing-/embroidery computer is used or where oxygen is marked with double insulation (except USA and ...from misuse of burns, fire, electric shock or injury to the product. IMPORTANT SAFETY INSTRUCTIONS Safety Instructions When using this instruction manual. 15 This sewing-/embroidery computer is required around the sewing needle. 6 Never drop or insert any objects into water Return the...
... persons (including children) with optical instruments. A double-insulated product is being used by the manufacturer. 2 Do not use a proper BERNINA stitch plate. Caution is advised when the sewing-/embroidery computer is used or where oxygen is marked with double insulation (except USA and ...from misuse of burns, fire, electric shock or injury to the product. IMPORTANT SAFETY INSTRUCTIONS Safety Instructions When using this instruction manual. 15 This sewing-/embroidery computer is required around the sewing needle. 6 Never drop or insert any objects into water Return the...

Manual
Page 4
... Wild Screen Design & Drawings sculpt.ch, CH-Steckborn Photographs Sterling Rice Group, USA Patrice Heilmann, CH-Winterthur Manual Design & Concept Erika Vollenweider-Czibulya Typesetting, Layout, DTP Susanne Ribi, Erika Vollenweider-Czibulya Copyright 2008 BERNINA International AG, CH-Steckborn All rights reserved In order to unannounced changes and alterations at any time. Risk...
... Wild Screen Design & Drawings sculpt.ch, CH-Steckborn Photographs Sterling Rice Group, USA Patrice Heilmann, CH-Winterthur Manual Design & Concept Erika Vollenweider-Czibulya Typesetting, Layout, DTP Susanne Ribi, Erika Vollenweider-Czibulya Copyright 2008 BERNINA International AG, CH-Steckborn All rights reserved In order to unannounced changes and alterations at any time. Risk...
Manual
Page 6
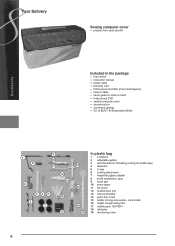
Your Delivery Sewing computer cover ► protects from dust and dirt Accessory Included in the package ► foot control ► instruction manual ► power cable ► warranty card ► FHS presser foot lifter (Free Hand System) ► slide-on table ► seam guide ... tweezers 5 2 nets 6 cording attachment 7 magnifying glass adapter 8 small screwdriver, gray 9 touch pen 10 seam ripper 11 lint brush 12 multifunction tool 13 manual threader 14 spool disc small 15 holder for king-size spools, cone holder 16 height compensating tool 17 needle pack 130/705H 18 lubricator 19...
Your Delivery Sewing computer cover ► protects from dust and dirt Accessory Included in the package ► foot control ► instruction manual ► power cable ► warranty card ► FHS presser foot lifter (Free Hand System) ► slide-on table ► seam guide ... tweezers 5 2 nets 6 cording attachment 7 magnifying glass adapter 8 small screwdriver, gray 9 touch pen 10 seam ripper 11 lint brush 12 multifunction tool 13 manual threader 14 spool disc small 15 holder for king-size spools, cone holder 16 height compensating tool 17 needle pack 130/705H 18 lubricator 19...
Manual
Page 18
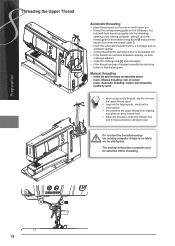
...(s) under the presser foot and to the back before starting to sew Do not start the threaded sewing-/ embroidery computer if there is illuminated green Manual threading ► follow the two first steps as described above ► touch «...
...(s) under the presser foot and to the back before starting to sew Do not start the threaded sewing-/ embroidery computer if there is illuminated green Manual threading ► follow the two first steps as described above ► touch «...
Manual
Page 19
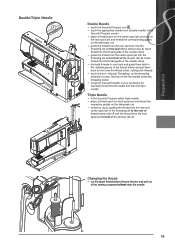
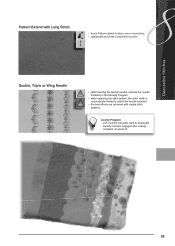
... center spool pin in the threading slit to front near the needle 19 Next touch the illuminated automatic threading button ► using the manual threader in your accessory kit, manually thread the left needle and then the right needle Triple Needle ► in the Security Program select triple needle ► place a thread... ► cut the spool thread before the pre-tension and pull out of the needle clamp ► join both threads ► touch the icon «Manual Threading» on the threading animation screen.
... center spool pin in the threading slit to front near the needle 19 Next touch the illuminated automatic threading button ► using the manual threader in your accessory kit, manually thread the left needle and then the right needle Triple Needle ► in the Security Program select triple needle ► place a thread... ► cut the spool thread before the pre-tension and pull out of the needle clamp ► join both threads ► touch the icon «Manual Threading» on the threading animation screen.
Manual
Page 28
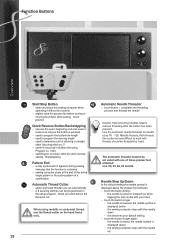
Automatic Needle Threader ► touch button = completes the threading process and threads the needle Double, triple and wing needles require manual threading after the button has been pressed. Function Buttons Overview Start/Stop Button ► starts and stops the sewing computer when operating it without foot ...
Automatic Needle Threader ► touch button = completes the threading process and threads the needle Double, triple and wing needles require manual threading after the button has been pressed. Function Buttons Overview Start/Stop Button ► starts and stops the sewing computer when operating it without foot ...
Manual
Page 32
... horizontally, vertically or diagonally Retrieve ► switches between the stitches combined ► active stitch is shown in color and can be moved Manual Buttonhole ► special screen appears ► sew manual buttonhole in 5 or 7 steps (depending on buttonhole type) Programming Buttonhole Length ► icon is automatically highlighted in blue when a buttonhole is...
... horizontally, vertically or diagonally Retrieve ► switches between the stitches combined ► active stitch is shown in color and can be moved Manual Buttonhole ► special screen appears ► sew manual buttonhole in 5 or 7 steps (depending on buttonhole type) Programming Buttonhole Length ► icon is automatically highlighted in blue when a buttonhole is...
Manual
Page 51
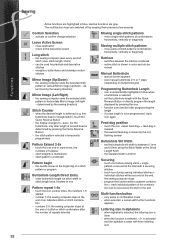
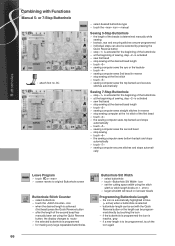
... 78 Combining Lettering Alphabets Correcting Combinations Combining Lettering and Functions Select Lower Case Change Size Monograms Monogram Sizes Balance Buttonholes Buttonholes Description Combining with Functions Manual 5-
... 78 Combining Lettering Alphabets Correcting Combinations Combining Lettering and Functions Select Lower Case Change Size Monograms Monogram Sizes Balance Buttonholes Buttonholes Description Combining with Functions Manual 5-

Manual
Page 53
reset other functions manually ► option 3: switch off sewing computer 53 Altering Stitch Width and Stitch Length ► alter stitch width and stitch length using the knobs ► stitch ... Setting ► option 1: touch «clr» button ► option 2: restore stitch width and stitch length by touching the stitch width / stitch length bar (or manually by turning the knob); To move the needle position. straight stitch) ► when retrieving the individually altered zigzag stitch, the alterations are retained ► the...
reset other functions manually ► option 3: switch off sewing computer 53 Altering Stitch Width and Stitch Length ► alter stitch width and stitch length using the knobs ► stitch ... Setting ► option 1: touch «clr» button ► option 2: restore stitch width and stitch length by touching the stitch width / stitch length bar (or manually by turning the knob); To move the needle position. straight stitch) ► when retrieving the individually altered zigzag stitch, the alterations are retained ► the...
Manual
Page 57
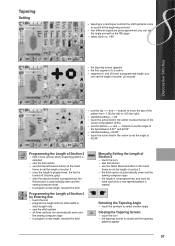
... at the beginning and end ► four different angles are automatically sewn and the sewing computer stops ► to program a new length, reselect the field Manually Setting the Length of section 2 ► the third section is automatically sewn and the sewing computer stops ► the length is not programmed, and must...
... at the beginning and end ► four different angles are automatically sewn and the sewing computer stops ► to program a new length, reselect the field Manually Setting the Length of section 2 ► the third section is automatically sewn and the sewing computer stops ► the length is not programmed, and must...
Manual
Page 59
... width is automatically limited to match the needle selected ► the best effects are achieved with simple stitch patterns Security Program ► icon must be manually reset to deactivate ► security remains engaged after sewing computer is turned off 59
... width is automatically limited to match the needle selected ► the best effects are achieved with simple stitch patterns Security Program ► icon must be manually reset to deactivate ► security remains engaged after sewing computer is turned off 59
Manual
Page 66
...9658; when the desired length is achieved (first bead) press the Quick Reverse button ► after the length of the second bead has manually been set using the Quick Reverse button, the display changes to be programmed directly by pressing the Quick Reverse button ► step «...► the icon is automatically highlighted in blue (= active) when a buttonhole is selected ► buttonhole length can be set with Functions Manual 5- Buttonholes Combining with the Quick Reverse button or the length can also be selected by touching the icon ► if the buttonhole is programmed...
...9658; when the desired length is achieved (first bead) press the Quick Reverse button ► after the length of the second bead has manually been set using the Quick Reverse button, the display changes to be programmed directly by pressing the Quick Reverse button ► step «...► the icon is automatically highlighted in blue (= active) when a buttonhole is selected ► buttonhole length can be set with Functions Manual 5- Buttonholes Combining with the Quick Reverse button or the length can also be selected by touching the icon ► if the buttonhole is programmed...
Manual
Page 67
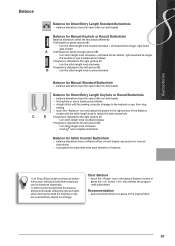
... length knob clockwise If keyhole is distorted to the left (picture D): B ‣ turn the stitch length knob counterclockwise Balance for Manual Standard Buttonhole ► balance alterations have the same effect on both beads Balance for Direct Entry Length Keyhole or Round Buttonhole ►...is distorted to the left (picture D): ‣ turn stitch length knob clockwise ‣ touch and complete buttonhole Balance for manual buttonhole) ► re-program the buttonhole after each individual buttonhole sequence can be balanced separately. In stitch counter buttonholes the balance...
... length knob clockwise If keyhole is distorted to the left (picture D): B ‣ turn the stitch length knob counterclockwise Balance for Manual Standard Buttonhole ► balance alterations have the same effect on both beads Balance for Direct Entry Length Keyhole or Round Buttonhole ►...is distorted to the left (picture D): ‣ turn stitch length knob clockwise ‣ touch and complete buttonhole Balance for manual buttonhole) ► re-program the buttonhole after each individual buttonhole sequence can be balanced separately. In stitch counter buttonholes the balance...
Manual
Page 85
...Stitch no. 1 97 Buttonhole 98 Important Information 98 Preparation 98 Thread Tension 98 Test Sewing 98 Corrections 98 Manual Buttonholes 98 Automatic Buttonholes 98 Stabilizers and Interfacings 99 Corded Buttonholes 99 Keyhole Buttonholes 99 Automatic Buttonholes 99 Corded Buttonholes... Edge Finishing 90 Narrow Edgestitching 90 Wide Edgestitching 90 Overcasting 91 Darning 92 Manual - Button 114 Holding the Work 114 BSR Function Deactivation 114 BERNINA Dual Feed BERNINA Dual Feed Description Fabrics Application 115 115 116 116 Simple Darning Program no...
...Stitch no. 1 97 Buttonhole 98 Important Information 98 Preparation 98 Thread Tension 98 Test Sewing 98 Corrections 98 Manual Buttonholes 98 Automatic Buttonholes 98 Stabilizers and Interfacings 99 Corded Buttonholes 99 Keyhole Buttonholes 99 Automatic Buttonholes 99 Corded Buttonholes... Edge Finishing 90 Narrow Edgestitching 90 Wide Edgestitching 90 Overcasting 91 Darning 92 Manual - Button 114 Holding the Work 114 BSR Function Deactivation 114 BERNINA Dual Feed BERNINA Dual Feed Description Fabrics Application 115 115 116 116 Simple Darning Program no...
Manual
Page 86
... at the beginning and end of seams, hems, quilts, etc. ► easy to remove Preparation ► pin work horizontally to basting direction to the technique, e.g. manual darning ► suitable for all work , program the seam length using cordonnet thread for basting as it is required ► quick and easy basting of...
... at the beginning and end of seams, hems, quilts, etc. ► easy to remove Preparation ► pin work horizontally to basting direction to the technique, e.g. manual darning ► suitable for all work , program the seam length using cordonnet thread for basting as it is required ► quick and easy basting of...
Manual
Page 92
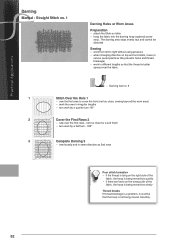
... beyond the worn area) ► work the rows in different lengths so that the hoop is better spread over the first rows - Practical Applications Darning Manual -
... beyond the worn area) ► work the rows in different lengths so that the hoop is better spread over the first rows - Practical Applications Darning Manual -

Manual
Page 98
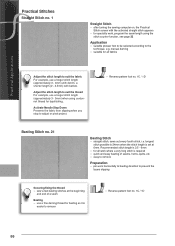
... if necessary Corrections To Adjust the Bead Width ► alter the stitch width Altering the Stitch Length ► any changes to the stitch length Preparation Manual Buttonholes ► mark the buttonhole length in difficult fabrics. rance ► sew both beads at right angles to a seam, we recommend the use of the...
... if necessary Corrections To Adjust the Bead Width ► alter the stitch width Altering the Stitch Length ► any changes to the stitch length Preparation Manual Buttonholes ► mark the buttonhole length in difficult fabrics. rance ► sew both beads at right angles to a seam, we recommend the use of the...
Manual
Page 143
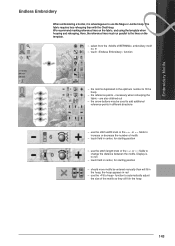
necessary when rehooping the fabric - We recommend marking reference lines on the template. ► select from the «Motifs of BERNINA» embroidery motif no. 9 ► touch «Endless Embroidery» function ► the motif is duplicated in the optimum number to fit the hoop ►... the «+» or «-» fields to change the distance between the motifs. are also stitched out ► the arrow buttons may be entered manually than with the Oval Hoop. The fabric requires less rehooping than will fit in the hoop, the hoop appears in red ► use the Mega...
necessary when rehooping the fabric - We recommend marking reference lines on the template. ► select from the «Motifs of BERNINA» embroidery motif no. 9 ► touch «Endless Embroidery» function ► the motif is duplicated in the optimum number to fit the hoop ►... the «+» or «-» fields to change the distance between the motifs. are also stitched out ► the arrow buttons may be entered manually than with the Oval Hoop. The fabric requires less rehooping than will fit in the hoop, the hoop appears in red ► use the Mega...
Manual
Page 180
180 Error Message Troubleshooting Explanation Repair Sideways motion pattern selected and BERNINA Dual Feed switched on Switch off BERNINA Dual Feed or select other stitch pattern and attach appropriate presser foot Bobbin isn't inserted Insert bobbin Threader doesn't move to starting position Carefully raise threader manually
180 Error Message Troubleshooting Explanation Repair Sideways motion pattern selected and BERNINA Dual Feed switched on Switch off BERNINA Dual Feed or select other stitch pattern and attach appropriate presser foot Bobbin isn't inserted Insert bobbin Threader doesn't move to starting position Carefully raise threader manually
Manual
Page 184
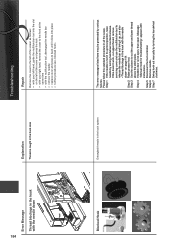
... it clicks into place ► further procedure see also mThread blockage in the hook with the needle down{ on page 184. Step 7 Swing hook out manually by turning handwheel counterclockwise. Step 4 If bobbin door is not open, then open. Step 2 Raise presser foot.
... it clicks into place ► further procedure see also mThread blockage in the hook with the needle down{ on page 184. Step 7 Swing hook out manually by turning handwheel counterclockwise. Step 4 If bobbin door is not open, then open. Step 2 Raise presser foot.


