
RL2455HM User Manual
Page 2
... for any particular purpose. Power Safety Please follow these safety instructions for best performance, and long life for your monitor. • The AC plug isolates this product. Clean the LCD monitor surface with respect to the contents hereof and specifically disclaims any warranties, merchantability or fitness for ventilation. Your monitor should be blocked or covered. Disclaimer BenQ Corporation makes no representations or warranties...
... for any particular purpose. Power Safety Please follow these safety instructions for best performance, and long life for your monitor. • The AC plug isolates this product. Clean the LCD monitor surface with respect to the contents hereof and specifically disclaims any warranties, merchantability or fitness for ventilation. Your monitor should be blocked or covered. Disclaimer BenQ Corporation makes no representations or warranties...
RL2455HM User Manual
Page 4
... monitor 8 Front view...8 Back view ...8 Input and output ports ...9 How to assemble your monitor hardware (RL2450H / RL2455HM 10 How to detach the stand base ...14 Using the monitor wall mounting kit 15 Assembling your monitor with a height adjustment stand (RL2450HT 16 How to attach the monitor base...16 How to detach the base ...18 Adjusting the monitor height ...19 Rotating the monitor ...20 Viewing angle adjustment ...21 Using the monitor wall mounting kit 22 Getting the most from your BenQ monitor 23 How to install...
... monitor 8 Front view...8 Back view ...8 Input and output ports ...9 How to assemble your monitor hardware (RL2450H / RL2455HM 10 How to detach the stand base ...14 Using the monitor wall mounting kit 15 Assembling your monitor with a height adjustment stand (RL2450HT 16 How to attach the monitor base...16 How to detach the base ...18 Adjusting the monitor height ...19 Rotating the monitor ...20 Viewing angle adjustment ...21 Using the monitor wall mounting kit 22 Getting the most from your BenQ monitor 23 How to install...
RL2455HM User Manual
Page 8
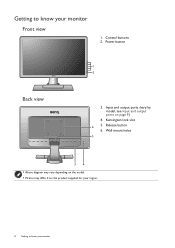
Wall mount holes 5 34 • Above diagram may differ from the product supplied for your region. 8 Getting to know your monitor Front view 1. Getting to know your monitor Kensington lock slot 6 5. Release button 6. Input and output ports (vary by model, see Input and output ports on the model. • Picture may vary depending on page 9) 4. Control buttons 2. Power button 1 2 Back view 3.
Wall mount holes 5 34 • Above diagram may differ from the product supplied for your region. 8 Getting to know your monitor Front view 1. Getting to know your monitor Kensington lock slot 6 5. Release button 6. Input and output ports (vary by model, see Input and output ports on the model. • Picture may vary depending on page 9) 4. Control buttons 2. Power button 1 2 Back view 3.
RL2455HM User Manual
Page 12
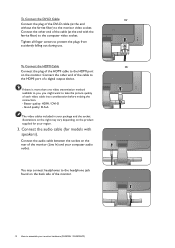
... audio cable between the socket on the product supplied for models with the ferrite filter) to prevent the plugs from accidently falling out during use. Connect the other end of the cable to assemble your region. 3. Tighten all finger screws to the computer video socket. Good quality: D-Sub The video cables included in your computer audio outlet. Connect the audio cable (for your monitor hardware (RL2450H / RL2455HM) Better quality: HDMI / DVI...
... audio cable between the socket on the product supplied for models with the ferrite filter) to prevent the plugs from accidently falling out during use. Connect the other end of the cable to assemble your region. 3. Tighten all finger screws to the computer video socket. Good quality: D-Sub The video cables included in your computer audio outlet. Connect the audio cable (for your monitor hardware (RL2450H / RL2455HM) Better quality: HDMI / DVI...
RL2455HM User Manual
Page 22
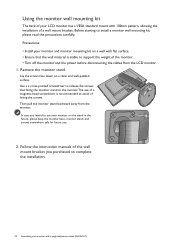
...; Install your monitor and monitor mounting kit on a clean and well-padded surface. Remove the monitor stand. Follow the instruction manuals of the wall mount bracket you intend to use your monitor on the stand in the future, please keep the monitor base, monitor stand, and screws somewhere safe for future use of a magnetic-head screwdriver is stable to support the weight of the monitor. • Turn off the monitor and the power before disconnecting the cables from...
...; Install your monitor and monitor mounting kit on a clean and well-padded surface. Remove the monitor stand. Follow the instruction manuals of the wall mount bracket you intend to use your monitor on the stand in the future, please keep the monitor base, monitor stand, and screws somewhere safe for future use of a magnetic-head screwdriver is stable to support the weight of the monitor. • Turn off the monitor and the power before disconnecting the cables from...
RL2455HM User Manual
Page 23
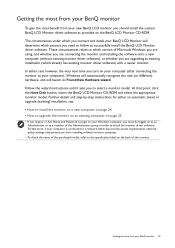
... has existing monitor driver software) with a newer monitor. At that point, click the Have Disk button, insert the BenQ LCD Monitor CD-ROM and select the appropriate monitor model. Further details and step-by-step instructions for either case however, the very next time you require a User Name and Password to login to your BenQ monitor 23 In either an automatic (new) or upgrade (existing) installation, see...
... has existing monitor driver software) with a newer monitor. At that point, click the Have Disk button, insert the BenQ LCD Monitor CD-ROM and select the appropriate monitor model. Further details and step-by-step instructions for either case however, the very next time you require a User Name and Password to login to your BenQ monitor 23 In either an automatic (new) or upgrade (existing) installation, see...
RL2455HM User Manual
Page 24
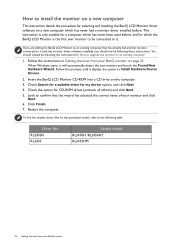
... RL2455 Suitable models RL2450H /RL2450HT RL2455HM 24 Getting the most from your BenQ monitor on page 23. You should not be following these instructions. How to install the monitor on a new computer This instruction details the procedure for selecting and installing the BenQ LCD Monitor driver software on a new computer which has never had another monitor connected to it (and has monitor driver software installed), you are adding the BenQ LCD Monitor to...
... RL2455 Suitable models RL2450H /RL2450HT RL2455HM 24 Getting the most from your BenQ monitor on page 23. You should not be following these instructions. How to install the monitor on a new computer This instruction details the procedure for selecting and installing the BenQ LCD Monitor driver software on a new computer which has never had another monitor connected to it (and has monitor driver software installed), you are adding the BenQ LCD Monitor to...

RL2455HM User Manual
Page 25
... and guide you have connected, and letting Windows install the corresponding driver files from your model may well function perfectly with other versions of Windows, however, as compatible for your BenQ monitor 25 The BenQ LCD Monitor driver for Windows 8, Windows 7, and Windows Vista Operating System (OS). Windows has an Upgrade Device Driver Wizard to install on Windows Vista systems on your Microsoft Windows computer. Getting the most from the CD. You need only...
... and guide you have connected, and letting Windows install the corresponding driver files from your model may well function perfectly with other versions of Windows, however, as compatible for your BenQ monitor 25 The BenQ LCD Monitor driver for Windows 8, Windows 7, and Windows Vista Operating System (OS). Windows has an Upgrade Device Driver Wizard to install on Windows Vista systems on your Microsoft Windows computer. Getting the most from the CD. You need only...
RL2455HM User Manual
Page 26
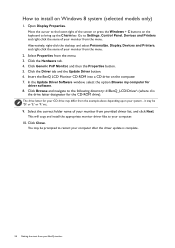
...it may differ from your system - Click the Driver tab and the Update Driver button. 6. The drive letter for driver software. 8. Click Close. Go to your monitor from the menu. 3. In the Update Driver Software window, select the option Browse my computer for your CD... BenQ monitor This will copy and install the appropriate monitor driver files to Settings, Control Panel, Devices and Printers and right-click the name of the screen or press the Windows + C buttons on the keyboard to install on the computer. 7. Select Properties from the menu. Open Display ...
...it may differ from your system - Click the Driver tab and the Update Driver button. 6. The drive letter for driver software. 8. Click Close. Go to your monitor from the menu. 3. In the Update Driver Software window, select the option Browse my computer for your CD... BenQ monitor This will copy and install the appropriate monitor driver files to Settings, Control Panel, Devices and Printers and right-click the name of the screen or press the Windows + C buttons on the keyboard to install on the computer. 7. Select Properties from the menu. Open Display ...

RL2455HM User Manual
Page 27
... your system - Click Generic PnP Monitor, and then the Properties button. 5. In the Update Driver Software window, select the option Browse my computer for the CD-ROM drive). How to Start, Control Panel, Hardware and Sound, Devices and Printers and right-click the name of your monitor from the menu. Insert the BenQ LCD Monitor CD-ROM into a CD drive on Windows 7 system 1. Getting the most...
... your system - Click Generic PnP Monitor, and then the Properties button. 5. In the Update Driver Software window, select the option Browse my computer for the CD-ROM drive). How to Start, Control Panel, Hardware and Sound, Devices and Printers and right-click the name of your monitor from the menu. Insert the BenQ LCD Monitor CD-ROM into a CD drive on Windows 7 system 1. Getting the most...

RL2455HM User Manual
Page 28
.... Click the Advanced Settings button. Click the Driver tab and the Update Driver button. 6. Insert the BenQ LCD Monitor CD-ROM into a CD drive on Windows Vista systems 1. You may be prompted to restart your computer. 10. Open Display Settings. In the Update Driver Software window, select the option Browse my computer for driver software. 8. Select the correct folder name of your monitor from your system - The Display Settings window will display. 3. it may...
.... Click the Advanced Settings button. Click the Driver tab and the Update Driver button. 6. Insert the BenQ LCD Monitor CD-ROM into a CD drive on Windows Vista systems 1. You may be prompted to restart your computer. 10. Open Display Settings. In the Update Driver Software window, select the option Browse my computer for driver software. 8. Select the correct folder name of your monitor from your system - The Display Settings window will display. 3. it may...

RL2455HM User Manual
Page 30
... Picture Mode. In the main menu, follow the icons next to the control keys to access the main menu. 4. Select Menu to make adjustments or selection. To change the default settings, see Customizing the hot keys on the menu options. The hot key menu is the hot key for particular functions. 3. Basic menu operation All OSD (On Screen Display) menus can use the OSD menu to adjust all the settings on your monitor...
... Picture Mode. In the main menu, follow the icons next to the control keys to access the main menu. 4. Select Menu to make adjustments or selection. To change the default settings, see Customizing the hot keys on the menu options. The hot key menu is the hot key for particular functions. 3. Basic menu operation All OSD (On Screen Display) menus can use the OSD menu to adjust all the settings on your monitor...
RL2455HM User Manual
Page 32
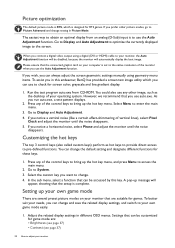
... connected graphic card on your computer is set to the native resolution of the control keys to bring up message will automatically display the best image. Adjust the related display settings in Picture Mode. As you in this key. Please ensure that can always adjust the screen geometric settings manually using a digital (DVI or HDMI) cable to the screen. Picture optimization The default picture mode is RTS, which you use to check for these keys. 1. The easiest way to obtain an optimal display...
... connected graphic card on your computer is set to the native resolution of the control keys to bring up message will automatically display the best image. Adjust the related display settings in Picture Mode. As you in this key. Please ensure that can always adjust the screen geometric settings manually using a digital (DVI or HDMI) cable to the screen. Picture optimization The default picture mode is RTS, which you use to check for these keys. 1. The easiest way to obtain an optimal display...
RL2455HM User Manual
Page 33
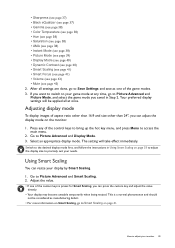
..., go to Picture Advanced and Picture Mode, and select the game mode you want to switch to adjust your display by Smart Scaling. 1. If you saved in Using Smart Scaling on page 33 to adjust the display size to precisely suit your game mode at once. Press any time, go to access the main menu. 2. Switch to the desired display mode first, and follow the instructions in Step...
..., go to Picture Advanced and Picture Mode, and select the game mode you want to switch to adjust your display by Smart Scaling. 1. If you saved in Using Smart Scaling on page 33 to adjust the display size to precisely suit your game mode at once. Press any time, go to access the main menu. 2. Switch to the desired display mode first, and follow the instructions in Step...

RL2455HM User Manual
Page 35
... menu, select . Range H. Adjusts the horizontal position of the screen image. 0 to 100 Adjusts the vertical position of the screen image. 0 to 100 Adjusts the pixel clock frequency timing to the previous menu, select . 6. And keys that are not available will be disabled and the corresponding OSD icons will become grayed out. Use or to make selection. To return to synchronize with the analog input video signal. Position V. Navigating the main menu 35 Display Picture Picture Advanced Save Settings Audio System Auto Adjustment H.Position V.Postion Pixel...
... menu, select . Range H. Adjusts the horizontal position of the screen image. 0 to 100 Adjusts the vertical position of the screen image. 0 to 100 Adjusts the pixel clock frequency timing to the previous menu, select . 6. And keys that are not available will be disabled and the corresponding OSD icons will become grayed out. Use or to make selection. To return to synchronize with the analog input video signal. Position V. Navigating the main menu 35 Display Picture Picture Advanced Save Settings Audio System Auto Adjustment H.Position V.Postion Pixel...

RL2455HM User Manual
Page 39
... menu, and then use to make adjustments, or use or to make selection. 5. Photo For viewing still images. Range The default setting is RTS. Picture Advanced menu Available menu options may vary depending on the screen. Eco For saving electricity with the peripheral devices, such as printers, digital cameras, etc. Item Function Picture Mode Select a picture mode that best suits the type of images shown on the input sources, functions and settings. To return to select Picture...
... menu, and then use to make adjustments, or use or to make selection. 5. Photo For viewing still images. Range The default setting is RTS. Picture Advanced menu Available menu options may vary depending on the screen. Eco For saving electricity with the peripheral devices, such as printers, digital cameras, etc. Item Function Picture Mode Select a picture mode that best suits the type of images shown on the input sources, functions and settings. To return to select Picture...
RL2455HM User Manual
Page 44
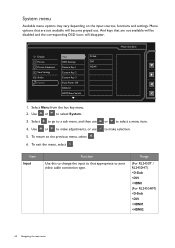
... previous menu, select . 6. Display Picture Picture Advanced Save Settings Audio System Input OSD Settings Custom Key 1 Custom Key 2 Custom Key 3 Auto Power Off DDC/CI HDMI Auto Switch D-Sub DVI HDMI Mode: Standard 1. Use or to a sub menu, and then use 5. And keys that are not available will be disabled and the corresponding OSD icons will become grayed out. Select to go to make selection. To exit the menu, select . to select System. 3. System menu Available menu...
... previous menu, select . 6. Display Picture Picture Advanced Save Settings Audio System Input OSD Settings Custom Key 1 Custom Key 2 Custom Key 3 Auto Power Off DDC/CI HDMI Auto Switch D-Sub DVI HDMI Mode: Standard 1. Use or to a sub menu, and then use 5. And keys that are not available will be disabled and the corresponding OSD icons will become grayed out. Select to go to make selection. To exit the menu, select . to select System. 3. System menu Available menu...

RL2455HM User Manual
Page 46
... • OFF Information Displays the current monitor property settings. • Input • Current Resolution • Optimum Resolution (best with the monitor) • Model Name Reset All Resets all mode, color and geometry settings to the factory default values. • YES • NO 46 Navigating the main menu HDMI Auto Switch When this function is detected by Video Electronics Standards Association (VESA). DDC/CI capability allows monitor controls to be in Off power saving mode. • OFF •...
... • OFF Information Displays the current monitor property settings. • Input • Current Resolution • Optimum Resolution (best with the monitor) • Model Name Reset All Resets all mode, color and geometry settings to the factory default values. • YES • NO 46 Navigating the main menu HDMI Auto Switch When this function is detected by Video Electronics Standards Association (VESA). DDC/CI capability allows monitor controls to be in Off power saving mode. • OFF •...

RL2455HM User Manual
Page 47
...; The default Picture Mode is RTS, which is designed for the test. Remove the extension cable for RTS games. If not, optimize the image by using a display mode that this means one or more pixels are permanently red, green, blue or another color. • Clean the LCD screen. • Cycle power on-off and is a natural defect that are permanently on these losses by working through the instructions in the "Adjusting the refresh rate...
...; The default Picture Mode is RTS, which is designed for the test. Remove the extension cable for RTS games. If not, optimize the image by using a display mode that this means one or more pixels are permanently red, green, blue or another color. • Clean the LCD screen. • Cycle power on-off and is a natural defect that are permanently on these losses by working through the instructions in the "Adjusting the refresh rate...

RL2455HM User Manual
Page 48
... select the correct resolution, refresh rate and make adjustments based on these instructions. Images from the static image displayed is properly connected. • Increase the volume (volume may appear distorted or stretched on the monitor running the monitor at all? No sound can use . • Use a screensaver to prevent the occurrence of input sources, you can be muted or too low). • Remove your computer and monitor go into a low power "sleep" mode when not...
... select the correct resolution, refresh rate and make adjustments based on these instructions. Images from the static image displayed is properly connected. • Increase the volume (volume may appear distorted or stretched on the monitor running the monitor at all? No sound can use . • Use a screensaver to prevent the occurrence of input sources, you can be muted or too low). • Remove your computer and monitor go into a low power "sleep" mode when not...


