RL2455HM User Manual
Page 4
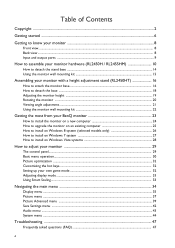
... ...8 Input and output ports ...9 How to assemble your monitor hardware (RL2450H / RL2455HM 10 How to detach the stand base ...14 Using the monitor wall mounting kit 15 Assembling your monitor with a height adjustment stand (RL2450HT 16 How to attach the monitor base...16 How to detach the base ...18... Adjusting the monitor height ...19 Rotating the monitor ...20 Viewing angle adjustment ...21 Using the monitor wall mounting kit 22 Getting the most from your BenQ monitor 23 How to install...
... ...8 Input and output ports ...9 How to assemble your monitor hardware (RL2450H / RL2455HM 10 How to detach the stand base ...14 Using the monitor wall mounting kit 15 Assembling your monitor with a height adjustment stand (RL2450HT 16 How to attach the monitor base...16 How to detach the base ...18... Adjusting the monitor height ...19 Rotating the monitor ...20 Viewing angle adjustment ...21 Using the monitor wall mounting kit 22 Getting the most from your BenQ monitor 23 How to install...
RL2455HM User Manual
Page 6
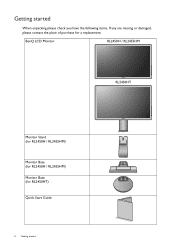
BenQ LCD Monitor RL2450H / RL2455HM RL2450HT Monitor Stand (for RL2450H / RL2455HM) Monitor Base (for RL2450H / RL2455HM) Monitor Base (for a replacement. Getting started When unpacking please check you have the following items. If any are missing or damaged, please contact the place of purchase for RL2450HT) Quick Start Guide 6 Getting started
BenQ LCD Monitor RL2450H / RL2455HM RL2450HT Monitor Stand (for RL2450H / RL2455HM) Monitor Base (for RL2450H / RL2455HM) Monitor Base (for a replacement. Getting started When unpacking please check you have the following items. If any are missing or damaged, please contact the place of purchase for RL2450HT) Quick Start Guide 6 Getting started
RL2455HM User Manual
Page 9
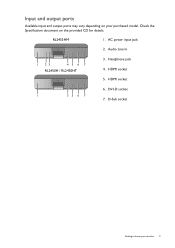
Audio Line In 1 23 45 6 7 RL2450H / RL2450HT 3. DVI-D socket 1 35 6 7 7. Input and output ports Available input and output ports may vary depending on the provided CD for details. RL2455HM 1. HDMI socket 5. D-Sub socket Getting to know your purchased model. HDMI socket 6. Check the Specification document on your monitor 9 Headphone jack 4. AC power input jack 2.
Audio Line In 1 23 45 6 7 RL2450H / RL2450HT 3. DVI-D socket 1 35 6 7 7. Input and output ports Available input and output ports may vary depending on the provided CD for details. RL2455HM 1. HDMI socket 5. D-Sub socket Getting to know your purchased model. HDMI socket 6. Check the Specification document on your monitor 9 Headphone jack 4. AC power input jack 2.
RL2455HM User Manual
Page 10
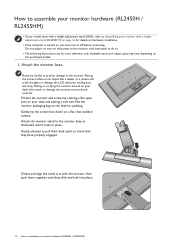
...are for padding. Gently attempt to pull them together until they have properly engaged. Orient and align the stand arm with a height adjustment stand (RL2450HT) on page 16 for details on hardware installation. • If the computer is turned on you must turn -on your desk and placing ... locks in place. Available input and output jacks may vary depending on a flat clean padded surface. How to assemble your monitor hardware (RL2450H / RL2455HM) • If your model came with a height adjustment stand (HAS), refer to Assembling your monitor with the monitor, then push them back apart...
...are for padding. Gently attempt to pull them together until they have properly engaged. Orient and align the stand arm with a height adjustment stand (RL2450HT) on page 16 for details on hardware installation. • If the computer is turned on you must turn -on your desk and placing ... locks in place. Available input and output jacks may vary depending on a flat clean padded surface. How to assemble your monitor hardware (RL2450H / RL2455HM) • If your model came with a height adjustment stand (HAS), refer to Assembling your monitor with the monitor, then push them back apart...

RL2455HM User Manual
Page 16
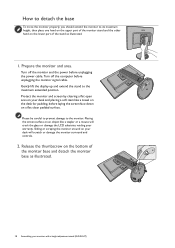
... base as illustrated. 2 3 1 Gently attempt to pull them together. Orient and align the stand base socket with a height adjustment stand (RL2450HT) Tighten the thumbscrew on your desk will crack the glass or damage the LCD substrate voiding your warranty. Placing the screen surface on the desk... and controls. Carefully lift the monitor, turn it over and place it off before continuing. Assembling your monitor with a height adjustment stand (RL2450HT) How to attach the monitor base • If the computer is turned on a flat even surface. 16 Assembling your monitor with the ...
... base as illustrated. 2 3 1 Gently attempt to pull them together. Orient and align the stand base socket with a height adjustment stand (RL2450HT) Tighten the thumbscrew on your desk will crack the glass or damage the LCD substrate voiding your warranty. Placing the screen surface on the desk... and controls. Carefully lift the monitor, turn it over and place it off before continuing. Assembling your monitor with a height adjustment stand (RL2450HT) How to attach the monitor base • If the computer is turned on a flat even surface. 16 Assembling your monitor with the ...
RL2455HM User Manual
Page 17
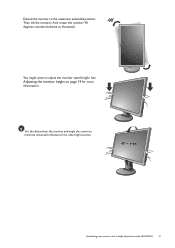
You might want to minimize unwanted reflections from other light sources. -5O ~ +15O Assembling your monitor with a height adjustment stand (RL2450HT) 17 You should position the monitor and angle the screen to adjust the monitor stand height. And rotate the monitor 90 degrees counterclockwise as illustrated. See Adjusting the monitor height on page 19 for more information. Extend the monitor to the maximum extended position. -90 Then tilt the monitor.
You might want to minimize unwanted reflections from other light sources. -5O ~ +15O Assembling your monitor with a height adjustment stand (RL2450HT) 17 You should position the monitor and angle the screen to adjust the monitor stand height. And rotate the monitor 90 degrees counterclockwise as illustrated. See Adjusting the monitor height on page 19 for more information. Extend the monitor to the maximum extended position. -90 Then tilt the monitor.
RL2455HM User Manual
Page 18
.... Sliding or scraping the monitor around on your desk will crack the glass or damage the LCD substrate voiding your monitor with a height adjustment stand (RL2450HT) How to detach the base To move the monitor properly, you should extend the monitor to its maximum height, then place one hand on the...
.... Sliding or scraping the monitor around on your desk will crack the glass or damage the LCD substrate voiding your monitor with a height adjustment stand (RL2450HT) How to detach the base To move the monitor properly, you should extend the monitor to its maximum height, then place one hand on the...
RL2455HM User Manual
Page 19
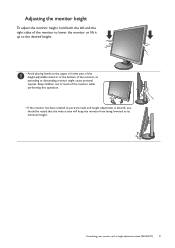
Assembling your monitor with a height adjustment stand (RL2450HT) 19 Adjusting the monitor height To adjust the monitor height, hold both the left and the right sides of the monitor to lower the monitor ...
Assembling your monitor with a height adjustment stand (RL2450HT) 19 Adjusting the monitor height To adjust the monitor height, hold both the left and the right sides of the monitor to lower the monitor ...
RL2455HM User Manual
Page 20
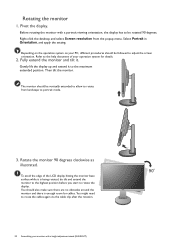
... setting. You might need to portrait mode. 3. The monitor should be rotated 90 degrees. Pivot the display. Before rotating the monitor with a height adjustment stand (RL2450HT) Right-click the desktop and select Screen resolution from landscape to route the cables again via the cable clip after the rotation. 20 Assembling your...
... setting. You might need to portrait mode. 3. The monitor should be rotated 90 degrees. Pivot the display. Before rotating the monitor with a height adjustment stand (RL2450HT) Right-click the desktop and select Screen resolution from landscape to route the cables again via the cable clip after the rotation. 20 Assembling your...
RL2455HM User Manual
Page 21
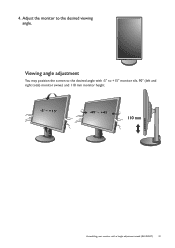
Viewing angle adjustment You may position the screen to the desired angle with a height adjustment stand (RL2450HT) 21 Adjust the monitor to +15° monitor tilt, 90° (left and right total) monitor swivel, and 110 mm monitor height. -5O ~ +15O -45O ~ +45O 110 mm Assembling your monitor with -5° to the desired viewing angle. 4.
Viewing angle adjustment You may position the screen to the desired angle with a height adjustment stand (RL2450HT) 21 Adjust the monitor to +15° monitor tilt, 90° (left and right total) monitor swivel, and 110 mm monitor height. -5O ~ +15O -45O ~ +45O 110 mm Assembling your monitor with -5° to the desired viewing angle. 4.
RL2455HM User Manual
Page 22
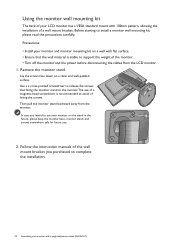
Using the monitor wall mounting kit The back of your LCD monitor has a VESA standard mount with a height adjustment stand (RL2450HT) Follow the instruction manuals of losing the screws. Remove the monitor stand. Lay the screen face down on a wall with flat surface. • Ensure that ...
Using the monitor wall mounting kit The back of your LCD monitor has a VESA standard mount with a height adjustment stand (RL2450HT) Follow the instruction manuals of losing the screws. Remove the monitor stand. Lay the screen face down on a wall with flat surface. • Ensure that ...
RL2455HM User Manual
Page 24
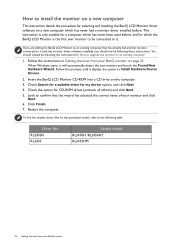
...suitable driver files for the purchased model, refer to upgrade the monitor on the computer. 3. If you are adding the BenQ LCD Monitor to Install Hardware Device Drivers. 2. You should not be following the instructions for How to the following these instructions. Insert the...that the wizard has selected the correct name of your BenQ monitor on page 23. Check the option for my device option, and click Next. 4. Driver files RL2450H RL2455 Suitable models RL2450H /RL2450HT RL2455HM 24 Getting the most from your BenQ monitor Click Finish. 7. Follow the prompts until it...
...suitable driver files for the purchased model, refer to upgrade the monitor on the computer. 3. If you are adding the BenQ LCD Monitor to Install Hardware Device Drivers. 2. You should not be following the instructions for How to the following these instructions. Insert the...that the wizard has selected the correct name of your BenQ monitor on page 23. Check the option for my device option, and click Next. 4. Driver files RL2450H RL2455 Suitable models RL2450H /RL2450HT RL2455HM 24 Getting the most from your BenQ monitor Click Finish. 7. Follow the prompts until it...
RL2455HM User Manual
Page 44
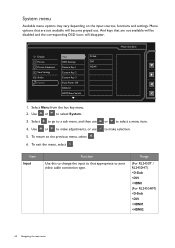
... video cable connection type. to make selection. Use or to make adjustments, or use 4. To exit the menu, select . Range (For RL2450T / RL2450HT) • D-Sub • DVI • HDMI (For RL2455HM) • D-Sub • DVI • HDMI1 • HDMI2 44 Navigating the main menu Select Menu from the hot key menu. 2. Item...
... video cable connection type. to make selection. Use or to make adjustments, or use 4. To exit the menu, select . Range (For RL2450T / RL2450HT) • D-Sub • DVI • HDMI (For RL2455HM) • D-Sub • DVI • HDMI1 • HDMI2 44 Navigating the main menu Select Menu from the hot key menu. 2. Item...