User Manual
Page 2
...; Pushbutton or keyboard "Hot" key command switching • AutoScan mode for error-free boot-ups • Microsoft® IntelliMouse® and IntelliMouse® Pro support • Up to control two computers from one keyboard, mouse and monitor • Integrated Mouse Conversion Technology allows connection of AT-style computers that have serial mouse ports while using a PS/2 mouse only at the console • Keyboard and mouse...
...; Pushbutton or keyboard "Hot" key command switching • AutoScan mode for error-free boot-ups • Microsoft® IntelliMouse® and IntelliMouse® Pro support • Up to control two computers from one keyboard, mouse and monitor • Integrated Mouse Conversion Technology allows connection of AT-style computers that have serial mouse ports while using a PS/2 mouse only at the console • Keyboard and mouse...

User Manual
Page 3
P73039_F1D102-eng_man.qxd 9/26/00 3:42 PM Page 2 Technical Specifications Console Connectors: Keyboard: Mouse: Monitor: 6 pin MiniDIN female 6 pin MiniDIN female (for PS/2 mouse) DB9 male (for spare serial mouse) HDDB15 female Computer Port Connectors: Keyboard: Mouse: Monitor: 6 pin MiniDIN female 6 pin MiniDIN female (for PS/2 mouse) DB9 male (for serial mouse) HDDB15 male Dimensions: Width: Height: Depth...
P73039_F1D102-eng_man.qxd 9/26/00 3:42 PM Page 2 Technical Specifications Console Connectors: Keyboard: Mouse: Monitor: 6 pin MiniDIN female 6 pin MiniDIN female (for PS/2 mouse) DB9 male (for spare serial mouse) HDDB15 female Computer Port Connectors: Keyboard: Mouse: Monitor: 6 pin MiniDIN female 6 pin MiniDIN female (for PS/2 mouse) DB9 male (for serial mouse) HDDB15 male Dimensions: Width: Height: Depth...

User Manual
Page 4
P73039_F1D102-eng_man.qxd 9/26/00 3:42 PM Page 3 Product Detail FRONT PANEL Current Active Port LED Indicators Current Active Bank LED Indicators Bank Select/ Scan Button Port Select Button REAR PANEL SLAVE INPUT DB25 Daisy-chain port MASTER INPUT SLAVE OUTPUT DB25 Daisy-chain port CONSOLE connectors PC PORT connectors Serial mouse output VGA signal output DC power jack VGA monitor connector DIP switches Keyboard connector Optional serial mouse connector PS/2 mouse connector Keyboard output PS/2 mouse output 3
P73039_F1D102-eng_man.qxd 9/26/00 3:42 PM Page 3 Product Detail FRONT PANEL Current Active Port LED Indicators Current Active Bank LED Indicators Bank Select/ Scan Button Port Select Button REAR PANEL SLAVE INPUT DB25 Daisy-chain port MASTER INPUT SLAVE OUTPUT DB25 Daisy-chain port CONSOLE connectors PC PORT connectors Serial mouse output VGA signal output DC power jack VGA monitor connector DIP switches Keyboard connector Optional serial mouse connector PS/2 mouse connector Keyboard output PS/2 mouse output 3
User Manual
Page 5
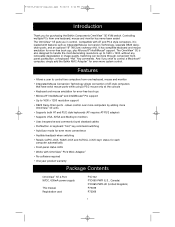
... 6 pin MiniDIN Male Other Cables and Adapters: • High-resolution/high-refresh rate VGA cable for use with thumbscrews Part# A3H981-XX • PS/2 to AT keyboard adapter - Cable kits have the right cables! Below are the Belkin part numbers and their descriptions. P73039_F1D102-eng_man.qxd 9/26/00 3:42 PM Page 4 List of Parts Needed Make sure you have all the cables you will be controlling.
... 6 pin MiniDIN Male Other Cables and Adapters: • High-resolution/high-refresh rate VGA cable for use with thumbscrews Part# A3H981-XX • PS/2 to AT keyboard adapter - Cable kits have the right cables! Below are the Belkin part numbers and their descriptions. P73039_F1D102-eng_man.qxd 9/26/00 3:42 PM Page 4 List of Parts Needed Make sure you have all the cables you will be controlling.
User Manual
Page 6
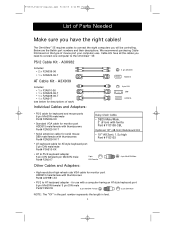
... 2. Set the DIP switches. Please refer to the HDDB15 female port on the back of the OmniView™ SE labeled with your computers, OmniView™ SE, keyboard, mouse, and monitor are using will not be daisy-chained off . NOT DOING SO MAY RESULT IN KEYBOARD AND/OR MOUSE ERRORS, OR FAULTY OPERATION. Use this setting. P73039_F1D102-eng_man.qxd 9/26/00 3:42 PM Page 5 Hardware Installation...
... 2. Set the DIP switches. Please refer to the HDDB15 female port on the back of the OmniView™ SE labeled with your computers, OmniView™ SE, keyboard, mouse, and monitor are using will not be daisy-chained off . NOT DOING SO MAY RESULT IN KEYBOARD AND/OR MOUSE ERRORS, OR FAULTY OPERATION. Use this setting. P73039_F1D102-eng_man.qxd 9/26/00 3:42 PM Page 5 Hardware Installation...
User Manual
Page 7
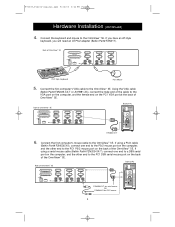
... the OmniView™ SE. If using a serial mouse cable (Belkin Part# F2N209-XX-T), connect one end to the PS/2 mouse port on the computer, and the other end to the PC1 PS/2 mouse port on the PC1 VGA port at the back of the cable to the OmniView™ SE. Connect the first computer's mouse cable to the OmniView™ SE. Connect the first computer's VGA cable to the OmniView™ SE...
... the OmniView™ SE. If using a serial mouse cable (Belkin Part# F2N209-XX-T), connect one end to the PS/2 mouse port on the computer, and the other end to the PC1 PS/2 mouse port on the PC1 VGA port at the back of the cable to the OmniView™ SE. Connect the first computer's mouse cable to the OmniView™ SE. Connect the first computer's VGA cable to the OmniView™ SE...
User Manual
Page 8
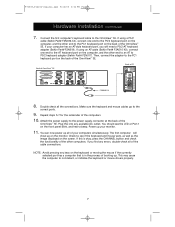
... the LED or Port 1 on the back of the OmniView™ SE. The first computer will need a PS/2-AT keyboard adapter (Belkin Part# F2N018). Check to the OmniView™ SE. Make sure the keyboard and mouse cables go to the power supply connector at the back of the OmniView™ SE. Attach the power supply to the correct ports. 9. P73039_F1D102-eng_man.qxd 9/26/00 3:42 PM Page 7 Hardware Installation (continued...
... the LED or Port 1 on the back of the OmniView™ SE. The first computer will need a PS/2-AT keyboard adapter (Belkin Part# F2N018). Check to the OmniView™ SE. Make sure the keyboard and mouse cables go to the power supply connector at the back of the OmniView™ SE. Attach the power supply to the correct ports. 9. P73039_F1D102-eng_man.qxd 9/26/00 3:42 PM Page 7 Hardware Installation (continued...
User Manual
Page 9
... both. BANK numbers range from 1 through 3 are using the OmniView™ SE in a single-unit configuration, it must be set to any unused unique bank number from 0 to 3 for the actual settings. BANK 0 is the unit that connects to four OmniView™ SE units can be daisy chained together, whether 2-Port, 4-Port, or a mixture of 4 BANKs. The DIP switches must be set correctly for more...
... both. BANK numbers range from 1 through 3 are using the OmniView™ SE in a single-unit configuration, it must be set to any unused unique bank number from 0 to 3 for the actual settings. BANK 0 is the unit that connects to four OmniView™ SE units can be daisy chained together, whether 2-Port, 4-Port, or a mixture of 4 BANKs. The DIP switches must be set correctly for more...

User Manual
Page 10
...and the OmniView™ SE units be daisy-chained to cascade with the OmniView™ PRO as well. This is an 8-Port, 19" (48.3cm) rackmountable OmniView™, having the same features as the OmniView™ SE, but adding On-Screen Display. When the OmniView™...continued) Daisy-chaining OmniView™ SE units with an OmniView™ PRO Bank 0 (Master) 1 2 3 4 5 6 7 8 CONSOLE Keyboard, mouse and monitor Bank 1 (slave) Bank 2 (slave) 9 10 11 12 13 14 Bank 3 (slave) 15 16 17 18 The OmniView™ SE is used as MASTER, all of the other OmniView™ units in...
...and the OmniView™ SE units be daisy-chained to cascade with the OmniView™ PRO as well. This is an 8-Port, 19" (48.3cm) rackmountable OmniView™, having the same features as the OmniView™ SE, but adding On-Screen Display. When the OmniView™...continued) Daisy-chaining OmniView™ SE units with an OmniView™ PRO Bank 0 (Master) 1 2 3 4 5 6 7 8 CONSOLE Keyboard, mouse and monitor Bank 1 (slave) Bank 2 (slave) 9 10 11 12 13 14 Bank 3 (slave) 15 16 17 18 The OmniView™ SE is used as MASTER, all of the other OmniView™ units in...
User Manual
Page 11
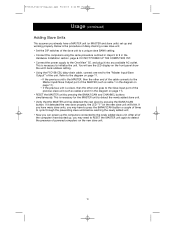
...CHANNEL buttons simultaneously. This is necessary to initialize the unit. DO NOT POWER UP THE COMPUTERS YET. • Connect the power supply to the OmniView™ SE, and plug it detected the new slave properly, the LED "1" on the front panel show the unit's bank address setting. • Using the F1D108-CBL daisy-chain cable, connect...new slave unit. • Set the DIP switches of the computers have booted up, you may have a MASTER unit (or MASTER and slave units) set-up and working properly. If you have many slave units, you may need to RESET the MASTER unit again to ...
...CHANNEL buttons simultaneously. This is necessary to initialize the unit. DO NOT POWER UP THE COMPUTERS YET. • Connect the power supply to the OmniView™ SE, and plug it detected the new slave properly, the LED "1" on the front panel show the unit's bank address setting. • Using the F1D108-CBL daisy-chain cable, connect...new slave unit. • Set the DIP switches of the computers have booted up, you may have a MASTER unit (or MASTER and slave units) set-up and working properly. If you have many slave units, you may need to RESET the MASTER unit again to ...

User Manual
Page 12
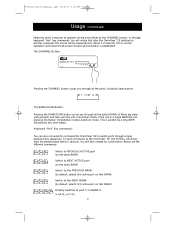
P73039_F1D102-eng_man.qxd 9/26/00 3:42 PM Page 11 Usage (continued) Daisy-Chaining the OmniView™ SE: Cable 1 MASTER (Bank 0) Cable 2 slave (Bank 1) Cable 3 slave (Bank 2) slave (Bank 3) 11
P73039_F1D102-eng_man.qxd 9/26/00 3:42 PM Page 11 Usage (continued) Daisy-Chaining the OmniView™ SE: Cable 1 MASTER (Bank 0) Cable 2 slave (Bank 1) Cable 3 slave (Bank 2) slave (Bank 3) 11
User Manual
Page 13
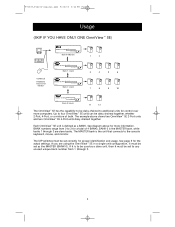
... switches to port Y on that BANK) Switch to the NEXT BANK (by two short beeps. This is normal operation and ensures that after the OmniView™ SE switches to another computer, the mouse will hear a beep for about 1-2 seconds. Keyboard "Hot" Key commands: You can be done either by the CHANNEL button, or through keyboard "Hot" key commands. To send commands to the OmniView...
... switches to port Y on that BANK) Switch to the NEXT BANK (by two short beeps. This is normal operation and ensures that after the OmniView™ SE switches to another computer, the mouse will hear a beep for about 1-2 seconds. Keyboard "Hot" Key commands: You can be done either by the CHANNEL button, or through keyboard "Hot" key commands. To send commands to the OmniView...

User Manual
Page 14
... or using the table below , that is interrupted and will be set on the slave units. Hence, if you only have one port for a number of AutoScan mode, press the SPACEBAR. 13 Set DIP switches 1 & 2 using the keyboard when the OmniView™ SE switches to the next. For instance, if you prefer. To get out of seconds, before switching to the next port, data flow is...
... or using the table below , that is interrupted and will be set on the slave units. Hence, if you only have one port for a number of AutoScan mode, press the SPACEBAR. 13 Set DIP switches 1 & 2 using the keyboard when the OmniView™ SE switches to the next. For instance, if you prefer. To get out of seconds, before switching to the next port, data flow is...
User Manual
Page 15
... or connected to make sure that the PS/2 mouse port (or IRQ) is enabled. • Make sure the mouse is working properly. Make sure the power switch is on. • RESET the OmniView™ SE by simultaneously pressing the BANK/SCAN and CHANNEL buttons on the front panel. • Do not press any keys on how to make sure that the power adapter is...
... or connected to make sure that the PS/2 mouse port (or IRQ) is enabled. • Make sure the mouse is working properly. Make sure the power switch is on. • RESET the OmniView™ SE by simultaneously pressing the BANK/SCAN and CHANNEL buttons on the front panel. • Do not press any keys on how to make sure that the power adapter is...
User Manual
Page 16
... serial port. P73039_F1D102-eng_man.qxd 9/26/00 3:42 PM Page 15 Troubleshooting (continued) Q: The computers boot up fine, but the mouse does not work. Problems with more than 2 operational buttons, use non-PS/2 proprietary mouse protocol. • Make sure you are inserted properly in and is on. • RESET the OmniView™ SE by simultaneously pressing the BANK/SCAN and CHANNEL buttons on...
... serial port. P73039_F1D102-eng_man.qxd 9/26/00 3:42 PM Page 15 Troubleshooting (continued) Q: The computers boot up fine, but the mouse does not work. Problems with more than 2 operational buttons, use non-PS/2 proprietary mouse protocol. • Make sure you are inserted properly in and is on. • RESET the OmniView™ SE by simultaneously pressing the BANK/SCAN and CHANNEL buttons on...
User Manual
Page 17
Make sure the power switch is working properly. Why? Note that the driver is either for about the Optional Serial Mouse port at the console: If you can plug in and is on. • RESET the OmniView™ SE by simultaneously pressing the BANK/SCAN and CHANNEL buttons on the front panel. • Make sure you must be directly connected to PS/2 mouse signals...
Make sure the power switch is working properly. Why? Note that the driver is either for about the Optional Serial Mouse port at the console: If you can plug in and is on. • RESET the OmniView™ SE by simultaneously pressing the BANK/SCAN and CHANNEL buttons on the front panel. • Make sure you must be directly connected to PS/2 mouse signals...

User Manual
Page 18
... THEORY, INCLUDING BUT NOT LIMITED TO LOST PROFITS, DOWNTIME, GOODWILL, DAMAGE TO OR REPROGRAMMING, OR REPRODUCING ANY PROGRAM OR DATA STORED IN OR USED WITH BELKIN PRODUCTS. Some states do not allow the...belkin.com Belkin Components, Ltd. Diamantlaan 8 • 2132 WV Hoofddorp • The Netherlands Tel: +31 (0) 235698765 Fax: +31 (0) 235612694 © 2000 Belkin Components. Operation is subject to this product against defects in conformity with Generic Emissions Standard EN50081-1 and with Generic Immunity Standard EN50082-1 1992. or if any Belkin serial number has been removed...
... THEORY, INCLUDING BUT NOT LIMITED TO LOST PROFITS, DOWNTIME, GOODWILL, DAMAGE TO OR REPROGRAMMING, OR REPRODUCING ANY PROGRAM OR DATA STORED IN OR USED WITH BELKIN PRODUCTS. Some states do not allow the...belkin.com Belkin Components, Ltd. Diamantlaan 8 • 2132 WV Hoofddorp • The Netherlands Tel: +31 (0) 235698765 Fax: +31 (0) 235612694 © 2000 Belkin Components. Operation is subject to this product against defects in conformity with Generic Emissions Standard EN50081-1 and with Generic Immunity Standard EN50082-1 1992. or if any Belkin serial number has been removed...


