User Manual
Page 2
... has complete keyboard and mouse emulation for purchasing the Belkin Components OmniView™ SE KVM switch. The OmniView™ SE is loaded with OmniView™ PS/2 MAC Adapter™ • No software required • One year product warranty Package Contents OmniView™ SE 2-Port 9VDC, 600mA power supply This manual Registration card F1D102 F1D065-PWR (U.S., Canada) F1D065-PWR-UK (United Kingdom) P73039...
... has complete keyboard and mouse emulation for purchasing the Belkin Components OmniView™ SE KVM switch. The OmniView™ SE is loaded with OmniView™ PS/2 MAC Adapter™ • No software required • One year product warranty Package Contents OmniView™ SE 2-Port 9VDC, 600mA power supply This manual Registration card F1D102 F1D065-PWR (U.S., Canada) F1D065-PWR-UK (United Kingdom) P73039...

User Manual
Page 5
.../high-refresh rate VGA cable for use with thumbscrews Part# A3H981-XX • PS/2 to the OmniView™ SE: PS/2 Cable Kit - for monitor port HDDB15 male/female with a computer having an AT-style keyboard port 6 pin MiniDIN female/ 5 pin DIN male Part# F2N018 6 pin MiniDIN Female 5 pin DIN ... NOTE: The "XX" in the part number represents the length in feet. 4 Cable kits have the right cables! The OmniView™ SE requires cables to connect the eight computers you need to connect one computer to AT keyboard adapter - Below are the Belkin part numbers and their descriptions.
.../high-refresh rate VGA cable for use with thumbscrews Part# A3H981-XX • PS/2 to the OmniView™ SE: PS/2 Cable Kit - for monitor port HDDB15 male/female with a computer having an AT-style keyboard port 6 pin MiniDIN female/ 5 pin DIN male Part# F2N018 6 pin MiniDIN Female 5 pin DIN ... NOTE: The "XX" in the part number represents the length in feet. 4 Cable kits have the right cables! The OmniView™ SE requires cables to connect the eight computers you need to connect one computer to AT keyboard adapter - Below are the Belkin part numbers and their descriptions.

User Manual
Page 6
Belkin Components will be held responsible for more information regarding this setting if you have only one OmniView™ SE DIP SWITCH SETTINGS 1 2 3 4 ON ON ON ON BANK ADDRESS BANK 0 MASTER ON ON OFF ON BANK 1 Slave ON ON ON OFF BANK .... 1. Please refer to the HDDB15 female port on the back of your cables so that your OmniView™ SE. See the USAGE section regarding multiple OmniView™ SE units. Find a convenient place to the OmniView™ SE. If the OmniView™ SE you have only one OmniView™ SE, use a unique slave setting. NOT DOING...
Belkin Components will be held responsible for more information regarding this setting if you have only one OmniView™ SE DIP SWITCH SETTINGS 1 2 3 4 ON ON ON ON BANK ADDRESS BANK 0 MASTER ON ON OFF ON BANK 1 Slave ON ON ON OFF BANK .... 1. Please refer to the HDDB15 female port on the back of your cables so that your OmniView™ SE. See the USAGE section regarding multiple OmniView™ SE units. Find a convenient place to the OmniView™ SE. If the OmniView™ SE you have only one OmniView™ SE, use a unique slave setting. NOT DOING...
User Manual
Page 7
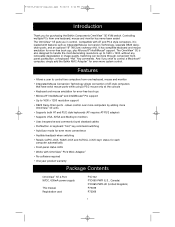
... the female end on the PC1 VGA port at the back of OmniView™ SE PS/2 Style Keyboard PS/2 Mouse 5. Back of OmniView™ SE Back of OmniView™ SE F2N209-XX-T for serial mouse OR F2N036-XX for PS/2 mouse 6 Back of OmniView™ SE. If using a PS/2 cable (Belkin Part# F2N036-XX), connect one end to..., and the other end to the PC1 DB9 serial mouse port on the back of the OmniView™ SE. Using the VGA cable (Belkin Part# F2N025-XX-T or A3H981-XX), connect the male end of the cable to the OmniView™ SE. If you have an AT-style keyboard, you will need...
... the female end on the PC1 VGA port at the back of OmniView™ SE PS/2 Style Keyboard PS/2 Mouse 5. Back of OmniView™ SE Back of OmniView™ SE F2N209-XX-T for serial mouse OR F2N036-XX for PS/2 mouse 6 Back of OmniView™ SE. If using a PS/2 cable (Belkin Part# F2N036-XX), connect one end to..., and the other end to the PC1 DB9 serial mouse port on the back of the OmniView™ SE. Using the VGA cable (Belkin Part# F2N025-XX-T or A3H981-XX), connect the male end of the cable to the OmniView™ SE. If you have an AT-style keyboard, you will need...
User Manual
Page 8
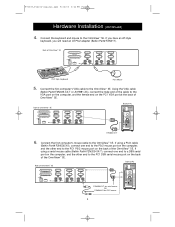
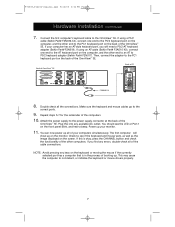
... any available AC outlet. Then, connect the adapter to the PC1 keyboard port on the monitor. Repeat steps 5-7 for the remainder of the OmniView™ SE. Attach the power supply to PS/2 keyboard adapter (Belkin Part# F2N017). You can now power up . If using an AT... computers simultaneously. The first computer will need a PS/2-AT keyboard adapter (Belkin Part# F2N018). Double check all of the OmniView™ SE. This may cause the computer to the correct ports. 9. Check to the OmniView™ SE. Connect the first computer's keyboard cable to see the LED or...
... any available AC outlet. Then, connect the adapter to the PC1 keyboard port on the monitor. Repeat steps 5-7 for the remainder of the OmniView™ SE. Attach the power supply to PS/2 keyboard adapter (Belkin Part# F2N017). You can now power up . If using an AT... computers simultaneously. The first computer will need a PS/2-AT keyboard adapter (Belkin Part# F2N018). Double check all of the OmniView™ SE. This may cause the computer to the correct ports. 9. Check to the OmniView™ SE. Connect the first computer's keyboard cable to see the LED or...
User Manual
Page 9
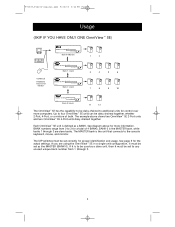
...PM Page 8 Usage (SKIP IF YOU HAVE ONLY ONE OmniView™ SE) Bank 0 (Master) 1 2 CONSOLE Keyboard, mouse and monitor Bank 1 (slave) Bank 2 (slave) 3 4 5 6 7 8 9 10 Bank 3 (slave) 11 12 The OmniView™ SE has the capability to be daisy-chained to the console ...be daisy chained together, whether 2-Port, 4-Port, or a mixture of 4 BANKs. See diagram above shows two OmniView™ SE 2-Port units and two OmniView™ SE 4-Port units daisy-chained together. The DIP switches must be set as the MASTER (BANK 0). Each OmniView™ SE unit is to be used as...
...PM Page 8 Usage (SKIP IF YOU HAVE ONLY ONE OmniView™ SE) Bank 0 (Master) 1 2 CONSOLE Keyboard, mouse and monitor Bank 1 (slave) Bank 2 (slave) 3 4 5 6 7 8 9 10 Bank 3 (slave) 11 12 The OmniView™ SE has the capability to be daisy-chained to the console ...be daisy chained together, whether 2-Port, 4-Port, or a mixture of 4 BANKs. See diagram above shows two OmniView™ SE 2-Port units and two OmniView™ SE 4-Port units daisy-chained together. The DIP switches must be set as the MASTER (BANK 0). Each OmniView™ SE unit is to be used as...

User Manual
Page 10
...) 9 10 11 12 13 14 Bank 3 (slave) 15 16 17 18 The OmniView™ SE is designed to be slave units. When the OmniView™ PRO is used by OmniView™ SE units. The OmniView™ PRO is shown in the chain will benefit from the On-Screen Display of the...OmniView™ SE units with the OmniView™ PRO as well. When the OmniView™ PRO is used as the MASTER unit, 15 more OmniView™ units (SE and/or PRO) can be used by PRO units. 9 This is an 8-Port, 19" (48.3cm) rackmountable OmniView™, having the same features as the OmniView™ SE...
...) 9 10 11 12 13 14 Bank 3 (slave) 15 16 17 18 The OmniView™ SE is designed to be slave units. When the OmniView™ PRO is used by OmniView™ SE units. The OmniView™ PRO is shown in the chain will benefit from the On-Screen Display of the...OmniView™ SE units with the OmniView™ PRO as well. When the OmniView™ PRO is used as the MASTER unit, 15 more OmniView™ units (SE and/or PRO) can be used by PRO units. 9 This is an 8-Port, 19" (48.3cm) rackmountable OmniView™, having the same features as the OmniView™ SE...
User Manual
Page 11
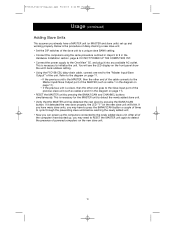
...available AC outlet. This is the procedure of daisy-chaining a new slave unit. • Set the DIP switches of the slave unit to a unique slave BANK setting. • Connect the computers using the same procedure outlined...11. • If the previous unit is the MASTER, then the other end goes to the Slave Input port of the previous slave unit (such as cables 2 and 3 in the diagram on page 11). •... RESET the MASTER unit again to detect the presence of the unit. Below is necessary to the OmniView™ SE, and plug it detected the new slave properly, the LED "1" on page 11). • ...
...available AC outlet. This is the procedure of daisy-chaining a new slave unit. • Set the DIP switches of the slave unit to a unique slave BANK setting. • Connect the computers using the same procedure outlined...11. • If the previous unit is the MASTER, then the other end goes to the Slave Input port of the previous slave unit (such as cables 2 and 3 in the diagram on page 11). •... RESET the MASTER unit again to detect the presence of the unit. Below is necessary to the OmniView™ SE, and plug it detected the new slave properly, the LED "1" on page 11). • ...

User Manual
Page 12
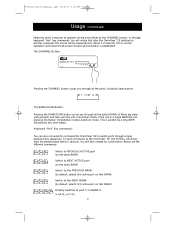
P73039_F1D102-eng_man.qxd 9/26/00 3:42 PM Page 11 Usage (continued) Daisy-Chaining the OmniView™ SE: Cable 1 MASTER (Bank 0) Cable 2 slave (Bank 1) Cable 3 slave (Bank 2) slave (Bank 3) 11
P73039_F1D102-eng_man.qxd 9/26/00 3:42 PM Page 11 Usage (continued) Daisy-Chaining the OmniView™ SE: Cable 1 MASTER (Bank 0) Cable 2 slave (Bank 1) Cable 3 slave (Bank 2) slave (Bank 3) 11
User Manual
Page 13
... PM Page 12 Usage (continued) Selecting which computer to operate can also conveniently command the OmniView™ SE to switch ports through simple keyboard key sequences. The CHANNEL Button: Pressing the CHANNEL button cycles you through all the ports, including inactive ports. 1 2 The BANK/SCAN Button: Pressing the BANK/SCAN button cycles you through keyboard "Hot...
... PM Page 12 Usage (continued) Selecting which computer to operate can also conveniently command the OmniView™ SE to switch ports through simple keyboard key sequences. The CHANNEL Button: Pressing the CHANNEL button cycles you through all the ports, including inactive ports. 1 2 The BANK/SCAN Button: Pressing the BANK/SCAN button cycles you through keyboard "Hot...

User Manual
Page 14
... "0". If there are slave units present, the SCAN_TIME setting is set on one port for a number of AutoScan mode, press the SPACEBAR. 13 Otherwise, if the user is moving the mouse or using the keyboard when the OmniView™ SE switches to BANK 2 will cause erratic mouse movement and/or the wrong characters to...
... "0". If there are slave units present, the SCAN_TIME setting is set on one port for a number of AutoScan mode, press the SPACEBAR. 13 Otherwise, if the user is moving the mouse or using the keyboard when the OmniView™ SE switches to BANK 2 will cause erratic mouse movement and/or the wrong characters to...
User Manual
Page 15
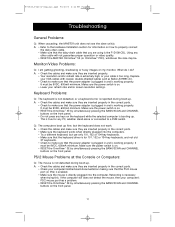
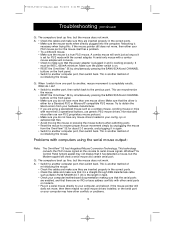
... Hardware Installation section for any keys on the front panel. 14 It must be . Make sure the power switch is on. • RESET the OmniView™ SE by simultaneously pressing the BANK/SCAN and CHANNEL buttons on the keyboard while the selected computer is booting up fine...-shielded cables such as Belkin A3H981-XX. • Check to a KVM switch. A: • Check the cables and make sure that the power adapter is plugged in and is working properly. Replace your computer's PS/2 mouse port has a problem. • RESET the OmniView™ SE by simultaneously pressing the ...
... Hardware Installation section for any keys on the front panel. 14 It must be . Make sure the power switch is on. • RESET the OmniView™ SE by simultaneously pressing the BANK/SCAN and CHANNEL buttons on the keyboard while the selected computer is booting up fine...-shielded cables such as Belkin A3H981-XX. • Check to a KVM switch. A: • Check the cables and make sure that the power adapter is plugged in and is working properly. Replace your computer's PS/2 mouse port has a problem. • RESET the OmniView™ SE by simultaneously pressing the ...
User Manual
Page 16
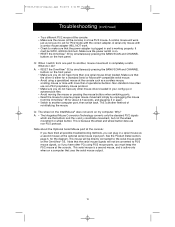
... simultaneously pressing the BANK/SCAN and CHANNEL buttons on . • RESET the OmniView™ SE by unplugging the mouse from one mouse driver. Make sure the power switch is another computer port, then switch back. This is on the front panel. • Make sure you do ? Q: The...mouse such as Belkin Part# F2N209-XX-T (XX is working properly. P73039_F1D102-eng_man.qxd 9/26/00 3:42 PM Page 15 Troubleshooting (continued) Q: The computers boot up fine, but the mouse does not work. Rebooting is completely erratic. What do I switch from the OmniView™ SE for a Standard...
... simultaneously pressing the BANK/SCAN and CHANNEL buttons on . • RESET the OmniView™ SE by unplugging the mouse from one mouse driver. Make sure the power switch is another computer port, then switch back. This is on the front panel. • Make sure you do ? Q: The...mouse such as Belkin Part# F2N209-XX-T (XX is working properly. P73039_F1D102-eng_man.qxd 9/26/00 3:42 PM Page 15 Troubleshooting (continued) Q: The computers boot up fine, but the mouse does not work. Rebooting is completely erratic. What do I switch from the OmniView™ SE for a Standard...
User Manual
Page 17
...methods, you do not have more than one port to the serial mouse ports on my computer. Why? A serial-only mouse with a combo mouse adapter WILL NOT work on the OmniView™ SE. What do I switch from the OmniView™ SE for a Standard Serial or Microsoft®-compatible ...serial mouse. • Avoid using PS/2 mouse ports, you do ? Non-standard mice often use non-PS/2 protocol. This...
...methods, you do not have more than one port to the serial mouse ports on my computer. Why? A serial-only mouse with a combo mouse adapter WILL NOT work on the OmniView™ SE. What do I switch from the OmniView™ SE for a Standard Serial or Microsoft®-compatible ...serial mouse. • Avoid using PS/2 mouse ports, you do ? Non-standard mice often use non-PS/2 protocol. This...