
Operating Instructions
Page 4
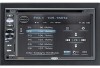
DVD • Aspect Ratio - VM9224 FEATURES Congratulations on your iPod. *Video/photo playback requires jLink-USB iPod interface cable (sold separately). • Power Management Charges iPod while Connected Chassis • 2.0 DIN (Import / ISO-DIN Mountable) • Fixed Front Panel • 6.2" High Definition TFT LCD • 1,152,000 Sub Pixels (800x3 X 480) • Beep Tone Confirmation (ON-OFF Option) • Heat Management System - Play music and...
DVD • Aspect Ratio - VM9224 FEATURES Congratulations on your iPod. *Video/photo playback requires jLink-USB iPod interface cable (sold separately). • Power Management Charges iPod while Connected Chassis • 2.0 DIN (Import / ISO-DIN Mountable) • Fixed Front Panel • 6.2" High Definition TFT LCD • 1,152,000 Sub Pixels (800x3 X 480) • Beep Tone Confirmation (ON-OFF Option) • Heat Management System - Play music and...

Operating Instructions
Page 5
... streaming music from a PDA / PMP • 44-Key Infrared Remote Control • One Composite Video Output for Additional Screens • Front Panel Audio/Video Input • Three-Band Tone control (Bass, Mid and Treble) with Eight Preset EQ Curves • Front Panel A/V Aux Input for Portable Media Devices • Front, Rear and Subwoofer Line Output • Programmable Volume Control • Rear Camera Input (Normal and Mirror Image View) • Touch Screen Calibration Mode • 2VRMS Line Output - All Channels •...
... streaming music from a PDA / PMP • 44-Key Infrared Remote Control • One Composite Video Output for Additional Screens • Front Panel Audio/Video Input • Three-Band Tone control (Bass, Mid and Treble) with Eight Preset EQ Curves • Front Panel A/V Aux Input for Portable Media Devices • Front, Rear and Subwoofer Line Output • Programmable Volume Control • Rear Camera Input (Normal and Mirror Image View) • Touch Screen Calibration Mode • 2VRMS Line Output - All Channels •...

Operating Instructions
Page 7
... setting). 4 USB/SD Interface Connector Connect a USB device or insert an SD card for playback of music/video files. 9. VM9224 CONTROLS AND INDICATORS 1. EJECT Press to activate the Local (LOC) setting. TFT Display 7. A/V Input Attach a compatible A/V device. 10. While in the audio menu, press and release to activate the MUTE function and silence the receiver. Press and hold to eject a disc. Press to enter and/or confirm audio settings. RESET Press to reset system settings to turn the unit off . 8. Disc Slot 2. IR Remote Control Receiver...
... setting). 4 USB/SD Interface Connector Connect a USB device or insert an SD card for playback of music/video files. 9. VM9224 CONTROLS AND INDICATORS 1. EJECT Press to activate the Local (LOC) setting. TFT Display 7. A/V Input Attach a compatible A/V device. 10. While in the audio menu, press and release to activate the MUTE function and silence the receiver. Press and hold to eject a disc. Press to enter and/or confirm audio settings. RESET Press to reset system settings to turn the unit off . 8. Disc Slot 2. IR Remote Control Receiver...
Operating Instructions
Page 12
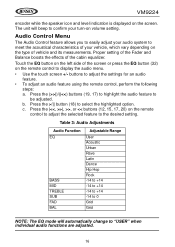
Accesses wards the iPod Menu disc content Decreases Decreases volume volume Increases Increases volume volume Selects the previous track for - VM9224 Table 1: Remote Control Functions Button Function Name # DISP/ 10 CLEAR DVD Displays playing information VCD Displays playing information TUNER Displays playing information CD/MP3/ USB/SD Display playing information iPod Displays playing information PRE- 11 SET /\ PRE- 12 SET \/ ANGLE 13 >> 14 VOL - 15 VOL + 16 |/|| 18 Delete entry or move backwards to correct error in Direct Access mode Delete entry or move...
Accesses wards the iPod Menu disc content Decreases Decreases volume volume Increases Increases volume volume Selects the previous track for - VM9224 Table 1: Remote Control Functions Button Function Name # DISP/ 10 CLEAR DVD Displays playing information VCD Displays playing information TUNER Displays playing information CD/MP3/ USB/SD Display playing information iPod Displays playing information PRE- 11 SET /\ PRE- 12 SET \/ ANGLE 13 >> 14 VOL - 15 VOL + 16 |/|| 18 Delete entry or move backwards to correct error in Direct Access mode Delete entry or move...

Operating Instructions
Page 17
... "MUTE" wire is connected, audio output mutes when a telephone call is received by the car phone (using any of the screen or press the SRC button on the remote to mute the volume from the unit. RADIO SOURCE MENU RADIO BT DISC N WE S NAV 8GB USB1 USB2 SD AUX CAMERA 14 VM9224 OPERATING INSTRUCTIONS Power On / Off Press the /SRC button (4) on the unit (or the button (4) on the remote control) to turn the unit on the front panel (4) or remote control (8) to change the source through the Setup menu. Mute...
... "MUTE" wire is connected, audio output mutes when a telephone call is received by the car phone (using any of the screen or press the SRC button on the remote to mute the volume from the unit. RADIO SOURCE MENU RADIO BT DISC N WE S NAV 8GB USB1 USB2 SD AUX CAMERA 14 VM9224 OPERATING INSTRUCTIONS Power On / Off Press the /SRC button (4) on the unit (or the button (4) on the remote control) to turn the unit on the front panel (4) or remote control (8) to change the source through the Setup menu. Mute...

Operating Instructions
Page 18
... connected to the A/V INPUT. To program a specific turn-on volume level, turn the rotary encoder (7) to adjust the volume to a USB1 port, "IPOD" appears instead of the radio. Volume Adjustment Volume Increase/Decrease To increase or decrease the volume level, turn -on remote control. VM9224 Touch the RADIO, DISC, USB1, USB2, SD, BT, NAV, AUX or CAMERA button to turning the unit off. Programmable Turn-On Volume This feature allows the user to access auxiliary devices. NOTE: If an iPod is closed) mode to select a turn...
... connected to the A/V INPUT. To program a specific turn-on volume level, turn the rotary encoder (7) to adjust the volume to a USB1 port, "IPOD" appears instead of the radio. Volume Adjustment Volume Increase/Decrease To increase or decrease the volume level, turn -on remote control. VM9224 Touch the RADIO, DISC, USB1, USB2, SD, BT, NAV, AUX or CAMERA button to turning the unit off. Programmable Turn-On Volume This feature allows the user to access auxiliary devices. NOTE: If an iPod is closed) mode to select a turn...
Operating Instructions
Page 19
... your turn-on volume setting. c. b. VM9224 encoder while the speaker icon and level indication is displayed on the left side of the cabin equalizer. Touch the EQ button on the screen. Press the buttons (19, 17) to highlight the audio feature to select the highlighted option. Press the or The unit will beep to display the audio menu. • Use the touch screen +/- Press the >/|| button (18) to be adjusted. buttons to...
... your turn-on volume setting. c. b. VM9224 encoder while the speaker icon and level indication is displayed on the left side of the cabin equalizer. Touch the EQ button on the screen. Press the buttons (19, 17) to highlight the audio feature to select the highlighted option. Press the or The unit will beep to display the audio menu. • Use the touch screen +/- Press the >/|| button (18) to be adjusted. buttons to...

Operating Instructions
Page 20
... seconds of the head unit allows connectivity to the PAC adapter. Mute 4. SRC (Source) 7. ** Select 8. ** Select 9. This feature / function may be selected. Steering Wheel Control (SWC) The VM9224 is pressed momentarily, Preset Up will be available on the front bottom-right corner of the screen. Please refer to press the reset button (10) located on some vehicles. Seek Up / Next Track / ** Preset Up 6. A 3.5mm female connector (labeled "SWC Interface...
... seconds of the head unit allows connectivity to the PAC adapter. Mute 4. SRC (Source) 7. ** Select 8. ** Select 9. This feature / function may be selected. Steering Wheel Control (SWC) The VM9224 is pressed momentarily, Preset Up will be available on the front bottom-right corner of the screen. Please refer to press the reset button (10) located on some vehicles. Seek Up / Next Track / ** Preset Up 6. A 3.5mm female connector (labeled "SWC Interface...

Operating Instructions
Page 21
... Cal DEMO General Language Audio Clock Mode 12Hr Clock 04 : 31 AM Tuner Region USA Beep On 05:33 AM Back Accessing Menu Items Touch the sub-menu name, press the or >>| direction buttons (22, 14, 17, 19) on the screen to enter the "SETUP" menu. VM9224 SETUP MENU To access system settings, press the SETUP button (29) on the remote control or touch the button on the remote control to select a sub-menu (Language, Audio, RDS, etc.). Use the...
... Cal DEMO General Language Audio Clock Mode 12Hr Clock 04 : 31 AM Tuner Region USA Beep On 05:33 AM Back Accessing Menu Items Touch the sub-menu name, press the or >>| direction buttons (22, 14, 17, 19) on the screen to enter the "SETUP" menu. VM9224 SETUP MENU To access system settings, press the SETUP button (29) on the remote control or touch the button on the remote control to select a sub-menu (Language, Audio, RDS, etc.). Use the...
Operating Instructions
Page 22
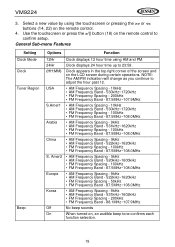
Clock displays 24 hour time up to confirm setup. Clock appears in the top right corner of the screen and on , an audible beep tone confirms each function selection. 19 General Sub-menu Features Setting Clock Mode Clock Tuner Region Beep Options Function 12Hr 24Hr (HH:MM) USA S.Amer1 Arabia China S. NOTE: The AM/PM indication will change as you continue to adjust the hour past 12. • AM...
Clock displays 24 hour time up to confirm setup. Clock appears in the top right corner of the screen and on , an audible beep tone confirms each function selection. 19 General Sub-menu Features Setting Clock Mode Clock Tuner Region Beep Options Function 12Hr 24Hr (HH:MM) USA S.Amer1 Arabia China S. NOTE: The AM/PM indication will change as you continue to adjust the hour past 12. • AM...

Operating Instructions
Page 24
... "call" button. Rating Sub-menu Features The DVD system has a built-in range. Once setup, the parental lock is "1234". PG-13 5. Automatically connect when your password. The default code is released only by using your paired phone is in parental lock feature to activate the "Rating" feature. By default, the rating system is available for many models. Setting Set Password Parental Ctrl Load Factory Options _ _ _ _ 1. Select the...
... "call" button. Rating Sub-menu Features The DVD system has a built-in range. Once setup, the parental lock is "1234". PG-13 5. Automatically connect when your password. The default code is released only by using your paired phone is in parental lock feature to activate the "Rating" feature. By default, the rating system is available for many models. Setting Set Password Parental Ctrl Load Factory Options _ _ _ _ 1. Select the...
Operating Instructions
Page 28
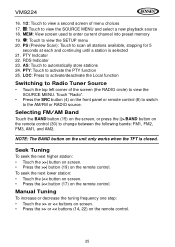
... current channel into preset memory 19. : Touch to automatically store stations 24. PTY Indicator 22. AS: Touch to view the SETUP menu 20. NOTE: The BAND button on the remote control (30) to activate the PTY function 25. Selecting FM/AM Band Touch the BAND button (15) on the screen, or press the ||>/BAND button on the unit only works when the TFT is selected 21. PTY: Touch to change...
... current channel into preset memory 19. : Touch to automatically store stations 24. PTY Indicator 22. AS: Touch to view the SETUP menu 20. NOTE: The BAND button on the remote control (30) to activate the PTY function 25. Selecting FM/AM Band Touch the BAND button (15) on the screen, or press the ||>/BAND button on the unit only works when the TFT is selected 21. PTY: Touch to change...

Operating Instructions
Page 29
... the preset number in which you would like to store the current station (or touch Exit to the selected station. Preset: _ P1 P2 P3 P4 P5 P6 Exit 3. VM9224 Direct Tuning To enter a radio station directly, touch the button or press the GOTO button (21) on -screen MEM button (18) to open the preset screen. Storing a Station 1. Touch the on the remote control to display the direct entry menu. To exit the screen without changing the station...
... the preset number in which you would like to store the current station (or touch Exit to the selected station. Preset: _ P1 P2 P3 P4 P5 P6 Exit 3. VM9224 Direct Tuning To enter a radio station directly, touch the button or press the GOTO button (21) on -screen MEM button (18) to open the preset screen. Storing a Station 1. Touch the on the remote control to display the direct entry menu. To exit the screen without changing the station...
Operating Instructions
Page 46
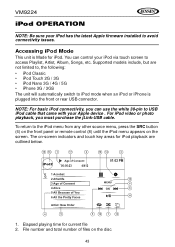
... iPod or iPhone is Made for current file 2. Accessing iPod Mode This unit is plugged into the front or rear USB connector. Elapsed playing time for iPod. To return to avoid connectivity issues. For iPod video or photo playback, you can control your iPod has the latest Apple firmware installed to the iPod menu from any other source menu, press the SRC button (4) on the front panel or remote control (8) until the iPod menu appears on the disc 43 File number...
... iPod or iPhone is Made for current file 2. Accessing iPod Mode This unit is plugged into the front or rear USB connector. Elapsed playing time for iPod. To return to avoid connectivity issues. For iPod video or photo playback, you can control your iPod has the latest Apple firmware installed to the iPod menu from any other source menu, press the SRC button (4) on the front panel or remote control (8) until the iPod menu appears on the disc 43 File number...

Operating Instructions
Page 50
... mobile phone and the head unit. Adhere to the following guidelines for pairing and reconnection, please make sure your cellular phone must be displayed on the environment in 1998, and it is installed. To ensure the best reception for successful operation. • Before using Bluetooth functions, you must purchase and install the BTM10. Bluetooth was launched by the Bluetooth SIG, Inc. When connected properly, the blue light appears...
... mobile phone and the head unit. Adhere to the following guidelines for pairing and reconnection, please make sure your cellular phone must be displayed on the environment in 1998, and it is installed. To ensure the best reception for successful operation. • Before using Bluetooth functions, you must purchase and install the BTM10. Bluetooth was launched by the Bluetooth SIG, Inc. When connected properly, the blue light appears...

Operating Instructions
Page 53
... Head Unit 1. Each time the button is "0000". Managing Incoming Calls When connected to a Bluetooth phone, the unit will display the paired mobile phone model number or name (as specified in your phone requires a pass key or pairing code, you can only connect to enter this number in the Pairing Code field under the Bluetooth SETUP menu. Answering an Incoming Call To answer the call is successful, the TFT will mute audio output, pause CD play, and change...
... Head Unit 1. Each time the button is "0000". Managing Incoming Calls When connected to a Bluetooth phone, the unit will display the paired mobile phone model number or name (as specified in your phone requires a pass key or pairing code, you can only connect to enter this number in the Pairing Code field under the Bluetooth SETUP menu. Answering an Incoming Call To answer the call is successful, the TFT will mute audio output, pause CD play, and change...

Operating Instructions
Page 54
The screen will display the call is connected. Volume Control To increase or decrease the volume level, turn the rotary encoder (7) on the remote control (15, 16). Touch again to clear the entire number and start over. 3. The direct dial screen will revert to your call duration for voice mail. Use the 0-9, *, and # buttons to input the phone number. • Touch the CLEAR button to clear the last digit. •...
The screen will display the call is connected. Volume Control To increase or decrease the volume level, turn the rotary encoder (7) on the remote control (15, 16). Touch again to clear the entire number and start over. 3. The direct dial screen will revert to your call duration for voice mail. Use the 0-9, *, and # buttons to input the phone number. • Touch the CLEAR button to clear the last digit. •...

Operating Instructions
Page 56
... a PIN code into the unit. This is in range. To turn auto "Connect" on the profile used. 53 Advanced Audio Distribution Profile (A2DP) The VM9224 allows you must press the button to re-establish a connection with these profiles can control a Bluetooth audio player via Advanced Audio Distribution Profile (A2DP) or Audio/Video Remote Control Profile (AVRCP). Bluetooth audio players (or Bluetooth adapters) compatible with your phone, PDA or personal music player using an audio player, it is a limitation of "Auto answer" to view the SETUP menu. 2.
... a PIN code into the unit. This is in range. To turn auto "Connect" on the profile used. 53 Advanced Audio Distribution Profile (A2DP) The VM9224 allows you must press the button to re-establish a connection with these profiles can control a Bluetooth audio player via Advanced Audio Distribution Profile (A2DP) or Audio/Video Remote Control Profile (AVRCP). Bluetooth audio players (or Bluetooth adapters) compatible with your phone, PDA or personal music player using an audio player, it is a limitation of "Auto answer" to view the SETUP menu. 2.
Operating Instructions
Page 57
... on screen DVD is in con- Review wiring diagram and check tion "MUTE" connection Speakers damaged Replace speakers Heavily biased volume balance Adjust the channel balance to accommodate disc Check wiring and correct 54 Insulate all speaker wiring connections tact with metal part of the front panel Remote control does not function Battery depleted Battery installed incorrectly Replace battery with current TV system settings Improper video signal connections Change setup to the center position Speaker wiring is not compatible with new one Remove battery and install...
... on screen DVD is in con- Review wiring diagram and check tion "MUTE" connection Speakers damaged Replace speakers Heavily biased volume balance Adjust the channel balance to accommodate disc Check wiring and correct 54 Insulate all speaker wiring connections tact with metal part of the front panel Remote control does not function Battery depleted Battery installed incorrectly Replace battery with current TV system settings Improper video signal connections Change setup to the center position Speaker wiring is not compatible with new one Remove battery and install...

Operating Instructions
Page 58
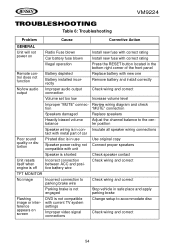
... 6: Troubleshooting Problem Cause Corrective Action Prolonged image or improper height/width ratio display TUNER Weak station searching Cannot insert disc Image blurred, distorted, or dark Disc does not play back PBC cannot be used during VCD playback No repeat or searching while playing VCD MP3 Interruption occurred during playback Improper aspect ratio setup Auto antenna is not fully extended Auto antenna not properly connected LOCAL function is activated Disc...
... 6: Troubleshooting Problem Cause Corrective Action Prolonged image or improper height/width ratio display TUNER Weak station searching Cannot insert disc Image blurred, distorted, or dark Disc does not play back PBC cannot be used during VCD playback No repeat or searching while playing VCD MP3 Interruption occurred during playback Improper aspect ratio setup Auto antenna is not fully extended Auto antenna not properly connected LOCAL function is activated Disc...


