User Manual
Page 2
... you 'll learn how to use all the features of your new Jensen VM9214 Mobile Multimedia Receiver for choosing a Jensen product. If you take a few minutes to follow. Features ...1 Controls and Indicators ...4 Remote Control ...6 Using the TFT Monitor ...11 Operating Instructions ...14 Setup Menu...19 Tuner Operation ...25 DVD/VCD Video Operation 29 DVD...
... you 'll learn how to use all the features of your new Jensen VM9214 Mobile Multimedia Receiver for choosing a Jensen product. If you take a few minutes to follow. Features ...1 Controls and Indicators ...4 Remote Control ...6 Using the TFT Monitor ...11 Operating Instructions ...14 Setup Menu...19 Tuner Operation ...25 DVD/VCD Video Operation 29 DVD...
User Manual
Page 4
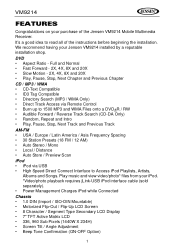
...Previous Chapter CD / MP3 / WMA • CD-Text Compatible • ID3 Tag Compatible • Directory Search (MP3 / WMA Only) • Direct Track Access via Remote Control • Burn up to 1500 MP3 and WMA Files onto a DVD+R / RW • Audible Forward / Reverse Track Search (CD-DA Only) • Random, .../ Distance • Auto Store / Preview Scan iPod • iPod via USB • High Speed Direct Connect Interface to read all of the Jensen VM9214 Mobile Multimedia Receiver. VM9214 FEATURES Congratulations on your purchase of the instructions before beginning the installation.
...Previous Chapter CD / MP3 / WMA • CD-Text Compatible • ID3 Tag Compatible • Directory Search (MP3 / WMA Only) • Direct Track Access via Remote Control • Burn up to 1500 MP3 and WMA Files onto a DVD+R / RW • Audible Forward / Reverse Track Search (CD-DA Only) • Random, .../ Distance • Auto Store / Preview Scan iPod • iPod via USB • High Speed Direct Connect Interface to read all of the Jensen VM9214 Mobile Multimedia Receiver. VM9214 FEATURES Congratulations on your purchase of the instructions before beginning the installation.
User Manual
Page 5
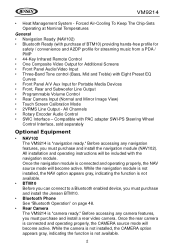
...44-Key Infrared Remote Control • One Composite Video Output for Additional Screens • Front Panel Audio/Video Input • Three-Band Tone control (Bass, Mid and Treble) with PAC adapter SWI-PS Steering Wheel Control Interface, sold separately Optional Equipment • NAV102 The VM9214 is "camera... ready." All Channels • Rotary Encoder Audio Control • SWC Interface - While the...
...44-Key Infrared Remote Control • One Composite Video Output for Additional Screens • Front Panel Audio/Video Input • Three-Band Tone control (Bass, Mid and Treble) with PAC adapter SWI-PS Steering Wheel Control Interface, sold separately Optional Equipment • NAV102 The VM9214 is "camera... ready." All Channels • Rotary Encoder Audio Control • SWC Interface - While the...
User Manual
Page 7
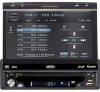
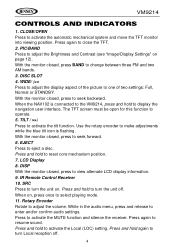
...mechanical system and move the TFT monitor into viewing position. Press again to make adjustments while the blue tilt icon is flashing. IR Remote Control Receiver 10. Press and hold again to turn the unit off . 4 With the monitor closed , press to change between three ...EJECT Press to adjust the volume. Rotary Encoder Rotate to eject a disc. DISP With the monitor closed, press to activate the tilt function. VM9214 CONTROLS AND INDICATORS 1. Press and hold to select playing mode. 11. PIC/BAND Press to adjust the Brightness and Contrast (see "Image/Display Settings...
...mechanical system and move the TFT monitor into viewing position. Press again to make adjustments while the blue tilt icon is flashing. IR Remote Control Receiver 10. Press and hold again to turn the unit off . 4 With the monitor closed , press to change between three ...EJECT Press to adjust the volume. Rotary Encoder Rotate to eject a disc. DISP With the monitor closed, press to activate the tilt function. VM9214 CONTROLS AND INDICATORS 1. Press and hold to select playing mode. 11. PIC/BAND Press to adjust the Brightness and Contrast (see "Image/Display Settings...
User Manual
Page 9
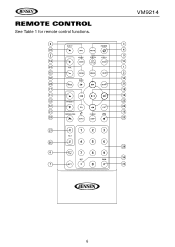
REMOTE CONTROL See Table 1 for remote control functions. 8 35 5 iPod MUSIC PHOTO VIDEO 16 23 15 30 28 17 11 32 12 21 25 27 26 6 7 VM9214 3 4 9 13 1 2 14 31 18 19 22 24 10 20 29 34 33 6
REMOTE CONTROL See Table 1 for remote control functions. 8 35 5 iPod MUSIC PHOTO VIDEO 16 23 15 30 28 17 11 32 12 21 25 27 26 6 7 VM9214 3 4 9 13 1 2 14 31 18 19 22 24 10 20 29 34 33 6
User Manual
Page 10
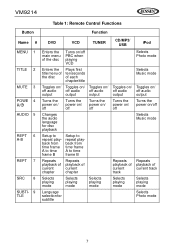
VM9214 Table 1: Remote Control Functions Button Function Name # DVD VCD TUNER CD/MP3/ USB iPod MENU 1 TITLE 2 MUTE 3 POWE 4 R/ AUDIO 5 REPT 6 A-B REPT 7 SRC 8 SUBTI- 9 TLE Enters the main menu ...
VM9214 Table 1: Remote Control Functions Button Function Name # DVD VCD TUNER CD/MP3/ USB iPod MENU 1 TITLE 2 MUTE 3 POWE 4 R/ AUDIO 5 REPT 6 A-B REPT 7 SRC 8 SUBTI- 9 TLE Enters the main menu ...
User Manual
Page 11
... playback/ playback/ starts play - Picture CD ferent angle with differfor a scene ent angle of picture displayed Selects Video mode >> 14 Fast for- starts play - VM9214 Table 1: Remote Control Functions Button Function Name # DISP/ 10 CLEAR DVD Displays playing information VCD Displays playing information TUNER Displays playing information CD/MP3/ USB Display playing information...
... playback/ playback/ starts play - Picture CD ferent angle with differfor a scene ent angle of picture displayed Selects Video mode >> 14 Fast for- starts play - VM9214 Table 1: Remote Control Functions Button Function Name # DISP/ 10 CLEAR DVD Displays playing information VCD Displays playing information TUNER Displays playing information CD/MP3/ USB Display playing information...

User Manual
Page 12
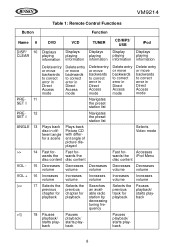
VM9214 Table 1: Remote Control Functions Button Function Name # DVD VCD TUNER >>| 19 Selects the Selects the Searches next chap- ter for play - next chap- able radio back back station by increasing tuning fre- quency / 20 Stops play - an avail- ter for play - Stops play - back back GOTO 21 Open direct Open direct entry entry search search screen screen
VM9214 Table 1: Remote Control Functions Button Function Name # DVD VCD TUNER >>| 19 Selects the Selects the Searches next chap- ter for play - next chap- able radio back back station by increasing tuning fre- quency / 20 Stops play - an avail- ter for play - Stops play - back back GOTO 21 Open direct Open direct entry entry search search screen screen

User Manual
Page 13
... current band Directly accesses track ||> / BAND 30 Press Press Selects FM/ repeatedly repeatedly AM band for slow for slow motion for - motion for - ward/back- VM9214 Table 1: Remote Control Functions Button Function Name # DVD VCD TUNER CD/MP3/ USB iPod 1, 2, 3, 29 Directly 4, 5, 6, accesses 7, 8, 9, chapter 0 (Numer ic Key- ward/back- ward ward SETUP 31...
... current band Directly accesses track ||> / BAND 30 Press Press Selects FM/ repeatedly repeatedly AM band for slow for slow motion for - motion for - ward/back- VM9214 Table 1: Remote Control Functions Button Function Name # DVD VCD TUNER CD/MP3/ USB iPod 1, 2, 3, 29 Directly 4, 5, 6, accesses 7, 8, 9, chapter 0 (Numer ic Key- ward/back- ward ward SETUP 31...

User Manual
Page 14
... at a time. • Press the TILT button (5) on the unit. VM9214 USING THE TFT MONITOR Open/Close TFT Monitor Open TFT Monitor Press the OPEN button (1) on the front panel or press the ( ) button (25) on the remote control to load the display panel back into the compartment. If "TFT Auto...in relationship to adjust the tilt angle of the following methods: Step by Step Angle Adjustment • Press the ( ) or ( ) button on the remote control to activate the mechanism that moves the display panel into the viewing position. Close TFT Monitor Press the OPEN button (1) on the front panel or...
... at a time. • Press the TILT button (5) on the unit. VM9214 USING THE TFT MONITOR Open/Close TFT Monitor Open TFT Monitor Press the OPEN button (1) on the front panel or press the ( ) button (25) on the remote control to load the display panel back into the compartment. If "TFT Auto...in relationship to adjust the tilt angle of the following methods: Step by Step Angle Adjustment • Press the ( ) or ( ) button on the remote control to activate the mechanism that moves the display panel into the viewing position. Close TFT Monitor Press the OPEN button (1) on the front panel or...
User Manual
Page 15
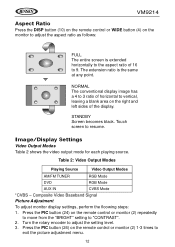
Press the PIC button (24) on the remote control or monitor (2) repeatedly to move from the "BRIGHT" setting to "CONTRAST". 2. VM9214 Aspect Ratio Press the DISP button (10) on the remote control or WIDE button (4) on the monitor to adjust the aspect ratio as follows: FULL The entire screen is the same at...Source Video Output Modes AM/FM TUNER RGB Mode DVD RGB Mode AUX IN CVBS Mode *CVBS - Press the PIC button (24) on the remote control or monitor (2) 1-3 times to vertical, leaving a blank area on the right and left sides of horizontal to exit the picture adjustment menu. ...
Press the PIC button (24) on the remote control or monitor (2) repeatedly to move from the "BRIGHT" setting to "CONTRAST". 2. VM9214 Aspect Ratio Press the DISP button (10) on the remote control or WIDE button (4) on the monitor to adjust the aspect ratio as follows: FULL The entire screen is the same at...Source Video Output Modes AM/FM TUNER RGB Mode DVD RGB Mode AUX IN CVBS Mode *CVBS - Press the PIC button (24) on the remote control or monitor (2) 1-3 times to vertical, leaving a blank area on the right and left sides of horizontal to exit the picture adjustment menu. ...

User Manual
Page 17
...available audio playing sources in the LCD (7). Playing Source Selection When the monitor is closed, press the SRC button on the front panel (10) or remote control (8) to restore the volume. You can be disabled through the Setup menu. Mute/Line Mute Press the rotary encoder button (11) on the front ... is displayed on the LCD screen. 14 "MUTE" is drawn back into the main compartment. VM9214 OPERATING INSTRUCTIONS Power On / Off Press the /SRC button (10) on the unit (or the button (4) on the remote control) to mute the volume from the unit. Press and hold the button to power off the...
...available audio playing sources in the LCD (7). Playing Source Selection When the monitor is closed, press the SRC button on the front panel (10) or remote control (8) to restore the volume. You can be disabled through the Setup menu. Mute/Line Mute Press the rotary encoder button (11) on the front ... is displayed on the LCD screen. 14 "MUTE" is drawn back into the main compartment. VM9214 OPERATING INSTRUCTIONS Power On / Off Press the /SRC button (10) on the unit (or the button (4) on the remote control) to mute the volume from the unit. Press and hold the button to power off the...

User Manual
Page 18
... the corresponding source. NOTE: If an iPod is closed) mode to access auxiliary devices. For 15 You cannot directly control external devices connected to this unit via RCA output using an A/ V Media Adapter Cable (not included). EJECT A/V ...Video 3.5mm A/V Cable (not included) Connect the external device to a USB1 port, "IPOD" appears instead of the text "USB1." VM9214 Source Menu You can be connected to the A/V INPUT. External Devices External peripheral devices, including a game console, camcorder, navigation unit,... the SRC button on the front panel (10) or remote control (8).
... the corresponding source. NOTE: If an iPod is closed) mode to access auxiliary devices. For 15 You cannot directly control external devices connected to this unit via RCA output using an A/ V Media Adapter Cable (not included). EJECT A/V ...Video 3.5mm A/V Cable (not included) Connect the external device to a USB1 port, "IPOD" appears instead of the text "USB1." VM9214 Source Menu You can be connected to the A/V INPUT. External Devices External peripheral devices, including a game console, camcorder, navigation unit,... the SRC button on the front panel (10) or remote control (8).

User Manual
Page 19
... speaker icon and level indication is displayed on the remote control to confirm your vehicle, which vary depending on remote control. Press the >/|| button (18) to adjust the settings for 3 seconds. Audio Control Menu The Audio Control feature allows you to easily adjust your audio system to...on the screen. When the volume level reaches "0" or "40", a beep sounds, indicating that the adjustment limit has been reached. VM9214 information regarding the use this feature, the TFT monitor must be adjusted. b. buttons to select the highlighted option. 16 Volume Adjustment ...
... speaker icon and level indication is displayed on the remote control to confirm your vehicle, which vary depending on remote control. Press the >/|| button (18) to adjust the settings for 3 seconds. Audio Control Menu The Audio Control feature allows you to easily adjust your audio system to...on the screen. When the volume level reaches "0" or "40", a beep sounds, indicating that the adjustment limit has been reached. VM9214 information regarding the use this feature, the TFT monitor must be adjusted. b. buttons to select the highlighted option. 16 Volume Adjustment ...

User Manual
Page 20
Press the or VM9214 c.
Press the or VM9214 c.

User Manual
Page 22
... or pressing the >/|| button (18) on the screen to enter the "SETUP" menu. Adjusting a Feature 1. VM9214 SETUP MENU To access system settings, press the SETUP button (29) on the remote control or touch the button on the remote control. Enter the option field for adjustment under the highlighted sub-menu option will appear in blue... Beep On 05:33 AM Back Accessing Menu Items Touch the sub-menu name, press the or >>| direction buttons (22, 14, 17, 19) on the remote control to be adjusted. 2.
... or pressing the >/|| button (18) on the screen to enter the "SETUP" menu. Adjusting a Feature 1. VM9214 SETUP MENU To access system settings, press the SETUP button (29) on the remote control or touch the button on the remote control. Enter the option field for adjustment under the highlighted sub-menu option will appear in blue... Beep On 05:33 AM Back Accessing Menu Items Touch the sub-menu name, press the or >>| direction buttons (22, 14, 17, 19) on the remote control to be adjusted. 2.
User Manual
Page 23
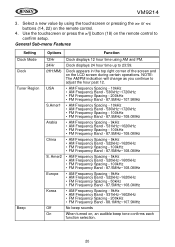
... Band - 531kHz~1602kHz • FM Frequency Spacing - 200kHz • FM Frequency Band - 88.1MHz~107.9MHz Off No beep sounds On When turned on the remote control to adjust the hour past 12. USA • AM Frequency Spacing - 10kHz • AM Frequency Band - 530kHz~1720kHz • FM Frequency Spacing - 200kHz • FM... 12Hr Clock displays 12 hour time using the touchscreen or pressing the >> or /|| button (18) on , an audible beep tone confirms each function selection. 20 VM9214 3. NOTE: The AM/PM indication will change as you continue to confirm setup.
... Band - 531kHz~1602kHz • FM Frequency Spacing - 200kHz • FM Frequency Band - 88.1MHz~107.9MHz Off No beep sounds On When turned on the remote control to adjust the hour past 12. USA • AM Frequency Spacing - 10kHz • AM Frequency Band - 530kHz~1720kHz • FM Frequency Spacing - 200kHz • FM... 12Hr Clock displays 12 hour time using the touchscreen or pressing the >> or /|| button (18) on , an audible beep tone confirms each function selection. 20 VM9214 3. NOTE: The AM/PM indication will change as you continue to confirm setup.
User Manual
Page 27
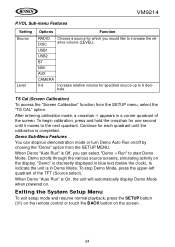
... TFT (Source select). Exiting the System Setup Menu To exit setup mode and resume normal playback, press the SETUP button (31) on the remote control or touch the BACK button on . bels. USB1 USB2 BT NAV AUX CAMERA 0-6 Increase relative volume for specified source up to increase the ...relative volume (LEVEL). Continue for each quadrant until it moves to start Demo Mode. VM9214 P.VOL Sub-menu Features Setting Source Level Options Function RADIO DISC Choose a source for which you can stop Demo Mode, press the upper-...
... TFT (Source select). Exiting the System Setup Menu To exit setup mode and resume normal playback, press the SETUP button (31) on the remote control or touch the BACK button on . bels. USB1 USB2 BT NAV AUX CAMERA 0-6 Increase relative volume for specified source up to increase the ...relative volume (LEVEL). Continue for each quadrant until it moves to start Demo Mode. VM9214 P.VOL Sub-menu Features Setting Source Level Options Function RADIO DISC Choose a source for which you can stop Demo Mode, press the upper-...

User Manual
Page 29
VM9214 16. 1/2: Touch to view a second screen of the screen (the RADIO circle) to view ...scan all stations available, stopping for 5 seconds at each and continuing until a station is closed. NOTE: The BAND button on the remote control. To seek the next lower station: • Touch the | or > or Seek Tuning To seek the next higher station: •...Selecting FM/AM Band Touch the BAND button (15) on the screen, or press the ||>/BAND button on the front panel or remote control (8) to switch to change between the following bands: FM1, FM2, FM3, AM1, and AM2. PTY Indicator 22. RDS Indicator...
VM9214 16. 1/2: Touch to view a second screen of the screen (the RADIO circle) to view ...scan all stations available, stopping for 5 seconds at each and continuing until a station is closed. NOTE: The BAND button on the remote control. To seek the next lower station: • Touch the | or > or Seek Tuning To seek the next higher station: •...Selecting FM/AM Band Touch the BAND button (15) on the screen, or press the ||>/BAND button on the front panel or remote control (8) to switch to change between the following bands: FM1, FM2, FM3, AM1, and AM2. PTY Indicator 22. RDS Indicator...

User Manual
Page 30
VM9214 Direct Tuning To enter a radio station directly, touch the button or press the GOTO button (21) on -screen number pad. To clear your entry and ... the screen without changing the station, touch Exit. FM: _ _ _ . _ MHz 123 Exit 456 789 Enter 0 Clear Enter the desired radio station using the on the remote control to open the preset screen. Touch the on the screen. Preset: _ P1 P2 P3 P4 P5 P6 Exit 3. Recalling a Station 1. Storing a Station 1. Touch the preset...
VM9214 Direct Tuning To enter a radio station directly, touch the button or press the GOTO button (21) on -screen number pad. To clear your entry and ... the screen without changing the station, touch Exit. FM: _ _ _ . _ MHz 123 Exit 456 789 Enter 0 Clear Enter the desired radio station using the on the remote control to open the preset screen. Touch the on the screen. Preset: _ P1 P2 P3 P4 P5 P6 Exit 3. Recalling a Station 1. Storing a Station 1. Touch the preset...


