
Operation Manual
Page 1
PE702 PORTABLE 7" LCD MONITOR AND DVD PLAYER For Customer Service Visit Our Website At W W W .audiovox.com Product Information, Photos, FAQ's Owner's Manuals 1 1286823
PE702 PORTABLE 7" LCD MONITOR AND DVD PLAYER For Customer Service Visit Our Website At W W W .audiovox.com Product Information, Photos, FAQ's Owner's Manuals 1 1286823
Operation Manual
Page 3
..., trouble-free service, and is compact so that the PE702 is installed in accordance with you anywhere and is in a fire or electric shock). Do not place the set on or in hotels, offices or your system is designed for selecting the PE702 portable DVD player. There is brought directly from a cold to disassemble the cabinet. The main features include a 7" Wide Screen (16:9 Aspect Ratio...
..., trouble-free service, and is compact so that the PE702 is installed in accordance with you anywhere and is in a fire or electric shock). Do not place the set on or in hotels, offices or your system is designed for selecting the PE702 portable DVD player. There is brought directly from a cold to disassemble the cabinet. The main features include a 7" Wide Screen (16:9 Aspect Ratio...
Operation Manual
Page 4
... in a car Plug one end of disc. Use a cloth lightly dampened with the discs. Do not stick paper, tape or glue on the left side of discs may not be intentionally fixed by wiping the disc from the center out with a cleaning cloth. Handle the disc by its case after playing. Also refer to DC Adapter 3. 1 x Rechargeable Battery 4. 1 x Remote Control 5. 1 x Instruction Manual 6. 1 x Audio/Video Cable 7. 1 x Cigarette Lighter Adapter D. Powering and installation 1.
... in a car Plug one end of disc. Use a cloth lightly dampened with the discs. Do not stick paper, tape or glue on the left side of discs may not be intentionally fixed by wiping the disc from the center out with a cleaning cloth. Handle the disc by its case after playing. Also refer to DC Adapter 3. 1 x Rechargeable Battery 4. 1 x Remote Control 5. 1 x Instruction Manual 6. 1 x Audio/Video Cable 7. 1 x Cigarette Lighter Adapter D. Powering and installation 1.
Operation Manual
Page 7
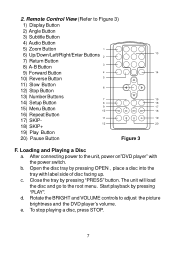
...picture brightness and the DVD player's volume. b. d. e. After connecting power to the root menu. Rotate the BRIGHT and VOLUME controls to Figure 3) 1) Display Button 2) Angle Button 3) Subtitle Button 4) Audio Button 5) Zoom Button 6) Up/Down/Left/Right/Enter Buttons 7) Return Button 8) A-B Button 9) Forward Button 10) Reverse Button 11) Slow Button 12) Stop Button 13) Number Buttons 14) Setup Button 15) Menu Button 16) Repeat Button 17) SKIP- 18) SKIP+ 19) Play Button 20) Pause Button Figure 3 F. Loading and Playing a Disc a. Open the disc tray...
...picture brightness and the DVD player's volume. b. d. e. After connecting power to the root menu. Rotate the BRIGHT and VOLUME controls to Figure 3) 1) Display Button 2) Angle Button 3) Subtitle Button 4) Audio Button 5) Zoom Button 6) Up/Down/Left/Right/Enter Buttons 7) Return Button 8) A-B Button 9) Forward Button 10) Reverse Button 11) Slow Button 12) Stop Button 13) Number Buttons 14) Setup Button 15) Menu Button 16) Repeat Button 17) SKIP- 18) SKIP+ 19) Play Button 20) Pause Button Figure 3 F. Loading and Playing a Disc a. Open the disc tray...
Operation Manual
Page 8
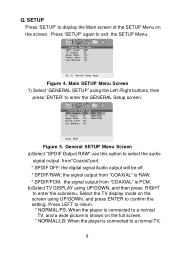
.... Select the TV display mode on the full screen. * NORMAL/LB: When the player is connected to a normal TV, 8 G. G ene ral Se tup Page .. b)Select TV DISPLAY using UP/DOWN, and press ENTER to a normal TV, and a wide picture is PCM. Press LEFT to return. * NORMAL/PS: When the player is connected to confirm the setting. General SETUP Menu Screen a)Select "SPDIF Output RAW" use this option to select the audio signal output from...
.... Select the TV display mode on the full screen. * NORMAL/LB: When the player is connected to a normal TV, 8 G. G ene ral Se tup Page .. b)Select TV DISPLAY using UP/DOWN, and press ENTER to a normal TV, and a wide picture is PCM. Press LEFT to return. * NORMAL/PS: When the player is connected to confirm the setting. General SETUP Menu Screen a)Select "SPDIF Output RAW" use this option to select the audio signal output from...
Operation Manual
Page 9
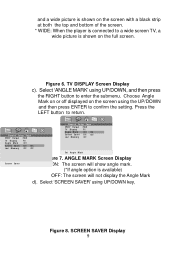
... the screen with a black strip at both the top and bottom of the screen. * WIDE: When the player is connected to a wide screen TV, a wide picture is available) OFF: The screen will not display the Angle Mark d). Choose Angle Mark on or off displayed on the full screen. G ene ra l Seetu pp PPaaggee .... Select 'SCREEN SAVER' using UP/DOWN, and then press the RIGHT button...
... the screen with a black strip at both the top and bottom of the screen. * WIDE: When the player is connected to a wide screen TV, a wide picture is available) OFF: The screen will not display the Angle Mark d). Choose Angle Mark on or off displayed on the full screen. G ene ra l Seetu pp PPaaggee .... Select 'SCREEN SAVER' using UP/DOWN, and then press the RIGHT button...
Operation Manual
Page 10
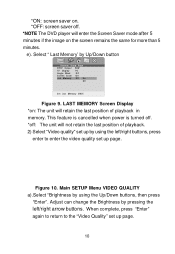
... unit will retain the last position of playback. 2) Select "Video quality" set up by using the Up/Down buttons, then press "Enter". Main SETUP Menu VIDEO QUALITY a).Select "Brightness by using the left /right arrow buttons. G ene ral Se tup Page .. This feature is cancelled when power is turned off. *off . *NOTE The DVD player will enter the Screen Saver mode after 5 minutes if the image on : The...
... unit will retain the last position of playback. 2) Select "Video quality" set up by using the Up/Down buttons, then press "Enter". Main SETUP Menu VIDEO QUALITY a).Select "Brightness by using the left /right arrow buttons. G ene ral Se tup Page .. This feature is cancelled when power is turned off. *off . *NOTE The DVD player will enter the Screen Saver mode after 5 minutes if the image on : The...
Operation Manual
Page 12
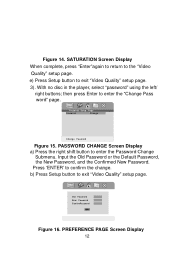
Passwo rd Change Change Password Figure 15. b) Press Setup button to enter the "Change Pass word" page. .. PREFERENCE PAGE Screen Display 12 then press Enter to exit "Video Quality" setup page. Input the Old Password or the Default Password, the New Password, and the Confirmed New Password. Press 'ENTER' to exit "Video Quality" setup page. 3). Figure 14. e) Press Setup button to confirm the change. With no disc in the player, select "password" using the left/ right buttons; Pa...
Passwo rd Change Change Password Figure 15. b) Press Setup button to enter the "Change Pass word" page. .. PREFERENCE PAGE Screen Display 12 then press Enter to exit "Video Quality" setup page. Input the Old Password or the Default Password, the New Password, and the Confirmed New Password. Press 'ENTER' to exit "Video Quality" setup page. 3). Figure 14. e) Press Setup button to confirm the change. With no disc in the player, select "password" using the left/ right buttons; Pa...
Operation Manual
Page 13
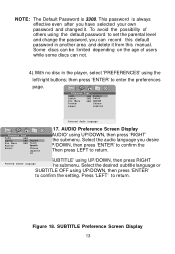
... RIGHT Preferred Subtitle Languageto enter the submenu. To avoid the possibility of users while some discs can record this manual. ENG Engliash ENG Fre nc h ENG C h ine se Japanese Prefe rred A udio Language Figure 17. NOTE: The Default Password is always effective even after you have selected your own password and changed it from this default password in the player, select 'PREFERENCES' using the left/right buttons;
... RIGHT Preferred Subtitle Languageto enter the submenu. To avoid the possibility of users while some discs can record this manual. ENG Engliash ENG Fre nc h ENG C h ine se Japanese Prefe rred A udio Language Figure 17. NOTE: The Default Password is always effective even after you have selected your own password and changed it from this default password in the player, select 'PREFERENCES' using the left/right buttons;
Operation Manual
Page 14
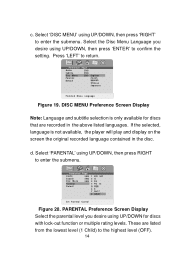
... .. DISC MENU Preference Screen Display Note: Language and subtitle selection is not available, the player will play and display on the screen the original recorded language contained in the above listed languages. Select 'DISC MENU' using UP/DOWN, then press RIGHT to confirm the setting. ENG ENG ENG Engliash Fre nc h C h ine se Japanese Prefe rred M enu Language Figure 19. ENG 1 ENG 2 ENG 3 4 6 7 8 KID SAF G PG PG 13 R Nc17 A DULT Set Parental Control Figure...
... .. DISC MENU Preference Screen Display Note: Language and subtitle selection is not available, the player will play and display on the screen the original recorded language contained in the above listed languages. Select 'DISC MENU' using UP/DOWN, then press RIGHT to confirm the setting. ENG ENG ENG Engliash Fre nc h C h ine se Japanese Prefe rred M enu Language Figure 19. ENG 1 ENG 2 ENG 3 4 6 7 8 KID SAF G PG PG 13 R Nc17 A DULT Set Parental Control Figure...
Operation Manual
Page 15
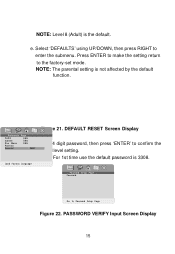
... Go To Passwo rd Setup Page Figure 22. Press ENTER to make the setting return to enter the submenu. NOTE: For 1st time use the default password is not affected by the default function. PASSWORD VERIFY Input Screen Display 15 A u d io ENG S ub tit le ENG Disc Menu ENG P are n ta l Enter a 4 digit password, then press 'ENTER' to confirm the P are n ta l RESETparental level setting. Load Factory Language .. DEFAULT RESET Screen Display .. Figure 21. Pa...
... Go To Passwo rd Setup Page Figure 22. Press ENTER to make the setting return to enter the submenu. NOTE: For 1st time use the default password is not affected by the default function. PASSWORD VERIFY Input Screen Display 15 A u d io ENG S ub tit le ENG Disc Menu ENG P are n ta l Enter a 4 digit password, then press 'ENTER' to confirm the P are n ta l RESETparental level setting. Load Factory Language .. DEFAULT RESET Screen Display .. Figure 21. Pa...
Operation Manual
Page 16
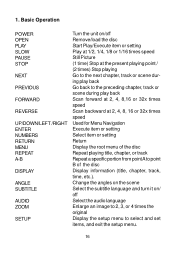
1. Basic Operation POWER OPEN PLAY SLOW PAUSE STOP NEXT PREVIOUS FORWARD REVERSE UP/DOWN/LEFT /RIGHT ENTER NUMBERS RETURN MENU REPEAT A-B DISPLAY ANGLE SUBTITLE AUDIO ZOOM SETUP Turn the unit on / off Remove/load the disc Start Play/Execute item or setting Play at 1/2, 1/4, 1/8 or 1/16 times speed Still Picture (1 time) Stop at the present playing point / (2 times) Stop playing Go to the next chapter, track or scene during play back Go back to the preceding chapter, track or scene...
1. Basic Operation POWER OPEN PLAY SLOW PAUSE STOP NEXT PREVIOUS FORWARD REVERSE UP/DOWN/LEFT /RIGHT ENTER NUMBERS RETURN MENU REPEAT A-B DISPLAY ANGLE SUBTITLE AUDIO ZOOM SETUP Turn the unit on / off Remove/load the disc Start Play/Execute item or setting Play at 1/2, 1/4, 1/8 or 1/16 times speed Still Picture (1 time) Stop at the present playing point / (2 times) Stop playing Go to the next chapter, track or scene during play back Go back to the preceding chapter, track or scene...
Operation Manual
Page 17
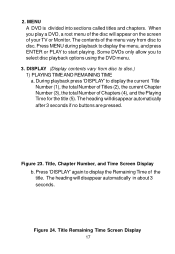
... disc. Press 'DISPLAY' again to select disc playback options using the DVD menu. 3. When you to display the Remaining Time of Chapters (4), and the Playing Time for the title (5). Figure 23. 2. MENU A DVD is divided into sections called titles and chapters. Title, Chapter Number, and Time Screen Display b. Figure 24. Title Remaining Time Screen Display 17 The heading will appear on the screen of the disc will disappear automatically after 3 seconds if no buttons...
... disc. Press 'DISPLAY' again to select disc playback options using the DVD menu. 3. When you to display the Remaining Time of Chapters (4), and the Playing Time for the title (5). Figure 23. 2. MENU A DVD is divided into sections called titles and chapters. Title, Chapter Number, and Time Screen Display b. Figure 24. Title Remaining Time Screen Display 17 The heading will appear on the screen of the disc will disappear automatically after 3 seconds if no buttons...
Operation Manual
Page 20
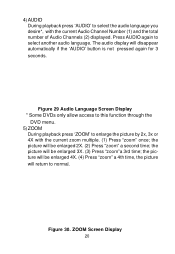
... function through the DVD menu. 5) ZOOM During playback press 'ZOOM' to enlarge the picture by 2x, 3x or 4X with the current Audio Channel Number (1) and the total number of Audio Channels (2) displayed. Figure 30. the picture will return to normal. ZOOM Screen Display 20 the picture will be enlarged 4X. (4) Press "zoom" a 4th time, the picture will be enlarged 2X. (2) Press "zoom" a second time; 4) AUDIO During playback press 'AUDIO' to select the audio language...
... function through the DVD menu. 5) ZOOM During playback press 'ZOOM' to enlarge the picture by 2x, 3x or 4X with the current Audio Channel Number (1) and the total number of Audio Channels (2) displayed. Figure 30. the picture will return to normal. ZOOM Screen Display 20 the picture will be enlarged 4X. (4) Press "zoom" a 4th time, the picture will be enlarged 2X. (2) Press "zoom" a second time; 4) AUDIO During playback press 'AUDIO' to select the audio language...
Operation Manual
Page 25
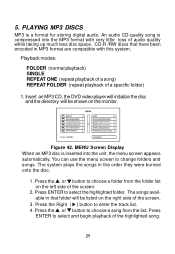
... side of the screen. 3. MENU Screen Display When an MP3 disc is a format for storing digital audio. Press the or button to choose a song from the folder list on the monitor. 5. Playback modes: FOLDER (normal playback) SINGLE REPEAT ONE (repeat playback of a song) REPEAT FOLDER (repeat playback of the highlighted song. 25 Press the Right ( ) button to change folders and songs. The system plays the songs in MP3 format are compatible with very little...
... side of the screen. 3. MENU Screen Display When an MP3 disc is a format for storing digital audio. Press the or button to choose a song from the folder list on the monitor. 5. Playback modes: FOLDER (normal playback) SINGLE REPEAT ONE (repeat playback of a song) REPEAT FOLDER (repeat playback of the highlighted song. 25 Press the Right ( ) button to change folders and songs. The system plays the songs in MP3 format are compatible with very little...
Operation Manual
Page 29
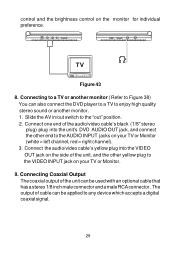
... stereo sound or another monitor. 1. Slide the AV in/out switch to the AUDIO INPUT jacks on the side of the unit can also connect the DVD player to a TV to any device which accepts a digital coaxial signal. 29 Connecting Coaxial Output The coaxial output of the unit, and the other end to the "out" position. 2. Connect the audio/video cable's yellow plug into the unit's DVD AUDIO OUT...
... stereo sound or another monitor. 1. Slide the AV in/out switch to the AUDIO INPUT jacks on the side of the unit can also connect the DVD player to a TV to any device which accepts a digital coaxial signal. 29 Connecting Coaxial Output The coaxial output of the unit, and the other end to the "out" position. 2. Connect the audio/video cable's yellow plug into the unit's DVD AUDIO OUT...
Operation Manual
Page 30
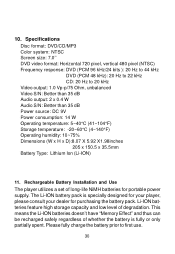
Specifications Disc format: DVD/CD/MP3 Color system: NTSC Screen size: 7.0'' DVD video format: Horizontal 720 pixel, vertical 480 pixel (NTSC) Frequency response: DVD (PCM 96 kHz/24 bits ): 20 Hz to 44 kHz DVD (PCM 48 kHz): 20 Hz to 22 kHz CD: 20 Hz to first use. 30 Please fully charge the battery prior to 20 kHz Video output: 1.0 Vp-p/75 Ohm, unbalanced Video S/N: Better than 35 dB...
Specifications Disc format: DVD/CD/MP3 Color system: NTSC Screen size: 7.0'' DVD video format: Horizontal 720 pixel, vertical 480 pixel (NTSC) Frequency response: DVD (PCM 96 kHz/24 bits ): 20 Hz to 44 kHz DVD (PCM 48 kHz): 20 Hz to 22 kHz CD: 20 Hz to first use. 30 Please fully charge the battery prior to 20 kHz Video output: 1.0 Vp-p/75 Ohm, unbalanced Video S/N: Better than 35 dB...
Operation Manual
Page 31
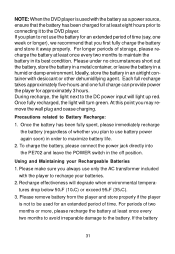
... remove the wall plug and cease charging. Please make sure you plan to use the battery for at least eight hours prior to the battery. Please remove battery from the player and store properly if the player is used for approximately 3 hours. For longer periods of time (say, one full charge can provide power the player for an extended period of time. During recharge, the light next to Battery...
... remove the wall plug and cease charging. Please make sure you plan to use the battery for at least eight hours prior to the battery. Please remove battery from the player and store properly if the player is used for approximately 3 hours. For longer periods of time (say, one full charge can provide power the player for an extended period of time. During recharge, the light next to Battery...
Operation Manual
Page 32
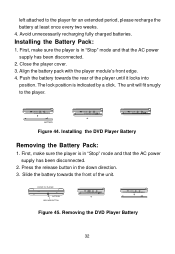
..., make sure the player is indicated by a click. Align the battery pack with the player module's front edge. 4. Installing the DVD Player Battery Removing the Battery Pack: 1. Close the player cover. 3. The lock position is in "Stop" mode and that the AC power supply has been disconnected. 2. First, make sure the player is in "Stop" mode and that the AC power supply has been disconnected. 2. FRONT OF PLAYER BATTERY RELEASE BUTTON Figure 45. Removing the DVD Player Battery...
..., make sure the player is indicated by a click. Align the battery pack with the player module's front edge. 4. Installing the DVD Player Battery Removing the Battery Pack: 1. Close the player cover. 3. The lock position is in "Stop" mode and that the AC power supply has been disconnected. 2. First, make sure the player is in "Stop" mode and that the AC power supply has been disconnected. 2. FRONT OF PLAYER BATTERY RELEASE BUTTON Figure 45. Removing the DVD Player Battery...
Operation Manual
Page 33
... WARRANTY Applies to Audiovox Video Products AUDIOVOX ELECTRONICS CORP. (the Company) warrants to the original retail purchaser of this product that should this product or any part thereof, under normal use and conditions, be proven defective in material or workmanship within the terms of this product. This Warranty gives you specific legal rights and you . To obtain repair or replacement...
... WARRANTY Applies to Audiovox Video Products AUDIOVOX ELECTRONICS CORP. (the Company) warrants to the original retail purchaser of this product that should this product or any part thereof, under normal use and conditions, be proven defective in material or workmanship within the terms of this product. This Warranty gives you specific legal rights and you . To obtain repair or replacement...


