Operation Manual
Page 2
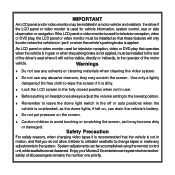
... always adjust the volume setting to the lowest position. ♦ Remember to leave the dome light switch in the off or auto positions when the vehicle is unattended, as it is recommended that the vehicle is not in a motor vehicle and visible to the driver if the LCD panel or video monitor is used for television reception, video or DVD play that operates when...
... always adjust the volume setting to the lowest position. ♦ Remember to leave the dome light switch in the off or auto positions when the vehicle is unattended, as it is recommended that the vehicle is not in a motor vehicle and visible to the driver if the LCD panel or video monitor is used for television reception, video or DVD play that operates when...
Operation Manual
Page 3
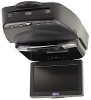
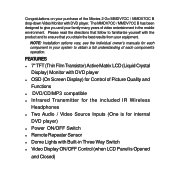
... DVD player. FEATURES ♦ 7" TFT (Thin Film Transistor)Active Matrix LCD (Liquid Crystal Display) Monitor with the product and to obtain a full understanding of Picture Quality and Functions ♦ DVD/CD/MP3 compatible ♦ Infrared Transmitter for each component's operation. Congratulations on your equipment. NOTE: Installation options vary, see the individual owner's manuals for the included IR Wireless Headphones ♦ Two Audio / Video Source Inputs...
... DVD player. FEATURES ♦ 7" TFT (Thin Film Transistor)Active Matrix LCD (Liquid Crystal Display) Monitor with the product and to obtain a full understanding of Picture Quality and Functions ♦ DVD/CD/MP3 compatible ♦ Infrared Transmitter for each component's operation. Congratulations on your equipment. NOTE: Installation options vary, see the individual owner's manuals for the included IR Wireless Headphones ♦ Two Audio / Video Source Inputs...
Operation Manual
Page 5
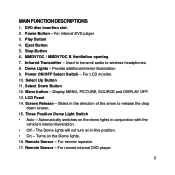
.... Display MENU, PICTURE, SOURCE and DISPLAY OFF. 13. Three Position Dome Light Switch • Auto - Turns on the dome lights in conjunction with the vehicle's interior illumination. • Off - Remote Sensor - MAIN FUNCTION DESCRIPTIONS 1. Power ON/OFF Select Switch - Select Down Button 12. Slides in this position. • On - Remote Sensor - For remote repeater. 17. Stop Button 6. LCD Panel 14. Automatically switches on the Dome lights. 16. For remote internal DVD player. 5 Used to transmit audio to...
.... Display MENU, PICTURE, SOURCE and DISPLAY OFF. 13. Three Position Dome Light Switch • Auto - Turns on the dome lights in conjunction with the vehicle's interior illumination. • Off - Remote Sensor - MAIN FUNCTION DESCRIPTIONS 1. Power ON/OFF Select Switch - Select Down Button 12. Slides in this position. • On - Remote Sensor - For remote repeater. 17. Stop Button 6. LCD Panel 14. Automatically switches on the Dome lights. 16. For remote internal DVD player. 5 Used to transmit audio to...

Operation Manual
Page 6
REMOTE CONTROL OPERATION - + + - 1 2 BATTERY INSTALLATION 3 4 Before attempting to operate your 5 6 Remote Control, install the batteries as 7 described below. 8 1) Turn the Remote Control face down. 9 Using a fingernail, lift the battery 10 cover off. 11 12 2) Install two "AAA" batteries as shown. 13 Make sure that proper polarity (+ or -) is not a universal remote control and will operate the MMDV7OC / MMDV7OC B DVD player only. The remote control will not control equipment from other manufacturers. 6 EJECT D IS PLAY 123 A N GLE 456 AU D IO 0 ZO...
REMOTE CONTROL OPERATION - + + - 1 2 BATTERY INSTALLATION 3 4 Before attempting to operate your 5 6 Remote Control, install the batteries as 7 described below. 8 1) Turn the Remote Control face down. 9 Using a fingernail, lift the battery 10 cover off. 11 12 2) Install two "AAA" batteries as shown. 13 Make sure that proper polarity (+ or -) is not a universal remote control and will operate the MMDV7OC / MMDV7OC B DVD player only. The remote control will not control equipment from other manufacturers. 6 EJECT D IS PLAY 123 A N GLE 456 AU D IO 0 ZO...

Operation Manual
Page 9
.... EJECT ( ) Button The disc will be viewed only when the player is in the menu options. 23. The setup display can be ejected from the disc compartment. 9 SETUP Button Allows the user to select or switch a highlighted selection. 24. NUMBERS Buttons Allows the user to enter the number 0 to repeat various titles, chapters or tracks of CD tracks, dvd chapters and password setting. 25. ENTER Button Used to select the DVD options (Display, OSD Language, Default, Parental Control, Password, Exit Setup...
.... EJECT ( ) Button The disc will be viewed only when the player is in the menu options. 23. The setup display can be ejected from the disc compartment. 9 SETUP Button Allows the user to select or switch a highlighted selection. 24. NUMBERS Buttons Allows the user to enter the number 0 to repeat various titles, chapters or tracks of CD tracks, dvd chapters and password setting. 25. ENTER Button Used to select the DVD options (Display, OSD Language, Default, Parental Control, Password, Exit Setup...
Operation Manual
Page 10
... DISPLAY UNIT & INTERNAL DVD PLAYER) 1. Remember to turn the unit OFF and pivot the LCD to switch on the monitor. 3. Press the POWER Button to the locked position when not in use . 2. Select AV1 from the menu options (see page 14 for details). 5. Move the screen downward and pivot it until a comfortable viewing angle is in position while the system is reached. Power Button PO W ER PLAY...
... DISPLAY UNIT & INTERNAL DVD PLAYER) 1. Remember to turn the unit OFF and pivot the LCD to switch on the monitor. 3. Press the POWER Button to the locked position when not in use . 2. Select AV1 from the menu options (see page 14 for details). 5. Move the screen downward and pivot it until a comfortable viewing angle is in position while the system is reached. Power Button PO W ER PLAY...
Operation Manual
Page 11
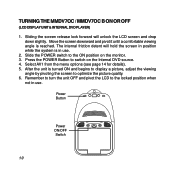
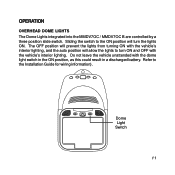
... PLAY STO P EJEC T OF F O N P OW E R O N OF F AU TO DO M E LIGH T Dome Light Switch 11 Sliding the switch to the ON position will allow the lights to the Installation Guide for wiring information). The OFF position will prevent the lights from turning ON with the dome light switch in the ON position, as this could result in a discharged battery. Refer to turn the lights ON. OPERATION OVERHEAD...
... PLAY STO P EJEC T OF F O N P OW E R O N OF F AU TO DO M E LIGH T Dome Light Switch 11 Sliding the switch to the ON position will allow the lights to the Installation Guide for wiring information). The OFF position will prevent the lights from turning ON with the dome light switch in the ON position, as this could result in a discharged battery. Refer to turn the lights ON. OPERATION OVERHEAD...
Operation Manual
Page 12
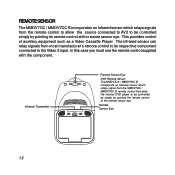
... B remote control that allow the source connected to AV2 to the Video 2 input. In this case you must use the remote control supplied with the component. This provides control of auxiliary equipment such as a Video Cassette Player. The infrared sensor can relay signals from the remote control to allow the internal DVD player to be controlled simply by pointing the remote control at the remote sensor eye. Infrared Transmitter PO W ER PLAY...
... B remote control that allow the source connected to AV2 to the Video 2 input. In this case you must use the remote control supplied with the component. This provides control of auxiliary equipment such as a Video Cassette Player. The infrared sensor can relay signals from the remote control to allow the internal DVD player to be controlled simply by pointing the remote control at the remote sensor eye. Infrared Transmitter PO W ER PLAY...

Operation Manual
Page 13
... restore the factory settings, select RESET and press either the UP or DOWN button. Then press the DOWN/UP button to select the item you want to the factory preset settings. 13 All of the picture settings (BRIGHTNESS, CONTRAST, COLOR and TINT) will return to adjust. PICTURE ADJUSTMENT When watching the program, the quality of the picture can be adjusted to select the item. Press the MENU button again...
... restore the factory settings, select RESET and press either the UP or DOWN button. Then press the DOWN/UP button to select the item you want to the factory preset settings. 13 All of the picture settings (BRIGHTNESS, CONTRAST, COLOR and TINT) will return to adjust. PICTURE ADJUSTMENT When watching the program, the quality of the picture can be adjusted to select the item. Press the MENU button again...
Operation Manual
Page 15
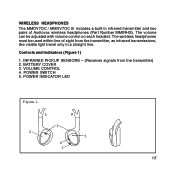
... pairs of sight from the transmitter) 2. INFRARED PICKUP SENSORS - (Receives signals from the transmitter, as infrared transmissions, like visible light travel only in a straight line. POWER SWITCH 5. The wireless headphones must be adjusted with volume control on each headset. POWER INDICATOR LED Figure 1 L R 1 2 5 O N •O FF 4 VOL 3 15 Controls and Indicators (Figure 1) 1. BATTERY COVER 3. The volume can be used within line of Audiovox wireless headphones (Part Number...
... pairs of sight from the transmitter) 2. INFRARED PICKUP SENSORS - (Receives signals from the transmitter, as infrared transmissions, like visible light travel only in a straight line. POWER SWITCH 5. The wireless headphones must be adjusted with volume control on each headset. POWER INDICATOR LED Figure 1 L R 1 2 5 O N •O FF 4 VOL 3 15 Controls and Indicators (Figure 1) 1. BATTERY COVER 3. The volume can be used within line of Audiovox wireless headphones (Part Number...
Operation Manual
Page 17
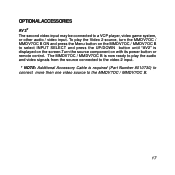
... Menu button on the MMDV7OC / MMDV7OC B to select INPUT SELECT and press the UP/DOWN button until "AV2" is required (Part Number 8010730) to connect more then one video source to a VCP player, video game system, or other audio / video input. To play the audio and video signals from the source connected to the video 2 input. * NOTE: Additional Accessory Cable is displayed on the screen.Turn the source component on with its power button or remote control. OPTIONAL ACCESSORIES AV 2* The second video input...
... Menu button on the MMDV7OC / MMDV7OC B to select INPUT SELECT and press the UP/DOWN button until "AV2" is required (Part Number 8010730) to connect more then one video source to a VCP player, video game system, or other audio / video input. To play the audio and video signals from the source connected to the video 2 input. * NOTE: Additional Accessory Cable is displayed on the screen.Turn the source component on with its power button or remote control. OPTIONAL ACCESSORIES AV 2* The second video input...
Operation Manual
Page 18
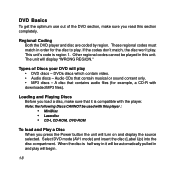
... used with downloaded MP3 files). The unit will play . Audio CDs that contains audio files (for the disc to play • DVD discs - A disc that contain musical or sound content only. • MP3 discs - This unit's code is compatible with the player. DVDs discs which contain video. • Audio discs - DVD Basics To get the optimum use out of Discs your DVD will display "WRONG REGION." If the codes don't match, the disc won't play will turn on and display the source selected. When the disc...
... used with downloaded MP3 files). The unit will play . Audio CDs that contains audio files (for the disc to play • DVD discs - A disc that contain musical or sound content only. • MP3 discs - This unit's code is compatible with the player. DVDs discs which contain video. • Audio discs - DVD Basics To get the optimum use out of Discs your DVD will display "WRONG REGION." If the codes don't match, the disc won't play will turn on and display the source selected. When the disc...
Operation Manual
Page 19
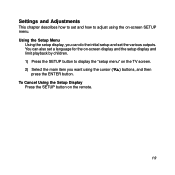
To Cancel Using the Setup Display Press the SETUP button on the remote. 19 You can do the initial setup and set the various outputs. Using the Setup Menu Using the setup display, you can also set and how to display the "setup menu" on the TV screen. 2) Select the main item you want using the on-screen SETUP menu. Settings and Adjustments This chapter describes how to set a language for the on-screen display and the setup display and limit playback by children. 1) Press the SETUP button to adjust using the cursor ( ) buttons, and then press the ENTER button.
To Cancel Using the Setup Display Press the SETUP button on the remote. 19 You can do the initial setup and set the various outputs. Using the Setup Menu Using the setup display, you can also set and how to display the "setup menu" on the TV screen. 2) Select the main item you want using the on-screen SETUP menu. Settings and Adjustments This chapter describes how to set a language for the on-screen display and the setup display and limit playback by children. 1) Press the SETUP button to adjust using the cursor ( ) buttons, and then press the ENTER button.

Operation Manual
Page 20
Then press ENTER to select the appropriate settings. 4:3 / PS This displays the wide picture on the screen with a portion of the left & right side removed. 4:3 / LB This displays the wide picture with black bands on the upper and lower portions of the screen. 16:9 This displays a picture with black bands on the upper and lower portion of the screen. Settings for Display Press the SETUP button and select Display. The DISPLAY SETUP allows you to adjust screen setting (aspect ratio) Press and then use the (▼▲)buttons to confirm your selection. 20
Then press ENTER to select the appropriate settings. 4:3 / PS This displays the wide picture on the screen with a portion of the left & right side removed. 4:3 / LB This displays the wide picture with black bands on the upper and lower portions of the screen. 16:9 This displays a picture with black bands on the upper and lower portion of the screen. Settings for Display Press the SETUP button and select Display. The DISPLAY SETUP allows you to adjust screen setting (aspect ratio) Press and then use the (▼▲)buttons to confirm your selection. 20

Operation Manual
Page 21
Press and then use the ( ) buttons to factory defaults. The DEFAULTS SETUP allows you to reset ALL options to select the desired language. Defaults Settings Press the SETUP button and select Defaults. The user can select either English, French or Spanish for On-Screen Display Press the SETUP button and using the ( )buttons select "OSD LANGUAGE". Press and then press Enter to select the language for the onscreen display. Setting the Language for the OSD language. OSD (On-Screen Display) Language Menu The OSD Language Menu allows the user to implement the reset. 21
Press and then use the ( ) buttons to factory defaults. The DEFAULTS SETUP allows you to reset ALL options to select the desired language. Defaults Settings Press the SETUP button and select Defaults. The user can select either English, French or Spanish for On-Screen Display Press the SETUP button and using the ( )buttons select "OSD LANGUAGE". Press and then press Enter to select the language for the onscreen display. Setting the Language for the OSD language. OSD (On-Screen Display) Language Menu The OSD Language Menu allows the user to implement the reset. 21

Operation Manual
Page 23
NEW PASSWORD Input a new password (4 digits) using numeric buttons OLD PASSWORD Input the old password or the default password (4 digits) CONFIRM PWD Confirm the new password by entering the same new password again. Settings for Password (Parental Control Password) Press the SETUP button and select PASSWORD. Press and then press Enter. Then press Enter to change the parental control password. The PASSWORD SETUP allows you to implement it. 23
NEW PASSWORD Input a new password (4 digits) using numeric buttons OLD PASSWORD Input the old password or the default password (4 digits) CONFIRM PWD Confirm the new password by entering the same new password again. Settings for Password (Parental Control Password) Press the SETUP button and select PASSWORD. Press and then press Enter. Then press Enter to change the parental control password. The PASSWORD SETUP allows you to implement it. 23
Operation Manual
Page 26
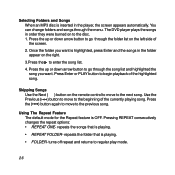
... on the remote control to move to the previous song. The DVD player plays the songs in the player, the screen appears automatically. Pressing REPEAT consecutively changes the repeat options: • REPEAT ONE- Selecting Folders and Songs When an MP3 disc is inserted in order they were burned on the left side of the highlighted song. Use the Previous ( ) button to move...
... on the remote control to move to the previous song. The DVD player plays the songs in the player, the screen appears automatically. Pressing REPEAT consecutively changes the repeat options: • REPEAT ONE- Selecting Folders and Songs When an MP3 disc is inserted in order they were burned on the left side of the highlighted song. Use the Previous ( ) button to move...
Operation Manual
Page 27
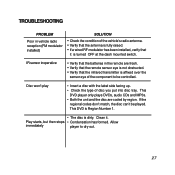
... turned OFF at the dash mounted switch. If the regional codes don't match, the disc can't be controlled. This DVD is Region Number 1. • The disc is dirty. Allow immediately player to be played. This DVD player only plays DVDs, audio CDs and MP3s. • Both the unit and the disc are fresh. • Verify that the remote sensor eye is not obstructed. • Verify that it . Disc won't play • Insert a disc...
... turned OFF at the dash mounted switch. If the regional codes don't match, the disc can't be controlled. This DVD is Region Number 1. • The disc is dirty. Allow immediately player to be played. This DVD player only plays DVDs, audio CDs and MP3s. • Both the unit and the disc are fresh. • Verify that the remote sensor eye is not obstructed. • Verify that it . Disc won't play • Insert a disc...
Operation Manual
Page 28
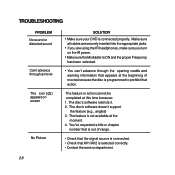
.... 2. The disc's software doesn't support the feature (e.g., angles) 3. Make sure all cables are securely inserted into the appropriate jacks. • If you are using the IR headphones, make sure you turn on the IR power. • Make sure the Modulator is ON and the proper Frequency has been selected. • You can't advance through a movie The icon ( ) appears on screen No Picture...
.... 2. The disc's software doesn't support the feature (e.g., angles) 3. Make sure all cables are securely inserted into the appropriate jacks. • If you are using the IR headphones, make sure you turn on the IR power. • Make sure the Modulator is ON and the proper Frequency has been selected. • You can't advance through a movie The icon ( ) appears on screen No Picture...
Operation Manual
Page 30
... installation, mishandling, misuse, neglect, accident, or by removal or defacement of the factory serial number/bar code label(s). This Warranty gives you specific legal rights and you . CANADA : CALL 1-800-645-4994 FOR LOCATION OF WARRANTY STATION SERVING...discs, speakers, accessories, or vehicle electrical systems. This Warranty does not apply to any part thereof, under normal use and conditions, be proven defective in material or workmanship within the terms of this Warranty, the product is in connection with the sale of this product. This Warranty is to be repaired or replaced...
... installation, mishandling, misuse, neglect, accident, or by removal or defacement of the factory serial number/bar code label(s). This Warranty gives you specific legal rights and you . CANADA : CALL 1-800-645-4994 FOR LOCATION OF WARRANTY STATION SERVING...discs, speakers, accessories, or vehicle electrical systems. This Warranty does not apply to any part thereof, under normal use and conditions, be proven defective in material or workmanship within the terms of this Warranty, the product is in connection with the sale of this product. This Warranty is to be repaired or replaced...


