Operation Manual
Page 3
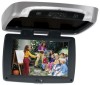
...Three Way Switch • Built-in 16 Channel Frequency Wireless FM Modulator • Last Position Memory for each component in your Audiovox entertainment system but remember the safety of all passengers remains the number one priority. Enjoy your system to the system. Please note... • AV Output 3 System adjustments can be accomplished using the remote control, while seat-belts remain fastened. Congratulations Congratulations on your family many years of video entertainment in the mobile environment. The MMD11 has been designed to give you do not allow children to unfasten ...
...Three Way Switch • Built-in 16 Channel Frequency Wireless FM Modulator • Last Position Memory for each component in your Audiovox entertainment system but remember the safety of all passengers remains the number one priority. Enjoy your system to the system. Please note... • AV Output 3 System adjustments can be accomplished using the remote control, while seat-belts remain fastened. Congratulations Congratulations on your family many years of video entertainment in the mobile environment. The MMD11 has been designed to give you do not allow children to unfasten ...
Operation Manual
Page 5
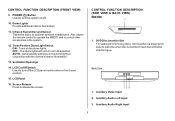
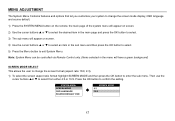
.... Automatically switches on in the system. 12. Infrared Transmitter and Sensor Transmits audio to control other accessories in this position. Also allows the remote control to operate the MMD11 and to optional wireless headphones. Screen Release Press to turn off . 10. Auxiliary Audio Right Input 5 Turns on state to turn the system...
.... Automatically switches on in the system. 12. Infrared Transmitter and Sensor Transmits audio to control other accessories in this position. Also allows the remote control to operate the MMD11 and to optional wireless headphones. Screen Release Press to turn off . 10. Auxiliary Audio Right Input 5 Turns on state to turn the system...

Operation Manual
Page 6
... face down. Make sure that proper polarity (+ or -) is not a universal remote control and will operate the MMD11. It is observed. 3) Align the cover tabs with the remote control and slide the cover until it locks. REMOTE CONTROL OPERATION MAIN FUNCTION DESCRIPTION Battery Installation Before attempting to operate your finger, slide the battery cover...
... face down. Make sure that proper polarity (+ or -) is not a universal remote control and will operate the MMD11. It is observed. 3) Align the cover tabs with the remote control and slide the cover until it locks. REMOTE CONTROL OPERATION MAIN FUNCTION DESCRIPTION Battery Installation Before attempting to operate your finger, slide the battery cover...
Operation Manual
Page 7
...video source will alternately store or erase the channel from memory. 7 ERASE / WRITE Button** While tuned to M1 mode only. Sets the remote control code to turn the unit ON and OFF. 2. DVD Mode Select Button Switches certain function keys on all channels are searched and channels... following sequence: DVD > AUX > AV1. 6. MONITOR SELECT M1 Button - TV Mode Select Button** Switches certain function keys on the unit and the remote control. ** Function not available in this button will change in memory. 7. SKIP / SEARCH Button** This button selects between SKIP and SEARCH mode. SOURCE...
...video source will alternately store or erase the channel from memory. 7 ERASE / WRITE Button** While tuned to M1 mode only. Sets the remote control code to turn the unit ON and OFF. 2. DVD Mode Select Button Switches certain function keys on all channels are searched and channels... following sequence: DVD > AUX > AV1. 6. MONITOR SELECT M1 Button - TV Mode Select Button** Switches certain function keys on the unit and the remote control. ** Function not available in this button will change in memory. 7. SKIP / SEARCH Button** This button selects between SKIP and SEARCH mode. SOURCE...
Operation Manual
Page 12
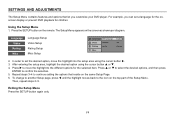
... por q to confirm the setting. SYSTEM MENU SCREEN MODE OSD LANGUAGE SOURCE DEFAULT DVD SCREEN MODE 4:3 16:9 12 Note: System Menu can be controlled via Remote Control only. (Items selected in the menu will appear on screen. 4) Use the cursor buttons p or q to select an item in the main page and...) SCREEN MODE SELECT This allows the user to change the screen mode display, OSD language and source default. 1) Press the SYSTEM MENU button on the remote, the main page of the system menu will appear on screen. 2) Use the cursor buttons p or q to select the desired item in the sub menu...
... por q to confirm the setting. SYSTEM MENU SCREEN MODE OSD LANGUAGE SOURCE DEFAULT DVD SCREEN MODE 4:3 16:9 12 Note: System Menu can be controlled via Remote Control only. (Items selected in the menu will appear on screen. 4) Use the cursor buttons p or q to select an item in the main page and...) SCREEN MODE SELECT This allows the user to change the screen mode display, OSD language and source default. 1) Press the SYSTEM MENU button on the remote, the main page of the system menu will appear on screen. 2) Use the cursor buttons p or q to select the desired item in the sub menu...
Operation Manual
Page 14
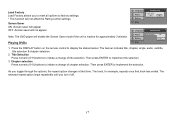
... on the top part of the Setup Menu. To change to another Setup page, press t until the highlight moves back to the icon on the remote. For example, you customize your DVD player. Press u to set a language for the onscreen display or prevent DVD playback for the selected item. After entering...
... on the top part of the Setup Menu. To change to another Setup page, press t until the highlight moves back to the icon on the remote. For example, you customize your DVD player. Press u to set a language for the onscreen display or prevent DVD playback for the selected item. After entering...
Operation Manual
Page 17
.... * This function will enable the Screen Saver mode if the unit is inactive for example, repeats once that time. Press the DISPLAY button on the remote control to implement the selection. 3. Screen Saver ON -Screen saver will appear OFF -Screen saver will not appear Note: The DVD player will not affect...
.... * This function will enable the Screen Saver mode if the unit is inactive for example, repeats once that time. Press the DISPLAY button on the remote control to implement the selection. 3. Screen Saver ON -Screen saver will appear OFF -Screen saver will not appear Note: The DVD player will not affect...
Operation Manual
Page 18
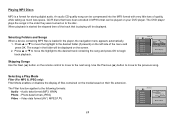
... An audio CD-quality song can be compressed into the MP3 format with very little loss of files contained on the media based on the remote control to move the highlight to the desired track containing the song and press OK to the following formats: Audio - Use the Previous (9) button to...
... An audio CD-quality song can be compressed into the MP3 format with very little loss of files contained on the media based on the remote control to move the highlight to the desired track containing the song and press OK to the following formats: Audio - Use the Previous (9) button to...

Operation Manual
Page 22
... lighting. Remember to turn the system on and is in use. Power ON/OFF Remote Sensor Button Infrared Transmitter Screen Release OVERHEAD DOME LIGHTS The Dome Lights integrated into the MMD11 are controlled by pivoting the screen to the ON position will hold the screen in position... not in use the internal backlighting will drop down slightly. REMOTE SENSOR The MMD11 infrared remote sensors to relay signals to turn the lights ON. Pivot the screen downward until a comfortable viewing angle is pointed at the remote sensor. 22 The OFF position will prevent the lights from ...
... lighting. Remember to turn the system on and is in use. Power ON/OFF Remote Sensor Button Infrared Transmitter Screen Release OVERHEAD DOME LIGHTS The Dome Lights integrated into the MMD11 are controlled by pivoting the screen to the ON position will hold the screen in position... not in use the internal backlighting will drop down slightly. REMOTE SENSOR The MMD11 infrared remote sensors to relay signals to turn the lights ON. Pivot the screen downward until a comfortable viewing angle is pointed at the remote sensor. 22 The OFF position will prevent the lights from ...
Operation Manual
Page 23
To access the A/V inputs, turn the MMD11 on and press the source button on the MMD11 or the Source button on the remote control until "AV1" is displayed on each headset. The audio / video device could be a video game system, video camera, or other audio/video devices. ...adjusted using the controls on the screen. Please see your wireless headphones. AUX The MMD11 will provide an audio/video signal that duplicates the signal displayed by the MMD11 to AV1 input (use with its power button or remote control. Any number of wireless headphones may be used within a line of the unit...
To access the A/V inputs, turn the MMD11 on and press the source button on the MMD11 or the Source button on the remote control until "AV1" is displayed on each headset. The audio / video device could be a video game system, video camera, or other audio/video devices. ...adjusted using the controls on the screen. Please see your wireless headphones. AUX The MMD11 will provide an audio/video signal that duplicates the signal displayed by the MMD11 to AV1 input (use with its power button or remote control. Any number of wireless headphones may be used within a line of the unit...
Operation Manual
Page 24
...ON and the proper Frequency has been selected. - Condensation has formed. Make sure your DVD is connected properly. Check the type of movies because the disc is programmed to prohibit that action. 24 If the regional codes don't match, the disc can 't advance through... securely inserted into disc tray. You can 't be played. Insert a disc with the label side facing up. - Clean it. - TROUBLESHOOTING PROBLEM IR remote inoperative Disc won't play Play starts, but then stops immediately No sound or distorted sound Can't advance through the opening credits and warning information that...
...ON and the proper Frequency has been selected. - Condensation has formed. Make sure your DVD is connected properly. Check the type of movies because the disc is programmed to prohibit that action. 24 If the regional codes don't match, the disc can 't advance through... securely inserted into disc tray. You can 't be played. Insert a disc with the label side facing up. - Clean it. - TROUBLESHOOTING PROBLEM IR remote inoperative Disc won't play Play starts, but then stops immediately No sound or distorted sound Can't advance through the opening credits and warning information that...
Operation Manual
Page 26
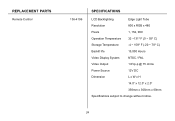
REPLACEMENT PARTS Remote Control 136-4196 SPECIFICATIONS LCD Backlighting Edge Light Tube Resolution 800 x RGB x 480 Pixels 1, 152, 000 Operation Temperature 32 ~131º F (0 ~ 55º C) Storage Temperature -4 ~ 158º F (-20 ~ 70º C) Backlit life 15,000 Hours Video Display System NTSC / PAL Video Output 1.0Vp-p @ 75 ohms Power Source 12V DC Dimension L x W x H 14.0" x 12.0" x 2.0" 356mm x 305mm x 60mm Specifications subject to change without notice. 26
REPLACEMENT PARTS Remote Control 136-4196 SPECIFICATIONS LCD Backlighting Edge Light Tube Resolution 800 x RGB x 480 Pixels 1, 152, 000 Operation Temperature 32 ~131º F (0 ~ 55º C) Storage Temperature -4 ~ 158º F (-20 ~ 70º C) Backlit life 15,000 Hours Video Display System NTSC / PAL Video Output 1.0Vp-p @ 75 ohms Power Source 12V DC Dimension L x W x H 14.0" x 12.0" x 2.0" 356mm x 305mm x 60mm Specifications subject to change without notice. 26


