Operation Manual
Page 2
.... If the LCD panel or video monitor is used for television reception, video or DVD play that operates when the vehicle is in "park" or when the vehicle's parking brake is not applied must be installed to the lowest position. Be extremely careful when working on headphones always adjust the volume setting to the rear of the motor vehicle. Routing wires in personal injury...
.... If the LCD panel or video monitor is used for television reception, video or DVD play that operates when the vehicle is in "park" or when the vehicle's parking brake is not applied must be installed to the lowest position. Be extremely careful when working on headphones always adjust the volume setting to the rear of the motor vehicle. Routing wires in personal injury...
Operation Manual
Page 3
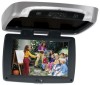
... component in 16 Channel Frequency Wireless FM Modulator • Last Position Memory for each component's operation. Please note: Installation options vary, see the individual owner's manuals for DVD • Screen Mode Selection (16:9, 4:3) • Full Function Remote Control • Backlit Controls • AV Output 3 Please read the directions that follow to familiarize yourself with Drop-Down Video / Monitor. Congratulations Congratulations on your purchase of the Jensen MMD11 DVD Player with the...
... component in 16 Channel Frequency Wireless FM Modulator • Last Position Memory for each component's operation. Please note: Installation options vary, see the individual owner's manuals for DVD • Screen Mode Selection (16:9, 4:3) • Full Function Remote Control • Backlit Controls • AV Output 3 Please read the directions that follow to familiarize yourself with Drop-Down Video / Monitor. Congratulations Congratulations on your purchase of the Jensen MMD11 DVD Player with the...
Operation Manual
Page 4
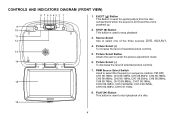
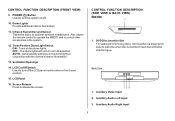
Picture Select (+) To increase the level of selected picture controls. 7. Picture Select (-) To decrease the level of selected picture controls. 13 5. CONTROLS AND INDICATORS DIAGRAM (FRONT VIEW) 8 7 6 5 43 2 1 9 10 11 12 1. FMM Source Select Switch Used to select one of a disc. 16 4 PLAY (u) Button This button is used to stop playback. 3. STOP (n) Button This button is powered up. 2. Source Select Use to select the frequency in sequence rotation: FM OFF, CH1 88.1MHz, CH2 88.3MHz, CH3 88.5MHz, CH4...
Picture Select (+) To increase the level of selected picture controls. 7. Picture Select (-) To decrease the level of selected picture controls. 13 5. CONTROLS AND INDICATORS DIAGRAM (FRONT VIEW) 8 7 6 5 43 2 1 9 10 11 12 1. FMM Source Select Switch Used to select one of a disc. 16 4 PLAY (u) Button This button is used to stop playback. 3. STOP (n) Button This button is powered up. 2. Source Select Use to select the frequency in sequence rotation: FM OFF, CH1 88.1MHz, CH2 88.3MHz, CH3 88.5MHz, CH4...
Operation Manual
Page 5
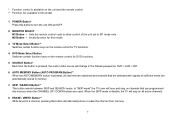
POWER ( ) Button Used to turn off . 10. Infrared Transmitter and Sensor Transmits audio to release the screen. OFF - Ventilation Openings 14. DVD Disc insertion Slot For loading and removing discs. Insert disc with the vehicle's interior illumination. 13. Auxiliary Audio Left Input 3. AUTO - LCD Cut Off Switch Used to load disc when disc is inserted. Auxiliary Video Input 2. Turns on the dome lights in conjunction with label side facing up. Three Position Dome Light Switch ON - Screen Release Press...
POWER ( ) Button Used to turn off . 10. Infrared Transmitter and Sensor Transmits audio to release the screen. OFF - Ventilation Openings 14. DVD Disc insertion Slot For loading and removing discs. Insert disc with the vehicle's interior illumination. 13. Auxiliary Audio Left Input 3. AUTO - LCD Cut Off Switch Used to load disc when disc is inserted. Auxiliary Video Input 2. Turns on the dome lights in conjunction with label side facing up. Three Position Dome Light Switch ON - Screen Release Press...

Operation Manual
Page 6
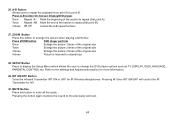
... the arrow. 2) Install Two "AAA" batteries. The remote control will not control equipment from other manufacturers. 6 1 2 3 4 5 6 7 8 9 10 11 12 13 POWER MONITOR SELECT EJECT M1 M2 TV DVD SOURCE 1 2 3 AUTO MEMORY 4 5 6 SKIP/ SEARCH 7 8 9 ERASE/ WRITE 0 VOLUME FMM CHANNEL DAY/ ON/OFF SELECT NIGHT PIX IRT RETURN DISPLAY ON/OFF MUTE 35 34 33 32 31 30 29 14 OK 15 28 MENU SETUP 16 17 REPEAT 27 AUDIO ZOOM 18...
... the arrow. 2) Install Two "AAA" batteries. The remote control will not control equipment from other manufacturers. 6 1 2 3 4 5 6 7 8 9 10 11 12 13 POWER MONITOR SELECT EJECT M1 M2 TV DVD SOURCE 1 2 3 AUTO MEMORY 4 5 6 SKIP/ SEARCH 7 8 9 ERASE/ WRITE 0 VOLUME FMM CHANNEL DAY/ ON/OFF SELECT NIGHT PIX IRT RETURN DISPLAY ON/OFF MUTE 35 34 33 32 31 30 29 14 OK 15 28 MENU SETUP 16 17 REPEAT 27 AUDIO ZOOM 18...
Operation Manual
Page 7
... levels are used. POWER Button* Press this model 3. Invalid function for this button to turn the unit ON and OFF. 2. In "SKIP mode" the TV tuner will alternately store or erase the channel from memory. 7 SKIP / SEARCH Button** This button selects between SKIP and SEARCH mode. When the SKIP mode is disable, the TV will change in memory. 7. SOURCE Button* Each time the button is pressed, the audio / video source will stop on all channels are searched and channels...
... levels are used. POWER Button* Press this model 3. Invalid function for this button to turn the unit ON and OFF. 2. In "SKIP mode" the TV tuner will alternately store or erase the channel from memory. 7 SKIP / SEARCH Button** This button selects between SKIP and SEARCH mode. When the SKIP mode is disable, the TV will change in memory. 7. SOURCE Button* Each time the button is pressed, the audio / video source will stop on all channels are searched and channels...
Operation Manual
Page 8
... : Go to implement a selected setting or menu option. 15. OK Button (ENTER) Used to movies playback. 12. CURSOR / CHANNEL UP DOWN (pqtu) ** Use these buttons to display current disc information while the disc is playing. DISPLAY Press to navigate the menu selections on or off. 10. Press cursor (pq) buttons to access the DVD menu (DVD MODE). 16. 9. For Title/Chapter selection use CHq to enter the desired Title Chapter selection. 13. MENU Button Allows the user to select...
... : Go to implement a selected setting or menu option. 15. OK Button (ENTER) Used to movies playback. 12. CURSOR / CHANNEL UP DOWN (pqtu) ** Use these buttons to display current disc information while the disc is playing. DISPLAY Press to navigate the menu selections on or off. 10. Press cursor (pq) buttons to access the DVD menu (DVD MODE). 16. 9. For Title/Chapter selection use CHq to enter the desired Title Chapter selection. 13. MENU Button Allows the user to select...
Operation Manual
Page 10
... when playing a DVD disc. Refer to original size 28. Mark the beginning of the section to repeat (Set point A) Twice Repeat AB Mark the end of the original size 4 times Picture is returned to the settings and Adjustments section for M1. 30. SETUP Button Press to display the Setup Menu which allows the user to repeat (Set point B) 3 times AB Off Cancel the A-B repeat function 27...
... when playing a DVD disc. Refer to original size 28. Mark the beginning of the section to repeat (Set point A) Twice Repeat AB Mark the end of the original size 4 times Picture is returned to the settings and Adjustments section for M1. 30. SETUP Button Press to display the Setup Menu which allows the user to repeat (Set point B) 3 times AB Off Cancel the A-B repeat function 27...
Operation Manual
Page 11
... user to enter numbers 0 to eject the disc. 11 EJECT () Button* This button is used to 9 for selection of selection of the picture adjustments. 34. PIX Button (Picture Select)* Each time this button is more suitable for BRIGHTNESS, CONTRAST, COLOR, TINT or RESET. VOLUME DOWN (-) or UP (+)* Press to a preset level that is pressed, the on screen picture adjustment displays the "adjustment bar" for low light operation. 32. In "Night" mode, the LCD backlit is displayed, use the VOLUME(+)/ VOLUME(-) button...
... user to enter numbers 0 to eject the disc. 11 EJECT () Button* This button is used to 9 for selection of selection of the picture adjustments. 34. PIX Button (Picture Select)* Each time this button is more suitable for BRIGHTNESS, CONTRAST, COLOR, TINT or RESET. VOLUME DOWN (-) or UP (+)* Press to a preset level that is pressed, the on screen picture adjustment displays the "adjustment bar" for low light operation. 32. In "Night" mode, the LCD backlit is displayed, use the VOLUME(+)/ VOLUME(-) button...
Operation Manual
Page 12
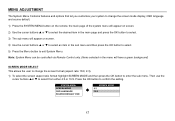
... be controlled via Remote Control only. (Items selected in the menu will have a green background) SCREEN MODE SELECT This allows the user to change the screen mode display, OSD language and source default. 1) Press the SYSTEM MENU button on the remote, the main page of the system menu will appear on screen. 2) Use the cursor buttons p or q to select the desired item in the main page and press the OK button to select. 3) The sub menu...
... be controlled via Remote Control only. (Items selected in the menu will have a green background) SCREEN MODE SELECT This allows the user to change the screen mode display, OSD language and source default. 1) Press the SYSTEM MENU button on the remote, the main page of the system menu will appear on screen. 2) Use the cursor buttons p or q to select the desired item in the main page and press the OK button to select. 3) The sub menu...
Operation Manual
Page 14
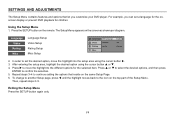
... option using the cursor button u. 3. Press u to move the highlight to set a language for the onscreen display or prevent DVD playback for the selected item. Then, repeat steps 2~5. Exiting the Setup Menu Press the SETUP button again only. 14 The Setup Menu appears on the remote. In order to the different options for children. Press the SETUP button on the screen as shown per diagram. SETTINGS AND ADJUSTMENTS The Setup Menu...
... option using the cursor button u. 3. Press u to move the highlight to set a language for the onscreen display or prevent DVD playback for the selected item. Then, repeat steps 2~5. Exiting the Setup Menu Press the SETUP button again only. 14 The Setup Menu appears on the remote. In order to the different options for children. Press the SETUP button on the screen as shown per diagram. SETTINGS AND ADJUSTMENTS The Setup Menu...

Operation Manual
Page 15
... recorded in the disc. Note: The audio selection is not available, the player will play and display on -screen display. The bandwidth will play and display on the screen the original language contained in the above listed languages. LANGUAGE SETUP Language for On-Screen Display OSD MENU: The OSD MENU setup allows you desire using pq button, then press "ENTER" to confirm the setting. Select the audio you to select the language for...
... recorded in the disc. Note: The audio selection is not available, the player will play and display on -screen display. The bandwidth will play and display on the screen the original language contained in the above listed languages. LANGUAGE SETUP Language for On-Screen Display OSD MENU: The OSD MENU setup allows you desire using pq button, then press "ENTER" to confirm the setting. Select the audio you to select the language for...
Operation Manual
Page 16
... the control. To set the parental level and change the password, you can record this default password in another area and delete it . Select this manual. Language Parental : 6.Adult Video Rating Password Enter Password Misc Note: The Default Password is always effective even after you desire using pq button, then press u button to be connected. Some discs can only be limited depending on the age of movie playback...
... the control. To set the parental level and change the password, you can record this default password in another area and delete it . Select this manual. Language Parental : 6.Adult Video Rating Password Enter Password Misc Note: The Default Password is always effective even after you desire using pq button, then press u button to be connected. Some discs can only be limited depending on the age of movie playback...
Operation Manual
Page 17
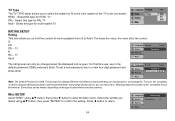
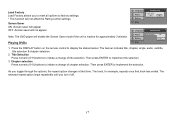
... control settings. Chapter selection Press numeric (0~9) buttons to initiate a change of chapter selection. Then press ENTER to display the status banner. Press the DISPLAY button on the remote control to implement the selection. Then press ENTER to initiate a change of title selection. The selected repeat option loops repeatedly until you toggle through the options, the repeat option changes at that track has ended. Playing DVDs Language Load Factory Video Load Factory Screen...
... control settings. Chapter selection Press numeric (0~9) buttons to initiate a change of chapter selection. Then press ENTER to display the status banner. Press the DISPLAY button on the remote control to implement the selection. Then press ENTER to initiate a change of title selection. The selected repeat option loops repeatedly until you toggle through the options, the repeat option changes at that track has ended. Playing DVDs Language Load Factory Video Load Factory Screen...
Operation Manual
Page 18
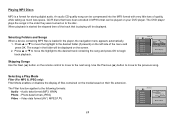
The Filter function applies to the disc. Photo data format (JPEG) Video - The DVD player plays the songs in MP3 format can be played on your DVD player. When playback is started the elapsed time of the track that have ...screen. 2. Skipping Songs Use the Next (:) button on the remote control to move the highlight to the next song. Selecting Folders and Songs When a device containing MP3 files is playing will be displayed. The songs in the player, the navigation menu appears automatically. 1. Playing MP3 Discs MP3 is a format for storing digital audio. Video...
The Filter function applies to the disc. Photo data format (JPEG) Video - The DVD player plays the songs in MP3 format can be played on your DVD player. When playback is started the elapsed time of the track that have ...screen. 2. Skipping Songs Use the Next (:) button on the remote control to move the highlight to the next song. Selecting Folders and Songs When a device containing MP3 files is playing will be displayed. The songs in the player, the navigation menu appears automatically. 1. Playing MP3 Discs MP3 is a format for storing digital audio. Video...
Operation Manual
Page 21
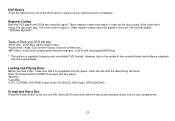
... Power button to play. However, due to the variety of Discs your DVD will display "WRONG REGION". Select DVD mode and insert the disc (Label towards driver) into the disc compartment. 21 Insert the disc with the player. Other regional codes cannot be guaranteed. The unit will play . Note: the following Discs CANNOT be used with downloaded MP3 files). * This system is region 1. A disc that it is compatible with the label facing the driver...
... Power button to play. However, due to the variety of Discs your DVD will display "WRONG REGION". Select DVD mode and insert the disc (Label towards driver) into the disc compartment. 21 Insert the disc with the player. Other regional codes cannot be guaranteed. The unit will play . Note: the following Discs CANNOT be used with downloaded MP3 files). * This system is region 1. A disc that it is compatible with the label facing the driver...

Operation Manual
Page 22
... a discharged battery. Power ON/OFF Remote Sensor Button Infrared Transmitter Screen Release OVERHEAD DOME LIGHTS The Dome Lights integrated into the MMD11 are controlled by pivoting the screen to turn ON and OFF with the dome light switch in the ON position, as this could result in the Screen Release button will unlock the LCD screen and it will turn the system on the unit or the remote control will...
... a discharged battery. Power ON/OFF Remote Sensor Button Infrared Transmitter Screen Release OVERHEAD DOME LIGHTS The Dome Lights integrated into the MMD11 are controlled by pivoting the screen to turn ON and OFF with the dome light switch in the ON position, as this could result in the Screen Release button will unlock the LCD screen and it will turn the system on the unit or the remote control will...
Operation Manual
Page 23
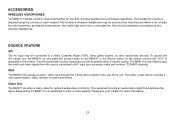
... a Video Cassette Player (VCP), video game system, or other input device. Please see your wireless headphones. AUX The MMD11 will provide an audio/video signal that duplicates the signal displayed by the MMD11 to AV1 input (use with its power button or remote control. Video Out The MMD11 provides a video output for more information. 23 See the documentation accompanying your installer for optional audio/video monitor(s). Turn the audio/video source component on the rear of sight from the source connected...
... a Video Cassette Player (VCP), video game system, or other input device. Please see your wireless headphones. AUX The MMD11 will provide an audio/video signal that duplicates the signal displayed by the MMD11 to AV1 input (use with its power button or remote control. Video Out The MMD11 provides a video output for more information. 23 See the documentation accompanying your installer for optional audio/video monitor(s). Turn the audio/video source component on the rear of sight from the source connected...
Operation Manual
Page 24
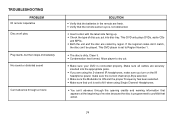
... batteries in the remote are using Single Channel Headphones. - This DVD player is set to M1 when using the 2-channel IR headphones, make sure you turn on the IR headphone power, make sure the correct channel (A-B) is selected. - The disc is ON and the proper Frequency has been selected. - Clean it. - Make sure that unit is set to Region Number 1. - You can 't be played. Both the unit and the disc are securely inserted into disc tray. Make...
... batteries in the remote are using Single Channel Headphones. - This DVD player is set to M1 when using the 2-channel IR headphones, make sure you turn on the IR headphone power, make sure the correct channel (A-B) is selected. - The disc is ON and the proper Frequency has been selected. - Clean it. - Make sure that unit is set to Region Number 1. - You can 't be played. Both the unit and the disc are securely inserted into disc tray. Make...
Operation Manual
Page 27
...-4994 128-6429F 27 12 MONTH LIMITED WARRANTY Applies to Movies To Go Mobile Video Products AUDIOVOX ELECTRONICS CORP. (the Company) warrants to the Company at the Company's option) without charge for installation, removal or reinstallation of the product, or to damage to digital memory/media devices, gaming devices, discs, speakers, accessories, or vehicle electrical systems. This Warranty does not apply...
...-4994 128-6429F 27 12 MONTH LIMITED WARRANTY Applies to Movies To Go Mobile Video Products AUDIOVOX ELECTRONICS CORP. (the Company) warrants to the Company at the Company's option) without charge for installation, removal or reinstallation of the product, or to damage to digital memory/media devices, gaming devices, discs, speakers, accessories, or vehicle electrical systems. This Warranty does not apply...


