

Operation Manual
Page 2
... Basic Operations...20 Changing Channels ...20 Adjusting the Volume ...20 Selecting Input Source Signal ...21 Selecting a Menu Language...21 Setting Picture...22 Customizing the Picture ...22 Using the Preset Picture Mode ...22 Setting System...23 Setting System In TV Mode ...23 Adjusting Screen Aspect ...23 Reducing Picture Noise ...23 VCR mode ...23 Loading Default Values ...23 Setting System In VGA Mode ...24 Changing the Position of Image ...24 Adjusting Clock and Phase ...24 Adjusting the Picture Automatically...24 Adjusting Screen Aspect ...25 Displaying Resolution...
... Basic Operations...20 Changing Channels ...20 Adjusting the Volume ...20 Selecting Input Source Signal ...21 Selecting a Menu Language...21 Setting Picture...22 Customizing the Picture ...22 Using the Preset Picture Mode ...22 Setting System...23 Setting System In TV Mode ...23 Adjusting Screen Aspect ...23 Reducing Picture Noise ...23 VCR mode ...23 Loading Default Values ...23 Setting System In VGA Mode ...24 Changing the Position of Image ...24 Adjusting Clock and Phase ...24 Adjusting the Picture Automatically...24 Adjusting Screen Aspect ...25 Displaying Resolution...

Operation Manual
Page 3
... Picture-by-Picture...31 Using Hotkeys...32 Setting Sleep Timer ...32 Setting Audio Mode...32 Adjusting Back Light of the Panel ...32 Freezing Picture...32 Viewing Closed Captions...33 Turning Closed Caption On or Off...33 Setting Closed Caption...33 Setting CC When Mute ...33 Adjusting Child Lock Settings...34 Child Lock ...34 Turning Child Lock On or Off ...36 Changing the Password ...36 Adjusting the Movie Rating ...36 Adjusting the TV Rating ...36 Adjusting Canadian English Rating ...37 Adjusting Canadian French Rating ...37 Troubleshooting ...38 Care and Maintenance ...39 Specification...
... Picture-by-Picture...31 Using Hotkeys...32 Setting Sleep Timer ...32 Setting Audio Mode...32 Adjusting Back Light of the Panel ...32 Freezing Picture...32 Viewing Closed Captions...33 Turning Closed Caption On or Off...33 Setting Closed Caption...33 Setting CC When Mute ...33 Adjusting Child Lock Settings...34 Child Lock ...34 Turning Child Lock On or Off ...36 Changing the Password ...36 Adjusting the Movie Rating ...36 Adjusting the TV Rating ...36 Adjusting Canadian English Rating ...37 Adjusting Canadian French Rating ...37 Troubleshooting ...38 Care and Maintenance ...39 Specification...
Operation Manual
Page 4
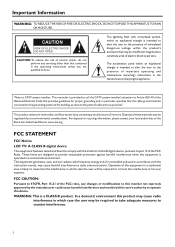
... building, as close to radio communications. The lightning flash with the instruction manual, may be of sufficient magnitude to constitute a risk of the National Electrical Code that provides guidelines for a Class B digital device, pursuant to correct the interference at his own expense. Operation of this equipment in a residential area is provided to call the CATV system installer's attention...
... building, as close to radio communications. The lightning flash with the instruction manual, may be of sufficient magnitude to constitute a risk of the National Electrical Code that provides guidelines for a Class B digital device, pursuant to correct the interference at his own expense. Operation of this equipment in a residential area is provided to call the CATV system installer's attention...
Operation Manual
Page 6
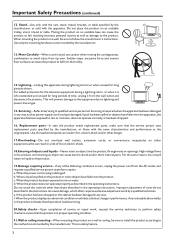
... the service person uses replacement parts specified by a qualified technician. a. Improper adjustment of the following conditions occurs, unplug the power cord from the AC outlet, and request a qualified service person to avoid injury from the wall outlet and disconnect the antenna. Important Safety Precautions (continued) 12. When the product displays an abnormal condition or exhibits a distinct change in the operating instructions. When the power cord or plug...
... the service person uses replacement parts specified by a qualified technician. a. Improper adjustment of the following conditions occurs, unplug the power cord from the AC outlet, and request a qualified service person to avoid injury from the wall outlet and disconnect the antenna. Important Safety Precautions (continued) 12. When the product displays an abnormal condition or exhibits a distinct change in the operating instructions. When the power cord or plug...
Operation Manual
Page 8
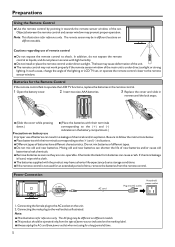
Preparations Using the Remote Control
Preparations Using the Remote Control
Operation Manual
Page 9
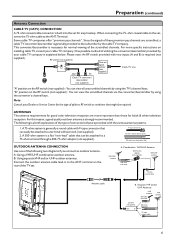
... inputs (A and B) is built into the set signal splitter (not supplied) IN Cable TV Line Cable TV converter/ descrambler (not supplied) "A" position on the RF switch (not supplied) : You can be attached to the subscriber by using the converter's channel keys. ANTENNAS The antenna requirements for black & white television reception. F-type connector 75-ohm coaxial cable (round) 300-ohm twin-lead cable (flat) OUTDOOR ANTENNA CONNECTION Use one of connections that can view all unscrambled channels by the cable TV...
... inputs (A and B) is built into the set signal splitter (not supplied) IN Cable TV Line Cable TV converter/ descrambler (not supplied) "A" position on the RF switch (not supplied) : You can be attached to the subscriber by using the converter's channel keys. ANTENNAS The antenna requirements for black & white television reception. F-type connector 75-ohm coaxial cable (round) 300-ohm twin-lead cable (flat) OUTDOOR ANTENNA CONNECTION Use one of connections that can view all unscrambled channels by the cable TV...
Operation Manual
Page 11
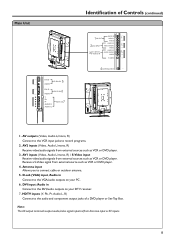
... INPUT 1. AV2 inputs (Video, Audio L/mono, R) Receive video/audio signals from external sources such as VCR or DVD player. 3. Receive a S-Video signal from Antenna input or AV inputs. 8 Note: The AV output terminals output audio/video signal inputted from external source such as VCR or DVD player. 4. Main Unit D-Sub AUDIO 5 D-Sub IN DVI-D AUDIO 6 DVI-D IN Y Pb Pr AUDIO R AUDIO L 7 HDTV IN Identification of a DVD player or Set-Top Box. HDTV inputs (Y, Pb, Pr, Audio L, R) Connect to the DVI/audio outputs on your DTV receiver. 7. DVI input /Audio in Connect to connect cable...
... INPUT 1. AV2 inputs (Video, Audio L/mono, R) Receive video/audio signals from external sources such as VCR or DVD player. 3. Receive a S-Video signal from Antenna input or AV inputs. 8 Note: The AV output terminals output audio/video signal inputted from external source such as VCR or DVD player. 4. Main Unit D-Sub AUDIO 5 D-Sub IN DVI-D AUDIO 6 DVI-D IN Y Pb Pr AUDIO R AUDIO L 7 HDTV IN Identification of a DVD player or Set-Top Box. HDTV inputs (Y, Pb, Pr, Audio L, R) Connect to the DVI/audio outputs on your DTV receiver. 7. DVI input /Audio in Connect to connect cable...
Operation Manual
Page 14
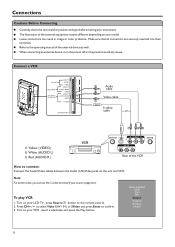
...OUT AV2 INPUT AV1 INPUT/ S-VIDEO IN AUDIO R AUDIO L VIDEO AUDIO R AUDIO L/MONO VIDEO AUDIO R AUDIO L/MONO VIDEO S-VIDEO ANTENNA INPUT Y WR Audio cable Video cable S-video cable or Y WR Y Yellow (VIDEO) W White (AUDIO L) R Red (AUDIO R ) VCR ANT OUT S-VIDEO AV OUT VIDEO L AUDIO R ANT IN AV IN VIDEO L AUDIO R Rear of the external device as well. Turn on the remote control. 2. Loose connectors can use the S-video terminal if your LCD TV , press Source button on your source supports it. Note: For better video, you can result in image or color problems. Make sure...
...OUT AV2 INPUT AV1 INPUT/ S-VIDEO IN AUDIO R AUDIO L VIDEO AUDIO R AUDIO L/MONO VIDEO AUDIO R AUDIO L/MONO VIDEO S-VIDEO ANTENNA INPUT Y WR Audio cable Video cable S-video cable or Y WR Y Yellow (VIDEO) W White (AUDIO L) R Red (AUDIO R ) VCR ANT OUT S-VIDEO AV OUT VIDEO L AUDIO R ANT IN AV IN VIDEO L AUDIO R Rear of the external device as well. Turn on the remote control. 2. Loose connectors can use the S-video terminal if your LCD TV , press Source button on your source supports it. Note: For better video, you can result in image or color problems. Make sure...
Operation Manual
Page 15
... playback Camcorder 1. Press CH5/6 to select Video2 and press Enter to confirm operation. Please read the owner's manual of the camcorder may be different and is dependent on your camcorder and set it to output mode. (For details, refer to connect: Connect the Audio/Video cables between the Audio (L/R)/Video jacks on the remote control. 2. Note: The operations of your LCD TV , press Source button on the unit and camcorder.
... playback Camcorder 1. Press CH5/6 to select Video2 and press Enter to confirm operation. Please read the owner's manual of the camcorder may be different and is dependent on your camcorder and set it to output mode. (For details, refer to connect: Connect the Audio/Video cables between the Audio (L/R)/Video jacks on the remote control. 2. Note: The operations of your LCD TV , press Source button on the unit and camcorder.

Operation Manual
Page 16
... Pr AUDIO R AUDIO L HDTV IN DVD player, Set-top Box W white (audio L) R red (audio R, Pr /Cr ) G Green (Y) B Blue (Pb /Cb ) How to connect a DVD Player (or Set-Top Box) using Component Video Connections: Connect the Video cable between the AUDIO input jacks on the unit and AUDIO output jacks on the DVD player (or Set-Top Box). Connect the Audio cable between the Y, Pb, Pr input jacks on the unit and Y, Pb, Pr output jacks on the remote control. 2. Press Enter to select YPbPr. 3. To play DVD or Set-Top Box 1. Source Select VGA...
... Pr AUDIO R AUDIO L HDTV IN DVD player, Set-top Box W white (audio L) R red (audio R, Pr /Cr ) G Green (Y) B Blue (Pb /Cb ) How to connect a DVD Player (or Set-Top Box) using Component Video Connections: Connect the Video cable between the AUDIO input jacks on the unit and AUDIO output jacks on the DVD player (or Set-Top Box). Connect the Audio cable between the Y, Pb, Pr input jacks on the unit and Y, Pb, Pr output jacks on the remote control. 2. Press Enter to select YPbPr. 3. To play DVD or Set-Top Box 1. Source Select VGA...

Operation Manual
Page 19
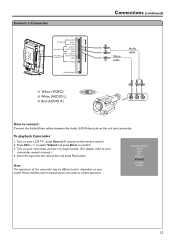
... unit and VCR. Turn on your VCR, insert a videotape for recording. 3. Note: The AV output terminals output the audio/video signal from the Antenna input or AV inputs. 16 Press the Record button to record. 2. Connect a VCR for Recording Connections (continued) AV OUT AV2 INPUT AV1 INPUT/ S-VIDEO IN AUDIO R AUDIO L VIDEO AUDIO R AUDIO L/MONO VIDEO AUDIO R AUDIO L/MONO VIDEO S-VIDEO ANTENNA INPUT Y Yellow (VIDEO) W White (AUDIO L) R Red (AUDIO R ) Y WR Video cable Audio cable Y WR AV OUT ANT OUT VIDEO L AUDIO R S-VIDEO ANT IN AV IN VIDEO L AUDIO R Rear of the VCR...
... unit and VCR. Turn on your VCR, insert a videotape for recording. 3. Note: The AV output terminals output the audio/video signal from the Antenna input or AV inputs. 16 Press the Record button to record. 2. Connect a VCR for Recording Connections (continued) AV OUT AV2 INPUT AV1 INPUT/ S-VIDEO IN AUDIO R AUDIO L VIDEO AUDIO R AUDIO L/MONO VIDEO AUDIO R AUDIO L/MONO VIDEO S-VIDEO ANTENNA INPUT Y Yellow (VIDEO) W White (AUDIO L) R Red (AUDIO R ) Y WR Video cable Audio cable Y WR AV OUT ANT OUT VIDEO L AUDIO R S-VIDEO ANT IN AV IN VIDEO L AUDIO R Rear of the VCR...
Operation Manual
Page 20
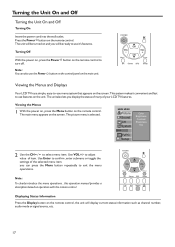
... the Display button on operation with the remote control. MAIN MENU Picture Sound CH System OSD TVPC Setup Color Brightness Contrast Sharpness Tint 2 Use the CH5/6 to use it's features. to -use the Power button on the control panel on the unit. Note: To clearly introduce the menu operations , this operation manual provides a description based on the remote control, the unit will display current status information such as channel number, audio mode or signal source, etc. 17 Viewing the Menus and Displays Your LCD TV...
... the Display button on operation with the remote control. MAIN MENU Picture Sound CH System OSD TVPC Setup Color Brightness Contrast Sharpness Tint 2 Use the CH5/6 to use it's features. to -use the Power button on the control panel on the unit. Note: To clearly introduce the menu operations , this operation manual provides a description based on the remote control, the unit will display current status information such as channel number, audio mode or signal source, etc. 17 Viewing the Menus and Displays Your LCD TV...

Operation Manual
Page 21
... antenna and cable channels. MAIN MENU Picture Sound CH System TV/Cable Channel No Add/Erase Auto Search OSD TVPC Setup Auto Searching Ch. Selecting the Signal Source Before your LCD TV can memorize the available channels, you can memorize and store all the available channels. During the process of the Auto Search, you must specify the type of signal source that is connected to the unit. (i.e., an antenna or cable system) 1 Press Menu to display the menu...
... antenna and cable channels. MAIN MENU Picture Sound CH System TV/Cable Channel No Add/Erase Auto Search OSD TVPC Setup Auto Searching Ch. Selecting the Signal Source Before your LCD TV can memorize the available channels, you can memorize and store all the available channels. During the process of the Auto Search, you must specify the type of signal source that is connected to the unit. (i.e., an antenna or cable system) 1 Press Menu to display the menu...
Operation Manual
Page 23
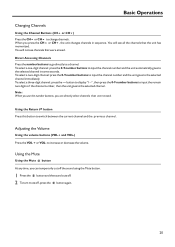
... the sound using the Mute button. 1 Press the button and the sound cuts off. 2 To turn mute off, press the button again. 20 To select a two-digit channel: press the 0-9 number buttons to input the channel number and the unit goes to a channel. Direct Accessing Channels Press the number buttons to go directly to the selected channel immediately. Using the Return button Press this button to change channels. Using the Mute Using the Mute button At any time, you...
... the sound using the Mute button. 1 Press the button and the sound cuts off. 2 To turn mute off, press the button again. 20 To select a two-digit channel: press the 0-9 number buttons to input the channel number and the unit goes to a channel. Direct Accessing Channels Press the number buttons to go directly to the selected channel immediately. Using the Return button Press this button to change channels. Using the Mute Using the Mute button At any time, you...

Operation Manual
Page 25
... Preset Picture Mode Use the P.M button to display the menu main page. Adjusted settings are three preset picture modes (Bright, Soft and Nature) and one user-set picture mode (User). paler Adjusts screen brightness for easier viewing of VOL+ lighter dark picture such as night scenes and black VOL- There are stored in User mode. MAIN MENU Picture Sound CH System OSD TVPC Setup Color Brightness Contrast Sharpness Tint 40 In TV/Video mode Option Color Brightness Contrast Sharpness Tint Function Operation Adjusts color...
... Preset Picture Mode Use the P.M button to display the menu main page. Adjusted settings are three preset picture modes (Bright, Soft and Nature) and one user-set picture mode (User). paler Adjusts screen brightness for easier viewing of VOL+ lighter dark picture such as night scenes and black VOL- There are stored in User mode. MAIN MENU Picture Sound CH System OSD TVPC Setup Color Brightness Contrast Sharpness Tint 40 In TV/Video mode Option Color Brightness Contrast Sharpness Tint Function Operation Adjusts color...
Operation Manual
Page 26
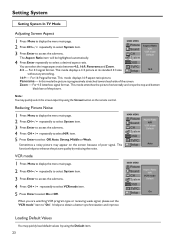
... MENU Picture Sound CH System Aspect Ratio N/R VCR mode Default OSD TVPC Setup On Loading Default Values You may quickly select the screen aspect by using the Default item. 23 OSD You can select the image aspect ratio between 4:3, 16:9, Panorama and Zoom. For 16:9 signal format. This mode displays 16:9 aspect ratio picture. Zoom -- This function helps to access the submenu. Panorama -- When you are watching VCR program type...
... MENU Picture Sound CH System Aspect Ratio N/R VCR mode Default OSD TVPC Setup On Loading Default Values You may quickly select the screen aspect by using the Default item. 23 OSD You can select the image aspect ratio between 4:3, 16:9, Panorama and Zoom. For 16:9 signal format. This mode displays 16:9 aspect ratio picture. Zoom -- This function helps to access the submenu. Panorama -- When you are watching VCR program type...
Operation Manual
Page 27
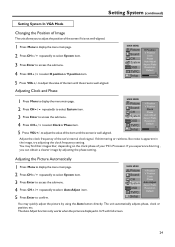
... is displayed in the image, try adjusting the clock frequency setting. MAIN MENU Picture Sound CH System OSD TVPC Setup H Position V Position Clock Phase Auto Adjust Aspect Ratio Resolution Default You may find that images blur, depending on the clock phase of the set's internal clock signal. to adjust the value of the item until the screen is well-aligned. Setting System (continued) Setting System In VGA Mode Changing...
... is displayed in the image, try adjusting the clock frequency setting. MAIN MENU Picture Sound CH System OSD TVPC Setup H Position V Position Clock Phase Auto Adjust Aspect Ratio Resolution Default You may find that images blur, depending on the clock phase of the set's internal clock signal. to adjust the value of the item until the screen is well-aligned. Setting System (continued) Setting System In VGA Mode Changing...

Operation Manual
Page 36
... the closed caption signal from television programs, so home-recorded video tapes also provide closed captioning. You may quickly select CCD mode by using the CCD button directly. For each mode, four channels are broadcast with YPbPr, VGA,DVI. Viewing Closed Captions The unit decodes and displays the closed captions that are available. Not all the programs and videos will offer closed captions. MAIN MENU Picture Sound CH CCD On/Off CCD Mode CC when mute Child Lock System...
... the closed caption signal from television programs, so home-recorded video tapes also provide closed captioning. You may quickly select CCD mode by using the CCD button directly. For each mode, four channels are broadcast with YPbPr, VGA,DVI. Viewing Closed Captions The unit decodes and displays the closed captions that are available. Not all the programs and videos will offer closed captions. MAIN MENU Picture Sound CH CCD On/Off CCD Mode CC when mute Child Lock System...
Operation Manual
Page 41
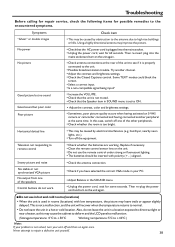
... Closed Captions control. Is a non-compatible signal being input? ! Check if you have selected the correct VGA mode in SOUND menu is set to +40°C ) Note: If your unit off and then on the unit. ! Then re-insert plug into the mains socket. ! This may improve the picture. Do not use in hot and cold rooms (locations) • When the unit is properly connected...
... Closed Captions control. Is a non-compatible signal being input? ! Check if you have selected the correct VGA mode in SOUND menu is set to +40°C ) Note: If your unit off and then on the unit. ! Then re-insert plug into the mains socket. ! This may improve the picture. Do not use in hot and cold rooms (locations) • When the unit is properly connected...
Operation Manual
Page 43
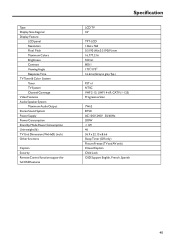
Type Display Size diagonal Display Feature LCD panel Resolution Pixel Pitch Maximum Colors Brightness Contrast Viewing Angle Response Time TV Tuner & Color System Tuner TV System Channel Coverage Video Features Audio Speaker System Maximum Audio Output Stereo Sound System Power Supply Power Consumption Stand by Mode Power Consumption Unit weight (lb) TV Unit Dimension (WxHxD) (inch) Other functions Caption Security Remote Control function support for full OSD features Specification LCD TV 32" TFT-LCD 1366 x 768 0.5190 (H)x 0.5190(V) mm 16,777,216 550 nit 800:1 170O/170O 16.6ms (Gray to gray...
Type Display Size diagonal Display Feature LCD panel Resolution Pixel Pitch Maximum Colors Brightness Contrast Viewing Angle Response Time TV Tuner & Color System Tuner TV System Channel Coverage Video Features Audio Speaker System Maximum Audio Output Stereo Sound System Power Supply Power Consumption Stand by Mode Power Consumption Unit weight (lb) TV Unit Dimension (WxHxD) (inch) Other functions Caption Security Remote Control function support for full OSD features Specification LCD TV 32" TFT-LCD 1366 x 768 0.5190 (H)x 0.5190(V) mm 16,777,216 550 nit 800:1 170O/170O 16.6ms (Gray to gray...


