
Operation Manual
Page 1
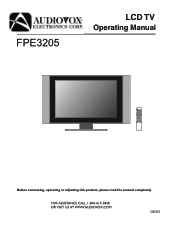
FPE3205 LCD TV Operating Manual Before connecting, operating or adjusting this product, please read the manual completely. FOR ASSISTANCE CALL 1-800-619-3848 OR VISIT US AT WWW.AUDIOVOX.COM 1287357
FPE3205 LCD TV Operating Manual Before connecting, operating or adjusting this product, please read the manual completely. FOR ASSISTANCE CALL 1-800-619-3848 OR VISIT US AT WWW.AUDIOVOX.COM 1287357

Operation Manual
Page 2
... Signal ...21 Selecting a Menu Language...21 Setting Picture...22 Customizing the Picture ...22 Using the Preset Picture Mode ...22 Setting System...23 Setting System In TV Mode ...23 Adjusting Screen Aspect ...23 Reducing Picture Noise ...23 VCR mode ...23 Loading Default Values ...23 Setting System In VGA Mode ...24 Changing the...
... Signal ...21 Selecting a Menu Language...21 Setting Picture...22 Customizing the Picture ...22 Using the Preset Picture Mode ...22 Setting System...23 Setting System In TV Mode ...23 Adjusting Screen Aspect ...23 Reducing Picture Noise ...23 VCR mode ...23 Loading Default Values ...23 Setting System In VGA Mode ...24 Changing the...

Operation Manual
Page 3
... the Size of TVPC Frame ...31 Viewing Picture-by-Picture...31 Using Hotkeys...32 Setting Sleep Timer ...32 Setting Audio Mode...32 Adjusting Back Light of the Panel ...32 Freezing Picture...32 Viewing Closed Captions...33 Turning Closed Caption On or Off...33 Setting Closed Caption......33 Setting CC When Mute ...33 Adjusting Child Lock Settings...34 Child Lock ...34 Turning Child Lock On or Off ...36 Changing the Password ...36 Adjusting the Movie Rating ...36 Adjusting the TV...
... the Size of TVPC Frame ...31 Viewing Picture-by-Picture...31 Using Hotkeys...32 Setting Sleep Timer ...32 Setting Audio Mode...32 Adjusting Back Light of the Panel ...32 Freezing Picture...32 Viewing Closed Captions...33 Turning Closed Caption On or Off...33 Setting Closed Caption......33 Setting CC When Mute ...33 Adjusting Child Lock Settings...34 Child Lock ...34 Turning Child Lock On or Off ...36 Changing the Password ...36 Adjusting the Movie Rating ...36 Adjusting the TV...
Operation Manual
Page 4
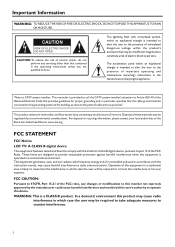
... RAIN OR MOISTURE. For disposal or recycling information, please contact your local authorities or the Electronic Industries Alliance: www.eia.org FCC STATEMENT FCC Notice LCD TV: A CLASS B digital device This equipment has been tested and found to comply with the instruction manual, may be regulated due to the point of mercury...
... RAIN OR MOISTURE. For disposal or recycling information, please contact your local authorities or the Electronic Industries Alliance: www.eia.org FCC STATEMENT FCC Notice LCD TV: A CLASS B digital device This equipment has been tested and found to comply with the instruction manual, may be regulated due to the point of mercury...
Operation Manual
Page 5
... basement, or near any ventilation openings. The wide blade or the third prong are designed for your outlet, consult an electrician for replacement of your LCD TV product, please read and understood before the product is operated. 2. Do not use liquid cleaners or aerosol cleaners. In order to high temperature environment, as...
... basement, or near any ventilation openings. The wide blade or the third prong are designed for your outlet, consult an electrician for replacement of your LCD TV product, please read and understood before the product is operated. 2. Do not use liquid cleaners or aerosol cleaners. In order to high temperature environment, as...
Operation Manual
Page 8
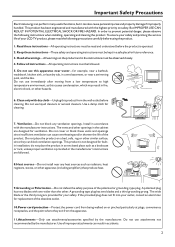
Preparations Using the Remote Control
Preparations Using the Remote Control
Operation Manual
Page 9
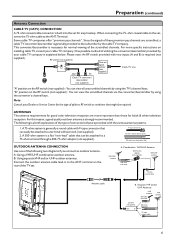
.... This converter/descrambler is necessary for black & white television reception. One possible method of utilizing the converter/descrambler provided by using the TV's channel keys. Note: Consult your Dealer or Service Center for easy hookup. A 75-ohm system is generally a round cable with ...Terminal. Please note: An RF switch provided with the various antenna systems. 1. When connecting the 75- Preparation (continued) Antenna Connection CABLE TV (CATV) CONNECTION A 75-ohm coaxial cable connector is built into the set for the type of splitter, RF switch or combiner that...
.... This converter/descrambler is necessary for black & white television reception. One possible method of utilizing the converter/descrambler provided by using the TV's channel keys. Note: Consult your Dealer or Service Center for easy hookup. A 75-ohm system is generally a round cable with ...Terminal. Please note: An RF switch provided with the various antenna systems. 1. When connecting the 75- Preparation (continued) Antenna Connection CABLE TV (CATV) CONNECTION A 75-ohm coaxial cable connector is built into the set for the type of splitter, RF switch or combiner that...
Operation Manual
Page 10
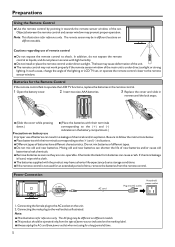
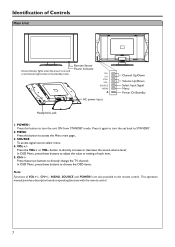
... these two buttons to STANDBY. 2. SOURCE To access signal source select menu. 4. MENU Press this button to turn the set back to directly change the TV channel; VOL+/Press the VOL+ or VOL- Remote Sensor Power Indicator CH+ CHVOL+ VOLSOURCE MENU AC power input Channel Up/Down Volume Up/Down Select...
... these two buttons to STANDBY. 2. SOURCE To access signal source select menu. 4. MENU Press this button to turn the set back to directly change the TV channel; VOL+/Press the VOL+ or VOL- Remote Sensor Power Indicator CH+ CHVOL+ VOLSOURCE MENU AC power input Channel Up/Down Volume Up/Down Select...
Operation Manual
Page 13
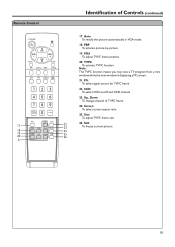
... TVPC frame size 22 26. PBP To activate picture-by-picture 19. TVPC To activate TVPC function Note: The TVPC function means you may view a TV program from a mini window while the main window is displaying a PC screen. 21. Remote Control 17 18 19 20 21 Identification of TVPC frame 24...
... TVPC frame size 22 26. PBP To activate picture-by-picture 19. TVPC To activate TVPC function Note: The TVPC function means you may view a TV program from a mini window while the main window is displaying a PC screen. 21. Remote Control 17 18 19 20 21 Identification of TVPC frame 24...
Operation Manual
Page 14
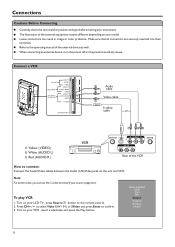
... and VCR. Source Select VGA DVI RF Video1 Video2 SVideo YPbPr 11 Loose connectors can use the S-video terminal if your model. Turn on your LCD TV , press Source button on your VCR , insert a videotape and press the Play button. To play VCR 1. Connect a VCR AV OUT AV2 INPUT AV1 INPUT/ S-VIDEO...
... and VCR. Source Select VGA DVI RF Video1 Video2 SVideo YPbPr 11 Loose connectors can use the S-video terminal if your model. Turn on your LCD TV , press Source button on your VCR , insert a videotape and press the Play button. To play VCR 1. Connect a VCR AV OUT AV2 INPUT AV1 INPUT/ S-VIDEO...
Operation Manual
Page 15
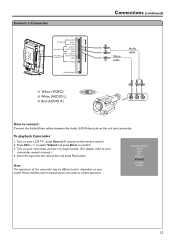
... camcorder owner's manual.) 4. Turn on the unit and camcorder. Please read the owner's manual of the camcorder may be different and is dependent on your LCD TV , press Source button on your model. Connect a Camcorder AV OUT AV2 INPUT AV1 INPUT/ S-VIDEO IN AUDIO R AUDIO L VIDEO AUDIO R AUDIO L/MONO VIDEO AUDIO R AUDIO...
... camcorder owner's manual.) 4. Turn on the unit and camcorder. Please read the owner's manual of the camcorder may be different and is dependent on your LCD TV , press Source button on your model. Connect a Camcorder AV OUT AV2 INPUT AV1 INPUT/ S-VIDEO IN AUDIO R AUDIO L VIDEO AUDIO R AUDIO L/MONO VIDEO AUDIO R AUDIO...

Operation Manual
Page 16
Source Select VGA DVI RF Video1 Video2 SVideo YPbPr Note: The Y, Pb, Pr outputs on the remote control. 2. Turn on your LCD TV , press Source button on your DVD player (or Set-Top Box) . Turn on the DVD player (or Set-Top Box). To play DVD or Set-...
Source Select VGA DVI RF Video1 Video2 SVideo YPbPr Note: The Y, Pb, Pr outputs on the remote control. 2. Turn on your LCD TV , press Source button on your DVD player (or Set-Top Box) . Turn on the DVD player (or Set-Top Box). To play DVD or Set-...
Operation Manual
Page 17
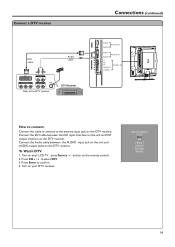
button on the DTV receiver. Connect the Audio cable between the DVI input interface on the unit and DVI output interface on your LCD TV , press Source 2. Turn on the DTV receiver . Source Select VGA DVI RF Video1 Video2 SVideo YPbPr 14 To Watch DTV 1. Connect the DVI cable between ...
button on the DTV receiver. Connect the Audio cable between the DVI input interface on the unit and DVI output interface on your LCD TV , press Source 2. Turn on the DTV receiver . Source Select VGA DVI RF Video1 Video2 SVideo YPbPr 14 To Watch DTV 1. Connect the DVI cable between ...

Operation Manual
Page 18
Turn on your PC and check for PC system requirements. 5. Press CH5/6 to confirm. 4. Turn on your LCD TV , press Source button on the remote control. 2. Source Select VGA DVI RF Video1 Video2 SVideo YPbPr 15 Press Enter to select VGA. 3. Connections (continued) Connect a ...
Turn on your PC and check for PC system requirements. 5. Press CH5/6 to confirm. 4. Turn on your LCD TV , press Source button on the remote control. 2. Source Select VGA DVI RF Video1 Video2 SVideo YPbPr 15 Press Enter to select VGA. 3. Connections (continued) Connect a ...

Operation Manual
Page 19
... inputs. 16 To record program 1. Turn on your VCR, insert a videotape for recording Connect the Audio/Video cables between the Audio (L/R)/Video jacks on your LCD TV, select a program you wish to record. 2. Turn on the unit and VCR. Connect a VCR for Recording Connections (continued) AV OUT AV2 INPUT AV1 INPUT/ S-VIDEO...
... inputs. 16 To record program 1. Turn on your VCR, insert a videotape for recording Connect the Audio/Video cables between the Audio (L/R)/Video jacks on your LCD TV, select a program you wish to record. 2. Turn on the unit and VCR. Connect a VCR for Recording Connections (continued) AV OUT AV2 INPUT AV1 INPUT/ S-VIDEO...
Operation Manual
Page 20
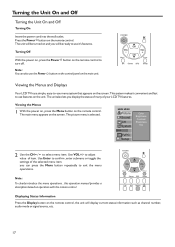
... on the unit. you can also use it convenient and fast to adjust value of the selected menu item. Viewing the Menus and Displays Your LCD TV has a simple, easy-to turn off. Viewing the Menus 1 With the power on, press the Menu button on the remote control to -use features ... Contrast Sharpness Tint 2 Use the CH5/6 to use the Power button on the control panel on and you display the status of many of your LCD TV features. Note: To clearly introduce the menu operations , this operation manual provides a description based on the remote control, the unit will display current status ...
... on the unit. you can also use it convenient and fast to adjust value of the selected menu item. Viewing the Menus and Displays Your LCD TV has a simple, easy-to turn off. Viewing the Menus 1 With the power on, press the Menu button on the remote control to -use features ... Contrast Sharpness Tint 2 Use the CH5/6 to use the Power button on the control panel on and you display the status of many of your LCD TV features. Note: To clearly introduce the menu operations , this operation manual provides a description based on the remote control, the unit will display current status ...

Operation Manual
Page 21
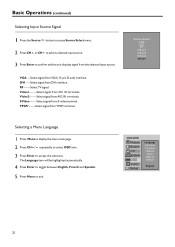
Selecting the Signal Source Before your LCD TV can memorize the available channels, you must specify the type of the Auto Search, you can memorize and store all the available channels. The TV/Cable menu item will begin memorizing all the available channels for both antenna and cable channels. MAIN MENU Picture ... (i.e., an antenna or cable system) 1 Press Menu to display the menu main page. 2 Press CH5/6 repeatedly to select CH item. 3 Press Enter to toggle TV or Cable. Num: 8 Menu to exit 18 Memorizing the Channels Your LCD TV can press Menu to an antenna, please select...
Selecting the Signal Source Before your LCD TV can memorize the available channels, you must specify the type of the Auto Search, you can memorize and store all the available channels. The TV/Cable menu item will begin memorizing all the available channels for both antenna and cable channels. MAIN MENU Picture ... (i.e., an antenna or cable system) 1 Press Menu to display the menu main page. 2 Press CH5/6 repeatedly to select CH item. 3 Press Enter to toggle TV or Cable. Num: 8 Menu to exit 18 Memorizing the Channels Your LCD TV can press Menu to an antenna, please select...

Operation Manual
Page 22
... to add, the selected channel will be added. MAIN MENU Picture Sound CH System OSD TVPC Setup TV/Cable Channel No Add/Erase Auto Search 8 MAIN MENU Picture Sound CH System OSD TVPC Setup TV/Cable Channel No Add/Erase Auto Search Erase 19 When the item is set to erase, the...
... to add, the selected channel will be added. MAIN MENU Picture Sound CH System OSD TVPC Setup TV/Cable Channel No Add/Erase Auto Search 8 MAIN MENU Picture Sound CH System OSD TVPC Setup TV/Cable Channel No Add/Erase Auto Search Erase 19 When the item is set to erase, the...
Operation Manual
Page 24
RF ------Select TV signal. DVI ----Select signal from YPbPr terminal. YPbPr ------Select signal from DVI interface. Video1-------Select signal from AV2 IN terminals. Video2-------Select signal from AV1 ...
RF ------Select TV signal. DVI ----Select signal from YPbPr terminal. YPbPr ------Select signal from DVI interface. Video1-------Select signal from AV2 IN terminals. Video2-------Select signal from AV1 ...

Operation Manual
Page 25
...) and one user-set picture mode (User). Bright 22 MAIN MENU Picture Sound CH System OSD TVPC Setup Color Brightness Contrast Sharpness Tint 40 In TV/Video mode Option Color Brightness Contrast Sharpness Tint Function Operation Adjusts color saturation. VOL+ stronger VOL- There are stored in User mode. Setting Picture Customizing...
...) and one user-set picture mode (User). Bright 22 MAIN MENU Picture Sound CH System OSD TVPC Setup Color Brightness Contrast Sharpness Tint 40 In TV/Video mode Option Color Brightness Contrast Sharpness Tint Function Operation Adjusts color saturation. VOL+ stronger VOL- There are stored in User mode. Setting Picture Customizing...


