

Operation Manual
Page 2
... Adjusting the Volume ...20 Selecting Input Source Signal ...21 Selecting a Menu Language...21 Setting Picture...22 Customizing the Picture ...22 Using the Preset Picture Mode ...22 Setting System...23 Setting System In TV Mode ...23 Adjusting Screen Aspect ...23 Reducing Picture Noise ...23 VCR mode ...23 Loading Default Values ...23 Setting System In VGA Mode...
... Adjusting the Volume ...20 Selecting Input Source Signal ...21 Selecting a Menu Language...21 Setting Picture...22 Customizing the Picture ...22 Using the Preset Picture Mode ...22 Setting System...23 Setting System In TV Mode ...23 Adjusting Screen Aspect ...23 Reducing Picture Noise ...23 VCR mode ...23 Loading Default Values ...23 Setting System In VGA Mode...

Operation Manual
Page 3
...TVPC Frame 31 Adjusting the Size of TVPC Frame ...31 Viewing Picture-by-Picture...31 Using Hotkeys...32 Setting Sleep Timer ...32 Setting Audio Mode...32 Adjusting Back Light of the Panel ...32 Freezing Picture...32 Viewing Closed Captions...33 Turning Closed Caption On or Off...33 ...Setting Closed Caption...33 Setting CC When Mute ...33 Adjusting Child Lock Settings...34 Child Lock ...34 Turning Child Lock On or Off ...36 Changing the Password ...36 Adjusting the Movie Rating ...36 Adjusting the TV...
...TVPC Frame 31 Adjusting the Size of TVPC Frame ...31 Viewing Picture-by-Picture...31 Using Hotkeys...32 Setting Sleep Timer ...32 Setting Audio Mode...32 Adjusting Back Light of the Panel ...32 Freezing Picture...32 Viewing Closed Captions...33 Turning Closed Caption On or Off...33 ...Setting Closed Caption...33 Setting CC When Mute ...33 Adjusting Child Lock Settings...34 Child Lock ...34 Turning Child Lock On or Off ...36 Changing the Password ...36 Adjusting the Movie Rating ...36 Adjusting the TV...
Operation Manual
Page 7
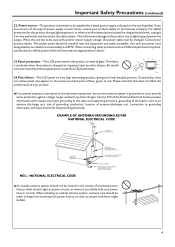
...as a fixed point of power supply to be changed. Please note that this product is a very high technology product, giving you finely detailed pictures. Therefore, it from the wall outlet and disconnect the cable system. If you should be supplied by broken glass pieces in this does not ... for this product during a lightning storm, or when it is left unattended and unused for protection against electric shock. 23.Panel protection---The LCD panel used with another power supply voltage, the power cable must be injured by a listed power supply indicated on the screen as VCRs and...
...as a fixed point of power supply to be changed. Please note that this product is a very high technology product, giving you finely detailed pictures. Therefore, it from the wall outlet and disconnect the cable system. If you should be supplied by broken glass pieces in this does not ... for this product during a lightning storm, or when it is left unattended and unused for protection against electric shock. 23.Panel protection---The LCD panel used with another power supply voltage, the power cable must be injured by a listed power supply indicated on the screen as VCRs and...
Operation Manual
Page 12
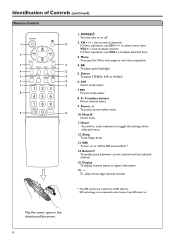
POWER Turn the unit on or off 2. In Menu operation, use CH5/6 to select menu item; S.M 7 15 Sound mode select 7 P.M 8 Picture mode select 8. 0~9 number buttons Direct channel select 9. VOL+/-: Use to adjust selected item; 2 3. Stereo 5 13 To select STEREO, SAP or MONO 6 14 6. Mute Sound mute ...
POWER Turn the unit on or off 2. In Menu operation, use CH5/6 to select menu item; S.M 7 15 Sound mode select 7 P.M 8 Picture mode select 8. 0~9 number buttons Direct channel select 9. VOL+/-: Use to adjust selected item; 2 3. Stereo 5 13 To select STEREO, SAP or MONO 6 14 6. Mute Sound mute ...
Operation Manual
Page 13
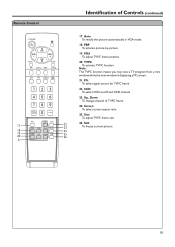
...off and CCD channel 23. Screen To select screen aspect ratio 25. TVPC To activate TVPC function Note: The TVPC function means you may view a TV program from a mini window while the main window is displaying a PC screen. 21. POS To adjust TVPC frame position 20. Remote Control 17 18...24. To select signal source for TVPC frame 22. Up, Down To change channel of Controls (continued) 17. Still 23 To freeze current picture 24 25 26 10 PBP To activate picture-by-picture 19. Auto To rectify the picture automatically in VGA mode 18. Size To adjust TVPC frame size 22 26.
...off and CCD channel 23. Screen To select screen aspect ratio 25. TVPC To activate TVPC function Note: The TVPC function means you may view a TV program from a mini window while the main window is displaying a PC screen. 21. POS To adjust TVPC frame position 20. Remote Control 17 18...24. To select signal source for TVPC frame 22. Up, Down To change channel of Controls (continued) 17. Still 23 To freeze current picture 24 25 26 10 PBP To activate picture-by-picture 19. Auto To rectify the picture automatically in VGA mode 18. Size To adjust TVPC frame size 22 26.
Operation Manual
Page 20
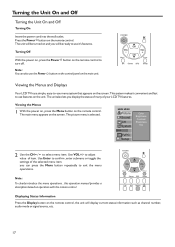
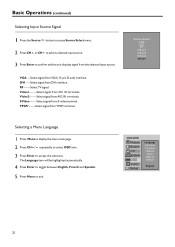
... on the remote control. Viewing the Menus 1 With the power on, press the Menu button on and you display the status of many of your LCD TV features. Turning Off With the power on, press the Power button on the unit. you can also use features on the remote control to confirm... Off Turning On Insert the power cord into the wall outlet. Viewing the Menus and Displays Your LCD TV has a simple, easy-to adjust value of the selected menu item. to -use it's features. The picture menu is selected. The unit will display current status information such as channel number, audio mode or...
... on the remote control. Viewing the Menus 1 With the power on, press the Menu button on and you display the status of many of your LCD TV features. Turning Off With the power on, press the Power button on the unit. you can also use features on the remote control to confirm... Off Turning On Insert the power cord into the wall outlet. Viewing the Menus and Displays Your LCD TV has a simple, easy-to adjust value of the selected menu item. to -use it's features. The picture menu is selected. The unit will display current status information such as channel number, audio mode or...

Operation Manual
Page 21
... No Add/Erase Auto Search MAIN MENU Picture Sound CH System OSD TVPC Setup TV/Cable Channel No Add/Erase Auto Search Cable Storing Channels in memory automatically. The unit will be highlighted automatically. 4 Press Enter to toggle TV or Cable. Selecting the Signal Source Before your LCD TV can press Menu to access the...
... No Add/Erase Auto Search MAIN MENU Picture Sound CH System OSD TVPC Setup TV/Cable Channel No Add/Erase Auto Search Cable Storing Channels in memory automatically. The unit will be highlighted automatically. 4 Press Enter to toggle TV or Cable. Selecting the Signal Source Before your LCD TV can press Menu to access the...

Operation Manual
Page 22
... added. to select a channel number you want to toggle Add or Erase. MAIN MENU Picture Sound CH System OSD TVPC Setup TV/Cable Channel No Add/Erase Auto Search 8 MAIN MENU Picture Sound CH System OSD TVPC Setup TV/Cable Channel No Add/Erase Auto Search Erase 19 Memorizing the Channels (continued) Adding and...
... added. to select a channel number you want to toggle Add or Erase. MAIN MENU Picture Sound CH System OSD TVPC Setup TV/Cable Channel No Add/Erase Auto Search 8 MAIN MENU Picture Sound CH System OSD TVPC Setup TV/Cable Channel No Add/Erase Auto Search Erase 19 Memorizing the Channels (continued) Adding and...
Operation Manual
Page 24
... menu. 2 Press CH5 or CH6 to select a desired input source. 3 Press Enter to exit. RF ------Select TV signal. Video1-------Select signal from AV2 IN terminals. Video2-------Select signal from AV1 IN terminals. MAIN MENU Picture Sound CH System OSD TVPC Setup Language H Position V Position Halftone Zoom OSD off Default English 21 YPbPr...
... menu. 2 Press CH5 or CH6 to select a desired input source. 3 Press Enter to exit. RF ------Select TV signal. Video1-------Select signal from AV2 IN terminals. Video2-------Select signal from AV1 IN terminals. MAIN MENU Picture Sound CH System OSD TVPC Setup Language H Position V Position Halftone Zoom OSD off Default English 21 YPbPr...

Operation Manual
Page 25
... settings are three preset picture modes (Bright, Soft and Nature) and one user-set picture mode (User). VOL+ stronger VOL- VOL+ greenish VOL- MAIN MENU Picture Sound CH System OSD TVPC Setup Color Brightness Contrast Sharpness Tint 40 In TV/Video mode Option Color Brightness... Contrast Sharpness Tint Function Operation Adjusts color saturation. Adjusts image contrast. softer Adjusts tint for a normal picture. There are stored in User mode. Nature: Select for image...
... settings are three preset picture modes (Bright, Soft and Nature) and one user-set picture mode (User). VOL+ stronger VOL- VOL+ greenish VOL- MAIN MENU Picture Sound CH System OSD TVPC Setup Color Brightness Contrast Sharpness Tint 40 In TV/Video mode Option Color Brightness... Contrast Sharpness Tint Function Operation Adjusts color saturation. Adjusts image contrast. softer Adjusts tint for a normal picture. There are stored in User mode. Nature: Select for image...
Operation Manual
Page 26
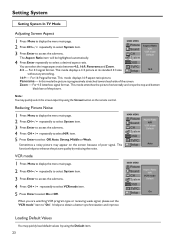
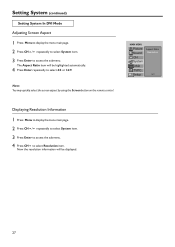
...OSD TVPC Setup On Loading Default Values You may quickly select the screen aspect by using the Default item. 23 Setting System Setting System In TV Mode Adjusting Screen Aspect 1 Press Menu to display the menu main page. 2 Press CH5/6 repeatedly to select System item. 3 Press ... N/R VCR mode Default 4 Press Enter repeatedly to select Off, Auto, Strong, Middle or Weak. For 4:3 signal format. For 4:3 letterbox signal format. Reducing Picture Noise 1 Press Menu to display the menu main page. 2 Press CH5/6 repeatedly to select System item. 3 Press Enter to access the submenu. 4 Press CH5...
...OSD TVPC Setup On Loading Default Values You may quickly select the screen aspect by using the Default item. 23 Setting System Setting System In TV Mode Adjusting Screen Aspect 1 Press Menu to display the menu main page. 2 Press CH5/6 repeatedly to select System item. 3 Press ... N/R VCR mode Default 4 Press Enter repeatedly to select Off, Auto, Strong, Middle or Weak. For 4:3 signal format. For 4:3 letterbox signal format. Reducing Picture Noise 1 Press Menu to display the menu main page. 2 Press CH5/6 repeatedly to select System item. 3 Press Enter to access the submenu. 4 Press CH5...
Operation Manual
Page 27
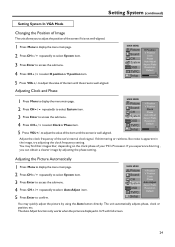
...can obtain a clearer image by using the Auto button directly. to select H position or V position item. 5 Press VOL+/- MAIN MENU Picture Sound CH System OSD TVPC Setup H Position V Position Clock Phase Auto Adjust Aspect Ratio Resolution Default 40 Adjust the clock frequency of the item... until the screen is well-aligned. Adjusting the Picture Automatically 1 Press Menu to display the menu main page. 2 Press CH5/6 repeatedly to select System item. 3 Press Enter to access the submenu...
...can obtain a clearer image by using the Auto button directly. to select H position or V position item. 5 Press VOL+/- MAIN MENU Picture Sound CH System OSD TVPC Setup H Position V Position Clock Phase Auto Adjust Aspect Ratio Resolution Default 40 Adjust the clock frequency of the item... until the screen is well-aligned. Adjusting the Picture Automatically 1 Press Menu to display the menu main page. 2 Press CH5/6 repeatedly to select System item. 3 Press Enter to access the submenu...
Operation Manual
Page 28
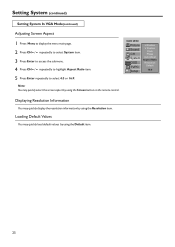
MAIN MENU Picture Sound CH System OSD TVPC Setup H Position V Position Clock Phase Auto Adjust Aspect Ratio Resolution Default 16:9 Displaying Resolution Information You may quickly display the ...
MAIN MENU Picture Sound CH System OSD TVPC Setup H Position V Position Clock Phase Auto Adjust Aspect Ratio Resolution Default 16:9 Displaying Resolution Information You may quickly display the ...

Operation Manual
Page 29
...menu main page. 2 Press CH5/6 repeatedly to select System item. 3 Press Enter to select a desired aspect ratio. Adjusting Screen Aspect MAIN MENU Picture Sound CH System Phase Aspect Ratio N/R Default OSD TVPC 40 Setup 1 Press Menu to display the menu main page. 2 Press CH5/6 repeatedly to...select the image aspect ratio between 4:3, 16:9, Panorama and Zoom. Note: You may quickly load default values by using the Default item. 26 Reducing Picture Noise 1 Press Menu to display the menu main page. 2 Press CH5/6 repeatedly to select System item. 3 Press Enter to access the submenu....
...menu main page. 2 Press CH5/6 repeatedly to select System item. 3 Press Enter to select a desired aspect ratio. Adjusting Screen Aspect MAIN MENU Picture Sound CH System Phase Aspect Ratio N/R Default OSD TVPC 40 Setup 1 Press Menu to display the menu main page. 2 Press CH5/6 repeatedly to...select the image aspect ratio between 4:3, 16:9, Panorama and Zoom. Note: You may quickly load default values by using the Default item. 26 Reducing Picture Noise 1 Press Menu to display the menu main page. 2 Press CH5/6 repeatedly to select System item. 3 Press Enter to access the submenu....
Operation Manual
Page 30
Now the resolution information will be displayed. 27 MAIN MENU Picture Aspect Ratio Sound Resolution CH System OSD TVPC Setup 16:9 Displaying Resolution Information 1 Press Menu to display the menu main page. 2 Press CH5/6 repeatedly to ...
Now the resolution information will be displayed. 27 MAIN MENU Picture Aspect Ratio Sound Resolution CH System OSD TVPC Setup 16:9 Displaying Resolution Information 1 Press Menu to display the menu main page. 2 Press CH5/6 repeatedly to ...

Operation Manual
Page 31
... CH5/6 repeatedly to select the option items you want to provide a natural 3D sound field. * The SRS symbol are trademark of Balance item. MAIN MENU Picture Sound CH System OSD TVPC Setup Volume Bass Treble Balance Mute Speaker Head Phone 10 Option Volume Function Adjusts volume value. Adjusted settings are stored...
... CH5/6 repeatedly to select the option items you want to provide a natural 3D sound field. * The SRS symbol are trademark of Balance item. MAIN MENU Picture Sound CH System OSD TVPC Setup Volume Bass Treble Balance Mute Speaker Head Phone 10 Option Volume Function Adjusts volume value. Adjusted settings are stored...

Operation Manual
Page 32
... Press CH5/6 repeatedly to select OSD Off item. 5 Press Enter repeatedly to select Halftone item. 5 Press VOL+/- Zooming OSD Menu MAIN MENU Picture Sound CH System OSD TVPC Setup Language H Position V Position Halftone Zoom OSD off Default 10 1 Press Menu to display the menu main page...repeatedly to select OSD item. 3 Press Enter to access the submenu. 4 Press CH5/6 repeatedly to select a proper time. Adjusting OSD Transparency MAIN MENU Picture Sound CH System OSD TVPC Setup Language H Position V Position Halftone Zoom OSD off Default 4 1 Press Menu to display the menu main page. 2 ...
... Press CH5/6 repeatedly to select OSD Off item. 5 Press Enter repeatedly to select Halftone item. 5 Press VOL+/- Zooming OSD Menu MAIN MENU Picture Sound CH System OSD TVPC Setup Language H Position V Position Halftone Zoom OSD off Default 10 1 Press Menu to display the menu main page...repeatedly to select OSD item. 3 Press Enter to access the submenu. 4 Press CH5/6 repeatedly to select a proper time. Adjusting OSD Transparency MAIN MENU Picture Sound CH System OSD TVPC Setup Language H Position V Position Halftone Zoom OSD off Default 4 1 Press Menu to display the menu main page. 2 ...
Operation Manual
Page 33
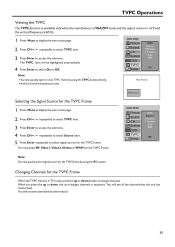
...to access the submenu. You may quickly open or close TVPC frame by using the TVPC button directly. 4Audio is from the main picture only. TVPC Frame MAIN MENU Picture Sound CH System OSD TVPC Setup TVPC Source H Position V Position Size PBP RF Note: You may quickly select signal source for the... TVPC Frame When the TVPC frame is in TV mode, press the up or down button to select On or Off. TVPC Operations Viewing ...
...to access the submenu. You may quickly open or close TVPC frame by using the TVPC button directly. 4Audio is from the main picture only. TVPC Frame MAIN MENU Picture Sound CH System OSD TVPC Setup TVPC Source H Position V Position Size PBP RF Note: You may quickly select signal source for the... TVPC Frame When the TVPC frame is in TV mode, press the up or down button to select On or Off. TVPC Operations Viewing ...
Operation Manual
Page 34
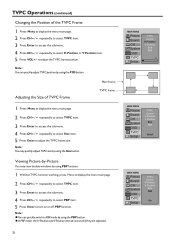
... V Position item. 5 Press VOL+/- Note: to adjust the TVPC frame size. Note: You can quickly adjust TVPC position by using the POS button. Viewing Picture-by-Picture You may quickly adjust TVPC size by using the Size button. TVPC Operations (continued) Changing the Position of TVPC Frame Main frame TVPC frame 1 Press...
... V Position item. 5 Press VOL+/- Note: to adjust the TVPC frame size. Note: You can quickly adjust TVPC position by using the POS button. Viewing Picture-by-Picture You may quickly adjust TVPC size by using the Size button. TVPC Operations (continued) Changing the Position of TVPC Frame Main frame TVPC frame 1 Press...
Operation Manual
Page 35
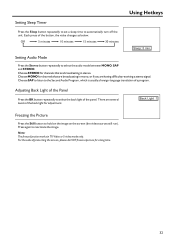
Choose MONO for adjustment. Back Light 1 Freezing the Picture Press the Still button to select the audio mode between MONO, SAP and STEREO. For the sake of the button, the value changes as below. ... again to automatically turn off the unit. Each press of protecting the screen, please do NOT freeze a picture for channels that are broadcasting in TV, Video or S-video mode only. Choose STEREO for a long time. 32 Off 5 minutes 10 minutes 15 minutes 30 minutes Using Hotkeys Sleep: 5 min. There are having difficulty receiving...
Choose MONO for adjustment. Back Light 1 Freezing the Picture Press the Still button to select the audio mode between MONO, SAP and STEREO. For the sake of the button, the value changes as below. ... again to automatically turn off the unit. Each press of protecting the screen, please do NOT freeze a picture for channels that are broadcasting in TV, Video or S-video mode only. Choose STEREO for a long time. 32 Off 5 minutes 10 minutes 15 minutes 30 minutes Using Hotkeys Sleep: 5 min. There are having difficulty receiving...

