

User Manual
Page 6
... television equipment during a lightning storm, or when it can cause the product to be moved with the utmost care. High Voltage exists in a risk of time, unplug it from the trolley. If the power cord or the plug is made of unauthorized parts can result in fire, electric shock and/or...
... television equipment during a lightning storm, or when it can cause the product to be moved with the utmost care. High Voltage exists in a risk of time, unplug it from the trolley. If the power cord or the plug is made of unauthorized parts can result in fire, electric shock and/or...
User Manual
Page 7
For disposal or recycling information please contact your community due to a minimum viewing level * DO NOT display the fixed image for extended periods of time * Turn the power OFF when not in the form of stationary fixed images. FPE2000 TV unit 2.. Remote Control (Model Specific) 5.. Important Safety Cautions Important Information ...
For disposal or recycling information please contact your community due to a minimum viewing level * DO NOT display the fixed image for extended periods of time * Turn the power OFF when not in the form of stationary fixed images. FPE2000 TV unit 2.. Remote Control (Model Specific) 5.. Important Safety Cautions Important Information ...

User Manual
Page 11
Batteries for the Remote Control If the remote control fails to operate the LCD TV functions, replace the batteries in the remote control. 1 Open the battery cover. 2 Insert two size-AAA batteries. 3 Replace the cover and slide in reverse until the lock snaps. Preparing the Remote Control Please install the batteries before using the remote control.
Batteries for the Remote Control If the remote control fails to operate the LCD TV functions, replace the batteries in the remote control. 1 Open the battery cover. 2 Insert two size-AAA batteries. 3 Replace the cover and slide in reverse until the lock snaps. Preparing the Remote Control Please install the batteries before using the remote control.
User Manual
Page 14
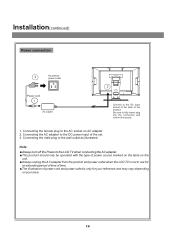
Connecting the male plug to the DC power input of the product. Connecting the AC adapter to the wall outlet as illustrated. Note: Be sure to the DC input socket of the back of the set. 3. Installation(continued) Power connection Household 3 power outlet Power cord 1 AC adapter 2 Connect to fully insert plug into the connection and confirm it is secure. 1. Connecting the female plug to the AC socket on AC adapter. 2.
Connecting the male plug to the DC power input of the product. Connecting the AC adapter to the wall outlet as illustrated. Note: Be sure to the DC input socket of the back of the set. 3. Installation(continued) Power connection Household 3 power outlet Power cord 1 AC adapter 2 Connect to fully insert plug into the connection and confirm it is secure. 1. Connecting the female plug to the AC socket on AC adapter. 2.
User Manual
Page 21
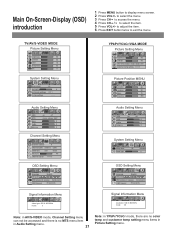
... color 18 sharpness 32 tint 0 System Setting Menu blue screen backlight ccd mode settings V-chip settings on bass treble balance off 0 0 0 System Setting Menu sleep time Back light 20 minutes 6 OSD Setting Menu language English OSD position OSD background opaque translucent OSD timeout 30 seconds Signal Information Menu video type: 650...
... color 18 sharpness 32 tint 0 System Setting Menu blue screen backlight ccd mode settings V-chip settings on bass treble balance off 0 0 0 System Setting Menu sleep time Back light 20 minutes 6 OSD Setting Menu language English OSD position OSD background opaque translucent OSD timeout 30 seconds Signal Information Menu video type: 650...
User Manual
Page 27
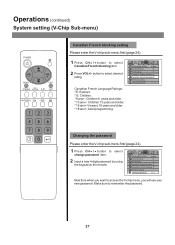
...+: Children 8 years and older. * 13 ans+: Children 13 years and older. * 16 ans+:Viewers 16 years and older. * 18 ans+: Adult programming. change password * * * * Next time when you want to access the V-chip menu, you will use your new password. Make sure to select Canadian French blocking item. 2 Press VOL+/- Changing...
...+: Children 8 years and older. * 13 ans+: Children 13 years and older. * 16 ans+:Viewers 16 years and older. * 18 ans+: Adult programming. change password * * * * Next time when you want to access the V-chip menu, you will use your new password. Make sure to select Canadian French blocking item. 2 Press VOL+/- Changing...
User Manual
Page 34
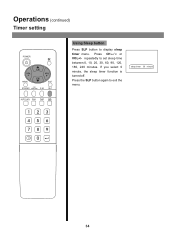
repeatedly to exit the menu. sleep timer 30 minute 34 Press the SLP button again to set sleep time between:0, 10, 20, 30, 60, 90, 120, 180, 240 minutes. Operations (continued) Timer setting 耋晤憮 S.M Using Sleep button Press SLP button to display sleep timer menu. If you select 0 minute, the sleep timer function is turned off. Press CH5/6 or VOL+/-
repeatedly to exit the menu. sleep timer 30 minute 34 Press the SLP button again to set sleep time between:0, 10, 20, 30, 60, 90, 120, 180, 240 minutes. Operations (continued) Timer setting 耋晤憮 S.M Using Sleep button Press SLP button to display sleep timer menu. If you select 0 minute, the sleep timer function is turned off. Press CH5/6 or VOL+/-
User Manual
Page 43
...) 800x600 VGA Brightness * 500 cd/m² Contrast ratio * 500:1 Viewing Angle 160 (H) / 120 (V) Dot Pitch 0.51 x 0.51mm Maximum Color 16.7M colors (8-bit/color) Response time (Tr, Td) 5ms (Tr) / 11ms (Td) = 16ms (Tr,Td) Backlight life** 50,000hr TV Reception TV System NTSC (only) Channel 181 Channel Cable/Air Antenna...
...) 800x600 VGA Brightness * 500 cd/m² Contrast ratio * 500:1 Viewing Angle 160 (H) / 120 (V) Dot Pitch 0.51 x 0.51mm Maximum Color 16.7M colors (8-bit/color) Response time (Tr, Td) 5ms (Tr) / 11ms (Td) = 16ms (Tr,Td) Backlight life** 50,000hr TV Reception TV System NTSC (only) Channel 181 Channel Cable/Air Antenna...