
P4PE2-X User Manual
Page 3
... About this guide vii P4PE2-X specifications summary viii Chapter 1: Product introduction 1.1 Welcome 1-2 1.2 Package contents 1-2 1.3 Special features 1-2 1.3.1 Product Highlights 1-2 1.3.2 Unique ASUS features 1-3 1.4 Before you proceed 1-4 1.5 Motherboard overview 1-5 1.5.1 Motherboard layout 1-5 1.5.2 Placement direction 1-6 1.5.3 Screw holes 1-6 1.6 Central Processing Unit (CPU 1-7 ... connectors 1-16 1.10.2 Internal connectors 1-17 Chapter 2: BIOS Information 2.1 Managing and updating your BIOS 2-2 2.1.1 Creating a bootable floppy disk 2-2 2.1.2 Using AFUDOS to update the...
... About this guide vii P4PE2-X specifications summary viii Chapter 1: Product introduction 1.1 Welcome 1-2 1.2 Package contents 1-2 1.3 Special features 1-2 1.3.1 Product Highlights 1-2 1.3.2 Unique ASUS features 1-3 1.4 Before you proceed 1-4 1.5 Motherboard overview 1-5 1.5.1 Motherboard layout 1-5 1.5.2 Placement direction 1-6 1.5.3 Screw holes 1-6 1.6 Central Processing Unit (CPU 1-7 ... connectors 1-16 1.10.2 Internal connectors 1-17 Chapter 2: BIOS Information 2.1 Managing and updating your BIOS 2-2 2.1.1 Creating a bootable floppy disk 2-2 2.1.2 Using AFUDOS to update the...

P4PE2-X User Manual
Page 4
Safeguards Contents 2.1.4 Using ASUS EZ Flash to update the BIOS 2-5 2.1.5 Recovering the BIOS with CrashFree BIOS 2 ....... 2-6 2.2 BIOS Setup program 2-8 2.2.1 BIOS menu screen 2-9 2.2.2 Menu bar 2-9 2.2.3 Navigation keys 2-9 2.2.4 Menu items 2-10 2.2.5 Sub-menu items 2-10 2.2.6 Configuration fields 2-10 2.2.7 Pop-up window 2-10 2.2.8 Scroll bar 2-10 2.2.9 General help 2-...
Safeguards Contents 2.1.4 Using ASUS EZ Flash to update the BIOS 2-5 2.1.5 Recovering the BIOS with CrashFree BIOS 2 ....... 2-6 2.2 BIOS Setup program 2-8 2.2.1 BIOS menu screen 2-9 2.2.2 Menu bar 2-9 2.2.3 Navigation keys 2-9 2.2.4 Menu items 2-10 2.2.5 Sub-menu items 2-10 2.2.6 Configuration fields 2-10 2.2.7 Pop-up window 2-10 2.2.8 Scroll bar 2-10 2.2.9 General help 2-...

P4PE2-X User Manual
Page 9
BIOS features Industry standard Manageability Form Factor Support CD contents 3Mb Flash EEPROM, AMI BIOS with enhanced ACPI, DMI, PnP, TCAV, SM BIOS2.3, ASUS C.P.R., ASUS EZ Flash, ASUS CrashFree BIOS2 PCI 2.2, USB 2.0 WOL/WOR by PME ATX form factor: 12 in x 7.0 in (30.5 cm x 17.8 cm) Device drivers ASUS PC Probe ASUS LiveUpdate Anti-virus utility * Specifications are subject to change without notice. ix
BIOS features Industry standard Manageability Form Factor Support CD contents 3Mb Flash EEPROM, AMI BIOS with enhanced ACPI, DMI, PnP, TCAV, SM BIOS2.3, ASUS C.P.R., ASUS EZ Flash, ASUS CrashFree BIOS2 PCI 2.2, USB 2.0 WOL/WOR by PME ATX form factor: 12 in x 7.0 in (30.5 cm x 17.8 cm) Device drivers ASUS PC Probe ASUS LiveUpdate Anti-virus utility * Specifications are subject to change without notice. ix
P4PE2-X User Manual
Page 13
... in 0.025V increments over defaults, the SFS (Stepless Frequency Selection) feature, an adjustable FSB/DDR ratio and the ASUS C.P.R. (CPU Parameter Recall). 1.3.2 Unique ASUS features CrashFree BIOS 2 This feature allows you to personalize and add style to your system performance. See pages 2-24. USB 2.0 ... Mbps on the CPU FSB and DDR type. ASUS MyLogo2™ This new feature present in case when the BIOS codes and data are corrupted. ASUS EZ Flash BIOS With the ASUS EZ Flash, you can easily update the system BIOS even before loading the operating system. DDR400 memory ...
... in 0.025V increments over defaults, the SFS (Stepless Frequency Selection) feature, an adjustable FSB/DDR ratio and the ASUS C.P.R. (CPU Parameter Recall). 1.3.2 Unique ASUS features CrashFree BIOS 2 This feature allows you to personalize and add style to your system performance. See pages 2-24. USB 2.0 ... Mbps on the CPU FSB and DDR type. ASUS MyLogo2™ This new feature present in case when the BIOS codes and data are corrupted. ASUS EZ Flash BIOS With the ASUS EZ Flash, you can easily update the system BIOS even before loading the operating system. DDR400 memory ...
P4PE2-X User Manual
Page 14
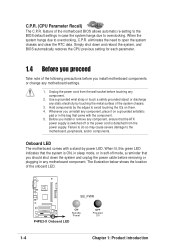
..., and/or components. Failure to do so may cause severe damage to overclocking, C.P.R. The illustration below shows the location of the motherboard BIOS allows automatic re-setting to overclocking. SB_PWR P4PE2-X ® ON Standby Power P4PE2-X Onboard LED OFF Powered Off 1-4 Chapter 1: Product introduction...in soft-off or the power cord is switched off mode, a reminder that you should shut down and reboot the system, and BIOS automatically restores the CPU previous setting for each parameter. 1.4 Before you proceed Take note of the system chassis. 3. Unplug the power ...
..., and/or components. Failure to do so may cause severe damage to overclocking, C.P.R. The illustration below shows the location of the motherboard BIOS allows automatic re-setting to overclocking. SB_PWR P4PE2-X ® ON Standby Power P4PE2-X Onboard LED OFF Powered Off 1-4 Chapter 1: Product introduction...in soft-off or the power cord is switched off mode, a reminder that you should shut down and reboot the system, and BIOS automatically restores the CPU previous setting for each parameter. 1.4 Before you proceed Take note of the system chassis. 3. Unplug the power ...
P4PE2-X User Manual
Page 15
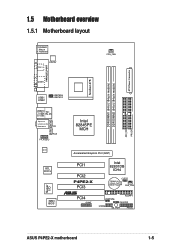
... USBPW34 USBPW12 USB2.0 Top: T: USB4 RJ-45 B: USB3 Top:Line In Center:Line Out Below:Mic In CD AUX FP_AUDIO AD1888 RTL 8101L Super I/O 3Mbit BIOS Intel 82845PE MCH SEC_IDE PRI_IDE Accelerated Graphics Port (AGP) PCI1 PCI2 P4PE2-X PCI3 ® PCI4 GAME Intel 82801DB ICH4 CR2032 3V Lithium Cell CMOS Power...
... USBPW34 USBPW12 USB2.0 Top: T: USB4 RJ-45 B: USB3 Top:Line In Center:Line Out Below:Mic In CD AUX FP_AUDIO AD1888 RTL 8101L Super I/O 3Mbit BIOS Intel 82845PE MCH SEC_IDE PRI_IDE Accelerated Graphics Port (AGP) PCI1 PCI2 P4PE2-X PCI3 ® PCI4 GAME Intel 82801DB ICH4 CR2032 3V Lithium Cell CMOS Power...
P4PE2-X User Manual
Page 17
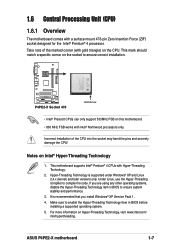
... CPU into the socket may bend the pins and severely damage the CPU! Make sure to enable the Hyper-Threading Technology item in BIOS to ensure system stability and performance. 3. 1.6 Central Processing Unit (CPU) 1.6.1 Overview The motherboard comes with gold triangle) on the...; Prescott CPUs can only support 533MHz FSB on the socket to compile the code. If you install Windows® XP Service Pack 1. 4. ASUS P4PE2-X motherboard 1-7 Notes on Hyper-Threading Technology, visit www.intel.com/ info/hyperthreading. For more information on Intel® Hyper-Threading Technology...
... CPU into the socket may bend the pins and severely damage the CPU! Make sure to enable the Hyper-Threading Technology item in BIOS to ensure system stability and performance. 3. 1.6 Central Processing Unit (CPU) 1.6.1 Overview The motherboard comes with gold triangle) on the...; Prescott CPUs can only support 533MHz FSB on the socket to compile the code. If you install Windows® XP Service Pack 1. 4. ASUS P4PE2-X motherboard 1-7 Notes on Hyper-Threading Technology, visit www.intel.com/ info/hyperthreading. For more information on Intel® Hyper-Threading Technology...

P4PE2-X User Manual
Page 21
... these steps to the card. See Table 3. 1.8 Expansion slots To install and configure an expansion card: 1. Align a DIMM on the system and change the necessary BIOS settings, if any. A* TShUeSsePIR4QPsE2ar-eXumsuoatlhlyearvbaoilabrdle for BIOS information. 3. Unlock a DIMM socket by pressing the retaining clips outward. 2.
... these steps to the card. See Table 3. 1.8 Expansion slots To install and configure an expansion card: 1. Align a DIMM on the system and change the necessary BIOS settings, if any. A* TShUeSsePIR4QPsE2ar-eXumsuoatlhlyearvbaoilabrdle for BIOS information. 3. Unlock a DIMM socket by pressing the retaining clips outward. 2.

P4PE2-X User Manual
Page 24
...cord and turn ON the computer. 4. Removing the cap will cause system boot failure! Shut down the key during the boot process and enter BIOS setup to re-enter data. Keep the cap on the jumper default position. You can automatically reset parameter settings to clear the Real Time ...pins 2-3 for about 5~10 seconds, then move the cap back to pins 2-3. For system failure due to overclocking. Hold down and reboot the system so BIOS can clear the CMOS memory of date, time, and system setup parameters by the onboard button cell battery. 1.9 Jumpers 1. Clear RTC RAM (CLRTC) This...
...cord and turn ON the computer. 4. Removing the cap will cause system boot failure! Shut down the key during the boot process and enter BIOS setup to re-enter data. Keep the cap on the jumper default position. You can automatically reset parameter settings to clear the Real Time ...pins 2-3 for about 5~10 seconds, then move the cap back to pins 2-3. For system failure due to overclocking. Hold down and reboot the system so BIOS can clear the CMOS memory of date, time, and system setup parameters by the onboard button cell battery. 1.9 Jumpers 1. Clear RTC RAM (CLRTC) This...

P4PE2-X User Manual
Page 32
... as described. 1-22 Chapter 1: Product introduction Pressing the power switch turns the system between ON and SLEEP, or ON and SOFT OFF, depending on the BIOS or OS settings. The System Panel connector is color-coded for more than four seconds turns the system OFF. • Hard disk activity LED (Red...
... as described. 1-22 Chapter 1: Product introduction Pressing the power switch turns the system between ON and SLEEP, or ON and SOFT OFF, depending on the BIOS or OS settings. The System Panel connector is color-coded for more than four seconds turns the system OFF. • Hard disk activity LED (Red...

P4PE2-X User Manual
Page 33
Detailed descriptions of the BIOS parameters are also provided. BIOS information ASUS P4PE2-X motherboard 2-1 Chapter 2 This chapter tells how to change system settings through the BIOS Setup menus.
Detailed descriptions of the BIOS parameters are also provided. BIOS information ASUS P4PE2-X motherboard 2-1 Chapter 2 This chapter tells how to change system settings through the BIOS Setup menus.
P4PE2-X User Manual
Page 34
... c. A Format 3 1/2 Floppy Disk window appears. Copy the original (or the latest) motherboard BIOS to manage and update the motherboard Basic Input/Output System (BIOS) setup. 1. ASUS EZ Flash - Refer to restore the BIOS in the future. Important notes • It is recommended that you save a copy of the ...174; XP, select Create an MS-DOS startup disk from PC") • Visit the ASUS website and download the latest BIOS file for details on Start, then select My Computer. Updates the BIOS using AFUDOS (refer to section "2.1.3 Using AFUDOS to create a bootable floppy disk. At the...
... c. A Format 3 1/2 Floppy Disk window appears. Copy the original (or the latest) motherboard BIOS to manage and update the motherboard Basic Input/Output System (BIOS) setup. 1. ASUS EZ Flash - Refer to restore the BIOS in the future. Important notes • It is recommended that you save a copy of the ...174; XP, select Create an MS-DOS startup disk from PC") • Visit the ASUS website and download the latest BIOS file for details on Start, then select My Computer. Updates the BIOS using AFUDOS (refer to section "2.1.3 Using AFUDOS to create a bootable floppy disk. At the...

P4PE2-X User Manual
Page 35
...! At the DOS prompt, type the command line: afudos /i[filename] where [filename] means the latest (or original) BIOS file that contains the BIOS file. 3. The BIOS information on a piece of the update process. Reading file ..... done Writing flash .... 0x0008CC00 (9%) DO NOT shutdown or ...floppy disk. 5. What you copied to the bootable floppy disk that you see on your motherboard. ASUS P4PE2-X motherboard 2-3 A:\>afudos /iP4PE2-X.ROM AMI Firmware Update Utility - Visit the ASUS website (www.asus.com) to update the BIOS To update the BIOS using the AFUDOS.EXE utility: 1.
...! At the DOS prompt, type the command line: afudos /i[filename] where [filename] means the latest (or original) BIOS file that contains the BIOS file. 3. The BIOS information on a piece of the update process. Reading file ..... done Writing flash .... 0x0008CC00 (9%) DO NOT shutdown or ...floppy disk. 5. What you copied to the bootable floppy disk that you see on your motherboard. ASUS P4PE2-X motherboard 2-3 A:\>afudos /iP4PE2-X.ROM AMI Firmware Update Utility - Visit the ASUS website (www.asus.com) to update the BIOS To update the BIOS using the AFUDOS.EXE utility: 1.

P4PE2-X User Manual
Page 36
A:\>afudos /iP4PE2-X.ROM AMI Firmware Update Utility - All rights reserved. done Erasing flash .... The BIOS information on your PC using AFUDOS.EXE: 1. When the BIOS update process is for the extension name. 2. done A:\> 5. What you see on the screen is complete, the...10 Copyright (C) 2002 American Megatrends, Inc. Reading flash ..... 0x0008CC00 (9%) 2-4 Chapter 2: BIOS Setup To copy the BIOS from PC You can use the AFUDOS.EXE utility to copy the current system BIOS to the DOS prompt. Reading file ..... Main filename Extension name A:\>afudos /oMYBIOS03.rom AMI...
A:\>afudos /iP4PE2-X.ROM AMI Firmware Update Utility - All rights reserved. done Erasing flash .... The BIOS information on your PC using AFUDOS.EXE: 1. When the BIOS update process is for the extension name. 2. done A:\> 5. What you see on the screen is complete, the...10 Copyright (C) 2002 American Megatrends, Inc. Reading flash ..... 0x0008CC00 (9%) 2-4 Chapter 2: BIOS Setup To copy the BIOS from PC You can use the AFUDOS.EXE utility to copy the current system BIOS to the DOS prompt. Reading file ..... Main filename Extension name A:\>afudos /oMYBIOS03.rom AMI...

P4PE2-X User Manual
Page 37
... Megatrends, Inc. User recovery requested. is complete, the utility returns to the DOS prompt. 2.1.4 Using ASUS EZ Flash to update the BIOS The ASUS EZ Flash feature allows you to easily update the BIOS without having to go through the long process of free disk space and is accessible by default to... the floppy disk. Make sure to display the following. 3. Make sure that contains the BIOS file. done A:\>...
... Megatrends, Inc. User recovery requested. is complete, the utility returns to the DOS prompt. 2.1.4 Using ASUS EZ Flash to update the BIOS The ASUS EZ Flash feature allows you to easily update the BIOS without having to go through the long process of free disk space and is accessible by default to... the floppy disk. Make sure to display the following. 3. Make sure that contains the BIOS file. done A:\>...

P4PE2-X User Manual
Page 38
... or a floppy disk that contains the motherboard BIOS before proceeding with the BIOS update process. • If you have saved a copy of the original motherboard BIOS to a bootable floppy disk, you to restore BIOS from the motherboard support CD, or from a... files are found ! Checking for floppy... 3. Rebooting. 2.1.5 Recovering the BIOS with CrashFree BIOS 2 The CrashFree BIOS 2 auto recovery tool allows you may cause system boot failure! Starting BIOS recovery... Completed. Bad BIOS checksum. Doing so may also use this motherboard. User recovery requested. Reading...
... or a floppy disk that contains the motherboard BIOS before proceeding with the BIOS update process. • If you have saved a copy of the original motherboard BIOS to a bootable floppy disk, you to restore BIOS from the motherboard support CD, or from a... files are found ! Checking for floppy... 3. Rebooting. 2.1.5 Recovering the BIOS with CrashFree BIOS 2 The CrashFree BIOS 2 auto recovery tool allows you may cause system boot failure! Starting BIOS recovery... Completed. Bad BIOS checksum. Doing so may also use this motherboard. User recovery requested. Reading...

P4PE2-X User Manual
Page 39
... CD-ROM found ! Start flashing... When the BIOS update process is no floppy disk found ! Bad BIOS checksum. Floppy not found . When the BIOS update process is detected, the following screen message appears. ASUS P4PE2-X motherboard 2-7 Boot the system. 2. Place...file "P4PE2-X.ROM". Visit ASUS website (www.asus.com) to download the latest BIOS file. Starting BIOS recovery... Doing so may cause system boot failure! 2. Starting BIOS recovery... Starting BIOS recovery... The recovered BIOS may not be the latest BIOS version for this motherboard. ...
... CD-ROM found ! Start flashing... When the BIOS update process is no floppy disk found ! Bad BIOS checksum. Floppy not found . When the BIOS update process is detected, the following screen message appears. ASUS P4PE2-X motherboard 2-7 Boot the system. 2. Place...file "P4PE2-X.ROM". Visit ASUS website (www.asus.com) to download the latest BIOS file. Starting BIOS recovery... Doing so may cause system boot failure! 2. Starting BIOS recovery... Starting BIOS recovery... The recovered BIOS may not be the latest BIOS version for this motherboard. ...

P4PE2-X User Manual
Page 40
... (www.asus.com) to use the Setup program, you see on the motherboard stores the Setup utility. This section explains how to "Run Setup". Otherwise, POST continues with the opportunity to enter Setup after changing any BIOS settings, load the default settings to enter the ... to change the power management settings. Do this chapter are installing a motherboard, reconfiguring your system, or prompted to configure your BIOS." The BIOS setup screens shown in section "2.1 Managing and updating your system using the navigation keys. It is designed to make your selections ...
... (www.asus.com) to use the Setup program, you see on the motherboard stores the Setup utility. This section explains how to "Run Setup". Otherwise, POST continues with the opportunity to enter Setup after changing any BIOS settings, load the default settings to enter the ... to change the power management settings. Do this chapter are installing a motherboard, reconfiguring your system, or prompted to configure your BIOS." The BIOS setup screens shown in section "2.1 Managing and updating your system using the navigation keys. It is designed to make your selections ...

P4PE2-X User Manual
Page 41
Use the navigation keys to select items in ] : [ST320413A] : [ASUS CD-S340] : [Not Detected] : [Not Detected] Use [ENTER], [TAB] or [SHIFT-TAB] to select a field. Some of a menu screen are the navigation keys for that ... the desired item is highlighted. 2.2.3 Navigation keys At the bottom right corner of the navigation keys differ from one screen to configure system time. ASUS P4PE2-X motherboard 2-9 2.2.1 BIOS menu screen Menu items Menu bar Configuration fields General help System Time System Date Legacy Diskette A Primary IDE Master Primary IDE Slave Secondary IDE...
Use the navigation keys to select items in ] : [ST320413A] : [ASUS CD-S340] : [Not Detected] : [Not Detected] Use [ENTER], [TAB] or [SHIFT-TAB] to select a field. Some of a menu screen are the navigation keys for that ... the desired item is highlighted. 2.2.3 Navigation keys At the bottom right corner of the navigation keys differ from one screen to configure system time. ASUS P4PE2-X motherboard 2-9 2.2.1 BIOS menu screen Menu items Menu bar Configuration fields General help System Time System Date Legacy Diskette A Primary IDE Master Primary IDE Slave Secondary IDE...

P4PE2-X User Manual
Page 42
...51:19] [Thu 08/05/2003] [1.44M, 3.5 in brackets, and is not user-configurable. A configurable field is enclosed in ] [English] :[ST320413A] :[ASUS CD-S340] :[Not Detected] :[Not Detected] The other items (Advanced, Power, Boot, and Exit) on the menu bar have their respective menu items. Main ... pop-up window Scroll bar At the top right corner of the menu screen is a brief description of the selected item. 2-10 Chapter 2: BIOS Setup Select Screen Select Item +- 2.2.4 Menu items The highlighted item on the menu bar displays the specific items for that item. 2.2.8 Scroll bar ...
...51:19] [Thu 08/05/2003] [1.44M, 3.5 in brackets, and is not user-configurable. A configurable field is enclosed in ] [English] :[ST320413A] :[ASUS CD-S340] :[Not Detected] :[Not Detected] The other items (Advanced, Power, Boot, and Exit) on the menu bar have their respective menu items. Main ... pop-up window Scroll bar At the top right corner of the menu screen is a brief description of the selected item. 2-10 Chapter 2: BIOS Setup Select Screen Select Item +- 2.2.4 Menu items The highlighted item on the menu bar displays the specific items for that item. 2.2.8 Scroll bar ...


