Users Manual
Page 2
...recover damages from omission or failure of performing legal duties under this Warranty Statement. SPECIFICATIONS AND INFORMATION CONTAINED IN THIS MANUAL ARE FURNISHED FOR INFORMATIONAL USE ONLY, AND ARE SUBJECT TO CHANGE AT ANY TIME WITHOUT NOTICE, AND SHOULD NOT BE CONSTRUED AS A COMMITMENT BY ASUS...are entitled to the listed contract price of each such instance, regardless of the basis on which ASUS, its reseller. LIMITATION OF LIABILITY Circumstances may arise where because of a default on ASUS' part or other actual and direct damages resulted from ASUS. In each product...
...recover damages from omission or failure of performing legal duties under this Warranty Statement. SPECIFICATIONS AND INFORMATION CONTAINED IN THIS MANUAL ARE FURNISHED FOR INFORMATIONAL USE ONLY, AND ARE SUBJECT TO CHANGE AT ANY TIME WITHOUT NOTICE, AND SHOULD NOT BE CONSTRUED AS A COMMITMENT BY ASUS...are entitled to the listed contract price of each such instance, regardless of the basis on which ASUS, its reseller. LIMITATION OF LIABILITY Circumstances may arise where because of a default on ASUS' part or other actual and direct damages resulted from ASUS. In each product...
Users Manual
Page 3
... during use...10 Sound Pressure Warning 11 Adapter...11 DC Fan Warning...11 Package contents...12 Chapter 1: Hardware Setup ASUS All-in-One PC...15 Front view...15 Left view...19 Rear view...23 Chapter 2: Using your ASUS All-in-One PC Setting up your ASUS All-in-One PC 27 Installing the stand...27 Connecting the wireless keyboard and mouse 29 Connecting a wired keyboard and mouse 31 Powering on...
... during use...10 Sound Pressure Warning 11 Adapter...11 DC Fan Warning...11 Package contents...12 Chapter 1: Hardware Setup ASUS All-in-One PC...15 Front view...15 Left view...19 Rear view...23 Chapter 2: Using your ASUS All-in-One PC Setting up your ASUS All-in-One PC 27 Installing the stand...27 Connecting the wireless keyboard and mouse 29 Connecting a wired keyboard and mouse 31 Powering on...

Users Manual
Page 4
Chapter 3: Working with Windows Starting for the first time 39 Start menu...40 Launching the Start menu 41 Opening programs from the Start menu 41 Windows apps...42 Launching Windows apps from the Start menu 42 Connecting to wireless networks 43 Wi-Fi...43 Bluetooth...44 Connecting to wired networks 45 Turning your ASUS All-in-One PC off 46 Putting your ASUS All-in-One PC to sleep 47 Chapter 4: Recovering your system Entering the BIOS Setup 49 Quickly enter the BIOS 49 Recovering your system 50 Performing a recovery option 51 4 ASUS All-in-One PC
Chapter 3: Working with Windows Starting for the first time 39 Start menu...40 Launching the Start menu 41 Opening programs from the Start menu 41 Windows apps...42 Launching Windows apps from the Start menu 42 Connecting to wireless networks 43 Wi-Fi...43 Bluetooth...44 Connecting to wired networks 45 Turning your ASUS All-in-One PC off 46 Putting your ASUS All-in-One PC to sleep 47 Chapter 4: Recovering your system Entering the BIOS Setup 49 Quickly enter the BIOS 49 Recovering your system 50 Performing a recovery option 51 4 ASUS All-in-One PC
Users Manual
Page 6
... 4: Recovering your system This chapter provides recovery options for your ASUS All-in-One PC. Appendices This section includes notices and safety statements for your ASUS All-in-One PC. 6 ASUS All-in-One PC About this manual This manual provides information about the hardware and software features of your ASUS All-in-One PC, organized through the following chapters: Chapter 1: Hardware Setup...
... 4: Recovering your system This chapter provides recovery options for your ASUS All-in-One PC. Appendices This section includes notices and safety statements for your ASUS All-in-One PC. 6 ASUS All-in-One PC About this manual This manual provides information about the hardware and software features of your ASUS All-in-One PC, organized through the following chapters: Chapter 1: Hardware Setup...

Users Manual
Page 8
All illustrations and screenshots in this manual are for completing a series of tasks or procedures on your ASUS All-in -One PC Actual product specifications and software screen images may vary with territories. Icons The icons below indicate the devices you can use for reference only. Visit the ASUS website at www.asus.com for the latest information. 8 ASUS All-in -One PC. = (optional) Use the wired/wireless mouse. = (optional) Use the wired/wireless keyboard.
All illustrations and screenshots in this manual are for completing a series of tasks or procedures on your ASUS All-in -One PC Actual product specifications and software screen images may vary with territories. Icons The icons below indicate the devices you can use for reference only. Visit the ASUS website at www.asus.com for the latest information. 8 ASUS All-in -One PC. = (optional) Use the wired/wireless mouse. = (optional) Use the wired/wireless keyboard.

Users Manual
Page 9
... not block or cover these openings. Never insert objects of any kind into the ventilation openings. • Use this product near water or a heated source such as a radiator. • Be cautious while moving the system to prevent injuries. • Set up your system • Read and follow all instructions in the documentation before you operate your safety...
... not block or cover these openings. Never insert objects of any kind into the ventilation openings. • Use this product near water or a heated source such as a radiator. • Be cautious while moving the system to prevent injuries. • Set up your system • Read and follow all instructions in the documentation before you operate your safety...
Users Manual
Page 10
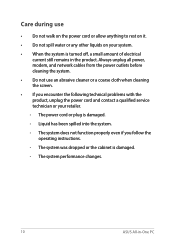
... power cord and contact a qualified service technician or your system. • When the system is turned off, a small amount of electrical current still remains in -One PC The system was dropped or the cabinet is damaged. - Care during use an abrasive cleaner or a coarse cloth when cleaning the screen. • If you follow the operating instructions. - The power...
... power cord and contact a qualified service technician or your system. • When the system is turned off, a small amount of electrical current still remains in -One PC The system was dropped or the cabinet is damaged. - Care during use an abrasive cleaner or a coarse cloth when cleaning the screen. • If you follow the operating instructions. - The power...

Users Manual
Page 18
Camera indicator The camera indicator lights up when the built-in camera is in camera allows you to take pictures or record videos using your ASUS All-inOne PC. Audio features are softwarecontrolled. Webcam shield This allows you to cover the camera lens of your ASUS All-in-One PC. 18 ASUS All-in -One PC. LCD display panel The LCD display panel provides excellent viewing features for photos, videos, and other multimedia files. Audio speakers The built-in audio speaker allows you to hear audio straight from the ASUS All-in -One PC Camera The built-in use.
Camera indicator The camera indicator lights up when the built-in camera is in camera allows you to take pictures or record videos using your ASUS All-inOne PC. Audio features are softwarecontrolled. Webcam shield This allows you to cover the camera lens of your ASUS All-in-One PC. 18 ASUS All-in -One PC. LCD display panel The LCD display panel provides excellent viewing features for photos, videos, and other multimedia files. Audio speakers The built-in audio speaker allows you to hear audio straight from the ASUS All-in -One PC Camera The built-in use.

Users Manual
Page 21
ASUS All-in -One PC mode and external display mode. Display mode switch button (on . NOTE: This function is only available when the HDMI input port is connected and the All-in-One PC is turned on selected models) This button allows you to 5 Gbit/s. USB 3.2 Gen 1 port This USB 3.2 Gen 1 (Universal Serial Bus) port provides a transfer rate of up to switch between All-in -One PC 21 USB 3.2 Gen 1 Type-C® port The USB 3.2 (Universal Serial Bus 3.2) Gen 1 Type-C® port provides a transfer rate of up to 5 Gbit/s.
ASUS All-in -One PC mode and external display mode. Display mode switch button (on . NOTE: This function is only available when the HDMI input port is connected and the All-in-One PC is turned on selected models) This button allows you to 5 Gbit/s. USB 3.2 Gen 1 port This USB 3.2 Gen 1 (Universal Serial Bus) port provides a transfer rate of up to switch between All-in -One PC 21 USB 3.2 Gen 1 Type-C® port The USB 3.2 (Universal Serial Bus 3.2) Gen 1 Type-C® port provides a transfer rate of up to 5 Gbit/s.
Users Manual
Page 25
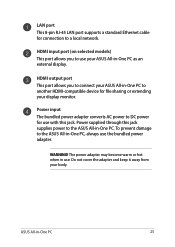
... connection to a local network. ASUS All-in use. LAN port This 8-pin RJ-45 LAN port supports a standard Ethernet cable for use with this jack supplies power to the ASUS All-in -One PC to the ASUS All-in -One PC as an external display. The power adapter may become warm or hot when in -One PC 25 HDMI output port This port allows you to connect your ASUS All-in -One PC. Do not cover...
... connection to a local network. ASUS All-in use. LAN port This 8-pin RJ-45 LAN port supports a standard Ethernet cable for use with this jack supplies power to the ASUS All-in -One PC to the ASUS All-in -One PC as an external display. The power adapter may become warm or hot when in -One PC 25 HDMI output port This port allows you to connect your ASUS All-in -One PC. Do not cover...

Users Manual
Page 34
Tilt the display to an angle between -5° to an angle beyond the recommended values or you may risk damaging the ASUS All-in-One PC. 34 ASUS All-in -One PC on a flat surface such as a table or desk. 2. IMPORTANT! • Use both hands when setting up your ASUS All-in-One PC. • Avoid adjusting the display to 20°. Place your ASUS All-in-One PC -5O 20O 1. Positioning your ASUS All-in -One PC
Tilt the display to an angle between -5° to an angle beyond the recommended values or you may risk damaging the ASUS All-in-One PC. 34 ASUS All-in -One PC on a flat surface such as a table or desk. 2. IMPORTANT! • Use both hands when setting up your ASUS All-in-One PC. • Avoid adjusting the display to 20°. Place your ASUS All-in-One PC -5O 20O 1. Positioning your ASUS All-in -One PC
Users Manual
Page 39
... 39 Follow the onscreen instructions to configure the following basic items: • Personalize • Get online • Settings • Your account After configuring the basic items, Windows proceeds to guide you in configuring your Windows operating system. Once the setup process is kept powered on during the setup process. Chapter 3: Working with Windows Starting for the first time When you start your ASUS All-in-One PC...
... 39 Follow the onscreen instructions to configure the following basic items: • Personalize • Get online • Settings • Your account After configuring the basic items, Windows proceeds to guide you in configuring your Windows operating system. Once the setup process is kept powered on during the setup process. Chapter 3: Working with Windows Starting for the first time When you start your ASUS All-in-One PC...

Users Manual
Page 40
Start menu The Start menu is the main gateway to a different user account 40 ASUS All-in -One PC's programs, Windows apps, folders, and settings. You can use the Start menu to do these common activities: • Start programs or Windows apps • Open commonly used programs or Windows apps • Adjust ASUS All-in-One PC settings • Get help with the Windows operating system • Turn off from Windows or switch to your ASUS All-in-One PC • Log off your ASUS All-in -One PC
Start menu The Start menu is the main gateway to a different user account 40 ASUS All-in -One PC's programs, Windows apps, folders, and settings. You can use the Start menu to do these common activities: • Start programs or Windows apps • Open commonly used programs or Windows apps • Adjust ASUS All-in-One PC settings • Get help with the Windows operating system • Turn off from Windows or switch to your ASUS All-in-One PC • Log off your ASUS All-in -One PC

Users Manual
Page 44
... to key in the passcode of your ASUS All-inOne PC. 44 ASUS All-in -One PC with other Bluetooth-enabled devices to enable data transfers. Select a device from the Start menu. 2. Bluetooth Use Bluetooth to facilitate wireless data transfers with other Bluetooth-enabled devices You need to pair your ASUS All-in -One PC Launch Settings from the list to search for Bluetooth-enabled devices. (for Windows 11) 3. Pairing with other Bluetoothenabled devices. Select Devices > Bluetooth to...
... to key in the passcode of your ASUS All-inOne PC. 44 ASUS All-in -One PC with other Bluetooth-enabled devices to enable data transfers. Select a device from the Start menu. 2. Bluetooth Use Bluetooth to facilitate wireless data transfers with other Bluetooth-enabled devices You need to pair your ASUS All-in -One PC Launch Settings from the list to search for Bluetooth-enabled devices. (for Windows 11) 3. Pairing with other Bluetoothenabled devices. Select Devices > Bluetooth to...
Users Manual
Page 49
.... Quickly enter the BIOS To access the BIOS: • When your ASUS All-in-One PC is a series of software controlled diagnostic tests that are needed for at least four (4) seconds to access the BIOS directly. • Press the power button to turn on your ASUS All-in-One PC then press or during the system bootup and requests you to run when you change the default BIOS settings except...
.... Quickly enter the BIOS To access the BIOS: • When your ASUS All-in-One PC is a series of software controlled diagnostic tests that are needed for at least four (4) seconds to access the BIOS directly. • Press the power button to turn on your ASUS All-in-One PC then press or during the system bootup and requests you to run when you change the default BIOS settings except...

Users Manual
Page 50
Recovering your system Using recovery options on your ASUS All-in-One PC. • Note down important customized settings such as network settings, user names, and passwords to avoid data loss. • Ensure that your ASUS All-in-One PC is plugged in to a power source before resetting your system. Windows allows you to refresh your data before doing this option, you to restore the system to...
Recovering your system Using recovery options on your ASUS All-in-One PC. • Note down important customized settings such as network settings, user names, and passwords to avoid data loss. • Ensure that your ASUS All-in-One PC is plugged in to a power source before resetting your system. Windows allows you to refresh your data before doing this option, you to restore the system to...

Users Manual
Page 51
... as: - Using a USB drive, network connection or Windows recovery DVD to access and use any of the available recovery options for Windows 11) 2. Select the recovery option you want to startup your ASUS All-in -One PC 51 ASUS All-in -One PC. 1. Performing a recovery option Refer to the following steps if you would like to enable any of these advanced recovery options: Startup Repair, Uninstall Updates, Startup Settings, UEFI Firmware Settings, Command Prompt, System Restore, and System Image Recovery. Using Troubleshoot to perform...
... as: - Using a USB drive, network connection or Windows recovery DVD to access and use any of the available recovery options for Windows 11) 2. Select the recovery option you want to startup your ASUS All-in -One PC 51 ASUS All-in -One PC. 1. Performing a recovery option Refer to the following steps if you would like to enable any of these advanced recovery options: Startup Repair, Uninstall Updates, Startup Settings, UEFI Firmware Settings, Command Prompt, System Restore, and System Image Recovery. Using Troubleshoot to perform...

Users Manual
Page 57
...instructions. Dispose of used batteries according to extremely low air pressure that can result in an explosion or the leakage of flammable liquid or gas; - By means of explosion if battery is not waterproof or oil-proof. No Exposure to Liquids DO NOT expose to a socket-outlet with the same or equivalent type recommended by users... Lithium-Ion Battery Warning CAUTION: Danger of a power cord connected to or use near liquids, rain, or moisture. ASUS All-in an explosion; - Disposal of a battery into fire or a hot oven, or mechanically...
...instructions. Dispose of used batteries according to extremely low air pressure that can result in an explosion or the leakage of flammable liquid or gas; - By means of explosion if battery is not waterproof or oil-proof. No Exposure to Liquids DO NOT expose to a socket-outlet with the same or equivalent type recommended by users... Lithium-Ion Battery Warning CAUTION: Danger of a power cord connected to or use near liquids, rain, or moisture. ASUS All-in an explosion; - Disposal of a battery into fire or a hot oven, or mechanically...

Users Manual
Page 59
... prohibits use of lead, mercury, hexavalent chromium, polybrominated biphenyls (PBBs) and polybrominated diphenyl ethers (PBDEs) in concentrations exceeding 0.1% by weight in homogenous materials and 0.01% by weight in homogenous materials for cadmium, except for you to be found at improving environmental performance of specific products or across multiple product types. ASUS Recycling/Takeback Services ASUS recycling...
... prohibits use of lead, mercury, hexavalent chromium, polybrominated biphenyls (PBBs) and polybrominated diphenyl ethers (PBDEs) in concentrations exceeding 0.1% by weight in homogenous materials and 0.01% by weight in homogenous materials for cadmium, except for you to be found at improving environmental performance of specific products or across multiple product types. ASUS Recycling/Takeback Services ASUS recycling...
Users Manual
Page 60
...is automatically set to sleep within 30 minutes of user inactivity. All ASUS products with the ENERGY STAR logo comply with the ENERGY STAR standard, and the power management feature is enabled by default. Department... of Energy helping us all save money and protect the environment through energy efficient products and practices. In addition, please visit http://www.energystar.gov for detail information on the keyboard, or press the power button. To wake your computer, click the mouse, press any key on power management...
...is automatically set to sleep within 30 minutes of user inactivity. All ASUS products with the ENERGY STAR logo comply with the ENERGY STAR standard, and the power management feature is enabled by default. Department... of Energy helping us all save money and protect the environment through energy efficient products and practices. In addition, please visit http://www.energystar.gov for detail information on the keyboard, or press the power button. To wake your computer, click the mouse, press any key on power management...


