
User Guide
Page 2
...backup purposes, without any problems in the About Box of such software and/or other Free Open Source Software Licenses. All Rights Reserved. ASUS PROVIDES THIS MANUAL "AS IS" WITHOUT WARRANTY OF ANY KIND, EITHER EXPRESS OR IMPLIED, INCLUDING BUT NOT LIMITED TO THE IMPLIED WARRANTIES OR CONDITIONS OF ...LOSS OF BUSINESS, LOSS OF USE OR DATA, INTERRUPTION OF BUSINESS AND THE LIKE), EVEN IF ASUS HAS BEEN ADVISED OF THE POSSIBILITY OF SUCH DAMAGES ARISING FROM ANY DEFECT OR ERROR IN THIS MANUAL OR PRODUCT. Offer to Provide Source Code of alteration is eager to : ASUSTeK Computer Inc...
...backup purposes, without any problems in the About Box of such software and/or other Free Open Source Software Licenses. All Rights Reserved. ASUS PROVIDES THIS MANUAL "AS IS" WITHOUT WARRANTY OF ANY KIND, EITHER EXPRESS OR IMPLIED, INCLUDING BUT NOT LIMITED TO THE IMPLIED WARRANTIES OR CONDITIONS OF ...LOSS OF BUSINESS, LOSS OF USE OR DATA, INTERRUPTION OF BUSINESS AND THE LIKE), EVEN IF ASUS HAS BEEN ADVISED OF THE POSSIBILITY OF SUCH DAMAGES ARISING FROM ANY DEFECT OR ERROR IN THIS MANUAL OR PRODUCT. Offer to Provide Source Code of alteration is eager to : ASUSTeK Computer Inc...
User Guide
Page 4
... that the power cables for the BIOS parameters are not damaged. Operation safety • Before installing the motherboard and adding components, carefully read all the manuals that your power supply is set to fix it by yourself. How this guide This user guide contains the information you need when installing and...
... that the power cables for the BIOS parameters are not damaged. Operation safety • Before installing the motherboard and adding components, carefully read all the manuals that your power supply is set to fix it by yourself. How this guide This user guide contains the information you need when installing and...

User Guide
Page 5
...prevent damage to help you must press the Enter or Return key. + + If you complete a task. Keys enclosed in this manual. NOTE: Tips and additional information to the components when completing a task IMPORTANT: Instructions that may include optional documentation, such as warranty ...flyers, that you must press the enclosed key. ASUS websites The ASUS website provides updated information on ASUS hardware and software products. Typography Bold text Indicates a menu or an item to the ASUS contact information. 2. Conventions used throughout this guide To ensure...
...prevent damage to help you must press the Enter or Return key. + + If you complete a task. Keys enclosed in this manual. NOTE: Tips and additional information to the components when completing a task IMPORTANT: Instructions that may include optional documentation, such as warranty ...flyers, that you must press the enclosed key. ASUS websites The ASUS website provides updated information on ASUS hardware and software products. Typography Bold text Indicates a menu or an item to the ASUS contact information. 2. Conventions used throughout this guide To ensure...
User Guide
Page 18
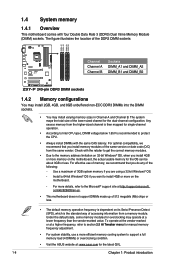
... size of the DDR3 DIMM sockets: DIMM_A1 DIMM_A2 DIMM_B1 DIMM_B2 Channel Sockets Channel A DIMM_A1 and DIMM_A2 Z97-P Channel B DIMM_B1 and DIMM_B2 Z97-P 240-pin DDR3 DIMM sockets 1.4.2 Memory configurations You may install 2GB, 4GB, and 8GB unbuffered non...asus.com for single-channel operation. • According to Intel CPU spec, DIMM voltage below 1.65V is then mapped for the latest QVL. 1-8 Chapter 1: Product introduction 1.4 System memory 1.4.1 Overview This motherboard comes with the same CAS latency. The figure illustrates the location of the lower-sized channel for manual...
... size of the DDR3 DIMM sockets: DIMM_A1 DIMM_A2 DIMM_B1 DIMM_B2 Channel Sockets Channel A DIMM_A1 and DIMM_A2 Z97-P Channel B DIMM_B1 and DIMM_B2 Z97-P 240-pin DDR3 DIMM sockets 1.4.2 Memory configurations You may install 2GB, 4GB, and 8GB unbuffered non...asus.com for single-channel operation. • According to Intel CPU spec, DIMM voltage below 1.65V is then mapped for the latest QVL. 1-8 Chapter 1: Product introduction 1.4 System memory 1.4.1 Overview This motherboard comes with the same CAS latency. The figure illustrates the location of the lower-sized channel for manual...
User Guide
Page 26
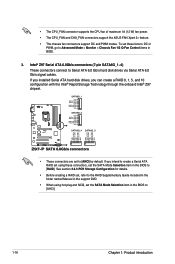
...maximum 1A (12 W) fan power. • The CPU_FAN and CHA_FAN connectors support the ASUS FAN Xpert 2+ feature. • The chassis fan connectors support DC and PWM modes. Intel® Z97 Serial ATA 6.0Gb/s connectors (7-pin SATA6G_1~4) These connectors connect to [AHCI]. 1-16 Chapter... 1: Product introduction See section 2.6.3 PCH Storage Configuration for details. • Before creating a RAID set, refer to the RAID Supplementary Guide included in the folder named Manual in the...
...maximum 1A (12 W) fan power. • The CPU_FAN and CHA_FAN connectors support the ASUS FAN Xpert 2+ feature. • The chassis fan connectors support DC and PWM modes. Intel® Z97 Serial ATA 6.0Gb/s connectors (7-pin SATA6G_1~4) These connectors connect to [AHCI]. 1-16 Chapter... 1: Product introduction See section 2.6.3 PCH Storage Configuration for details. • Before creating a RAID set, refer to the RAID Supplementary Guide included in the folder named Manual in the...
User Guide
Page 32
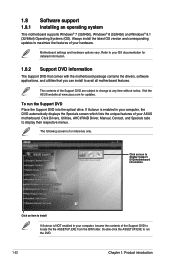
... into the optical drive. If Autorun is for reference only. Click Drivers, Utilities, AHCI/RAID Driver, Manual, Contact, and Specials tabs to change at www.asus.com for detailed information. 1.8.2 Support DVD information The Support DVD that comes with the motherboard package contains the... Autorun is NOT enabled in your computer, the DVD automatically displays the Specials screen which lists the unique features of your ASUS motherboard. Motherboard settings and hardware options vary. Always install the latest OS version and corresponding updates to avail all motherboard features...
... into the optical drive. If Autorun is for reference only. Click Drivers, Utilities, AHCI/RAID Driver, Manual, Contact, and Specials tabs to change at www.asus.com for detailed information. 1.8.2 Support DVD information The Support DVD that comes with the motherboard package contains the... Autorun is NOT enabled in your computer, the DVD automatically displays the Specials screen which lists the unique features of your ASUS motherboard. Motherboard settings and hardware options vary. Always install the latest OS version and corresponding updates to avail all motherboard features...
User Guide
Page 33
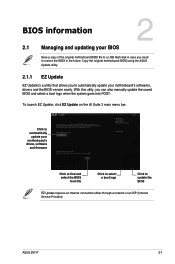
...utility that allows you to update the BIOS EZ Update requires an Internet connection either through a network or an ISP (Internet Service Provider). ASUS Z97-P 2-1 With this utlity, you need to restore the BIOS in the future. Click to automatically update your motherboard's driver, software and ... Click to automatically update your BIOS Save a copy of the original motherboard BIOS file to a USB flash disk in case you can also manually update the saved BIOS and select a boot logo when the system goes into POST. BIOS information 2 2.1 Managing and updating your motherboard's ...
...utility that allows you to update the BIOS EZ Update requires an Internet connection either through a network or an ISP (Internet Service Provider). ASUS Z97-P 2-1 With this utlity, you need to restore the BIOS in the future. Click to automatically update your motherboard's driver, software and ... Click to automatically update your BIOS Save a copy of the original motherboard BIOS file to a USB flash disk in case you can also manually update the saved BIOS and select a boot logo when the system goes into POST. BIOS information 2 2.1 Managing and updating your motherboard's ...

User Guide
Page 39
Refer to select the display language, system performance mode, fan profile and boot device priority. ASUS Z97-P 2-7 The EZ Mode provides you an overview of the selected mode. To access the Advanced Mode, click Advanced Mode(F7) or press . Displays the CPU... Creates storage RAID and configures system overclocking Enables or disables the Intel Rapid Storage Technology Displays the CPU Fan's speed. Click the button to manually tune the fans Loads optimized default settings Shows the bootable devices Saves the changes and resets the system Displays the Advanced mode menus Selects the...
Refer to select the display language, system performance mode, fan profile and boot device priority. ASUS Z97-P 2-7 The EZ Mode provides you an overview of the selected mode. To access the Advanced Mode, click Advanced Mode(F7) or press . Displays the CPU... Creates storage RAID and configures system overclocking Enables or disables the Intel Rapid Storage Technology Displays the CPU Fan's speed. Click the button to manually tune the fans Loads optimized default settings Shows the bootable devices Saves the changes and resets the system Displays the Advanced mode menus Selects the...
User Guide
Page 41
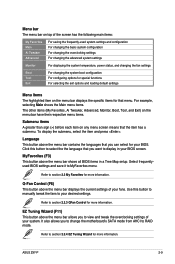
... exit options and loading default settings Menu items The highlighted item on any menu screen means that the item has a submenu. Click this button to manually tweak the fans to section 2.2.3 QFan Control for more information. Refer to your fans. EZ Tuning Wizard (F11) This button above the menu bar displays...
... exit options and loading default settings Menu items The highlighted item on any menu screen means that the item has a submenu. Click this button to manually tweak the fans to section 2.2.3 QFan Control for more information. Refer to your fans. EZ Tuning Wizard (F11) This button above the menu bar displays...

User Guide
Page 43
Click to select a fan to be configured Click to activate PWM Mode Click to activate DC Mode Select a profile to apply to your fans Click to undo the changes Click to apply the fan setting Click to go back to set a fan profile or manually configure the operating speed of your CPU and chassis fans. 2.2.3 QFan Control The QFan Control allows you to main menu ASUS Z97-P 2-11
Click to select a fan to be configured Click to activate PWM Mode Click to activate DC Mode Select a profile to apply to your fans Click to undo the changes Click to apply the fan setting Click to go back to set a fan profile or manually configure the operating speed of your CPU and chassis fans. 2.2.3 QFan Control The QFan Control allows you to main menu ASUS Z97-P 2-11
User Guide
Page 44
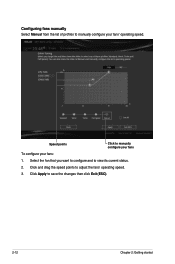
Click Apply to adjust the fans' operating speed. 3. Click and drag the speed points to save the changes then click Exit (ESC). 2-12 Chapter 2: Getting started Select the fan that you want to configure and to manually configure your fans To configure your fans' operating speed. Configuring fans manually Select Manual from the list of profiles to manually configure your fans: 1. Speed points Click to view its current status. 2.
Click Apply to adjust the fans' operating speed. 3. Click and drag the speed points to save the changes then click Exit (ESC). 2-12 Chapter 2: Getting started Select the fan that you want to configure and to manually configure your fans To configure your fans' operating speed. Configuring fans manually Select Manual from the list of profiles to manually configure your fans: 1. Speed points Click to view its current status. 2.
User Guide
Page 51
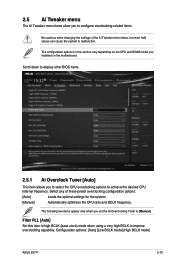
... down to display other BIOS items. 2.5.1 Ai Overclock Tuner [Auto] This item allows you to select the CPU overclocking options to [Manual]. The following two items appear only when you set the Ai Overclocking Tuner to achieve the desired CPU internal frequency. Select any of the...vary depending on the CPU and DIMM model you installed on the motherboard. Configuration options: [Auto] [Low BCLK mode] [High BCLK mode] ASUS Z97-P 2-19 2.5 Ai Tweaker menu The Ai Tweaker menu items allow you to configure overclocking-related items. Be cautious when changing the settings of these...
... down to display other BIOS items. 2.5.1 Ai Overclock Tuner [Auto] This item allows you to select the CPU overclocking options to [Manual]. The following two items appear only when you set the Ai Overclocking Tuner to achieve the desired CPU internal frequency. Select any of the...vary depending on the CPU and DIMM model you installed on the motherboard. Configuration options: [Auto] [Low BCLK mode] [High BCLK mode] ASUS Z97-P 2-19 2.5 Ai Tweaker menu The Ai Tweaker menu items allow you to configure overclocking-related items. Be cautious when changing the settings of these...
User Guide
Page 52
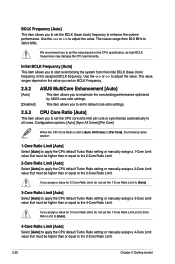
... Limit. We recommend you to set the value based on BCLK Frequency. 2.5.2 [Auto] [Disabled] ASUS MultiCore Enhancement [Auto] This item allows you to maximize the oveclocking performance optimized by ASUS core ratio settings. Initial BCLK Frequency [Auto] This item allows you to start overclocking the system from... Limit and 2-Core Ratio Limit to [Auto]. 4-Core Ratio Limit [Auto] Select [Auto] to apply the CPU default Turbo Ratio setting or manually assign a 4-Core Limit value that must be higher than or equal to the 3-Core Ratio Limit. 2-20 Chapter 2: Getting started Use the or...
... Limit. We recommend you to set the value based on BCLK Frequency. 2.5.2 [Auto] [Disabled] ASUS MultiCore Enhancement [Auto] This item allows you to maximize the oveclocking performance optimized by ASUS core ratio settings. Initial BCLK Frequency [Auto] This item allows you to start overclocking the system from... Limit and 2-Core Ratio Limit to [Auto]. 4-Core Ratio Limit [Auto] Select [Auto] to apply the CPU default Turbo Ratio setting or manually assign a 4-Core Limit value that must be higher than or equal to the 3-Core Ratio Limit. 2-20 Chapter 2: Getting started Use the or...
User Guide
Page 54
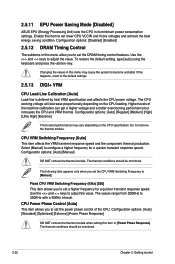
... Mode [Disabled] ASUS EPU (Energy Processing Unit) sets the CPU in this menu allow you to set the DRAM timing control features. To restore the default setting, type [auto] using the keyboard and press the key. Do not remove the thermal module. Select [Manual] to become unstable... a higher voltage and a better overclocking performance but increases the CPU and VRM thermal. The following item appears only when you to [Manual]. CPU VRM Switching Frequency [Auto] This item affects the VRM transient response speed and the component thermal production. The thermal conditions should ...
... Mode [Disabled] ASUS EPU (Energy Processing Unit) sets the CPU in this menu allow you to set the DRAM timing control features. To restore the default setting, type [auto] using the keyboard and press the key. Do not remove the thermal module. Select [Manual] to become unstable... a higher voltage and a better overclocking performance but increases the CPU and VRM thermal. The following item appears only when you to [Manual]. CPU VRM Switching Frequency [Auto] This item affects the VRM transient response speed and the component thermal production. The thermal conditions should ...
User Guide
Page 56
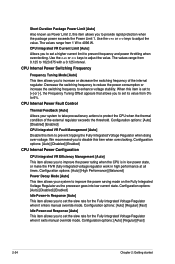
...integrated voltage regulator work in Response [Auto] This item allows you to set the slew rate for the Fully Integrated Voltage Regulator when it enters manual override mode. Configuration options: [Auto] [Regular] [Fast] 2-24 Chapter 2: Getting started Use the or keys to adjust the value. Configuration...Idle Power-out Response [Auto] This item allows you to set the slew rate for the Fully Integrated Voltage Regulator when it exits manual override mode. The values range from 0.125 to 1023.875 with a 0.125 interval. Decrease the switching frequency to reduce the power...
...integrated voltage regulator work in Response [Auto] This item allows you to set the slew rate for the Fully Integrated Voltage Regulator when it enters manual override mode. Configuration options: [Auto] [Regular] [Fast] 2-24 Chapter 2: Getting started Use the or keys to adjust the value. Configuration...Idle Power-out Response [Auto] This item allows you to set the slew rate for the Fully Integrated Voltage Regulator when it exits manual override mode. The values range from 0.125 to 1023.875 with a 0.125 interval. Decrease the switching frequency to reduce the power...
User Guide
Page 57
... tolerance to adjust the value. Higher value provides better power-saving condition.Use or key to enlarge the overclocking potential. Configuration options: [Auto] [Manual Mode] [Offset Mode] [Adaptive Mode] • The following item appears only when you set the CPU Core Voltage to 1.920V with a ... to overclock, but does not guarantee the CPU life. It finds the balance between optimal regulating while staying below the current threshold. ASUS Z97-P 2-25 When you enable this item, you can choose a high level voltage to enhance the power saving condition or the system overclocking...
... tolerance to adjust the value. Higher value provides better power-saving condition.Use or key to enlarge the overclocking potential. Configuration options: [Auto] [Manual Mode] [Offset Mode] [Adaptive Mode] • The following item appears only when you set the CPU Core Voltage to 1.920V with a ... to overclock, but does not guarantee the CPU life. It finds the balance between optimal regulating while staying below the current threshold. ASUS Z97-P 2-25 When you enable this item, you can choose a high level voltage to enhance the power saving condition or the system overclocking...
User Guide
Page 58
...Voltage offset and Additional Turbo Mode CPU Core Voltage options. 2.5.17 CPU Cache Voltage [Auto] This item allows you set the CPU Cache Voltage to [Manual Mode]. • [Adaptive Mode] is affected by a negative value. The values range from 0.001V to 0.999V with a 0.001V interval. 2-26...mode. By default, this item takes the standard value of voltage fed to the CPU uncores including its cache. Configuration options: [Auto] [Manual Mode] [Offset Mode] [Adaptive Mode]. • The following item appears only when you to set the amount of the installed CPU. ...
...Voltage offset and Additional Turbo Mode CPU Core Voltage options. 2.5.17 CPU Cache Voltage [Auto] This item allows you set the CPU Cache Voltage to [Manual Mode]. • [Adaptive Mode] is affected by a negative value. The values range from 0.001V to 0.999V with a 0.001V interval. 2-26...mode. By default, this item takes the standard value of voltage fed to the CPU uncores including its cache. Configuration options: [Auto] [Manual Mode] [Offset Mode] [Adaptive Mode]. • The following item appears only when you to set the amount of the installed CPU. ...

User Guide
Page 59
...core frequency. Configuration options: [Auto] [Manual Mode] [Offset Mode] [Adaptive Mode]. • The following item appears only when you to set the CPU Cache Voltage to [Adaptive Mode]. The values range from 0.001V to adjust the value. ASUS Z97-P 2-27 Additional Turbo Mode CPU Cache Voltage...Graphics Voltage [Auto] This item allows you set the CPU Graphics Voltage to set the CPU graphics voltage. The voltage you to [Manual Mode]. • [Adaptive Mode] is affected by a negative value. Increase the graphics voltage when increasing the iGPU frequency. The ...
...core frequency. Configuration options: [Auto] [Manual Mode] [Offset Mode] [Adaptive Mode]. • The following item appears only when you to set the CPU Cache Voltage to [Adaptive Mode]. The values range from 0.001V to adjust the value. ASUS Z97-P 2-27 Additional Turbo Mode CPU Cache Voltage...Graphics Voltage [Auto] This item allows you set the CPU Graphics Voltage to set the CPU graphics voltage. The voltage you to [Manual Mode]. • [Adaptive Mode] is affected by a negative value. Increase the graphics voltage when increasing the iGPU frequency. The ...

User Guide
Page 73
...pin chassis fan. CPU Middle Temperature [25] Use the or keys to set CPU Fan Profile to 100%. The values range from 20% to [Manual]. The following items appear only when you set the CPU fan warning speed. CPU Upper Temperature [70] Use the and keys to adjust the upper... [Silent] to minimize the fan speed for quiet CPU fan operation. [Turbo] Sets to [Turbo] to achieve maximum CPU fan speed. [Manual] Sets to [Manual] to 75ºC. ASUS Z97-P 2-41 Duty Cycle(%) [20] Use the and keys to adjust the CPU fan middle duty cycle. The values range from 25ºC ...
...pin chassis fan. CPU Middle Temperature [25] Use the or keys to set CPU Fan Profile to 100%. The values range from 20% to [Manual]. The following items appear only when you set the CPU fan warning speed. CPU Upper Temperature [70] Use the and keys to adjust the upper... [Silent] to minimize the fan speed for quiet CPU fan operation. [Turbo] Sets to [Turbo] to achieve maximum CPU fan speed. [Manual] Sets to [Manual] to 75ºC. ASUS Z97-P 2-41 Duty Cycle(%) [20] Use the and keys to adjust the CPU fan middle duty cycle. The values range from 25ºC ...
User Guide
Page 74
.... The values range from 60% to set the value for quiet chassis fan operation. [Turbo] Sets to [Turbo] to achieve maximum chassis fan speed. [Manual] Sets to [Manual] to assign detailed fan speed control parameters. Chassis Fan 1/2 Max. Chassis Fan 1/2 Middle Duty Cycle(%) [60] Use the or keys to 75°C. ...range from 60% to 100%. The values range from 60% to 100%. The following four items appear only when you set Chassis Fan 1/2 Profile to [Manual]. Chassis Fan 1/2 Q-Fan Source [CPU] This item controls the assigned fan according to the selected temperature source.
.... The values range from 60% to set the value for quiet chassis fan operation. [Turbo] Sets to [Turbo] to achieve maximum chassis fan speed. [Manual] Sets to [Manual] to assign detailed fan speed control parameters. Chassis Fan 1/2 Max. Chassis Fan 1/2 Middle Duty Cycle(%) [60] Use the or keys to 75°C. ...range from 60% to 100%. The values range from 60% to 100%. The following four items appear only when you set Chassis Fan 1/2 Profile to [Manual]. Chassis Fan 1/2 Q-Fan Source [CPU] This item controls the assigned fan according to the selected temperature source.


