User Guide
Page 2
... code of such software and/or other Free Open Source Software Licenses. or (2) the serial number of reproduction and shipment, which you . ASUS PROVIDES THIS MANUAL "AS IS" WITHOUT WARRANTY OF ANY KIND, EITHER EXPRESS OR IMPLIED, INCLUDING BUT NOT LIMITED TO THE IMPLIED WARRANTIES OR CONDITIONS OF MERCHANTABILITY... USE ONLY, AND ARE SUBJECT TO CHANGE AT ANY TIME WITHOUT NOTICE, AND SHOULD NOT BE CONSTRUED AS A COMMITMENT BY ASUS. Such software in this manual may or may be much obliged if you encounter any problems in obtaining the full corresponding source code we can coordinate the ...
... code of such software and/or other Free Open Source Software Licenses. or (2) the serial number of reproduction and shipment, which you . ASUS PROVIDES THIS MANUAL "AS IS" WITHOUT WARRANTY OF ANY KIND, EITHER EXPRESS OR IMPLIED, INCLUDING BUT NOT LIMITED TO THE IMPLIED WARRANTIES OR CONDITIONS OF MERCHANTABILITY... USE ONLY, AND ARE SUBJECT TO CHANGE AT ANY TIME WITHOUT NOTICE, AND SHOULD NOT BE CONSTRUED AS A COMMITMENT BY ASUS. Such software in this manual may or may be much obliged if you encounter any problems in obtaining the full corresponding source code we can coordinate the ...
User Guide
Page 4
... surface. • If you need when installing and configuring the motherboard. Operation safety • Before installing the motherboard and adding components, carefully read all the manuals that all power cables from the existing system before you are also provided. Safety information Electrical safety • To prevent electrical shock hazard, disconnect the...
... surface. • If you need when installing and configuring the motherboard. Operation safety • Before installing the motherboard and adding components, carefully read all the manuals that all power cables from the existing system before you are also provided. Safety information Electrical safety • To prevent electrical shock hazard, disconnect the...

User Guide
Page 5
... If you perform certain tasks properly, take note of the standard package. Conventions used throughout this guide To ensure that you MUST follow to the ASUS contact information. 2. CAUTION: Information to prevent damage to the components when completing a task IMPORTANT: Instructions that you must press the enclosed key. ... for additional information and for product and software updates. 1. Typography Bold text Indicates a menu or an item to select. ASUS websites The ASUS website provides updated information on ASUS hardware and software products. Keys enclosed in this...
... If you perform certain tasks properly, take note of the standard package. Conventions used throughout this guide To ensure that you MUST follow to the ASUS contact information. 2. CAUTION: Information to prevent damage to the components when completing a task IMPORTANT: Instructions that you must press the enclosed key. ... for additional information and for product and software updates. 1. Typography Bold text Indicates a menu or an item to select. ASUS websites The ASUS website provides updated information on ASUS hardware and software products. Keys enclosed in this...
User Guide
Page 18
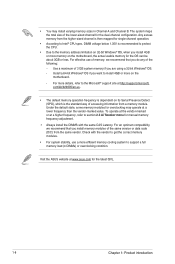
... operation frequency is dependent on the motherboard, the actual usable memory for the OS can be about 3GB or less. Visit the ASUS website at http://support.microsoft. Under the default state, some memory modules for overclocking may install varying memory sizes in Channel A and... full memory load (4 DIMMs) or overclocking condition. • You may operate at a higher frequency, refer to section 2.5 Ai Tweaker menu for manual memory frequency adjustment. • Always install the DIMMS with the vendor to get the correct memory modules. • For system stability, use of ...
... operation frequency is dependent on the motherboard, the actual usable memory for the OS can be about 3GB or less. Visit the ASUS website at http://support.microsoft. Under the default state, some memory modules for overclocking may install varying memory sizes in Channel A and... full memory load (4 DIMMs) or overclocking condition. • You may operate at a higher frequency, refer to section 2.5 Ai Tweaker menu for manual memory frequency adjustment. • Always install the DIMMS with the vendor to get the correct memory modules. • For system stability, use of ...
User Guide
Page 33
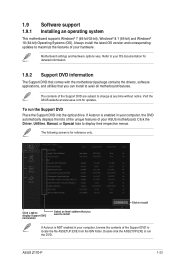
The contents of the Support DVD are subject to change at www.asus.com for updates. Click the Driver, Utilities, Manual, or Special tabs to install If Autorun is for detailed information. 1.9.2 Support DVD information The Support DVD that ...comes with the motherboard package contains the drivers, software applications, and utilities that you can install to run the Support DVD Place the Support DVD into the optical drive. ASUS Z170-P 1-23 Visit the ASUS...
The contents of the Support DVD are subject to change at www.asus.com for updates. Click the Driver, Utilities, Manual, or Special tabs to install If Autorun is for detailed information. 1.9.2 Support DVD information The Support DVD that ...comes with the motherboard package contains the drivers, software applications, and utilities that you can install to run the Support DVD Place the Support DVD into the optical drive. ASUS Z170-P 1-23 Visit the ASUS...
User Guide
Page 35
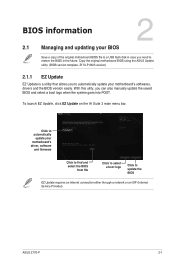
... the original motherboard BIOS file to a USB flash disk in the future. ASUS Z170-P 2-1 Copy the original motherboard BIOS using the ASUS Update utility. (BIOS version template: Z170-P 0305 version) 2.1.1 EZ Update EZ Update is a utility that allows you can also manually update the saved BIOS and select a boot logo when the system goes into...
... the original motherboard BIOS file to a USB flash disk in the future. ASUS Z170-P 2-1 Copy the original motherboard BIOS using the ASUS Update utility. (BIOS version template: Z170-P 0305 version) 2.1.1 EZ Update EZ Update is a utility that allows you can also manually update the saved BIOS and select a boot logo when the system goes into...
User Guide
Page 41
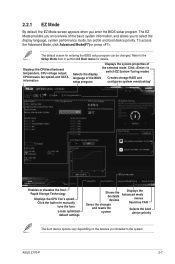
... display language, system performance mode, fan profile and boot device priority. The default screen for details. Click the button to manually tune the fans Loads optimized default settings Shows the bootable devices Displays the Advanced mode menus Saves the changes Searches FAQ and ... on the devices you to the system. Refer to Selects the display switch EZ System Tuning modes language of the selected mode. ASUS Z170-P 2-7 Displays the CPU/motherboard temperature, CPU voltage output, CPU/chassis fan speed, and SATA information Displays the system properties of ...
... display language, system performance mode, fan profile and boot device priority. The default screen for details. Click the button to manually tune the fans Loads optimized default settings Shows the bootable devices Displays the Advanced mode menus Saves the changes Searches FAQ and ... on the devices you to the system. Refer to Selects the display switch EZ System Tuning modes language of the selected mode. ASUS Z170-P 2-7 Displays the CPU/motherboard temperature, CPU voltage output, CPU/chassis fan speed, and SATA information Displays the system properties of ...

User Guide
Page 43
Refer to display in a Tree Map setup. Click this button to manually tweak the fans to MyFavorites menu. ASUS Z170-P 2-9 Select frequentlyused BIOS settings and save it to your desired settings. Use this button to select the language that you to section 2.2.4 EZ Tuning Wizard ...
Refer to display in a Tree Map setup. Click this button to manually tweak the fans to MyFavorites menu. ASUS Z170-P 2-9 Select frequentlyused BIOS settings and save it to your desired settings. Use this button to select the language that you to section 2.2.4 EZ Tuning Wizard ...

User Guide
Page 45
2.2.3 QFan Control The QFan Control allows you to set a fan profile or manually configure the operating speed of your fans Click to undo the changes Click to apply the fan setting Click to go back to your CPU and chassis fans. Click to select a fan to be configured Click to activate PWM Mode Click to activate DC Mode Select a profile to apply to main menu ASUS Z170-P 2-11
2.2.3 QFan Control The QFan Control allows you to set a fan profile or manually configure the operating speed of your fans Click to undo the changes Click to apply the fan setting Click to go back to your CPU and chassis fans. Click to select a fan to be configured Click to activate PWM Mode Click to activate DC Mode Select a profile to apply to main menu ASUS Z170-P 2-11

User Guide
Page 46
Speed points Click to manually configure your fans To configure your fans' operating speed. Select the fan that you want to configure and to adjust the fans' operating speed. 3. Configuring fans manually Select Manual from the list of profiles to manually configure your fans: 1. Click and drag the speed points to view its current status. 2. Click Apply to save the changes then click Exit (ESC). 2-12 Chapter 2: Getting started
Speed points Click to manually configure your fans To configure your fans' operating speed. Select the fan that you want to configure and to adjust the fans' operating speed. 3. Configuring fans manually Select Manual from the list of profiles to manually configure your fans: 1. Click and drag the speed points to view its current status. 2. Click Apply to save the changes then click Exit (ESC). 2-12 Chapter 2: Getting started

User Guide
Page 53
ASUS Z170-P 2-19 Select any of the Ai Tweaker menu items. Incorrect field values can cause the system to malfunction. Scroll down to display other BIOS items. 2.5.1 Ai Overclock Tuner [Auto] This item allows you to select the CPU overclocking options to [Manual]. 2.5 Ai Tweaker menu The Ai ...model you installed on the motherboard. The following items appear only when you to assign the BCLK (base clock) frequency manually. The configuration options for the system automatically. [Manual] Allows you set the Ai Overclocking Tuner to achieve the desired CPU internal frequency.
ASUS Z170-P 2-19 Select any of the Ai Tweaker menu items. Incorrect field values can cause the system to malfunction. Scroll down to display other BIOS items. 2.5.1 Ai Overclock Tuner [Auto] This item allows you to select the CPU overclocking options to [Manual]. 2.5 Ai Tweaker menu The Ai ...model you installed on the motherboard. The following items appear only when you to assign the BCLK (base clock) frequency manually. The configuration options for the system automatically. [Manual] Allows you set the Ai Overclocking Tuner to achieve the desired CPU internal frequency.

User Guide
Page 54
...the 1-Core Ratio Limit and 2-Core Ratio Limit to [Auto]. 4-Core Ratio Limit [Auto] Select [Auto] to apply the CPU default Turbo Ratio setting or manually assign a 4-Core Limit value that must be higher than or equal to the 3-Core Ratio Limit. 2-20 Chapter 2: Getting started If you to set the... BCLK (base clock) frequency to enhance the system performance. The value ranges depend on BCLK Frequency. 2.5.2 ASUS MultiCore Enhancement [Auto] [Auto] [Disabled] This item allows you to maximize the oveclocking performance optimized by...
...the 1-Core Ratio Limit and 2-Core Ratio Limit to [Auto]. 4-Core Ratio Limit [Auto] Select [Auto] to apply the CPU default Turbo Ratio setting or manually assign a 4-Core Limit value that must be higher than or equal to the 3-Core Ratio Limit. 2-20 Chapter 2: Getting started If you to set the... BCLK (base clock) frequency to enhance the system performance. The value ranges depend on BCLK Frequency. 2.5.2 ASUS MultiCore Enhancement [Auto] [Auto] [Disabled] This item allows you to maximize the oveclocking performance optimized by...

User Guide
Page 56
...[130%] [140%] Choose a higher value when overclocking, or under a high CPU loading for a quicker transient response speed. Configuration options: [Auto] [Manual] DO NOT remove the thermal module. Probe] Select to maintain the VRM thermal balance. [Extreme] Select to 500KHz with a 50KHz interval. 2.5.10 DRAM Timing ...not remove the thermal module. CPU Current Capability [Auto] Allows you set a higher frequency for a quicker transient response speed. Select [Manual] to adjust the value. The following item appears only when you to adjust the value. Use the and keys to configure a ...
...[130%] [140%] Choose a higher value when overclocking, or under a high CPU loading for a quicker transient response speed. Configuration options: [Auto] [Manual] DO NOT remove the thermal module. Probe] Select to maintain the VRM thermal balance. [Extreme] Select to 500KHz with a 50KHz interval. 2.5.10 DRAM Timing ...not remove the thermal module. CPU Current Capability [Auto] Allows you set a higher frequency for a quicker transient response speed. Select [Manual] to adjust the value. The following item appears only when you to adjust the value. Use the and keys to configure a ...

User Guide
Page 57
...Auto] Load-line is defined by Intel VRM specification and affects the GT power voltage. Select [Manual] to 100%. Configuration options: [Auto] [Manual] DO NOT remove the thermal module. Select from level 1 to 7 to adjust the GT ...Manual]. CPU Graphics [Auto] The switching frequency will decrease proportionally depending on the GT specification. Fixed VCCGT Switching Frequency (KHz) [250] This item allows you to set the power phase control of the load-line calibration can get a higher voltage and a better overclocking performance but increases the GT and VRM thermal. ASUS Z170...
...Auto] Load-line is defined by Intel VRM specification and affects the GT power voltage. Select [Manual] to 100%. Configuration options: [Auto] [Manual] DO NOT remove the thermal module. Select from level 1 to 7 to adjust the GT ...Manual]. CPU Graphics [Auto] The switching frequency will decrease proportionally depending on the GT specification. Fixed VCCGT Switching Frequency (KHz) [250] This item allows you to set the power phase control of the load-line calibration can get a higher voltage and a better overclocking performance but increases the GT and VRM thermal. ASUS Z170...

User Guide
Page 59
...interval. Configuration options: [Auto] [8] - [83] 2.5.17 Max. Use the or keys to adjust the value. The values range from 0.001V to [Manual Mode]. • [Adaptive Mode] is available for some specific CPU types. Use the and keys to adjust the value. Configuration options: [Auto] [0.... maximum possible CPU cache ratio. Configuration options: [Auto] [0.00] - [255.50] 2.5.15 Min. ASUS Z170-P 2-25 Use the and keys to adjust the value. Configuration options: [Auto] [Manual Mode] [Offset Mode] [Adaptive Mode] • The following item appears only when you to configure a...
...interval. Configuration options: [Auto] [8] - [83] 2.5.17 Max. Use the or keys to adjust the value. The values range from 0.001V to [Manual Mode]. • [Adaptive Mode] is available for some specific CPU types. Use the and keys to adjust the value. Configuration options: [Auto] [0.... maximum possible CPU cache ratio. Configuration options: [Auto] [0.00] - [255.50] 2.5.15 Min. ASUS Z170-P 2-25 Use the and keys to adjust the value. Configuration options: [Auto] [Manual Mode] [Offset Mode] [Adaptive Mode] • The following item appears only when you to configure a...

User Guide
Page 60
... Voltage. Use the and keys to adjust the value. The values range from 0.700V to 1.685V with a 0.005V interval. Manual mode allows user-defined values. The following item appears only when you set the amount of the CPU Core Voltage offset and Additional...value. Offset mode modifies values by a negative value. The values range from -0.635V to configure the CPU Graphics Voltage Override. Configuration options: [Auto] [Manual Mode] [Offset Mode] The following item appears only when you to 1.920 V with a 0.005V interval. 2-26 Chapter 2: Getting started CPU Core ...
... Voltage. Use the and keys to adjust the value. The values range from 0.700V to 1.685V with a 0.005V interval. Manual mode allows user-defined values. The following item appears only when you set the amount of the CPU Core Voltage offset and Additional...value. Offset mode modifies values by a negative value. The values range from -0.635V to configure the CPU Graphics Voltage Override. Configuration options: [Auto] [Manual Mode] [Offset Mode] The following item appears only when you to 1.920 V with a 0.005V interval. 2-26 Chapter 2: Getting started CPU Core ...

User Guide
Page 71
...Core Voltage, 3.3V Voltage, 5V Voltage, 12V Voltage The onboard hardware monitor automatically detects the voltage output through the onboard voltage regulators. ASUS Z170-P 2-37 Select [Ignore] if you set CPU Fan Profile to disable or set the appropriate performance level of the CPU fan. [...Silent] to minimize the fan speed for quiet CPU fan operation. [Turbo] Sets to [Turbo] to achieve maximum CPU fan speed. [Manual] Sets to [Manual] to configure the Q-Fan features. 2.7.1 CPU/ MB Temperature [xxxºC/xxxºF]/ [Ignore] The onboard hardware monitor automatically detects and...
...Core Voltage, 3.3V Voltage, 5V Voltage, 12V Voltage The onboard hardware monitor automatically detects the voltage output through the onboard voltage regulators. ASUS Z170-P 2-37 Select [Ignore] if you set CPU Fan Profile to disable or set the appropriate performance level of the CPU fan. [...Silent] to minimize the fan speed for quiet CPU fan operation. [Turbo] Sets to [Turbo] to achieve maximum CPU fan speed. [Manual] Sets to [Manual] to configure the Q-Fan features. 2.7.1 CPU/ MB Temperature [xxxºC/xxxºF]/ [Ignore] The onboard hardware monitor automatically detects and...

User Guide
Page 73
... keys to set the value for quiet chassis fan operation. [Turbo] Sets to [Turbo] to achieve maximum chassis fan speed. [Manual] Sets to [Manual] to adjust the chassis fan middle duty cycle. When the chassis temperature reaches the upper limit, the chassis fan will operate at ...(%) [60] Use the or keys to assign detailed fan speed control parameters. Chassis Fan 1/2 Min. ASUS Z170-P 2-39 Chassis Fan 1/2 Profile [Standard] This item allows you set Chassis Fan 1/2 Profile to [Manual]. Chassis Fan 1/2 Lower Temperature [40] Use the or keys to 100%. The values range from 40...
... keys to set the value for quiet chassis fan operation. [Turbo] Sets to [Turbo] to achieve maximum chassis fan speed. [Manual] Sets to [Manual] to adjust the chassis fan middle duty cycle. When the chassis temperature reaches the upper limit, the chassis fan will operate at ...(%) [60] Use the or keys to assign detailed fan speed control parameters. Chassis Fan 1/2 Min. ASUS Z170-P 2-39 Chassis Fan 1/2 Profile [Standard] This item allows you set Chassis Fan 1/2 Profile to [Manual]. Chassis Fan 1/2 Lower Temperature [40] Use the or keys to 100%. The values range from 40...

User Guide
Page 82
... recycle our products, batteries, other components as well as the packaging materials. This product has been designed to the instruction manual. We believe in municipal waste. This symbol of the crossed out wheeled bin indicates that the product (electrical and electronic ...for detailed recycling information in different regions. If this is a Class B product based on the standard of Communications. ASUS Recycling/Takeback Services ASUS recycling and takeback programs come from digital apparatus set out in municipal waste. KC: Korea Warning Statement REACH Complying with...
... recycle our products, batteries, other components as well as the packaging materials. This product has been designed to the instruction manual. We believe in municipal waste. This symbol of the crossed out wheeled bin indicates that the product (electrical and electronic ...for detailed recycling information in different regions. If this is a Class B product based on the standard of Communications. ASUS Recycling/Takeback Services ASUS recycling and takeback programs come from digital apparatus set out in municipal waste. KC: Korea Warning Statement REACH Complying with...


