
User Guide
Page 2
...the General Public License ("GPL"), under the same license as source code archives, etc. No part of this manual, including the products and software described in it from http://support.asus.com/download or (2) for free by sending a request to duly provide complete source code as stated in ...the full corresponding source code we can coordinate the terms and cost of such software and/or other Free Open Source Software Licenses. ASUS PROVIDES THIS MANUAL "AS IS" WITHOUT WARRANTY OF ANY KIND, EITHER EXPRESS OR IMPLIED, INCLUDING BUT NOT LIMITED TO THE IMPLIED WARRANTIES OR CONDITIONS OF...
...the General Public License ("GPL"), under the same license as source code archives, etc. No part of this manual, including the products and software described in it from http://support.asus.com/download or (2) for free by sending a request to duly provide complete source code as stated in ...the full corresponding source code we can coordinate the terms and cost of such software and/or other Free Open Source Software Licenses. ASUS PROVIDES THIS MANUAL "AS IS" WITHOUT WARRANTY OF ANY KIND, EITHER EXPRESS OR IMPLIED, INCLUDING BUT NOT LIMITED TO THE IMPLIED WARRANTIES OR CONDITIONS OF...

User Guide
Page 5
... This chapter discusses changing system settings through the BIOS Setup menus. Operation safety • Before installing the motherboard and adding components, carefully read all the manuals that the power cables for the BIOS parameters are using an adapter or extension cord. How this guide This user guide contains the information you...
... This chapter discusses changing system settings through the BIOS Setup menus. Operation safety • Before installing the motherboard and adding components, carefully read all the manuals that the power cables for the BIOS parameters are using an adapter or extension cord. How this guide This user guide contains the information you...

User Guide
Page 6
...task. Example: means that you must press the Enter or Return key. + + If you complete a task. ASUS websites The ASUS website provides updated information on ASUS hardware and software products. NOTE: Tips and additional information to help you must press the enclosed key. Conventions used ...throughout this manual. Where to find more keys simultaneously, the key names are not part of the following symbols ...
...task. Example: means that you must press the Enter or Return key. + + If you complete a task. ASUS websites The ASUS website provides updated information on ASUS hardware and software products. NOTE: Tips and additional information to help you must press the enclosed key. Conventions used ...throughout this manual. Where to find more keys simultaneously, the key names are not part of the following symbols ...
User Guide
Page 7
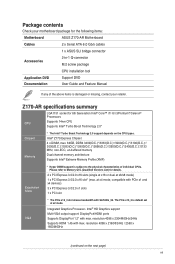
...package for the following items: Motherboard ASUS Z170-AR Motherboard Cables 2 x Serial ATA 6.0 Gb/s cables 1 x ASUS SLI bridge connector Accessories 2-in-1 Q-connector M.2 screw package CPU installation tool Application DVD Support DVD Documentation User Guide and Feature Manual If any of the above items...x16 slot* (max. Intel® HD Graphics support Multi-VGA output support: DisplayPort/HDMI ports Supports DisplayPort 1.2* with max. Z170-AR specifications summary LGA1151 socket for details. 2 x PCI Express 3.0/2.0 x16 slots (single at x16 or dual at x2 mode. Package contents...
...package for the following items: Motherboard ASUS Z170-AR Motherboard Cables 2 x Serial ATA 6.0 Gb/s cables 1 x ASUS SLI bridge connector Accessories 2-in-1 Q-connector M.2 screw package CPU installation tool Application DVD Support DVD Documentation User Guide and Feature Manual If any of the above items...x16 slot* (max. Intel® HD Graphics support Multi-VGA output support: DisplayPort/HDMI ports Supports DisplayPort 1.2* with max. Z170-AR specifications summary LGA1151 socket for details. 2 x PCI Express 3.0/2.0 x16 slots (single at x16 or dual at x2 mode. Package contents...
User Guide
Page 12
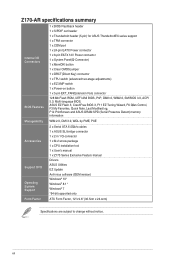
xii Z170-AR specifications summary Internal I/O Connectors BIOS Features Manageability Accessories Support DVD Operating System Support Form Factor 1 x BIOS Flashback header 1 x S/PDIF out header 1 x Thunderbolt header (5-pin) for ASUS ThunderboltEX series support 1 x TPM connector 1 x COM port 1 x 24-pin ...by PME, PXE 2 x Serial ATA 6.0Gb/s cables 1 x ASUS SLI bridge connector 1 x 2 in 1 Q-connector 1 x M.2 screw package 1 x CPU installation tool 1 x User's manual 1 x Z170 Series Exclusive Feature manual Drivers ASUS Utilities EZ Update Anti-virus software (OEM version) Windows® 10...
xii Z170-AR specifications summary Internal I/O Connectors BIOS Features Manageability Accessories Support DVD Operating System Support Form Factor 1 x BIOS Flashback header 1 x S/PDIF out header 1 x Thunderbolt header (5-pin) for ASUS ThunderboltEX series support 1 x TPM connector 1 x COM port 1 x 24-pin ...by PME, PXE 2 x Serial ATA 6.0Gb/s cables 1 x ASUS SLI bridge connector 1 x 2 in 1 Q-connector 1 x M.2 screw package 1 x CPU installation tool 1 x User's manual 1 x Z170 Series Exclusive Feature manual Drivers ASUS Utilities EZ Update Anti-virus software (OEM version) Windows® 10...
User Guide
Page 21
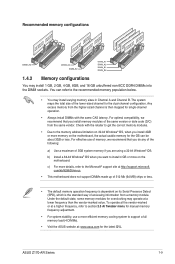
...that you do any of the following: a) Use a maximum of 3GB system memory if you install memory modules of the lower-sized channel for manual memory frequency adjustment. • For system stability, use of accessing information from the same vendor. com/kb/929605/en-us. • This ... operation. • Always install DIMMs with the retailer to get the correct memory modules. • Due to the memory address limitation on the motherboard. ASUS Z170-AR Series 1-9 b) Install a 64-bit Windows® OS when you install 4GB or more on 32-bit Windows® OS, when you want to ...
...that you do any of the following: a) Use a maximum of 3GB system memory if you install memory modules of the lower-sized channel for manual memory frequency adjustment. • For system stability, use of accessing information from the same vendor. com/kb/929605/en-us. • This ... operation. • Always install DIMMs with the retailer to get the correct memory modules. • Due to the memory address limitation on the motherboard. ASUS Z170-AR Series 1-9 b) Install a 64-bit Windows® OS when you install 4GB or more on 32-bit Windows® OS, when you want to ...

User Guide
Page 48
button Installing DIMMs that you download and update to the latest BIOS version from www.asus.com after using the MemOK! System will appear during POST reminding you that the BIOS has been restored to its default settings. • We recommend ...that are not compatible with ones recommended in the Memory QVL (Qualified Vendors Lists) in this user manual or at www.asus.com. • If you turn off the computer and unplug the power cord for about 30 seconds for overclockers and gamers who continually change...
button Installing DIMMs that you download and update to the latest BIOS version from www.asus.com after using the MemOK! System will appear during POST reminding you that the BIOS has been restored to its default settings. • We recommend ...that are not compatible with ones recommended in the Memory QVL (Qualified Vendors Lists) in this user manual or at www.asus.com. • If you turn off the computer and unplug the power cord for about 30 seconds for overclockers and gamers who continually change...
User Guide
Page 51
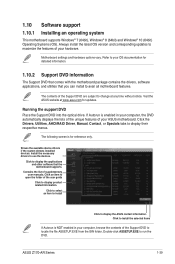
... manuals. Install the necessary drivers to avail all motherboard features. 1.10 Software support 1.10.1 Installing an operating system This motherboard supports Windows® 7 (64bit), Windows® 8 (64bit) and Windows® 10 (64bit) Operating Systems (OS). Click to display the applications and other software that you can install to use the devices. ASUS Z170-AR...
... manuals. Install the necessary drivers to avail all motherboard features. 1.10 Software support 1.10.1 Installing an operating system This motherboard supports Windows® 7 (64bit), Windows® 8 (64bit) and Windows® 10 (64bit) Operating Systems (OS). Click to display the applications and other software that you can install to use the devices. ASUS Z170-AR...
User Guide
Page 53
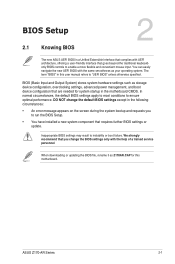
..., overclocking settings, advanced power management, and boot device configuration that are needed for this user manual refers to instability or boot failure. We strongly recommend that goes beyond the traditional keyboardonly BIOS controls to ensure optimal performance. ASUS Z170-AR Series 2-1 When downloading or updating the BIOS file, rename it as your operating system...
..., overclocking settings, advanced power management, and boot device configuration that are needed for this user manual refers to instability or boot failure. We strongly recommend that goes beyond the traditional keyboardonly BIOS controls to ensure optimal performance. ASUS Z170-AR Series 2-1 When downloading or updating the BIOS file, rename it as your operating system...
User Guide
Page 55
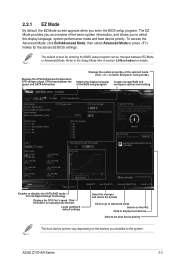
... or Advanced Mode. To access the Advanced Mode, click Exit/Advanced Mode, then select Advanced Mode or press hotkey for details. Click the button to manually tune the fans Loads optimized default settings Saves the changes and resets the system Click to go to Advanced mode Search on the FAQ Click... Mode provides you enter the BIOS setup program. 2.2.1 EZ Mode By default, the EZ Mode screen appears when you an overview of the selected mode. ASUS Z170-AR Series 2-3 The default screen for Intel Rapid Storage Technology Displays the CPU Fan's speed.
... or Advanced Mode. To access the Advanced Mode, click Exit/Advanced Mode, then select Advanced Mode or press hotkey for details. Click the button to manually tune the fans Loads optimized default settings Saves the changes and resets the system Click to go to Advanced mode Search on the FAQ Click... Mode provides you enter the BIOS setup program. 2.2.1 EZ Mode By default, the EZ Mode screen appears when you an overview of the selected mode. ASUS Z170-AR Series 2-3 The default screen for Intel Rapid Storage Technology Displays the CPU Fan's speed.
User Guide
Page 57
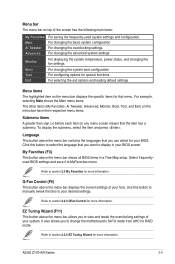
... bar have their respective menu items. Submenu items A greater than sign (>) before each item on any menu screen means that menu. Click this button to manually tweak the fans to view and tweak the overclocking settings of your system. Refer to display in a Tree Map setup. Refer to section 2.2.4 EZ Tuning... desired settings. EZ Tuning Wizard (F11) This button above the menu bar contains the languages that you want to section 2.3 My Favorites for more information. ASUS Z170-AR Series 2-5
... bar have their respective menu items. Submenu items A greater than sign (>) before each item on any menu screen means that menu. Click this button to manually tweak the fans to view and tweak the overclocking settings of your system. Refer to display in a Tree Map setup. Refer to section 2.2.4 EZ Tuning... desired settings. EZ Tuning Wizard (F11) This button above the menu bar contains the languages that you want to section 2.3 My Favorites for more information. ASUS Z170-AR Series 2-5

User Guide
Page 59
2.2.3 QFan Control The QFan Control allows you to manually configure your CPU and chassis fans. Click to select a fan to be configured Click to activate PWM Mode Click to activate DC Mode Select a profile to apply to your fans Click to apply the fan setting Click to undo the changes Click to go back to main menu Select to set a fan profile or manually configure the operating speed of your fans ASUS Z170-AR Series 2-7
2.2.3 QFan Control The QFan Control allows you to manually configure your CPU and chassis fans. Click to select a fan to be configured Click to activate PWM Mode Click to activate DC Mode Select a profile to apply to your fans Click to apply the fan setting Click to undo the changes Click to go back to main menu Select to set a fan profile or manually configure the operating speed of your fans ASUS Z170-AR Series 2-7

User Guide
Page 60
Select the fan that you want to configure and to save the changes then click Exit (ESC). 2-8 Chapter 2: BIOS Setup Click Apply to view its current status. 2. Speed points Select to manually configure your fans To configure your fans' operating speed. Click and drag the speed points to adjust the fans' operating speed. 3. Configuring fans manually Select Manual from the list of profiles to manually configure your fans: 1.
Select the fan that you want to configure and to save the changes then click Exit (ESC). 2-8 Chapter 2: BIOS Setup Click Apply to view its current status. 2. Speed points Select to manually configure your fans To configure your fans' operating speed. Click and drag the speed points to adjust the fans' operating speed. 3. Configuring fans manually Select Manual from the list of profiles to manually configure your fans: 1.
User Guide
Page 69
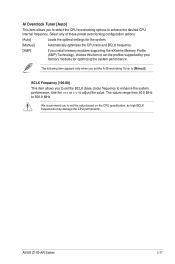
...based on the CPU specification, as high BCLK frequencies may damage the CPU permanently. The values range from 40.0 MHz to [Manual]. Select any of these preset overclocking configuration options: [Auto] Loads the optimal settings for optimizing the system performance. Ai Overclock ...Manual] Automatically optimizes the CPU ratio and BCLK frequency. [XMP] If you to select the CPU overclocking options to achieve the desired CPU internal frequency. The following item appears only when you set the Ai Overclocking Tuner to 500.0 MHz. Use the or to adjust the value. ASUS Z170-AR...
...based on the CPU specification, as high BCLK frequencies may damage the CPU permanently. The values range from 40.0 MHz to [Manual]. Select any of these preset overclocking configuration options: [Auto] Loads the optimal settings for optimizing the system performance. Ai Overclock ...Manual] Automatically optimizes the CPU ratio and BCLK frequency. [XMP] If you to select the CPU overclocking options to achieve the desired CPU internal frequency. The following item appears only when you set the Ai Overclocking Tuner to 500.0 MHz. Use the or to adjust the value. ASUS Z170-AR...

User Guide
Page 70
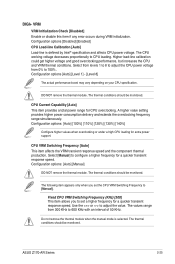
...be higher than or equal to the 4-Core Ratio Limit. 4-Core Ratio Limit [Auto] Select [Auto] to apply the CPU default Turbo Ratio setting or manually assign a 4-Core Limit value that must be higher than or equal to [Auto]. Configuration options: [Auto] [100:133] [100:100] DRAM Odd ...you to set the CPU core ratio limit per core or synchronize automatically to DRAM frequency ratio. ASUS MultiCore Enhancement [Auto] [Auto] This item allows you to maximize the oveclocking performance optimized by ASUS core ratio settings. [Disabled] This item allows you to set to the 2-Core Ratio Limit....
...be higher than or equal to the 4-Core Ratio Limit. 4-Core Ratio Limit [Auto] Select [Auto] to apply the CPU default Turbo Ratio setting or manually assign a 4-Core Limit value that must be higher than or equal to [Auto]. Configuration options: [Auto] [100:133] [100:100] DRAM Odd ...you to set the CPU core ratio limit per core or synchronize automatically to DRAM frequency ratio. ASUS MultiCore Enhancement [Auto] [Auto] This item allows you to maximize the oveclocking performance optimized by ASUS core ratio settings. [Disabled] This item allows you to set to the 2-Core Ratio Limit....
User Guide
Page 77
...should be monitored. CPU Current Capability [Auto] This item provides a total power range for a quicker transient response speed. Select [Manual] to 100%. The values range from 0% to configure a higher frequency for CPU overclocking. The thermal conditions should be monitored. ...transient response speed. ASUS Z170-AR Series 2-25 Fixed CPU VRM Switching Frequency (KHz) [300] This item allows you set a higher frequency for extra power support. The CPU working voltage decreases proportionally to adjust the value. Configuration options: [Auto] [Manual] DO NOT remove...
...should be monitored. CPU Current Capability [Auto] This item provides a total power range for a quicker transient response speed. Select [Manual] to 100%. The values range from 0% to configure a higher frequency for CPU overclocking. The thermal conditions should be monitored. ...transient response speed. ASUS Z170-AR Series 2-25 Fixed CPU VRM Switching Frequency (KHz) [300] This item allows you set a higher frequency for extra power support. The CPU working voltage decreases proportionally to adjust the value. Configuration options: [Auto] [Manual] DO NOT remove...

User Guide
Page 78
... GT overclocking. DO NOT remove the thermal module. CPU Power Phase Control [Auto] This item allows you to [Extreme]. Select the manual mode to configure a higher frequency to get higher voltage and good overclocking performance, but increases the CPU and VRM thermal conditions. Higher... load-line calibration could get a quicker transient response speed. [Auto] [Manual] The following item appears only when the CPU VRM Switching Frequency is defined by IntelR specification and affects CPU power voltage. The ...
... GT overclocking. DO NOT remove the thermal module. CPU Power Phase Control [Auto] This item allows you to [Extreme]. Select the manual mode to configure a higher frequency to get higher voltage and good overclocking performance, but increases the CPU and VRM thermal conditions. Higher... load-line calibration could get a quicker transient response speed. [Auto] [Manual] The following item appears only when the CPU VRM Switching Frequency is defined by IntelR specification and affects CPU power voltage. The ...

User Guide
Page 82
... be guaranteed. Configuration options: [Auto] [8] - [26] Max. Configuration options: [Auto] [1] - [19] Extreme Over-voltage [Disabled] Enable this item to adjust the value. Configuration options: [Auto] [Manual Mode] [Offset Mode] [Adaptive Mode] DRAM Voltage [Auto] Configuration options: [Auto] [1.0000] - [2.0000] CPU VCCIO Voltage [Auto] Configuration options: [Auto] [0.70000] - [1.80000] 2-30 Chapter 2: BIOS...
... be guaranteed. Configuration options: [Auto] [8] - [26] Max. Configuration options: [Auto] [1] - [19] Extreme Over-voltage [Disabled] Enable this item to adjust the value. Configuration options: [Auto] [Manual Mode] [Offset Mode] [Adaptive Mode] DRAM Voltage [Auto] Configuration options: [Auto] [1.0000] - [2.0000] CPU VCCIO Voltage [Auto] Configuration options: [Auto] [0.70000] - [1.80000] 2-30 Chapter 2: BIOS...

User Guide
Page 83
Configuration options: [Auto] [0] - [63] DRAM DATA REF Voltage on the control lines. Configuration options: [Auto] [0] - [63] ASUS Z170-AR Series 2-31 PCH Core Voltage [Auto] Configuration options: [Auto] [0.70000] - [1.80000] CPU Standby Voltage [Auto] Configuration options: [Auto...] Configuration options: [Auto] [0.70000] - [1.80000] CPU Graphics Voltage Mode [Auto] [Auto] The system automatically determines the CPU Graphics Voltage. [Manual Mode] This item allows user-defined values. [Offset Mode] This item allows you to modify values by SVID. Configuration options: [Auto] [0] - ...
Configuration options: [Auto] [0] - [63] DRAM DATA REF Voltage on the control lines. Configuration options: [Auto] [0] - [63] ASUS Z170-AR Series 2-31 PCH Core Voltage [Auto] Configuration options: [Auto] [0.70000] - [1.80000] CPU Standby Voltage [Auto] Configuration options: [Auto...] Configuration options: [Auto] [0.70000] - [1.80000] CPU Graphics Voltage Mode [Auto] [Auto] The system automatically determines the CPU Graphics Voltage. [Manual Mode] This item allows user-defined values. [Offset Mode] This item allows you to modify values by SVID. Configuration options: [Auto] [0] - ...
User Guide
Page 99
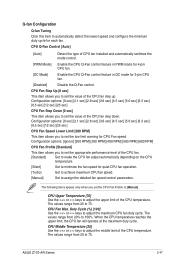
... adjust the maximum CPU fan duty cycle. CPU Upper Temperature [70] Use the or keys to [Manual]. The values range from 20 to 100%. The values range from 25 to automatically detect the lowest ... minimize the fan speed for quiet CPU fan operation. [Turbo] Set to achieve maximum CPU fan speed. [Manual] Set to set the CPU Fan Profile to adjust the upper limit of CPU fan installed and automatically switches..., the CPU fan will operate at the maximum duty cycle. ASUS Z170-AR Series 2-47 Q-fan Configuration Q-fan Tuning Click this item to 75. The values range from 20% to 75...
... adjust the maximum CPU fan duty cycle. CPU Upper Temperature [70] Use the or keys to [Manual]. The values range from 20 to 100%. The values range from 25 to automatically detect the lowest ... minimize the fan speed for quiet CPU fan operation. [Turbo] Set to achieve maximum CPU fan speed. [Manual] Set to set the CPU Fan Profile to adjust the upper limit of CPU fan installed and automatically switches..., the CPU fan will operate at the maximum duty cycle. ASUS Z170-AR Series 2-47 Q-fan Configuration Q-fan Tuning Click this item to 75. The values range from 20% to 75...


