User Guide
Page 3
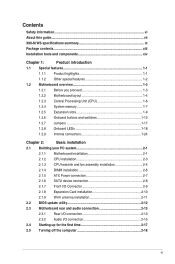
Contents Safety information...vi About this guide...vii X99-M WS specifications summary ix Package contents...xiii Installation tools and components xiv Chapter 1: Product introduction 1.1 Special features ...installation 2-6 2.1.5 ATX Power connection 2-7 2.1.6 SATA device connection 2-8 2.1.7 Front I/O Connector 2-9 2.1.8 Expansion Card installation 2-10 2.1.9 Wi-Fi antenna installation 2-11 2.2 BIOS update utility 2-12 2.3 Motherboard rear and audio connection 2-13 2.3.1 Rear I/O connection 2-13 2.3.2 Audio I/O connection 2-15 2.4 Starting up for the first time 2-17...
Contents Safety information...vi About this guide...vii X99-M WS specifications summary ix Package contents...xiii Installation tools and components xiv Chapter 1: Product introduction 1.1 Special features ...installation 2-6 2.1.5 ATX Power connection 2-7 2.1.6 SATA device connection 2-8 2.1.7 Front I/O Connector 2-9 2.1.8 Expansion Card installation 2-10 2.1.9 Wi-Fi antenna installation 2-11 2.2 BIOS update utility 2-12 2.3 Motherboard rear and audio connection 2-13 2.3.1 Rear I/O connection 2-13 2.3.2 Audio I/O connection 2-15 2.4 Starting up for the first time 2-17...
User Guide
Page 4
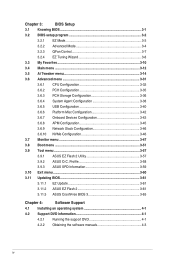
...3-59 3.10 Exit menu 3-60 3.11 Updating BIOS 3-61 3.11.1 EZ Update 3-61 3.11.2 ASUS EZ Flash 2 3-61 3.11.3 ASUS CrashFree BIOS 3 3-63 Chapter 4: Software Support 4.1 Installing an operating system 4-1 4.2 Support DVD information 4-1 4.2.1 Running the support DVD 4-1 4.2.2 Obtaining the software manuals 4-3 iv Chapter 3: BIOS Setup 3.1 Knowing BIOS 3-1 3.2 BIOS setup program 3-2 3.2.1 EZ Mode 3-3 ... Network Stack Configuration 3-46 3.6.10 NVMe Configuration 3-46 3.7 Monitor menu 3-47 3.8 Boot menu 3-51 3.9 Tool menu 3-57 3.9.1 ASUS EZ Flash 2 Utility 3-57...
...3-59 3.10 Exit menu 3-60 3.11 Updating BIOS 3-61 3.11.1 EZ Update 3-61 3.11.2 ASUS EZ Flash 2 3-61 3.11.3 ASUS CrashFree BIOS 3 3-63 Chapter 4: Software Support 4.1 Installing an operating system 4-1 4.2 Support DVD information 4-1 4.2.1 Running the support DVD 4-1 4.2.2 Obtaining the software manuals 4-3 iv Chapter 3: BIOS Setup 3.1 Knowing BIOS 3-1 3.2 BIOS setup program 3-2 3.2.1 EZ Mode 3-3 ... Network Stack Configuration 3-46 3.6.10 NVMe Configuration 3-46 3.7 Monitor menu 3-47 3.8 Boot menu 3-51 3.9 Tool menu 3-57 3.9.1 ASUS EZ Flash 2 Utility 3-57...
User Guide
Page 5
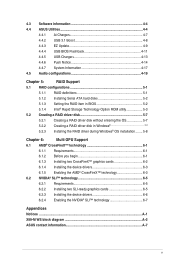
... 4.4 ASUS Utilities 4-4 4.4.1 Ai Charger 4-7 4.4.2 USB 3.1 Boost 4-8 4.4.3 EZ Update 4-9 4.4.4 USB BIOS Flashback 4-11 4.4.5 USB Charger 4-13 4.4.6 Push Notice 4-14 4.4.7 System Information 4-17 4.5 Audio configurations 4-19 Chapter 5: RAID Support 5.1 RAID configurations 5-1 5.1.1 RAID definitions 5-1 5.1.2 Installing Serial ATA hard disks 5-2 5.1.3 Setting the RAID item in BIOS 5-2... 6-5 6.2.3 Installing the device drivers 6-6 6.2.4 Enabling the NVIDIA® SLI™ technology 6-7 Appendices Notices ...A-1 X99-M WS block diagram A-2 ASUS contact information A-7 v
... 4.4 ASUS Utilities 4-4 4.4.1 Ai Charger 4-7 4.4.2 USB 3.1 Boost 4-8 4.4.3 EZ Update 4-9 4.4.4 USB BIOS Flashback 4-11 4.4.5 USB Charger 4-13 4.4.6 Push Notice 4-14 4.4.7 System Information 4-17 4.5 Audio configurations 4-19 Chapter 5: RAID Support 5.1 RAID configurations 5-1 5.1.1 RAID definitions 5-1 5.1.2 Installing Serial ATA hard disks 5-2 5.1.3 Setting the RAID item in BIOS 5-2... 6-5 6.2.3 Installing the device drivers 6-6 6.2.4 Enabling the NVIDIA® SLI™ technology 6-7 Appendices Notices ...A-1 X99-M WS block diagram A-2 ASUS contact information A-7 v
User Guide
Page 7
... 1. About this guide is organized This guide contains the following sources for additional information and for product and software updates. 1. How this guide This user guide contains the information you have been added by your dealer. It includes description...Support This chapter describes the contents of the switches, jumpers, and connectors on ASUS hardware and software products. 2. ASUS website The ASUS website (www.asus.com) provides updated information on the motherboard. 2. Chapter 3: BIOS Setup This chapter tells how to install and configure multiple AMD® CrossFire&#...
... 1. About this guide is organized This guide contains the following sources for additional information and for product and software updates. 1. How this guide This user guide contains the information you have been added by your dealer. It includes description...Support This chapter describes the contents of the switches, jumpers, and connectors on ASUS hardware and software products. 2. ASUS website The ASUS website (www.asus.com) provides updated information on the motherboard. 2. Chapter 3: BIOS Setup This chapter tells how to install and configure multiple AMD® CrossFire&#...

User Guide
Page 27
...off the computer and replace DIMMs during POST reminding you that you turn off the system and reinstall the DIMM before using the MemOK! ASUS X99-M WS 1-13 Chapter 1 3. If the test fails, the system reboots and test the next set is not properly installed. function. button ...QVL (Qualified Vendors Lists) in this user manual or at www.asus.com. • If you download and update to its default settings. • We recommend that the BIOS has been restored to the latest BIOS version from www.asus.com after turning on the computer. button lights continuously. function....
...off the computer and replace DIMMs during POST reminding you that you turn off the system and reinstall the DIMM before using the MemOK! ASUS X99-M WS 1-13 Chapter 1 3. If the test fails, the system reboots and test the next set is not properly installed. function. button ...QVL (Qualified Vendors Lists) in this user manual or at www.asus.com. • If you download and update to its default settings. • We recommend that the BIOS has been restored to the latest BIOS version from www.asus.com after turning on the computer. button lights continuously. function....

User Guide
Page 60
... times, indicating that supports USB BIOS Flashback. 3. Download the latest BIOS from the support site at http://support.asus.com and save the latest BIOS version for better compatibility and stability. 2. In case of the USB storage device and filename/file format error. If this means that the BIOS updating process is damaged during the process...
... times, indicating that supports USB BIOS Flashback. 3. Download the latest BIOS from the support site at http://support.asus.com and save the latest BIOS version for better compatibility and stability. 2. In case of the USB storage device and filename/file format error. If this means that the BIOS updating process is damaged during the process...
User Guide
Page 62
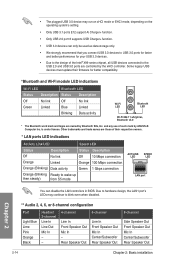
...port 8 supports USB Charger+ function. • USB 3.0 devices can disable the LAN controllers in BIOS. Other trademarks and trade names are controlled by the xHCI controller. Rear Speaker Out 6-channel Line...ports are those of such mark by ASUSTeK Computer Inc. Some legacy USB devices must update their respective owners. * LAN ports LED indications Activity Link LED Speed LED Status ... better performance for your USB 3.0 devices. • Due to the design of the Intel® X99 series chipset, all USB devices connected to blink even when disabled. ** Audio 2, 4, 6, or...
...port 8 supports USB Charger+ function. • USB 3.0 devices can disable the LAN controllers in BIOS. Other trademarks and trade names are controlled by the xHCI controller. Rear Speaker Out 6-channel Line...ports are those of such mark by ASUSTeK Computer Inc. Some legacy USB devices must update their respective owners. * LAN ports LED indications Activity Link LED Speed LED Status ... better performance for your USB 3.0 devices. • Due to the design of the Intel® X99 series chipset, all USB devices connected to blink even when disabled. ** Audio 2, 4, 6, or...
User Guide
Page 67
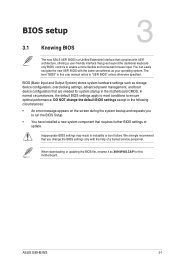
... of a trained service personnel. The term "BIOS" in the following circumstances: • An error message appears on the screen during the system bootup and requests you change the default BIOS settings except in this motherboard. Inappropriate BIOS settings may result to ensure optimal performance. We strongly recommend that requires further BIOS settings or update. Chapter 3 ASUS X99-M WS 3-1
... of a trained service personnel. The term "BIOS" in the following circumstances: • An error message appears on the screen during the system bootup and requests you change the default BIOS settings except in this motherboard. Inappropriate BIOS settings may result to ensure optimal performance. We strongly recommend that requires further BIOS settings or update. Chapter 3 ASUS X99-M WS 3-1
User Guide
Page 68
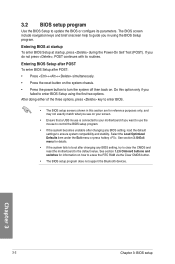
... 3.10 Exit menu for details. • If the system fails to boot after changing any BIOS setting, try to clear the CMOS and reset the motherboard to enter BIOS Setup using the BIOS Setup program. Do this section are for information on your screen. • Ensure that a USB... off then back on the system chassis. • Press the power button to ensure system compatibility and stability. 3.2 BIOS setup program Use the BIOS Setup to update the BIOS or configure its routines. Entering BIOS at startup To enter BIOS Setup at startup, press during the Power-On Self Test (POST).
... 3.10 Exit menu for details. • If the system fails to boot after changing any BIOS setting, try to clear the CMOS and reset the motherboard to enter BIOS Setup using the BIOS Setup program. Do this section are for information on your screen. • Ensure that a USB... off then back on the system chassis. • Press the power button to ensure system compatibility and stability. 3.2 BIOS setup program Use the BIOS Setup to update the BIOS or configure its routines. Entering BIOS at startup To enter BIOS Setup at startup, press during the Power-On Self Test (POST).
User Guide
Page 98
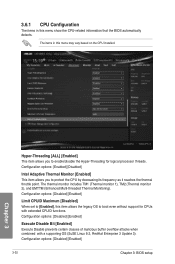
... you to enable/disable the Hyper-Threading for CPUs with a supporting OS (SuSE Linux 9.2, RedHat Enterprise 3 Update 3). Configuration options: [Disabled] [Enabled] 3-32 Chapter 3: BIOS setup The items in this menu show the CPU-related information that the BIOS automatically detects. Configuration options: [Disabled] [Enabled] Limit CPUID Maximum [Disabled] When set to [Enabled], this...
... you to enable/disable the Hyper-Threading for CPUs with a supporting OS (SuSE Linux 9.2, RedHat Enterprise 3 Update 3). Configuration options: [Disabled] [Enabled] 3-32 Chapter 3: BIOS setup The items in this menu show the CPU-related information that the BIOS automatically detects. Configuration options: [Disabled] [Enabled] Limit CPUID Maximum [Disabled] When set to [Enabled], this...
User Guide
Page 124
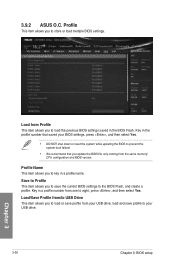
... allows you update the BIOS file only coming from the same memory/ CPU configuration and BIOS version. Key in the BIOS Flash. 3.9.2 ASUS O.C. Key in the profile number that saved your USB drive. 3-58 Chapter 3: BIOS setup Chapter 3 Save to Profile This item allows you to load the previous BIOS settings saved in...drive, load and save profile from /to USB Drive This item allows you to your BIOS settings, press , and then select Yes. • DO NOT shut down or reset the system while updating the BIOS to prevent the system boot failure! • We recommend that you to key in...
... allows you update the BIOS file only coming from the same memory/ CPU configuration and BIOS version. Key in the BIOS Flash. 3.9.2 ASUS O.C. Key in the profile number that saved your USB drive. 3-58 Chapter 3: BIOS setup Chapter 3 Save to Profile This item allows you to load the previous BIOS settings saved in...drive, load and save profile from /to USB Drive This item allows you to your BIOS settings, press , and then select Yes. • DO NOT shut down or reset the system while updating the BIOS to prevent the system boot failure! • We recommend that you to key in...
User Guide
Page 127
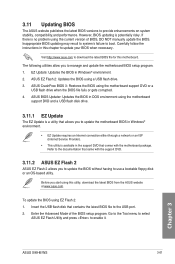
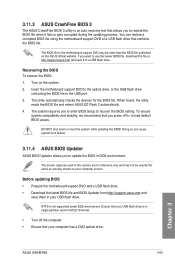
However, BIOS updating is no problem using a USB flash drive. 3. ASUS CrashFree BIOS 3: Restores the BIOS using EZ Flash 2: 1. Refer to the documentation that contains the latest BIOS file to update your BIOS when necessary. To update the BIOS using the motherboard support DVD or a USB flash drive when the BIOS file fails or gets corrupted. 4. Chapter 3 ASUS X99-M WS 3-61 Visit http://www.asus.com...
However, BIOS updating is no problem using a USB flash drive. 3. ASUS CrashFree BIOS 3: Restores the BIOS using EZ Flash 2: 1. Refer to the documentation that contains the latest BIOS file to update your BIOS when necessary. To update the BIOS using the motherboard support DVD or a USB flash drive when the BIOS file fails or gets corrupted. 4. Chapter 3 ASUS X99-M WS 3-61 Visit http://www.asus.com...
User Guide
Page 128
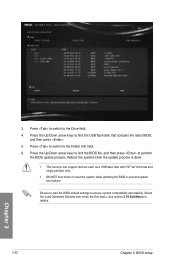
... then press to find the USB flash disk that contains the latest BIOS, and then press . 5. Press to switch to ensure system compatibility and stability. Press the Up/Down arrow keys to perform the BIOS update process. Select the Load Optimized Defaults item under the Exit menu. ...See section 3.10 Exit Menu for details. Chapter 3 3-62 Chapter 3: BIOS setup 3. Ensure to load the BIOS default settings to the Folder Info field. 6. Press ...
... then press to find the USB flash disk that contains the latest BIOS, and then press . 5. Press to switch to ensure system compatibility and stability. Press the Up/Down arrow keys to perform the BIOS update process. Select the Load Optimized Defaults item under the Exit menu. ...See section 3.10 Exit Menu for details. Chapter 3 3-62 Chapter 3: BIOS setup 3. Ensure to load the BIOS default settings to the Folder Info field. 6. Press ...
User Guide
Page 129
... shut down or reset the system while updating the BIOS! The screen captures used in this section are for the BIOS file. NTFS is an auto recovery tool that contains the BIOS file. Turn on your computer screen. The system requires you to a USB flash drive. Chapter 3 ASUS X99-M WS 3-63 Insert the motherboard support DVD to...
... shut down or reset the system while updating the BIOS! The screen captures used in this section are for the BIOS file. NTFS is an auto recovery tool that contains the BIOS file. Turn on your computer screen. The system requires you to a USB flash drive. Chapter 3 ASUS X99-M WS 3-63 Insert the motherboard support DVD to...
User Guide
Page 130
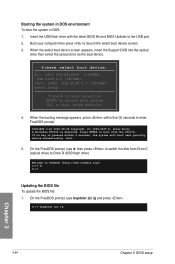
... is pressed within five (5) seconds to enter FreeDOS prompt. D:/> bupdater /pc /g Chapter 3 3-64 Chapter 3: BIOS setup Insert the USB flash drive with the latest BIOS file and BIOS Updater to FreeDOS (http://www.freedos.org)! Press ENTER to boot from Drive C (optical drive) to switch the disk... BIOS file To update the BIOS file: 1. When the select boot device screen appears, insert the Support DVD into the optical drive then select the optical drive as the boot device. Please select boot device: E1: ASUS DVD-E818A6T (4069MB) USB DISK 2.0 (3824MB) UEFI: (FAT) USB DISK 2.0 (...
... is pressed within five (5) seconds to enter FreeDOS prompt. D:/> bupdater /pc /g Chapter 3 3-64 Chapter 3: BIOS setup Insert the USB flash drive with the latest BIOS file and BIOS Updater to FreeDOS (http://www.freedos.org)! Press ENTER to boot from Drive C (optical drive) to switch the disk... BIOS file To update the BIOS file: 1. When the select boot device screen appears, insert the Support DVD into the optical drive then select the optical drive as the boot device. Please select boot device: E1: ASUS DVD-E818A6T (4069MB) USB DISK 2.0 (3824MB) UEFI: (FAT) USB DISK 2.0 (...
User Guide
Page 131
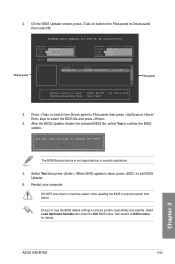
Drives panel ASUSTeK BIOS Updater for details. After the BIOS Updater checks the selected BIOS file, select Yes to ensure system compatibility and stability. When BIOS update is not supported due to Drives panel then select D:. Ensure to load the BIOS default settings to confirm the BIOS update. Chapter 3 ASUS X99-M WS 3-65 Are you sure you want to prevent system boot failure. Restart...
Drives panel ASUSTeK BIOS Updater for details. After the BIOS Updater checks the selected BIOS file, select Yes to ensure system compatibility and stability. When BIOS update is not supported due to Drives panel then select D:. Ensure to load the BIOS default settings to confirm the BIOS update. Chapter 3 ASUS X99-M WS 3-65 Are you sure you want to prevent system boot failure. Restart...
User Guide
Page 136
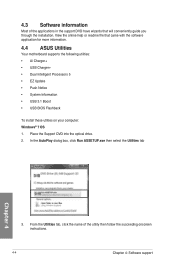
... wizards that came with the software application for more information. 4.4 ASUS Utilities Your motherboard supports the following utilities: • Ai Charger+ • USB Charger+ • Dual Intelligent Processors 5 • EZ Update • Push Notice • System Information • USB 3.1 Boost • USB BIOS Flashback To install these utlities on your computer: Windows®...
... wizards that came with the software application for more information. 4.4 ASUS Utilities Your motherboard supports the following utilities: • Ai Charger+ • USB Charger+ • Dual Intelligent Processors 5 • EZ Update • Push Notice • System Information • USB 3.1 Boost • USB BIOS Flashback To install these utlities on your computer: Windows®...
User Guide
Page 142
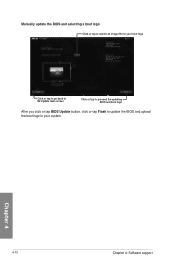
Manually update the BIOS and selecting a boot logo Click or tap to search an image file for your boot logo Click or tap to go back to EZ Update main screen Click or tap to proceed the updating BIOS and boot logo After you click or tap BIOS Update button, click or tap Flash to update the BIOS and upload the boot logo in your system. Chapter 4 4-10 Chapter 4: Software support
Manually update the BIOS and selecting a boot logo Click or tap to search an image file for your boot logo Click or tap to go back to EZ Update main screen Click or tap to proceed the updating BIOS and boot logo After you click or tap BIOS Update button, click or tap Flash to update the BIOS and upload the boot logo in your system. Chapter 4 4-10 Chapter 4: Software support
User Guide
Page 143
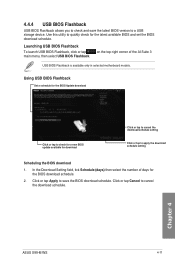
... allows you to check and save the BIOS download schedule. Chapter 4 ASUS X99-M WS 4-11 Launching USB BIOS Flashback To launch USB BIOS Flashback, click or tap main menu, then select USB BIOS Flashback. Use this utility to quickly check for the BIOS download schedule. 2. Using USB BIOS Flashback Set a schedule for the BIOS Update download Click or tap to check...
... allows you to check and save the BIOS download schedule. Chapter 4 ASUS X99-M WS 4-11 Launching USB BIOS Flashback To launch USB BIOS Flashback, click or tap main menu, then select USB BIOS Flashback. Use this utility to quickly check for the BIOS download schedule. 2. Using USB BIOS Flashback Set a schedule for the BIOS Update download Click or tap to check...
User Guide
Page 144
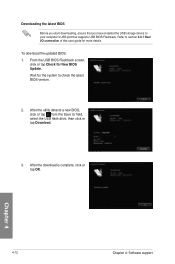
... 2.3.1 Rear I/O connection of this user guide for more details. Refer to your computer's USB port that supports USB BIOS Flashback. To download the updated BIOS: 1. Wait for New BIOS Update. Chapter 4 4-12 Chapter 4: Software support From the USB BIOS Flashback screen, click or tap Check for the system to : field, select the USB flash drive, then...
... 2.3.1 Rear I/O connection of this user guide for more details. Refer to your computer's USB port that supports USB BIOS Flashback. To download the updated BIOS: 1. Wait for New BIOS Update. Chapter 4 4-12 Chapter 4: Software support From the USB BIOS Flashback screen, click or tap Check for the system to : field, select the USB flash drive, then...
