User Guide
Page 5
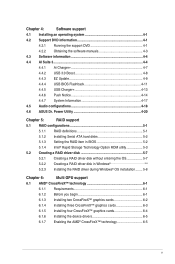
... 4-1 4.2 Support DVD information 4-1 4.2.1 Running the support DVD 4-1 4.2.2 Obtaining the software manuals 4-3 4.3 Software information 4-4 4.4 AI Suite 3...4-4 4.4.1 Ai Charger 4-7 4.4.2 USB 3.0 Boost 4-8 4.4.3 EZ Update 4-9 4.4.4 USB BIOS Flashback 4-11 4.4.5 USB Charger 4-13 4.4.6 Push Notice 4-14 4.4.7 System Information 4-17 4.5 Audio configurations 4-18 4.6 ASUS Dr. Power Utility 4-20 Chapter 5: RAID support 5.1 RAID configurations 5-1 5.1.1 RAID definitions 5-1 5.1.2 Installing Serial ATA hard disks 5-2 5.1.3 Setting...
... 4-1 4.2 Support DVD information 4-1 4.2.1 Running the support DVD 4-1 4.2.2 Obtaining the software manuals 4-3 4.3 Software information 4-4 4.4 AI Suite 3...4-4 4.4.1 Ai Charger 4-7 4.4.2 USB 3.0 Boost 4-8 4.4.3 EZ Update 4-9 4.4.4 USB BIOS Flashback 4-11 4.4.5 USB Charger 4-13 4.4.6 Push Notice 4-14 4.4.7 System Information 4-17 4.5 Audio configurations 4-18 4.6 ASUS Dr. Power Utility 4-20 Chapter 5: RAID support 5.1 RAID configurations 5-1 5.1.1 RAID definitions 5-1 5.1.2 Installing Serial ATA hard disks 5-2 5.1.3 Setting...

User Guide
Page 12
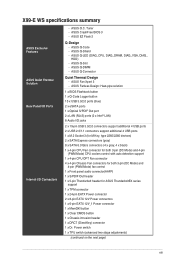
...Compatible with different usage scenarios Steam support - featuring friendly graphics user interface (continued on the next page) xii X99-E WS specifications summary ASUS Exclusive Features EPU - Featuring Fan Auto Tuning function and multiple thermistors selection for portable smartphone/tablet, supporting iOS7 and...power with the most fun gaming platform under Windows® system ASUS EZ DIY Push Notice - The ultra-fast transfer technology with USB BIOS Flashback Wizard for SATA Express Interactive HomeCloud ASUS HomeCloud Server Media Streamer - Monitor your needs Turbo LAN - Pipe...
...Compatible with different usage scenarios Steam support - featuring friendly graphics user interface (continued on the next page) xii X99-E WS specifications summary ASUS Exclusive Features EPU - Featuring Fan Auto Tuning function and multiple thermistors selection for portable smartphone/tablet, supporting iOS7 and...power with the most fun gaming platform under Windows® system ASUS EZ DIY Push Notice - The ultra-fast transfer technology with USB BIOS Flashback Wizard for SATA Express Interactive HomeCloud ASUS HomeCloud Server Media Streamer - Monitor your needs Turbo LAN - Pipe...
User Guide
Page 13
X99-E WS specifications summary ASUS Exclusive Features ASUS Quiet Thermal Solution Rear Panel I/O Ports Internal I /O jacks 2 x 19-pin USB 3.0/2.0 connectors support additional 4 USB ports 2 x USB 2.0/1.1 connectors support additional 4 USB ports 1 x M.2 Socket 3 (for M Key, type 2260/2280 devices) 2 x ... (continued on the next page) xiii ASUS EZ Flash 2 Q-Design - ASUS Q-LED (DIAG_CPU, DIAG_DRAM, DIAG_VGA, DIAG_ HDD) - ASUS Q-Code - ASUS CrashFree BIOS 3 - ASUS Fanless Design: Heat-pipe solution 1 x BIOS Flashback button 1 x Q-Code Logger button 10 x USB 3.0/2.0 ports (blue) 2 x eSATA ...
X99-E WS specifications summary ASUS Exclusive Features ASUS Quiet Thermal Solution Rear Panel I/O Ports Internal I /O jacks 2 x 19-pin USB 3.0/2.0 connectors support additional 4 USB ports 2 x USB 2.0/1.1 connectors support additional 4 USB ports 1 x M.2 Socket 3 (for M Key, type 2260/2280 devices) 2 x ... (continued on the next page) xiii ASUS EZ Flash 2 Q-Design - ASUS Q-LED (DIAG_CPU, DIAG_DRAM, DIAG_VGA, DIAG_ HDD) - ASUS Q-Code - ASUS CrashFree BIOS 3 - ASUS Fanless Design: Heat-pipe solution 1 x BIOS Flashback button 1 x Q-Code Logger button 10 x USB 3.0/2.0 ports (blue) 2 x eSATA ...

User Guide
Page 65
... into a solid light, this scenario happens, please restart the system to turn off the light. • Updating BIOS may be interrupted. ASUS X99-E WS 2-11 Follow the onscreen instructions to automatically download the latest BIOS version. 4. Launch the USB BIOS Flashback Wizard to complete the installation. 2. In case of interruption, please follow the steps again. • If...
... into a solid light, this scenario happens, please restart the system to turn off the light. • Updating BIOS may be interrupted. ASUS X99-E WS 2-11 Follow the onscreen instructions to automatically download the latest BIOS version. 4. Launch the USB BIOS Flashback Wizard to complete the installation. 2. In case of interruption, please follow the steps again. • If...

User Guide
Page 67
... USB 3.0 Boost) 2. USB 3.0 ports E56 (Support USB 8. Audio I /O connection Chapter 2 Rear panel connectors 1. ASUS X99-E WS 2-13 2.4 Motherboard rear and audio connections 2.4.1 Rear I /O ports*** * and **: Refer to the tables on the next page for the LAN port LEDs and audio port definitions. USB 3.0 ports E12 (Supports USB 3.0 3.0 Boost, upper port supports Boost) Q-Code Logger, lower port supports USB BIOS Flashback...
... USB 3.0 Boost) 2. USB 3.0 ports E56 (Support USB 8. Audio I /O connection Chapter 2 Rear panel connectors 1. ASUS X99-E WS 2-13 2.4 Motherboard rear and audio connections 2.4.1 Rear I /O ports*** * and **: Refer to the tables on the next page for the LAN port LEDs and audio port definitions. USB 3.0 ports E12 (Supports USB 3.0 3.0 Boost, upper port supports Boost) Q-Code Logger, lower port supports USB BIOS Flashback...

User Guide
Page 68
...the design of the Intel® X99 series chipset, all USB devices connected to the USB 2.0 and USB 3.0 ports are controlled by the xHCI controller. Due to hardware design, the LAN1 port's LEDs may run on xHCI mode or EHCI mode, depending on the operating system's setting. • USB 3.0 devices can only be used... (Blinking Ready to wake up then steady) from S5 mode ACT/LINK SPEED LED LED LAN port You can disable the LAN controllers in BIOS. Rear Speaker Out 6-channel Line In Front Speaker Out Mic In Center/Subwoofer Rear Speaker Out 8-channel Side Speaker Out Front Speaker Out Mic...
...the design of the Intel® X99 series chipset, all USB devices connected to the USB 2.0 and USB 3.0 ports are controlled by the xHCI controller. Due to hardware design, the LAN1 port's LEDs may run on xHCI mode or EHCI mode, depending on the operating system's setting. • USB 3.0 devices can only be used... (Blinking Ready to wake up then steady) from S5 mode ACT/LINK SPEED LED LED LAN port You can disable the LAN controllers in BIOS. Rear Speaker Out 6-channel Line In Front Speaker Out Mic In Center/Subwoofer Rear Speaker Out 8-channel Side Speaker Out Front Speaker Out Mic...

User Guide
Page 74
... after POST To enter BIOS Setup after changing any BIOS setting, load the default settings to ensure system compatibility and stability. Do this section are for reference purposes only, and may not exactly match what you see on your screen. • Ensure that a USB mouse is connected to your motherboard if... you want to use the mouse to control the BIOS setup program. • If the system becomes unstable after changing any BIOS setting, try to clear the CMOS and reset the motherboard to ...
... after POST To enter BIOS Setup after changing any BIOS setting, load the default settings to ensure system compatibility and stability. Do this section are for reference purposes only, and may not exactly match what you see on your screen. • Ensure that a USB mouse is connected to your motherboard if... you want to use the mouse to control the BIOS setup program. • If the system becomes unstable after changing any BIOS setting, try to clear the CMOS and reset the motherboard to ...

User Guide
Page 112
... recognized in this menu allow you to change the USB-related features. If no USB device is enabled. 3-40 Chapter 3: BIOS setup Chapter 3 xHCI Legacy USB Support [Enabled] [Enabled] Your system supports the USB 3.0 devices in legacy operating systems. [Disabled] Your USB 3.0 devices can be used for BIOS setup only and cannot be recognized in the boot...
... recognized in this menu allow you to change the USB-related features. If no USB device is enabled. 3-40 Chapter 3: BIOS setup Chapter 3 xHCI Legacy USB Support [Enabled] [Enabled] Your system supports the USB 3.0 devices in legacy operating systems. [Disabled] Your USB 3.0 devices can be used for BIOS setup only and cannot be recognized in the boot...

User Guide
Page 116
...performance support with USB3_E12 enabled. The SATAEXPRESS_E1 is disabled. [X4 Mode] Runs at x2 mode with ASUS ThunderboltEX card installed. Configuration options: [Disabled] [Enabled] Chapter 3 3-44 Chapter 3: BIOS setup PCI-EX16_2 Slot (Black) Bandwidth [Audio] [Auto] Runs at x4 mode for high system...] This item allows you to save energy when using the ASM1060SE Storage Controller. The USB_E12 and SATAEXPRESS_E1 are enabled. ASMedia USB 3.0 Battery Charging Support [Disabled] This item allows you to enable/disable the ASPM (active state power management) controller to enable...
...performance support with USB3_E12 enabled. The SATAEXPRESS_E1 is disabled. [X4 Mode] Runs at x2 mode with ASUS ThunderboltEX card installed. Configuration options: [Disabled] [Enabled] Chapter 3 3-44 Chapter 3: BIOS setup PCI-EX16_2 Slot (Black) Bandwidth [Audio] [Auto] Runs at x4 mode for high system...] This item allows you to save energy when using the ASM1060SE Storage Controller. The USB_E12 and SATAEXPRESS_E1 are enabled. ASMedia USB 3.0 Battery Charging Support [Disabled] This item allows you to enable/disable the ASPM (active state power management) controller to enable...

User Guide
Page 126
... Only hard drives connected to SATA ports are detected during POST. For a faster POST time, only USB ports with keyboard and mouse connections will not be detected. 3-54 Chapter 3: BIOS setup Chapter 3 Boot Configuration Fast Boot [Enabled] [Disabled] This item allows your system to go ...back to its normal boot speed. [Enabled] This item allows your system to accelerate the boot speed. All USB devices will extend the POST time....
... Only hard drives connected to SATA ports are detected during POST. For a faster POST time, only USB ports with keyboard and mouse connections will not be detected. 3-54 Chapter 3: BIOS setup Chapter 3 Boot Configuration Fast Boot [Enabled] [Disabled] This item allows your system to go ...back to its normal boot speed. [Enabled] This item allows your system to accelerate the boot speed. All USB devices will extend the POST time....

User Guide
Page 130
... your system. Configuration options: [Yes] [No] Load db from File This item allows you to delete the dbx file from a USB storage device. DBX Management The dbx (Revoked Signature database) lists the forbidden images of UEFI applications, operating system loaders, and UEFI drivers... securely. Configuration options: [Yes] [No] Chapter 3 3-58 Chapter 3: BIOS setup Configuration options: [Yes] [No] Load KEK from a USB storage device. Delete the KEK This item allows you to delete the KEK from a USB storage device. The KEK file must be formatted as a UEFI variable structure...
... your system. Configuration options: [Yes] [No] Load db from File This item allows you to delete the dbx file from a USB storage device. DBX Management The dbx (Revoked Signature database) lists the forbidden images of UEFI applications, operating system loaders, and UEFI drivers... securely. Configuration options: [Yes] [No] Chapter 3 3-58 Chapter 3: BIOS setup Configuration options: [Yes] [No] Load KEK from a USB storage device. Delete the KEK This item allows you to delete the KEK from a USB storage device. The KEK file must be formatted as a UEFI variable structure...

User Guide
Page 133
...Yes. Key in a profile name. Load/Save Profile from your USB drive. Profile Name This item allows you to load or save profile from /to USB Drive This item allows you to store or load multiple BIOS settings. ASUS X99-E WS 3-61 Chapter 3 Profile This item allows you to key in ...a profile number from the same memory/ CPU configuration and BIOS version. 3.9.2 ASUS O.C. Load from Profile This item allows...
...Yes. Key in a profile name. Load/Save Profile from your USB drive. Profile Name This item allows you to load or save profile from /to USB Drive This item allows you to store or load multiple BIOS settings. ASUS X99-E WS 3-61 Chapter 3 Profile This item allows you to key in ...a profile number from the same memory/ CPU configuration and BIOS version. 3.9.2 ASUS O.C. Load from Profile This item allows...

User Guide
Page 135
... discard your changes to the BIOS items. You can access the EZ Mode from the Exit menu to load the default values for each of the available filesystem devices. When you select this option or if you to ensure the values you press , a confirmation window appears. ASUS X99-E WS 3-63 Chapter 3 3.10 Exit menu... of the parameters on the Setup menus. Discard Changes & Exit This option allows you to attempt to launch the EFI Shell application (shellx64.efi) from USB drives This option allows you to discard changes and exit.
... discard your changes to the BIOS items. You can access the EZ Mode from the Exit menu to load the default values for each of the available filesystem devices. When you select this option or if you to ensure the values you press , a confirmation window appears. ASUS X99-E WS 3-63 Chapter 3 3.10 Exit menu... of the parameters on the Setup menus. Discard Changes & Exit This option allows you to attempt to launch the EFI Shell application (shellx64.efi) from USB drives This option allows you to discard changes and exit.
User Guide
Page 136
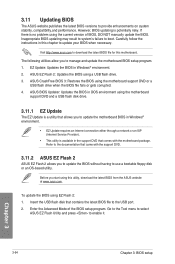
.... 3.11.1 EZ Update The EZ Update is a utility that comes with the support DVD. 3.11.2 ASUS EZ Flash 2 ASUS EZ Flash 2 allows you to the USB port. 2. Enter the Advanced Mode of BIOS, DO NOT manually update the BIOS. However, BIOS updating is potentially risky. Carefully follow the instructions in Windows® environment. 2. Visit http://www...
.... 3.11.1 EZ Update The EZ Update is a utility that comes with the support DVD. 3.11.2 ASUS EZ Flash 2 ASUS EZ Flash 2 allows you to the USB port. 2. Enter the Advanced Mode of BIOS, DO NOT manually update the BIOS. However, BIOS updating is potentially risky. Carefully follow the instructions in Windows® environment. 2. Visit http://www...

User Guide
Page 137
...Press the Up/Down arrow keys to perform the BIOS update process. See section 3.10 Exit Menu for details. Chapter 3 ASUS X99-E WS 3-65 Press the Up/Down arrow keys to find the BIOS file, and then press to find the USB flash disk that contains the latest BIOS, and then press . 5. Select the Load ...update process is done. • This function can support devices such as a USB flash disk with FAT 32/16 format and single partition only. • DO NOT shut down or reset the system while updating the BIOS to the Folder Info field. 6. Press to switch to ensure system compatibility ...
...Press the Up/Down arrow keys to perform the BIOS update process. See section 3.10 Exit Menu for details. Chapter 3 ASUS X99-E WS 3-65 Press the Up/Down arrow keys to find the BIOS file, and then press to find the USB flash disk that contains the latest BIOS, and then press . 5. Select the Load ...update process is done. • This function can support devices such as a USB flash disk with FAT 32/16 format and single partition only. • DO NOT shut down or reset the system while updating the BIOS to the Folder Info field. 6. Press to switch to ensure system compatibility ...

User Guide
Page 138
... support DVD may not be older than the BIOS file published on the system. 2. The BIOS file in this section are for the BIOS file. Before updating BIOS • Prepare the motherboard support DVD and a USB flash drive. • Download the latest BIOS file and BIOS Updater from http://support.asus.com and save it fails or gets...
... support DVD may not be older than the BIOS file published on the system. 2. The BIOS file in this section are for the BIOS file. Before updating BIOS • Prepare the motherboard support DVD and a USB flash drive. • Download the latest BIOS file and BIOS Updater from http://support.asus.com and save it fails or gets...

User Guide
Page 139
... /pc /g Chapter 3 ASUS X99-E WS 3-67 When the booting message appears, press within 5 seconds, the system will boot next priority device automatically. Booting the system in DOS environment To boot the system in DOS: 1. Boot your computer then press to the USB port. 2. Insert the USB flash drive with the latest BIOS file and BIOS Updater to...
... /pc /g Chapter 3 ASUS X99-E WS 3-67 When the booting message appears, press within 5 seconds, the system will boot next priority device automatically. Booting the system in DOS environment To boot the system in DOS: 1. Boot your computer then press to the USB port. 2. Insert the USB flash drive with the latest BIOS file and BIOS Updater to...

User Guide
Page 146
...to optimize performance settings while at www.asus.com for reference only and can vary depending on with your computer - AI Suite 3 main menu bar Dual Intelligent Processors 5 Ai Charger+ EZ Update USB BIOS Flashback Push Notice USB 3.0 Boost System USB Charger+ Information Version • Some ...functions in the AI Suite 3 main menu in this user guide may vary depending on the top-right corner of the integrated ASUS utilities. Click or tap to ...
...to optimize performance settings while at www.asus.com for reference only and can vary depending on with your computer - AI Suite 3 main menu bar Dual Intelligent Processors 5 Ai Charger+ EZ Update USB BIOS Flashback Push Notice USB 3.0 Boost System USB Charger+ Information Version • Some ...functions in the AI Suite 3 main menu in this user guide may vary depending on the top-right corner of the integrated ASUS utilities. Click or tap to ...

User Guide
Page 151
.... Click or tap Apply to apply the download schedule setting Scheduling the BIOS download 1. Launching USB BIOS Flashback To launch USB BIOS Flashback, click or tap main menu, then select USB BIOS Flashback. Click or tap Cancel to quickly check for the BIOS download schedule. 2. Chapter 4 X99-E WS 4-11 Use this utility to cancel the download schedule. on the top...
.... Click or tap Apply to apply the download schedule setting Scheduling the BIOS download 1. Launching USB BIOS Flashback To launch USB BIOS Flashback, click or tap main menu, then select USB BIOS Flashback. Click or tap Cancel to quickly check for the BIOS download schedule. 2. Chapter 4 X99-E WS 4-11 Use this utility to cancel the download schedule. on the top...

User Guide
Page 152
... you start downloading, ensure that supports USB BIOS Flashback. To download the updated BIOS: 1. From the USB BIOS Flashback screen, click or tap Check for the system to : field, select the USB flash drive, then click or tap Download. 3. Wait for New BIOS Update. Chapter 4 4-12 Chapter 4: Software support After the download is complete, click or tap...
... you start downloading, ensure that supports USB BIOS Flashback. To download the updated BIOS: 1. From the USB BIOS Flashback screen, click or tap Check for the system to : field, select the USB flash drive, then click or tap Download. 3. Wait for New BIOS Update. Chapter 4 4-12 Chapter 4: Software support After the download is complete, click or tap...
