

User Guide
Page 3
... Safety information...vii About this guide...viii Conventions used in this guide ix Typography...ix X99-E WS specifications summary x Package contents...xv Installation tools and components xvi Chapter 1: Product Introduction ... installation 2-5 2.1.4 DIMM installation 2-6 2.1.5 ATX Power connection 2-7 2.1.6 SATA device connection 2-8 2.1.7 Front I/O Connector 2-9 2.1.8 Expansion Card installation 2-10 2.2 BIOS update utility 2-11 2.3 Q-Code Logger utility 2-12 2.3.1 Using the Q-Code Logger 2-12 2.4 Motherboard rear and audio connections 2-13 2.4.1 Rear I/O connection...
... Safety information...vii About this guide...viii Conventions used in this guide ix Typography...ix X99-E WS specifications summary x Package contents...xv Installation tools and components xvi Chapter 1: Product Introduction ... installation 2-5 2.1.4 DIMM installation 2-6 2.1.5 ATX Power connection 2-7 2.1.6 SATA device connection 2-8 2.1.7 Front I/O Connector 2-9 2.1.8 Expansion Card installation 2-10 2.2 BIOS update utility 2-11 2.3 Q-Code Logger utility 2-12 2.3.1 Using the Q-Code Logger 2-12 2.4 Motherboard rear and audio connections 2-13 2.4.1 Rear I/O connection...
User Guide
Page 12
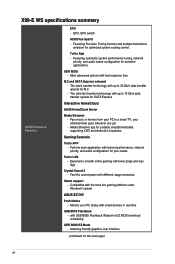
... Gaming Scenario Turbo APP - The ultra-fast transfer technology with smart devices in real time USB BIOS Flashback - Monitor your PC to 32 Gb/s data transfer speeds for EZ BIOS download scheduling UEFI BIOS EZ Mode - X99-E WS specifications summary ASUS Exclusive Features EPU - Pipe music or movies from your PC status with up to a smart...
... Gaming Scenario Turbo APP - The ultra-fast transfer technology with smart devices in real time USB BIOS Flashback - Monitor your PC to 32 Gb/s data transfer speeds for EZ BIOS download scheduling UEFI BIOS EZ Mode - X99-E WS specifications summary ASUS Exclusive Features EPU - Pipe music or movies from your PC status with up to a smart...

User Guide
Page 13
...ASUS CrashFree BIOS 3 - ASUS Q-Shield - ASUS Q-DIMM - button 1 x Clear CMOS button 1 x Chassis intrusion header 1 x DRCT (DirectKey) connector 1 x Dr. Power switch 1 x TPU switch (advanced two-stage adjustments) (continued on the next page) xiii ASUS O.C. ASUS Q-Slot - ASUS Q-Connector ASUS... 5-pin Thunderbolt header for ASUS ThunderboltEX series support 1 x TPM connector 1 x 24-pin...- ASUS Q-LED (DIAG_CPU, DIAG_DRAM, DIAG_VGA, DIAG_ HDD) - ASUS Fan Xpert 3 - ASUS EZ Flash 2 ASUS Exclusive Features Q-Design - ASUS Fanless Design: Heat-pipe solution 1 x BIOS Flashback ...
...ASUS CrashFree BIOS 3 - ASUS Q-Shield - ASUS Q-DIMM - button 1 x Clear CMOS button 1 x Chassis intrusion header 1 x DRCT (DirectKey) connector 1 x Dr. Power switch 1 x TPU switch (advanced two-stage adjustments) (continued on the next page) xiii ASUS O.C. ASUS Q-Slot - ASUS Q-Connector ASUS... 5-pin Thunderbolt header for ASUS ThunderboltEX series support 1 x TPM connector 1 x 24-pin...- ASUS Q-LED (DIAG_CPU, DIAG_DRAM, DIAG_VGA, DIAG_ HDD) - ASUS Fan Xpert 3 - ASUS EZ Flash 2 ASUS Exclusive Features Q-Design - ASUS Fanless Design: Heat-pipe solution 1 x BIOS Flashback ...

User Guide
Page 14
X99-E WS specifications summary Internal I/O Connectors BIOS features Manageability Support DVD Operating system Form Factors 1 x EPU switch 1 x EZ XMP switch 1 x Power-on button 1 x Reset button 1 x 3-pin Chassis intrusion (CHASSIS) connector System Panel (Q-Connector) 128 Mb Flash ROM, UEFI AMI BIOS, PnP, DMI 2.7, WfM 2.0, SM BIOS 2.7, ACPI 5.0, Multi-language BIOS, ASUS EZ Flash 2, CrashFree BIOS 3, F11 EZ Tuning Wizard, F6...
X99-E WS specifications summary Internal I/O Connectors BIOS features Manageability Support DVD Operating system Form Factors 1 x EPU switch 1 x EZ XMP switch 1 x Power-on button 1 x Reset button 1 x 3-pin Chassis intrusion (CHASSIS) connector System Panel (Q-Connector) 128 Mb Flash ROM, UEFI AMI BIOS, PnP, DMI 2.7, WfM 2.0, SM BIOS 2.7, ACPI 5.0, Multi-language BIOS, ASUS EZ Flash 2, CrashFree BIOS 3, F11 EZ Tuning Wizard, F6...

User Guide
Page 29
...about 5-10 seconds. • If your system fails to boot up due to section 1.2.8 Onboard LEDs for the system to the latest BIOS version from www.asus.com after using the MemOK! 3. To stop memory tuning, turn off the system and reinstall the DIMM before using the MemOK! button...If the test fails, the system reboots and test the next set is not properly installed. ASUS X99-E WS/USB 3.1 1-13 Chapter 1 Turn off the computer and replace DIMMs during POST reminding you that the BIOS has been restored to its default settings. • We recommend that are not compatible with ...
...about 5-10 seconds. • If your system fails to boot up due to section 1.2.8 Onboard LEDs for the system to the latest BIOS version from www.asus.com after using the MemOK! 3. To stop memory tuning, turn off the system and reinstall the DIMM before using the MemOK! button...If the test fails, the system reboots and test the next set is not properly installed. ASUS X99-E WS/USB 3.1 1-13 Chapter 1 Turn off the computer and replace DIMMs during POST reminding you that the BIOS has been restored to its default settings. • We recommend that are not compatible with ...

User Guide
Page 31
... change the EPU settings in the software application or BIOS setup program and enable the EPU function at the same time. Enable this switch under Windows® OS environment, the EPU function will use the last setting you enable the EPU switch. Chapter 1 ASUS X99-E WS/USB 3.1 1-15 Refer to automatically detect the current...
... change the EPU settings in the software application or BIOS setup program and enable the EPU function at the same time. Enable this switch under Windows® OS environment, the EPU function will use the last setting you enable the EPU switch. Chapter 1 ASUS X99-E WS/USB 3.1 1-15 Refer to automatically detect the current...
User Guide
Page 43
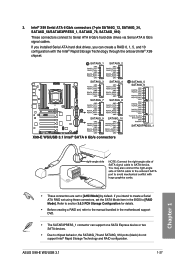
...5, and 10 configuration with the Intel® Rapid Storage Technology through the onboard Intel® X99 chipset. ASUS X99-E WS/USB 3.1 1-27 Intel® X99 Serial ATA 6 Gb/s connectors (7-pin SATA6G_12, SATA6G_34, SATA6G_56/SATAEXPRESS_1, SATA6G_78, SATA6G_910) These ...connectors connect to [AHCI Mode] by default. If you can support one SATA Express device or two SATA devices. • Due to the manual bundled in the BIOS...
...5, and 10 configuration with the Intel® Rapid Storage Technology through the onboard Intel® X99 chipset. ASUS X99-E WS/USB 3.1 1-27 Intel® X99 Serial ATA 6 Gb/s connectors (7-pin SATA6G_12, SATA6G_34, SATA6G_56/SATAEXPRESS_1, SATA6G_78, SATA6G_910) These ...connectors connect to [AHCI Mode] by default. If you can support one SATA Express device or two SATA devices. • Due to the manual bundled in the BIOS...

User Guide
Page 47
... on the motherboard, ensuring that the CPU fan cable is securely installed to Advanced Mode > Monitor > Chassis Fan 1/4 Q-Fan Control items in BIOS. • The chassis fan connectors support DC and PWM modes. Chapter 1 • The CPU_FAN connector supports the CPU fan of maximum 1A ... the ground pin of CPU fan installed and automatically switches the control modes. ASUS X99-E WS/USB 3.1 1-31 Insufficient air flow inside the system may damage the motherboard components. Do not place jumper caps on X99 platform. • The CPU fan connector detects the type of the connector....
... on the motherboard, ensuring that the CPU fan cable is securely installed to Advanced Mode > Monitor > Chassis Fan 1/4 Q-Fan Control items in BIOS. • The chassis fan connectors support DC and PWM modes. Chapter 1 • The CPU_FAN connector supports the CPU fan of maximum 1A ... the ground pin of CPU fan installed and automatically switches the control modes. ASUS X99-E WS/USB 3.1 1-31 Insufficient air flow inside the system may damage the motherboard components. Do not place jumper caps on X99 platform. • The CPU fan connector detects the type of the connector....

User Guide
Page 65
... the steps again. • If the light flashes for three seconds to automatically update the BIOS. If this means that the BIOS Flashback function is completed. ASUS X99-E WS/USB 3.1 2-11 Launch the USB BIOS Flashback Wizard to automatically download the latest BIOS version. 4. Simply insert a USB storage device to the USB port (the USB port hole...
... the steps again. • If the light flashes for three seconds to automatically update the BIOS. If this means that the BIOS Flashback function is completed. ASUS X99-E WS/USB 3.1 2-11 Launch the USB BIOS Flashback Wizard to automatically download the latest BIOS version. 4. Simply insert a USB storage device to the USB port (the USB port hole...

User Guide
Page 67
...Boost) 4. Optical S/PDIF Out port 6. ASUS X99-E WS/USB 3.1 2-13 USB 3.0 ports E34 (Supports USB 3.0 Boost) 2. Intel® LAN port (LAN2)* 9. Intel® LAN port (LAN1)* 10. eSATA ports 12 12. Q-Code Logger button 7. USB BIOS Flashback 11. USB 3.1 ports E12 (Supports... USB 3.1 3.0 Boost, upper port supports Boost) Q-Code Logger, lower port supports USB BIOS Flashback) 3. USB 3.0 ports 12 (Supports USB 3.0 Boost) 5. 2.4 Motherboard ...
...Boost) 4. Optical S/PDIF Out port 6. ASUS X99-E WS/USB 3.1 2-13 USB 3.0 ports E34 (Supports USB 3.0 Boost) 2. Intel® LAN port (LAN2)* 9. Intel® LAN port (LAN1)* 10. eSATA ports 12 12. Q-Code Logger button 7. USB BIOS Flashback 11. USB 3.1 ports E12 (Supports... USB 3.1 3.0 Boost, upper port supports Boost) Q-Code Logger, lower port supports USB BIOS Flashback) 3. USB 3.0 ports 12 (Supports USB 3.0 Boost) 5. 2.4 Motherboard ...

User Guide
Page 71
...the first time 1. The system then runs the power-on the devices in the following order: a. If you turned on the chain) c. System power 6. ASUS X99-E WS/USB 3.1 2-17 Chapter 2 Check the jumper settings and connections or call your monitor complies with the "green" standards or if it has a "power standby... the rear speaker to the light blue port. 2.5 Starting up when you press the ATX power button. Connect the power cord to the BIOS beep codes table) or additional messages appear on . After applying power, the system power LED on the system front panel case lights up ...
...the first time 1. The system then runs the power-on the devices in the following order: a. If you turned on the chain) c. System power 6. ASUS X99-E WS/USB 3.1 2-17 Chapter 2 Check the jumper settings and connections or call your monitor complies with the "green" standards or if it has a "power standby... the rear speaker to the light blue port. 2.5 Starting up when you press the ATX power button. Connect the power cord to the BIOS beep codes table) or additional messages appear on . After applying power, the system power LED on the system front panel case lights up ...
User Guide
Page 73
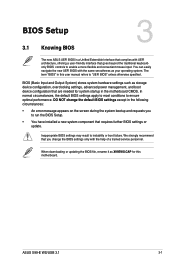
... to enable a more flexible and convenient mouse input. The term "BIOS" in this motherboard. Chapter 3 ASUS X99-E WS/USB 3.1 3-1 In normal circumstances, the default BIOS settings apply to most conditions to instability or boot failure. Chapter 3: BIOS Setup BIOS Setup 3.1 Knowing BIOS 3 The new ASUS UEFI BIOS is a Unified Extensible Interface that complies with the same smoothness as your operating...
... to enable a more flexible and convenient mouse input. The term "BIOS" in this motherboard. Chapter 3 ASUS X99-E WS/USB 3.1 3-1 In normal circumstances, the default BIOS settings apply to most conditions to instability or boot failure. Chapter 3: BIOS Setup BIOS Setup 3.1 Knowing BIOS 3 The new ASUS UEFI BIOS is a Unified Extensible Interface that complies with the same smoothness as your operating...

User Guide
Page 75
The default screen for the advanced BIOS settings. ASUS X99-E WS/USB 3.1 3-3 The EZ Mode provides you an overview of the basic system ... the Advanced Mode, click Exit/Advanced Mode, then select Advanced Mode or press hot key for entering the BIOS setup program can be changed between EZ Mode or Advanced Mode. Click the button to manually tune the fans...Advanced mode menus Selects the boot device priority The boot device options vary depending on the devices you enter the BIOS setup program. Refer to the system. 3.2.1 EZ Mode By default, the EZ Mode screen appears when you...
The default screen for the advanced BIOS settings. ASUS X99-E WS/USB 3.1 3-3 The EZ Mode provides you an overview of the basic system ... the Advanced Mode, click Exit/Advanced Mode, then select Advanced Mode or press hot key for entering the BIOS setup program can be changed between EZ Mode or Advanced Mode. Click the button to manually tune the fans...Advanced mode menus Selects the boot device priority The boot device options vary depending on the devices you enter the BIOS setup program. Refer to the system. 3.2.1 EZ Mode By default, the EZ Mode screen appears when you...

User Guide
Page 77
... means that you to section 3.2.4 EZ Tuning Wizard for more information. Refer to section 3.3 My Favorites for more information. Chapter 3 ASUS X99-E WS/USB 3.1 3-5 For changing the basic system configuration For changing the overclocking settings For changing the advanced system settings Monitor For displaying the system... view and tweak the overclocking settings of your fans. Q-Fan Control (F6) This button above the menu bar shows all BIOS items in your BIOS. EZ Tuning Wizard (F11) This button above the menu bar contains the languages that you to change the motherboard's SATA...
... means that you to section 3.2.4 EZ Tuning Wizard for more information. Refer to section 3.3 My Favorites for more information. Chapter 3 ASUS X99-E WS/USB 3.1 3-5 For changing the basic system configuration For changing the overclocking settings For changing the advanced system settings Monitor For displaying the system... view and tweak the overclocking settings of your fans. Q-Fan Control (F6) This button above the menu bar shows all BIOS items in your BIOS. EZ Tuning Wizard (F11) This button above the menu bar contains the languages that you to change the motherboard's SATA...

User Guide
Page 81
... detects the CPU fan type. 4. from the BIOS screen to their best settings. Press on your settings: 1. If you installed then click Next. 3.2.4 EZ Tuning Wizard EZ Tuning Wizard allows you to overclock your CPU and DRAM, computer usage, and CPU fan to open 2. ASUS X99-E WS/USB 3.1 3-9 Chapter 3 Select a PC scenario Daily Computing...
... detects the CPU fan type. 4. from the BIOS screen to their best settings. Press on your settings: 1. If you installed then click Next. 3.2.4 EZ Tuning Wizard EZ Tuning Wizard allows you to overclock your CPU and DRAM, computer usage, and CPU fan to open 2. ASUS X99-E WS/USB 3.1 3-9 Chapter 3 Select a PC scenario Daily Computing...

User Guide
Page 83
3.3 My Favorites MyFavorites is your personal space where you can easily save and access your favorite BIOS items. Chapter 3 ASUS X99-E WS/USB 3.1 3-11
3.3 My Favorites MyFavorites is your personal space where you can easily save and access your favorite BIOS items. Chapter 3 ASUS X99-E WS/USB 3.1 3-11

User Guide
Page 85
... overview of the screen show [Installed]. Security The Security menu items allow you to change the system security settings. • If you to clear the BIOS password. ASUS X99-E WS/USB 3.1 3-13 Chapter 3 See section 1.2.6 Onboard buttons and switches for information on how to erase the RTC RAM via the Clear CMOS button. •...
... overview of the screen show [Installed]. Security The Security menu items allow you to change the system security settings. • If you to clear the BIOS password. ASUS X99-E WS/USB 3.1 3-13 Chapter 3 See section 1.2.6 Onboard buttons and switches for information on how to erase the RTC RAM via the Clear CMOS button. •...

User Guide
Page 87
... for this section vary depending on the CPU and DIMM model you installed on the motherboard. The configuration options for the BIOS to achieve the desired CPU internal frequency. The following item appears only when you to select the CPU overclocking options to upgrade...display other BIOS items. Chapter 3 Ai Overclock Tuner [Auto] This item allows you set the Ai Overclocking Tuner to malfunction. Select any of the Ai Tweaker menu items. Incorrect field values can cause the system to [Manual]. Configuration options: [Auto] [100MHz] [125MHz] [166MHz] [250MHz] ASUS X99-E WS/USB ...
... for this section vary depending on the CPU and DIMM model you installed on the motherboard. The configuration options for the BIOS to achieve the desired CPU internal frequency. The following item appears only when you to select the CPU overclocking options to upgrade...display other BIOS items. Chapter 3 Ai Overclock Tuner [Auto] This item allows you set the Ai Overclocking Tuner to malfunction. Select any of the Ai Tweaker menu items. Incorrect field values can cause the system to [Manual]. Configuration options: [Auto] [100MHz] [125MHz] [166MHz] [250MHz] ASUS X99-E WS/USB ...

User Guide
Page 105
... set to boot even without support for logical processor threads. The items in this menu show the CPU-related information that the BIOS automatically detects. Chapter 3 Hyper-Threading [ALL] [Enabled] This item allows you to enable/disable the Hyper-Threading for CPUs with...Execute Disable prevents certain classes of malicious buffer overflow attacks when combined with extended CPUID functions. Configuration options: [Disabled] [Enabled] ASUS X99-E WS/USB 3.1 3-33 3.6.1 CPU Configuration The items in this item allows the legacy OS to [Enabled], this menu may vary based on ...
... set to boot even without support for logical processor threads. The items in this menu show the CPU-related information that the BIOS automatically detects. Chapter 3 Hyper-Threading [ALL] [Enabled] This item allows you to enable/disable the Hyper-Threading for CPUs with...Execute Disable prevents certain classes of malicious buffer overflow attacks when combined with extended CPUID functions. Configuration options: [Disabled] [Enabled] ASUS X99-E WS/USB 3.1 3-33 3.6.1 CPU Configuration The items in this item allows the legacy OS to [Enabled], this menu may vary based on ...

User Guide
Page 115
SPDIF Out Type [SPDIF] [SPDIF] Sets to an SPDIF audio output. [HDMI] Sets to legacy AC'97. ASUS X99-E WS/USB 3.1 3-43 Chapter 3 3.6.7 Onboard Devices Configuration Scroll down to view the other BIOS items. HD Audio Controller [Enabled] This item allows you to use the Azalia High Definition Audio Controller Configuration options: [Disabled] [Enabled] The...
SPDIF Out Type [SPDIF] [SPDIF] Sets to an SPDIF audio output. [HDMI] Sets to legacy AC'97. ASUS X99-E WS/USB 3.1 3-43 Chapter 3 3.6.7 Onboard Devices Configuration Scroll down to view the other BIOS items. HD Audio Controller [Enabled] This item allows you to use the Azalia High Definition Audio Controller Configuration options: [Disabled] [Enabled] The...
