User Guide
Page 2
... any form or by any means, except documentation kept by ASUS; Table of contents Notices...iii Safety information iv Care & Cleaning v Chapter 1: Product introduction 1.1 Welcome 1-1 1.2 Package contents 1-1 1.3 Assembling the monitor base 1-2 1.4 Monitor introduction 1-3 1.4.1 Front of the LCD monitor 1-3 1.4.2 Rear of the LCD monitor 1-4 Chapter 2: Setup 2.1 Adjusting the monitor 2-1 2.2 Detaching the arm/stand (for VESA wall mount 2-2 Chapter 3: General...
... any form or by any means, except documentation kept by ASUS; Table of contents Notices...iii Safety information iv Care & Cleaning v Chapter 1: Product introduction 1.1 Welcome 1-1 1.2 Package contents 1-1 1.3 Assembling the monitor base 1-2 1.4 Monitor introduction 1-3 1.4.1 Front of the LCD monitor 1-3 1.4.2 Rear of the LCD monitor 1-4 Chapter 2: Setup 2.1 Adjusting the monitor 2-1 2.2 Detaching the arm/stand (for VESA wall mount 2-2 Chapter 3: General...

User Guide
Page 5
... or flashes, or cannot work anymore, contact your dealer or service center to fix it. Conventions used in completing a task. Clean the monitor surface with the LCD. Do not repair the screen by the stand or the cord. • Cleaning. IMPORTANT: Information that the flicker disappears. • You...damage to the components when trying to the nature of the fluorescent light. The screen will recover slowly or you lift or reposition your monitor off and unplug the power cord. NOTE: Tips and additional information to aid in this guide WARNING: Information to prevent injury to ...
... or flashes, or cannot work anymore, contact your dealer or service center to fix it. Conventions used in completing a task. Clean the monitor surface with the LCD. Do not repair the screen by the stand or the cord. • Cleaning. IMPORTANT: Information that the flicker disappears. • You...damage to the components when trying to the nature of the fluorescent light. The screen will recover slowly or you lift or reposition your monitor off and unplug the power cord. NOTE: Tips and additional information to aid in this guide WARNING: Information to prevent injury to ...
User Guide
Page 7
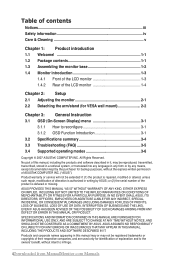
..., plus a host of the above items is damaged or missing, contact your VH162 Series LCD package for the following items: LCD monitor Monitor base Quick Start Guide 1 x Power cord 1 x VGA cable 1 x Audio cable (Only for purchasing the ASUS® VH162 Series LCD monitor! With these features, you can enjoy the convenience and delightful visual experience that the...
..., plus a host of the above items is damaged or missing, contact your VH162 Series LCD package for the following items: LCD monitor Monitor base Quick Start Guide 1 x Power cord 1 x VGA cable 1 x Audio cable (Only for purchasing the ASUS® VH162 Series LCD monitor! With these features, you can enjoy the convenience and delightful visual experience that the...

User Guide
Page 9
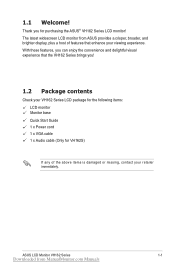
... Exit the OSD menu or go back to the previous menu as the OSD menu is also a hotkey for Contrast Ratio adjustment. 3. 1.4 Monitor introduction 1.4.1 Front of the LCD monitor 6 VH162S VH162D 1 2 3 4 5 1. / A Button: • Automatically adjust the image to its optimized position, clock, and phase by long pressing... to decrease the value of the function selected or move to the previous fuction. • This is activated. 4. Button(for VH162D): • Press this button to decrease the value of the function selected or move to enter/select the icon (function) highlighted...
... Exit the OSD menu or go back to the previous menu as the OSD menu is also a hotkey for Contrast Ratio adjustment. 3. 1.4 Monitor introduction 1.4.1 Front of the LCD monitor 6 VH162S VH162D 1 2 3 4 5 1. / A Button: • Automatically adjust the image to its optimized position, clock, and phase by long pressing... to decrease the value of the function selected or move to the previous fuction. • This is activated. 4. Button(for VH162D): • Press this button to decrease the value of the function selected or move to enter/select the icon (function) highlighted...
User Guide
Page 10
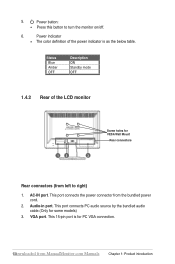
... VGA connection. 1D-4ownloaded from ManualMonitor.com Manuals Chapter 1: Product introduction AC-IN port. Audio-in port. Power indicator • The color definition of the LCD monitor 12 Screw holes for VESA Wall Mount Rear connectors 3 Rear connectors (from the bundled power cord. 2. This port connects the power connector from left to...
... VGA connection. 1D-4ownloaded from ManualMonitor.com Manuals Chapter 1: Product introduction AC-IN port. Audio-in port. Power indicator • The color definition of the LCD monitor 12 Screw holes for VESA Wall Mount Rear connectors 3 Rear connectors (from the bundled power cord. 2. This port connects the power connector from left to...
User Guide
Page 12
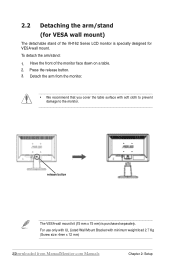
Have the front of the VH162 Series LCD monitor is purchased separately. Detach the arm from the monitor. • We recommend that you cover the table surface with minimum weight/load 2.7 Kg (Screw size: 4mm x 12 mm) 2D-2ownloaded from ManualMonitor.com Manuals ... mm) is specially designed for VESA wall mount. For use only with UL Listed Wall Mount Bracket with soft cloth to prevent damage to the monitor. Press the release button. 3. To detach the arm/stand: 1. 2.2 Detaching the arm/stand (for VESA wall mount) The detachable stand of the...
Have the front of the VH162 Series LCD monitor is purchased separately. Detach the arm from the monitor. • We recommend that you cover the table surface with minimum weight/load 2.7 Kg (Screw size: 4mm x 12 mm) 2D-2ownloaded from ManualMonitor.com Manuals ... mm) is specially designed for VESA wall mount. For use only with UL Listed Wall Mount Bracket with soft cloth to prevent damage to the monitor. Press the release button. 3. To detach the arm/stand: 1. 2.2 Detaching the arm/stand (for VESA wall mount) The detachable stand of the...


