
User Manual
Page 13
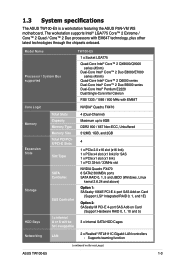
... Memory Expansion Slots Storage HDD Bays Total Slots Capacity Memory Type Memory Size Total PCI/PCIX/PCI-E Slots Slot Type SATA Controller SAS Controller I = internal A or S will be hot-swappable 4 (Dual-Channel) Maximum up to 8GB DDR2 800 / 667 Non-ECC, Unbuffered 512MB, 1GB, and 2GB 4 1 x PCIe 2.0 x16 slot (x16 link) 1 x PCIe x4 slot (x1 link) for SAS 1 x PCIe x1 slot (x1 link) 1 x PCI 32-bit / 33MHz slot NVIDIA Quadro FX470 6 SATA2 300MB/s ports SATA RAID 0, 1, 5 and JBOD (Windows, Linux kernal 2.6.24 and above) Option 1: SASsaby 1064E PCI-E 4-port SAS Add...
... Memory Expansion Slots Storage HDD Bays Total Slots Capacity Memory Type Memory Size Total PCI/PCIX/PCI-E Slots Slot Type SATA Controller SAS Controller I = internal A or S will be hot-swappable 4 (Dual-Channel) Maximum up to 8GB DDR2 800 / 667 Non-ECC, Unbuffered 512MB, 1GB, and 2GB 4 1 x PCIe 2.0 x16 slot (x16 link) 1 x PCIe x4 slot (x1 link) for SAS 1 x PCIe x1 slot (x1 link) 1 x PCI 32-bit / 33MHz slot NVIDIA Quadro FX470 6 SATA2 300MB/s ports SATA RAID 0, 1, 5 and JBOD (Windows, Linux kernal 2.6.24 and above) Option 1: SASsaby 1064E PCI-E 4-port SAS Add...
User Manual
Page 15
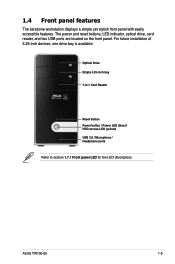
Optical Drive Empty 5.25-inch bay 7-in-1 Card Reader Reset button Power button / Power LED (blue) / HDD access LED (yellow) USB 2.0 / Microphone / Headphone ports Refer to section 1.7.1 Front panel LED for the LED descriptions. The power and reset buttons, LED indicator, optical drive, card reader, and two USB ports are located on the front panel. ASUS TW100-E5 1-5 1.4 Front panel features The barebone workstation displays a simple yet stylish front panel with easily accessible features. For future installation of 5.25-inch devices, one drive bay is available.
Optical Drive Empty 5.25-inch bay 7-in-1 Card Reader Reset button Power button / Power LED (blue) / HDD access LED (yellow) USB 2.0 / Microphone / Headphone ports Refer to section 1.7.1 Front panel LED for the LED descriptions. The power and reset buttons, LED indicator, optical drive, card reader, and two USB ports are located on the front panel. ASUS TW100-E5 1-5 1.4 Front panel features The barebone workstation displays a simple yet stylish front panel with easily accessible features. For future installation of 5.25-inch devices, one drive bay is available.

User Manual
Page 36
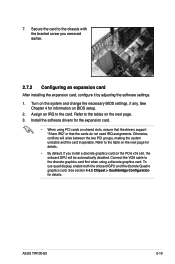
... the slot. 5. 2.7 Expansion cards 2.7.1 Installing expansion cards The system comes with it is properly seated on the slot. 2-18 Chapter 2: Hardware setup Remove the left side cover from the chasis. 3. Select the slot that came with one PCI Express x16 slot (x16 link), one PCI Express x4 slot (x1 link), one PCI Express x1 slot (x1 link), and one PCI 32-bit/33MHz/5V slot. Press the card firmly until it and make the necessary hardware settings...
... the slot. 5. 2.7 Expansion cards 2.7.1 Installing expansion cards The system comes with it is properly seated on the slot. 2-18 Chapter 2: Hardware setup Remove the left side cover from the chasis. 3. Select the slot that came with one PCI Express x16 slot (x16 link), one PCI Express x4 slot (x1 link), one PCI Express x1 slot (x1 link), and one PCI 32-bit/33MHz/5V slot. Press the card firmly until it and make the necessary hardware settings...
User Manual
Page 37
... change the necessary BIOS settings, if any. ASUS TW100-E5 2-19 Assign an IRQ to the chassis with the bracket screw you install a discrete graphics card on BIOS setup. 2. Connect the VGA cable to the table on the next page for the expansion card. • When using a discrete graphics card. Refer to the discrete graphics card first when using PCI cards on shared slots, ensure that the drivers support "Share IRQ" or that the cards...
... change the necessary BIOS settings, if any. ASUS TW100-E5 2-19 Assign an IRQ to the chassis with the bracket screw you install a discrete graphics card on BIOS setup. 2. Connect the VGA cable to the table on the next page for the expansion card. • When using a discrete graphics card. Refer to the discrete graphics card first when using PCI cards on shared slots, ensure that the drivers support "Share IRQ" or that the cards...
User Manual
Page 48
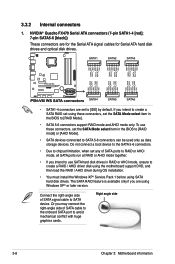
... mode] or [AHCI Mode]. • SATA devices connected to create a RAID / AHCI driver disk using the motherboard support DVD, and then load the RAID / AHCI driver during OS installation. • You must install the Windows XP® Service Pack 1 before using SATA hard disk drives. NVIDIA® Quadro FX470 Serial ATA connectors (7-pin SATA1-4 [red]; 7-pin SATA5-6 [black]) These connectors are for the Serial ATA signal cables for Serial ATA hard disk drives and optical disk drives. • SATA1-4 connectors are using these connectors, set to SATA device. Do not connect a boot device...
... mode] or [AHCI Mode]. • SATA devices connected to create a RAID / AHCI driver disk using the motherboard support DVD, and then load the RAID / AHCI driver during OS installation. • You must install the Windows XP® Service Pack 1 before using SATA hard disk drives. NVIDIA® Quadro FX470 Serial ATA connectors (7-pin SATA1-4 [red]; 7-pin SATA5-6 [black]) These connectors are for the Serial ATA signal cables for Serial ATA hard disk drives and optical disk drives. • SATA1-4 connectors are using these connectors, set to SATA device. Do not connect a boot device...
User Manual
Page 56
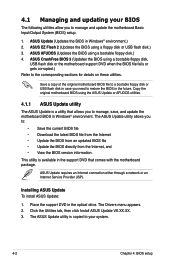
... Windows® environment.) 2. ASUS CrashFree BIOS 3 (Updates the BIOS using a bootable floppy disk.) 4. The Drivers menu appears. 2. The ASUS Update utility allows you to : • Save the current BIOS file • Download the latest BIOS file from the Internet • Update the BIOS from an updated BIOS file • Update the BIOS directly from the Internet, and • View the BIOS version information. Place the support DVD in the optical drive. ASUS EZ Flash 2 (Updates the BIOS using the ASUS Update or AFUDOS utilities. 4.1.1 ASUS Update utility The ASUS Update...
... Windows® environment.) 2. ASUS CrashFree BIOS 3 (Updates the BIOS using a bootable floppy disk.) 4. The Drivers menu appears. 2. The ASUS Update utility allows you to : • Save the current BIOS file • Download the latest BIOS file from the Internet • Update the BIOS from an updated BIOS file • Update the BIOS directly from the Internet, and • View the BIOS version information. Place the support DVD in the optical drive. ASUS EZ Flash 2 (Updates the BIOS using the ASUS Update or AFUDOS utilities. 4.1.1 ASUS Update utility The ASUS Update...

User Manual
Page 63
....ROM". Doing so can support ASUS CrashFree BIOS 3. Restart the system after the utility completes the updating process. • Only the USB flash disk with FAT 32/16 format and single partition can cause system boot failure! Starting BIOS recovery... Bad BIOS checksum. Turn on the system. 3. Turn on the system. 2. Insert the motherboard support DVD to the optical drive. 3. Prepare the motherboard support DVD, the floppy disk or the USB flash disk containing the updated motherboard BIOS before using the motherboard support DVD or...
....ROM". Doing so can support ASUS CrashFree BIOS 3. Restart the system after the utility completes the updating process. • Only the USB flash disk with FAT 32/16 format and single partition can cause system boot failure! Starting BIOS recovery... Bad BIOS checksum. Turn on the system. 3. Turn on the system. 2. Insert the motherboard support DVD to the optical drive. 3. Prepare the motherboard support DVD, the floppy disk or the USB flash disk containing the updated motherboard BIOS before using the motherboard support DVD or...

User Manual
Page 69
... random workloads by the chipset. Configuration options: [Enabled] [Disabled] SATA Mode select [IDE Mode] Sets the configuration for the SATA devices installed in this menu allow you to set this item to [RAID Mode]. • If you want the Serial ATA hard disk drives to use the Advanced Host Controller Interface (AHCI), set or change the configurations for the Serial ATA connectors supported by allowing the drive to internally optimize the order of commands. ASUS TW100-E5 4-15 SMART Monitoring [Auto] Sets the Smart Monitoring, Analysis, and Reporting Technology.
... random workloads by the chipset. Configuration options: [Enabled] [Disabled] SATA Mode select [IDE Mode] Sets the configuration for the SATA devices installed in this menu allow you to set this item to [RAID Mode]. • If you want the Serial ATA hard disk drives to use the Advanced Host Controller Interface (AHCI), set or change the configurations for the Serial ATA connectors supported by allowing the drive to internally optimize the order of commands. ASUS TW100-E5 4-15 SMART Monitoring [Auto] Sets the Smart Monitoring, Analysis, and Reporting Technology.
User Manual
Page 75
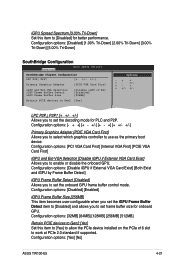
... which graphics controller to use as the primary boot device. Configuration options Primary Graphics Adapter [PCIE VGA Card First] Allows you to set the decoding mode for PLC and P2P. Configuration options: [Disable iGPU if External VGA Card Exist] [Both Exist and iGPU by Frame Buffer Detect] iGPU Frame Buffer Detect [Disabled] Allows you to set the onboard GPU frame buffer control mode. Configuration options: [Yes] [No] ASUS TW100-E5 4-21 Configuration options: [Disabled] [Enabled] iGPU...
... which graphics controller to use as the primary boot device. Configuration options Primary Graphics Adapter [PCIE VGA Card First] Allows you to set the decoding mode for PLC and P2P. Configuration options: [Disable iGPU if External VGA Card Exist] [Both Exist and iGPU by Frame Buffer Detect] iGPU Frame Buffer Detect [Disabled] Allows you to set the onboard GPU frame buffer control mode. Configuration options: [Yes] [No] ASUS TW100-E5 4-21 Configuration options: [Disabled] [Enabled] iGPU...
User Manual
Page 76
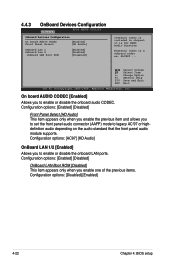
... module supports. ALC885 ... Change Option F1 General Help F10 Save and Exit ESC Exit v02.61 (C)Copyright 1985-2008, American Megatrends, Inc. Configuration options: [AC97] [HD Audio] OnBoard LAN 1/2 [Enabled] Allows you enable one of the previous items. Configuration options: [Disabled] [Enabled] 4-22 Chapter 4: BIOS setup Configuration options: [Enabled] [Disabled] OnBoard LAN Boot ROM [Disabled] This item appears only when you to enable or disable the onboard LAN ports. 4.4.3 OnBoard Devices Configuration Advanced BIOS SETUP UTILITY Onboard Devices Configuration On board...
... module supports. ALC885 ... Change Option F1 General Help F10 Save and Exit ESC Exit v02.61 (C)Copyright 1985-2008, American Megatrends, Inc. Configuration options: [AC97] [HD Audio] OnBoard LAN 1/2 [Enabled] Allows you enable one of the previous items. Configuration options: [Disabled] [Enabled] 4-22 Chapter 4: BIOS setup Configuration options: [Enabled] [Disabled] OnBoard LAN Boot ROM [Disabled] This item appears only when you to enable or disable the onboard LAN ports. 4.4.3 OnBoard Devices Configuration Advanced BIOS SETUP UTILITY Onboard Devices Configuration On board...
User Manual
Page 78
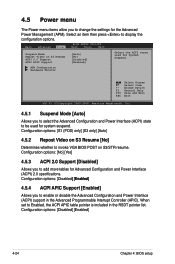
... the Advanced Programmable Interrupt Controller (APIC). Main Advanced Power BIOS SETUP UTILITY Boot Tools Exit Suspend Mode Repost Video on S3/STR resume. 4.5 Power menu The Power menu items allow you to display the configuration options. APM Configuration Hardware Monitor Select Screen Select Item +- Configuration options: [Disabled] [Enabled] 4-24 Chapter 4: BIOS setup Select an item then press to change the settings for system suspend. Configuration options: [No] [Yes] 4.5.3 ACPI 2.0 Support [Disabled] Allows you to add more tables for...
... the Advanced Programmable Interrupt Controller (APIC). Main Advanced Power BIOS SETUP UTILITY Boot Tools Exit Suspend Mode Repost Video on S3/STR resume. 4.5 Power menu The Power menu items allow you to display the configuration options. APM Configuration Hardware Monitor Select Screen Select Item +- Configuration options: [Disabled] [Enabled] 4-24 Chapter 4: BIOS setup Select an item then press to change the settings for system suspend. Configuration options: [No] [Yes] 4.5.3 ACPI 2.0 Support [Disabled] Allows you to add more tables for...
User Manual
Page 82
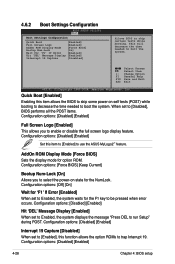
..., Inc. Configuration options: [Disabled] [Enabled] 4-28 Chapter 4: BIOS setup When set to Enabled, the system waits for the F1 key to select the power-on self tests (POST) while booting to decrease the time needed to skip certain tests while booting. 4.6.2 Boot Settings Configuration BIOS SETUP UTILITY Boot Boot Settings Configuration Quick Boot [Enabled] Full Screen Logo [Enabled] AddOn ROM Display Mode [Force BIOS] Bootup Num-Lock [On] Wait for 'F1' If Error [Enabled] Hit 'DEL' Message Display [Enabled] Interrupt 19 Capture [Disabled] Allows BIOS to boot the system...
..., Inc. Configuration options: [Disabled] [Enabled] 4-28 Chapter 4: BIOS setup When set to Enabled, the system waits for the F1 key to select the power-on self tests (POST) while booting to decrease the time needed to skip certain tests while booting. 4.6.2 Boot Settings Configuration BIOS SETUP UTILITY Boot Boot Settings Configuration Quick Boot [Enabled] Full Screen Logo [Enabled] AddOn ROM Display Mode [Force BIOS] Bootup Num-Lock [On] Wait for 'F1' If Error [Enabled] Hit 'DEL' Message Display [Enabled] Interrupt 19 Capture [Disabled] Allows BIOS to boot the system...

User Manual
Page 84
... six letters and/or numbers, then press . 3. Password Check [Setup] When set to [Setup], BIOS checks for user password both when accessing Setup and booting the system. When set to [Always], BIOS checks for user password when accessing the Setup utility. Change User Password Select this item to disabled password. After you set your password successfully. The message "Password Installed" appears after you to select the access restriction to the Setup items. Configuration options: [No Access] [View Only] [Limited] [Full Access] No Access prevents user access to any field. again...
... six letters and/or numbers, then press . 3. Password Check [Setup] When set to [Setup], BIOS checks for user password both when accessing Setup and booting the system. When set to [Always], BIOS checks for user password when accessing the Setup utility. Change User Password Select this item to disabled password. After you set your password successfully. The message "Password Installed" appears after you to select the access restriction to the Setup items. Configuration options: [No Access] [View Only] [Limited] [Full Access] No Access prevents user access to any field. again...
User Manual
Page 86
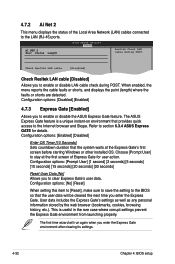
... Status Length BIOS SETUP UTILITY Tools Realtek Check LAN cable during POST. Configuration options: [Disabled] [Enabled] 4.7.3 Express Gate [Enabled] Allows you to the LAN (RJ-45) ports. Check Realtek LAN cable [Disabled] Check Realtek LAN cable [Disabled] Allows you to stay at the Express Gate's first screen before starting Windows or other installed OS. The ASUS Express Gate feature is useful in the rare case where corrupt settings prevent the Express Gate environment from launching properly. Choose [Prompt User...
... Status Length BIOS SETUP UTILITY Tools Realtek Check LAN cable during POST. Configuration options: [Disabled] [Enabled] 4.7.3 Express Gate [Enabled] Allows you to the LAN (RJ-45) ports. Check Realtek LAN cable [Disabled] Check Realtek LAN cable [Disabled] Allows you to stay at the Express Gate's first screen before starting Windows or other installed OS. The ASUS Express Gate feature is useful in the rare case where corrupt settings prevent the Express Gate environment from launching properly. Choose [Prompt User...
User Manual
Page 90
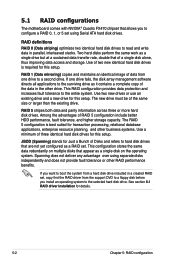
... using Serial ATA hard disk drives. RAID 1 (Data mirroring) copies and maintains an identical image of data from the support DVD to a floppy disk before you to configure a RAID 0, 1, or 5 set using separate disks independently and does not provide fault tolerance or other business systems. Use a minimum of Disks and refers to hard disk drives that are not yet configured as a single disk on multiple disks that appear as a RAID set , copy first the RAID driver from one drive fails, the disk array management software...
... using Serial ATA hard disk drives. RAID 1 (Data mirroring) copies and maintains an identical image of data from the support DVD to a floppy disk before you to configure a RAID 0, 1, or 5 set using separate disks independently and does not provide fault tolerance or other business systems. Use a minimum of Disks and refers to hard disk drives that are not yet configured as a single disk on multiple disks that appear as a RAID set , copy first the RAID driver from one drive fails, the disk array management software...

User Manual
Page 91
... the Power-On Self-Test (POST) to [RAID]. For optimal performance, install identical drives of SATA ports to RAID mode, all SATA ports run at RAID mode together. • Make sure to the "NVIDIA® RAID User Guide" found in the NVIDIA® Quadro FX470 chipset. Set the SATA Mode select item to enter the BIOS Setup Utility. 2. Connect the SATA signal cables. 3. See section 4.3.5 IDE Configuration for details. 3. Installing Serial ATA hard disks The motherboard supports Serial ATA hard disk drives. ASUS TW100-E5 5-3 Connect a SATA power cable to the power connector on...
... the Power-On Self-Test (POST) to [RAID]. For optimal performance, install identical drives of SATA ports to RAID mode, all SATA ports run at RAID mode together. • Make sure to the "NVIDIA® RAID User Guide" found in the NVIDIA® Quadro FX470 chipset. Set the SATA Mode select item to enter the BIOS Setup Utility. 2. Connect the SATA signal cables. 3. See section 4.3.5 IDE Configuration for details. 3. Installing Serial ATA hard disks The motherboard supports Serial ATA hard disk drives. ASUS TW100-E5 5-3 Connect a SATA power cable to the power connector on...
User Manual
Page 101
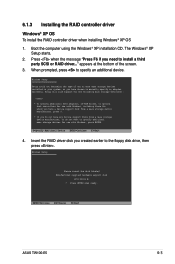
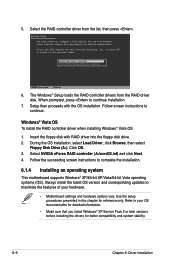
Boot the computer using the Windows® XP installation CD. ENTER=Continue ESC=Cancel F3=Exit ASUS TW100-E5 6-3 Insert the RAID driver disk you need to install a third party SCSI or RAID driver..." 6.1.3 Installing the RAID controller driver Windows® XP OS To install the RAID controller driver when installing Windows® XP OS 1. appears at the bottom of one or more mass storage devices installed in your system, or you do not have chosen to specify an...
Boot the computer using the Windows® XP installation CD. ENTER=Continue ESC=Cancel F3=Exit ASUS TW100-E5 6-3 Insert the RAID driver disk you need to install a third party SCSI or RAID driver..." 6.1.3 Installing the RAID controller driver Windows® XP OS To install the RAID controller driver when installing Windows® XP OS 1. appears at the bottom of one or more mass storage devices installed in your system, or you do not have chosen to specify an...
User Manual
Page 102
... to configure a SCSI Adapter for use with the OS installation. Setup then proceeds with Windows, using a device support disk provided by an adapter manufacturer. Follow screen instructions to complete the installation. 6.1.4 Installing an operating system This motherboard supports Windows® XP/64-bit XP/Vista/64-bit Vista operating systems (OS). Refer to your hardware. • Motherboard settings and hardware options vary. During the OS installation, select Load Driver, click Browse, then select Floppy Disk Drive (A:). Insert the floppy disk with RAID driver...
... to configure a SCSI Adapter for use with the OS installation. Setup then proceeds with Windows, using a device support disk provided by an adapter manufacturer. Follow screen instructions to complete the installation. 6.1.4 Installing an operating system This motherboard supports Windows® XP/64-bit XP/Vista/64-bit Vista operating systems (OS). Refer to your hardware. • Motherboard settings and hardware options vary. During the OS installation, select Load Driver, click Browse, then select Floppy Disk Drive (A:). Insert the floppy disk with RAID driver...

User Manual
Page 133
... Reset User Data [Enabled] [10 Seconds] [No] Press ENTER to run the utility to new versions. This utility doesn't support : 1.NTFS format Updating Express Gate You may update your existing Express Gate software to select and update BIOS. New versions of the software on the support DVD or download new versions from the ASUS support website. Follow the screen instructions to continue. 3. Express Gate configuration options are under the Tools menu. A software update confirmation dialog box appears. ASUS TW100-E5...
... Reset User Data [Enabled] [10 Seconds] [No] Press ENTER to run the utility to new versions. This utility doesn't support : 1.NTFS format Updating Express Gate You may update your existing Express Gate software to select and update BIOS. New versions of the software on the support DVD or download new versions from the ASUS support website. Follow the screen instructions to continue. 3. Express Gate configuration options are under the Tools menu. A software update confirmation dialog box appears. ASUS TW100-E5...
User Manual
Page 136
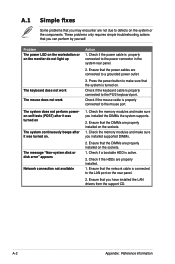
... to a grounded power outlet. 3. Check the memory modules and make sure you installed supported DIMMs. 2. Ensure that the network cable is connected to make sure that the DIMMs are properly installed. 1. A-2 Appendix: Reference information The message "Non-system disk or disk error" appears Network connection not available Action 1. Press the power button to the LAN port on . Check if a bootable HDD is properly connected to the PS/2 keyboard port. These problems only requires simple troubleshooting actions that you...
... to a grounded power outlet. 3. Check the memory modules and make sure you installed supported DIMMs. 2. Ensure that the network cable is connected to make sure that the DIMMs are properly installed. 1. A-2 Appendix: Reference information The message "Non-system disk or disk error" appears Network connection not available Action 1. Press the power button to the LAN port on . Check if a bootable HDD is properly connected to the PS/2 keyboard port. These problems only requires simple troubleshooting actions that you...


